Maintaining Your Portal
Configuring Your Portal
Now that your site has basic navigation, sample content, and a chosen look, you want to begin configuring other features to make your site special. The Portal Administrator has access to a wealth of configuration options to customize the look, content, and behavior of the site. This section discusses many of the set-it-and-forget-it types of configuration options. These are things that, for the most part, you want to include in your initial planning, set, and then leave alone until your next improvement project. This section also exposes you to a few tools that serve a purpose in both configuration and maintenance of your site (which is covered later in this chapter).
Site Settings
You can reach your site settings by clicking the Settings button in the Common Tasks area of the toolbar or by selecting Admin ð Site Settings. The Site Settings page contains expandable and collapsible categories of configuration options.
There are two important text buttons at the bottom of the page. Because a number of controls on the Site Settings page generate postbacks, you might occasionally be tempted to think that your changes have been saved — but no changes are saved until you click the Update button. The Submit Site To Google button formats and submits a request for Google to add your site to its search index.
| Note | Search engine ranking is based on a number of factors. To improve your site's ranking, add appropriate Title, Description, and Keyword text to each page before submitting your site to Google or any other search engine. |
In working with the Site Wizard, you already learned about all of the Details options available under Basic Settings, so those settings are skipped here and you can move on to the rest.
Basic Settings: Appearance
The Appearance settings control the configuration choices that affect the appearance of your site to visitors. Several of these settings involve the use of a selector similar to the one shown in Figure 4-13.

Figure 4-13
This selector uses a radio button to specify the source for populating the associated drop-down list box. The Host may provide skins or containers to all Portal Administrators and/or additional selections available only to your site (see Table 4-3). If the Host has enabled the Portal Administrator to upload skins, you'll be able to add your own and they will be available under the Sites option.
| Setting | Description |
|---|---|
| Logo | See the previous section on the Setup Wizard. |
| Body Background | This value is used in the HTML body tag of every page to render a tiled background image. If the selected skin hides background images, this setting may appear to have no effect. Leave this field clear if you don't intend to use a background image because it adds unnecessary weight to the rendered page. |
| Portal Skin | Specifies the skin for all non-administrator (and non-host) pages within the site. The skin is applied to all pages in the site where another skin has not been specifically chosen on those pages' individual settings. It also applies by default to all new pages. |
| Portal Container | Specifies the standard module container for all non-administrator (and non-host) pages within the site. The same rules of application and inheritance pertain to containers as well as skins. This choice applies to all modules in the site where another container has not been specifically chosen on those modules' individual settings. It also applies by default to all new modules. |
| Admin Skin | The look seen on Admin (and Host) menu pages within the site. Typically your choice of Admin Skin should be lightweight to reduce excessive image transfer and emphasize productivity over pizzazz. Some key pages are "system pages" implemented (under the covers) as Admin functions and retain the Admin skin, which complicates some aspects of site design. However, in the current version these pages (most notably the default Login, Registration, and Membership pages) are displayed using the same skin as the page that invoked them. You learn more about customizing the appearance of these pages later in this chapter. |
| Admin Container | Same as the Portal Container but affects only the Admin (and Host) pages. |
If the Host has enabled Skin Upload Permissions for Portals, two additional text buttons appear at the bottom of the Basic Settings category: Upload Skin and Upload Container. These functions are covered in detail in Chapter 16.
The Preview link provides a convenient way to see what a skin or container will look like after you apply it to your portal. Clicking Preview launches another browser window, which opens to the front page of the site using the option selected. Close the window when you are finished previewing the skin.
Advanced Settings: Security Settings
Portal Registration drives fundamental behavior of your site that should be part of your initial design. Through registration, anonymous site visitors can join (or apply to join) the Registered Users role and be granted access to privileged content or site functionality. Because the Registered Users role requires registration and authorization (either explicit or automatic), these functions combine to provide for different options in the registration process (see Figure 4-14).
![]()
Figure 4-14
Choose your registration type based on the functional access requirements for visitors to your site. Table 4-4 summarizes the choices and how they impact site behavior.
| Option | Description |
|---|---|
| None | Registration is not an available option to site visitors. The Login button remains visible so that administrative access can be gained; however, the Registration button is hidden. Sites that select this option often change their skin to move the Login button to a less prominent location than where it normally appears on the default skin. This setting is appropriate for sites that do not publish privileged content or that process registration offline. |
| Private | Registrants apply for privileged access to the site. Until authorization is explicitly granted, access is limited to that of any anonymous user. This setting is appropriate for sites that require approval of registration requests (for example, a private family web site that invites friends and relatives to apply). An e-mail is sent to the registrant advising him or her of the private nature of the site. An additional e-mail is sent upon authorization (if and when it is performed). It is good practice to explain the process for approval of private registration prominently on your site. |
| Public | Registration is automatically (and immediately) authorized without validation of the e-mail address. A welcome e-mail is sent to the registrant. This setting is appropriate for sites that want to track usage but do not require validation of contact information. |
| Verified | Registration generates a verification code, which is included in the welcome e-mail sent to the address supplied by the registrant. Authorization is granted when the user supplies the verification code at the time of their first login. This process ensures that all registered users have supplied a valid e-mail address. |
You can customize the content of the e-mails generated through the registration process by editing the appropriate language resources. You learn explicitly how to do this later in this chapter.
| Note | Remember that site registration is only the first step available for managing access to privileged content. After the site is registered, you can manage a user's access to pages and modules at a granular level through the application of security roles. |
Advanced Settings: Page Management
Earlier you learned that the portal owns some standard pages. The Page Management settings give you the ability to customize those pages and a few other aspects of your site's general navigation (see Figure 4-15).

Figure 4-15
Each of the options consists of a drop-down list box for selecting a custom page within your portal. The <None Specified> selection for any of these configuration options results in default behavior. Table 4-5 explains the behavioral impact of each setting.
| Setting | Description |
|---|---|
| Splash Page | When a visitor reaches your site via its alias (for example, http://www.dotnetnuke.com), the default behavior is to display the Home page. If a Splash page is specified, it is what is displayed to the visitor instead. This affects only the initial landing page for site navigation or invalid links and does not change the location of Home for other purposes. It is left to you to determine the appropriate method and timing of redirection to the Home page. A typical implementation would be to specify a page that is defined as a link to a Flash introduction (which redirects when finished). Alternatively, a more traditional approach can be taken by utilizing a page setting (discussed later in this chapter) to add a META REFRESH directive to the HEAD area of a Splash page to redirect to Home after a specified interval. |
| Home Page | The default target for site navigation (in the absence of a Splash page). It is also used as the destination link for the site logo as well as any other default site behavior that results in redirection to the Home page (such as logging out). If no Home page is specified, the first page in the navigation order is used. |
| Login Page | The default Login page is provided for your convenience; however, as a system page it lacks the capability for skinning and may not be consistent with the look of your site (it retains the Admin skin). If specified, the Login page will be used as the target for login requests instead of the default Login page. This allows for full customization and skinning including additional modules and page elements. But don't forget to include the Account Login module on the page and be sure the page and module permissions specify visibility to Unauthenticated Users (or All Users). A simple example of a custom Login page would be to include the Account Login module on the Home page, visible only to the Unauthenticated Users role. If a Login page is specified that does not actually contain an Account Login module, it is possible to get stuck. In the event this should occur, update the database directly to reset the Login page, as follows:
UPDATE PortalsSET LoginTabId = NULL WHERE PortalId = <the portal to fix> |
| User Page | Displays a user's registration information and preferences, provides for pass-word changes, and lists available membership services (see Figure 4-16). You can most readily see this by clicking the Registration button or by clicking your username if you are already logged in. The default User page is provided for your convenience. As another system page, it has the same skinning limitations and customization characteristics as the Login page. When you're creating a custom User page, be sure that the User Account module is visible to the All Users role. It serves the dual purpose of collecting registration information for Unauthenticated Users and displaying account information for Registered Users. |
| Home Directory | This display-only field identifies the path to the directory that holds all the portal's files. The directory is specified by the Host and represents a location relative to the web site root (for example, http://www.dotnetnuke.com/Portals/1). |
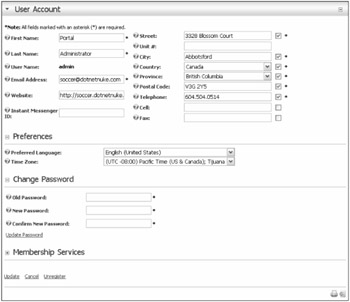
Figure 4-16
This is an opportune time to set defaults for what information is required for users to enter upon registration. On the User page, internal functions require that users enter a first and last name, username, password, and e-mail address. Other contact information fields are optional, but you can require them by clicking the check box next to the field.
Advanced Settings: Payment Settings
The Payment settings (see Figure 4-17) have been preserved from earlier versions of DotNetNuke for legacy support purposes. Only the PayPal option is supported using the POST method to emulate PayPal's Buy Now button functionality. Currently, these settings come into play only when public roles are defined with fees or when online portal signup is permitted. They are not used in any of the several eCommerce store and/or payment components available through third-party providers or in the free DotNetNuke Store module. These settings may be deprecated in a future version in favor of a more robust eCommerce API.

Figure 4-17
Because the Gators will offer at least one premium content area for subscription, you'll sign up for a PayPal account and use it to process payments for these services.
Other Settings
The group of miscellaneous settings (see Figure 4-18) has significant impact on several key display characteristics of your portal. Table 4-6 explains the impact of each setting.
| Setting | Description |
|---|---|
| Copyright | Used to populate the text of the [COPYRIGHT] skin object token. In each of the default skins, the copyright notice appears at the bottom of the page. If your skin does not implement the COPYRIGHT skin object, this setting has no effect. For more information on skin object tokens, see Chapter 16. |
| Banner Advertising | Controls the behavior of the [BANNER] skin object token. The None option nullifies the token, resulting in no display of banners. The Site and Host options determine whether banners are displayed from your portal's Vendor List or from the Host's Vendor List. The Host option provides for leveraging a single Vendor List across all portals. If your skin does not implement the BANNER skin object, this setting has no effect. If you applied the DotNetNuke template in the Site Wizard, you will see a banner on the upper-right side of the default skin, which is a default banner that appears if none exist in the Vendors List. |
| Administrator | Recall that the Portal Administrator's contact information is used for the "from" address in outgoing e-mail, the default-to address in the Feedback module, and so on. You can designate another portal user (who is also in the Administrator role) as the primary Portal Administrator. |
| Default Language | DotNetNuke supports localization of text, dates, and currency within the portal framework. English language files are installed by default but many additional language packs are available at www.dotnetnuke.com (40 currently). The default language is displayed to anonymous site visitors and Registered Users who have not selected a default language in their own membership settings. If additional language packs are installed, they will be available in this drop-down list. |
| Portal TimeZone | DotNetNuke supports localization of time zone similarly to languages. The default time zone is used for anonymous site visitors and Registered Users who have not selected a default time zone in their own membership settings. This feature is primarily available for support of modules that may require it. Timestamps visible in the Log or for the creation and update events for individual records are based on server time, rather than localized time. There are no features in the default installation of DotNetNuke that display localized time. |

Figure 4-18
The footer area of the default skins contains the [COPYRIGHT] skin object token, which displays the copyright notice specified in Other Site Settings (see Figure 4-19).
![]()
Figure 4-19
Changing the default language setting causes DotNetNuke to reload all static portal content (labels, Admin and Host menus, and date and currency formats) from resource files that correspond to the language specified. You can even customize the static labels if desired. Compare Figure 4-18 and Figure 4-20 to see how the choice of default language affects your portal. Note that dynamic content (like the text of the Copyright notice) is not translated. Modules that are well behaved also implement this approach to static localization.

Figure 4-20
| Note | Core support for multi-language module content (and versioning) is on the development roadmap for a future version of DotNetNuke. |
Stylesheet Editor
DotNetNuke supports cascading style sheets so that skin and container designers, as well as module developers, have a means to customize components they provide. The highest-level style sheet is located in the portal's home directory, appropriately named portal.css. The Stylesheet Editor gives you a convenient way to quickly update any style supported within the DotNetNuke framework (see Figure 4-21).
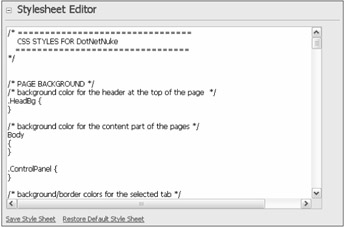
Figure 4-21
If you should ever need it, there is a Restore Default Style Sheet button, which returns the template to its original settings. Any customizations you made will be lost, so it's a good idea to make a backup copy of this file first.
| Note | DotNetNuke purposefully situates the portal.css file as the last in cascading order so that a Portal Administrator can quickly and easily update styles for a given site. However, if a skin designer adds a stylesheet reference or inline styles directly to a skin, the cascading order will be broken. A properly designed skin allows DotNetNuke to inject the skin's CSS file into the proper cascading order without an explicit reference. |
Security Roles
The DotNetNuke architecture enables you to control access to your content both at the page level and the module level through the application of user roles. A role can be thought of as a group with a purpose (for example, Newsletter Subscriber, Gallery Administrator, or Team Member). You learn to apply roles later in this chapter. Modules may extend the concept of permissions to include purposes relevant to their specific function, but for planning purposes you should consider that roles address two types of purposes (permissions) in the context of portal administration: View and Edit.
Some important security roles are predefined and you can define others as necessary. You are already acquainted with (and a member of) the Administrators role. You've also touched briefly on the Registered Users role, which includes all users that have registered on your site and have been authorized, whether by an Administrator, through public access, or through verification at login. Figure 4-22 shows the Security Roles page and predefined roles for a default portal.

Figure 4-22
Two additional built-in roles you will find useful are the Unauthenticated Users and All Users roles. The Unauthenticated Users role has no explicit definition because it denotes anonymous users who belong to no real security role at all. Likewise, the All Users role includes both users who are currently logged in as well as those who are not. You will see how both of these roles are used later when you work with page and module permissions.
Your portal may have additional roles based on the template you specified using the Site Wizard earlier in this chapter.
Creating a New Role
In designing the Gators web site, it was determined that a couple of additional roles would be needed. You'll add an opt-out role that all new users are automatically assigned to. The preconfigured Subscribers role is an example of this, but you'll create your own in this exercise. You'll also add a public role for subscription to premium services.
Basic Settings
Click the Add New Role link at the bottom of the Security Roles page to open the Edit Security Role page (see Figure 4-23). Table 4-7 describes the fields in the basic settings.
| Field | Description |
|---|---|
| Role Name and Description | These are visible to Administrators on the list of Security Roles (previously shown in Figure 4-22) and also in the Membership Services area of the Account Profile page if the role is defined as Public (shown later in Figure 4-25). |
| Public Role | These show up as user-selectable options in the Membership Services area of the Account Profile page (shown later in Figure 4-25). This is useful to enable user selection of optional services. |
| Auto Assignment | If this is checked, the role is retroactively applied to all existing users and is automatically assigned to all new users. |
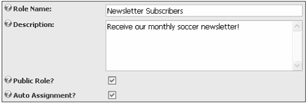
Figure 4-23
You'll define a role that is used to determine who should receive your monthly newsletter. The role is automatically assigned to each new user but, as a public role, it can be canceled by the user at any time. Figure 4-23 illustrates the setup of the new role.
Alternatively, you might choose not to auto-assign the role in favor of allowing your users to opt-in specifically. This would be a more acceptable option for marketing-oriented communications because the default user registration does not currently include the capability to opt-out at the time of signup.
Advanced Settings
You'll also define an optional role with a fee, which you'll use to expose privileged content to paid subscribers. The Gators site will provide access to a gallery of photos and for a small fee users can download high-quality images for printing. For this, you need to apply some advanced settings (see Figure 4-24).

Figure 4-24
Table 4-8 describes the fields in the advanced settings area.
| Setting | Description |
|---|---|
| Service Fee | The fee associated with the service that is enabled via the role. The fee is applied in the currency specified in your portal settings. If you've specified PayPal as your payment processor, be sure that your account is set up to accept payments in the chosen currency. |
| Billing Period (Every) | These two fields define how often a user is billed for the service. It may be a one-time or recurring fee. |
| Trial Fee | You can choose to allow a trial period for services at a different rate than the full service amount. Free trial services are often offered for a limited time. |
| Trial Period | These two fields define the duration of the trial period. When a trial role is granted, it is given an expiration date that is based on this time period. |
You'll apply a small monthly fee to this role. When users subscribe to it, they're taken to the PayPal web site where they can authorize a payment to your account. Upon completion of that process, they are transferred back to the home page of your web site. The update to the user's account is processed asynchronously.
Remove the preconfigured Subscriber role because you've just created your own.
Public Roles and Membership Services
Public roles, such as those you defined in the previous section, are made available to users via the Membership Services area of their Account Profile page (see Figure 4-25).

Figure 4-25
Delegating Authority and/or Assigning Privileges
Roles that are not public typically define privileged access for users or areas of responsibility for maintenance purposes. Assume you've already defined such a role for the individuals who will maintain the file download area called Gallery Maintenance. Navigate there by clicking the Manage Users In This Role button on the Edit Security Roles page.
To add a user to the role, simply select the user in the User Name drop-down list (see Figure 4-26) and click Add Role.
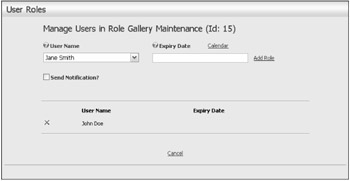
Figure 4-26
If appropriate, an expiry date can be specified, after which the role has no effect. The Send Notification check box (if checked) results in an e-mail being sent from the Portal Administrator to the user, advising her of her addition to the role.
All users currently assigned to the role appear in the list. Clicking the red X next to any user's name removes him or her from the role.
Now that you can create roles and assign users to them, you're ready to put those roles to use. In the next section, you create a page that your Gallery Subscriber role can access but a normal registered user cannot. Likewise, your Gallery Maintenance role should be able to edit the page while others (except Administrators) cannot.
Pages
Pages are the building blocks of your DotNetNuke portal. They are the real estate where you deposit content to create an interesting site. You can see them represented in menu items, bread crumbs, and site links. You've already dealt with a number of system pages, but in this section you learn all about creating and managing pages of your own.
Creating New Pages
The quickest way to create a new page is to click the Add button in the Page Functions area of the Control Panel. You can also create a page by selecting Admin ð Pages, navigating to the Page List, and clicking the Add New Page button. Table 4-9 explains the basic settings.
| Setting | Description |
|---|---|
| Page Name | This value appears as the text in the menu item, Recycle Bin, and anywhere that pages are listed (for example, in drop-down selection lists). |
| Page Title | Displays in the title bar of the user's browser. Search engines typically use this as a key indicator of relevance, so be sure to make your page titles fully descriptive of the page content (for example, "Soccer Team Photos for Download"). |
| Page Description | You added a default description when you imported your portal template (previously described in Table 4-2). However, it is recommended that you add a relevant description for each page within your site. |
| KeyWords | You added default keywords as well (as previously described in Table 4-2) but, again, unique keywords can improve your ranking for search engines. |
| Parent Page | Drives the navigation hierarchy of your site. [*] Any page that does not have a parent specified appears as a top-level menu item. Any page that has a parent specified appears as a submenu item to the parent page. Although a page can only have one parent, it is possible to create a page that is really just a reference to another (existing) page. So you can reference the same page from more than one place in the menu structure (see"Link URL" in Table 4-10). |
| Permissions | Each role in your portal can be explicitly assigned permissions to view or edit the page. Edit permissions are the same as those available to the Portal Administrator (for page-level actions only). View permissions determine whether the page is displayed to the role (as shown later in Figure 4-28). |
|
[*]You can take this hierarchy as deep as you like, but conventional wisdom says that going more than about two levels deep becomes difficult to navigate. Not every page needs to be accessible from the main menu. | |
| Setting | Description |
|---|---|
| Icon | Identifies an image that will be displayed beside the page name in the menu. Menu text bottom aligns with the images, so 16x16 icons tend to look the best. |
| Page Skin | This optional setting associates a skin specifically to this page. It's useful if you have a skin with special formatting or a functional need to appear different than the rest of your site. If this option is <Not Specified>, the page inherits the default skin as specified in the Site Settings (previously shown in Figure 4-13). |
| Page Container | This setting associates a default container specifically to this page. |
| Hidden | This option has nothing to do with the visibility of your page. (Visibility is a function of roles that you were introduced to earlier.) You select this option to keep a page from being added to the (main) menu. You may have many pages that are not part of your top-level navigation but that are linked in other ways throughout your site. Any page that is a descendent of a hidden page is also suppressed from the main menu. However, if you are using third-party navigational components, this is often a convenient way to create sub- or "child" menus. |
| Disabled | If a page is disabled, it is not accessible to any user of the site who is not a member of the Administrator role. This feature is useful for suppressing content without manipulating roles (for example, universally hiding a page until it is updated). |
| Start Date | Specify a date that the page (and menu item) becomes visible. Before the start date, the page will function as if it were disabled. |
| End Date | Specify a date after which the page (and menu item) is no longer visible. The page will function as normal until that date. |
| Link Url | Change the target of your page. The default is a Link Type of None, which is interpreted as an internal page. The page will open in the same browser window. URL (A Link To An External Resource): The menu item acts as a direct link to the target URL specified by entering a new URL or selecting one previously used. Page (A Page On Your Site): The menu item acts as a link to an existing page in your site. This option enables you to create multiple navigational items that point to the same place (for example, a descriptive page that applies to multiple products or an alternative navigational hierarchy for a child menu or site map). File (A File On Your Site): The menu item acts as a link to a file in your portal root (for example, a link to a PDF document or image). |
When you're creating a new page, you have the option to copy the structure and/or content of an existing page (see Figure 4-27).

Figure 4-27
If you have created a page that employs a layout of modules that will be common in your site, it may be useful to begin developing new pages using that same layout. You can specify which page to copy and whether the module content should be the same. If you select Copy Content, the modules on the new page will be shadows of existing modules on the Copy Modules From page. All of the shadow copies are linked so that changes to any one will update every instance on each copied page. This can be particularly helpful for things like links modules used for navigation, banner modules displayed on selected pages, and so on. If you do not select Copy Content, new empty modules are placed on the page in the same layout and with the same permissions as the page specified to copy from.
Table 4-10 explains the fields in the advanced settings area.
Securing Privileged Content
Earlier in this chapter, you learned to create security roles to logically group users. Page (and module) permissions enable you to give privileges to those groups of users. The built-in Administrator role always has both View and Edit permissions on every page.
Figure 4-28 shows the permissions that you'll apply to the Gators Gallery page. By giving View Page permissions to All Users, even anonymous users browsing the site can access the menu item and the page. In addition, you will give edit access to the Gallery Maintenance role, which will have responsibility for keeping this page current (for example, adding new photos).
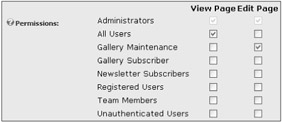
Figure 4-28
The permissions specified in Figure 4-28 only secure the edit privilege of the page. You'll recall that the Gators also have a paid role for Gallery Subscribers, which should give them access to premium content. When those pages are created, you'll uncheck All Users and give View Page permissions to the Gallery Maintenance and Gallery Subscriber roles only.
Now You See It, Now You Don't
The Unauthenticated Users role can be quite useful. It enables you to present a completely different view of your site to an anonymous user than to your registered users. If View Page permissions are assigned only to the Unauthenticated Users role, they will essentially disappear from view after a user is logged in.
One way of applying this concept is to define a Splash Page (shown previously in Figure 4-15) so that its View permissions are set only for Unauthenticated Users. This creates a landing page that is no longer visible when a user is logged in, but preserves the behavior of the Home page after login. Further, if the specified Home page is set only for Registered Users, its information remains private and the Splash page functions as a Home page for the anonymous user.
| Note | Take care when planning your site's navigation using the Unauthenticated User role. You don't want to hide a menu item if it has submenu items that you want to keep visible. |
Changing Navigational Structure
You've used the Parent page setting to specify navigational structure. But if that were the only mechanism you had to reorganize your site, it would be a little challenging. So another method involves the Pages list (see Figure 4-29), which you access by selecting Admin ð Pages.
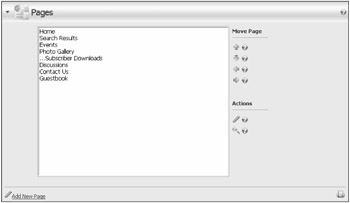
Figure 4-29
This list displays all the pages in your site in an organization that closely matches your menu structure. Items at the top of this list are leftmost in your menu, moving right along the menu as you move down the list. Items that are indented (for example, Subscriber Downloads) are submenu items. The buttons available on the right provide a means to change the defined parent of a selected page, moving it (and all its children) up or down within the menu hierarchy or changing its (and all its children's) position in the parent/child relationship. You can choose to Edit or View a page as well.
Regardless of the visibility settings of the page (whether by start/end dates, enable/disable, or hidden/unhidden), it will appear in this list, and so the menu hierarchy can become more difficult to see if you have a large number of pages on your site. For this reason, it may be advantageous to define a few phantom pages for organizational purposes. For example, you might define a hidden page called Orphans and assign it as the parent to pages that are suppressed from the menu.
Skins
The Skins page (see Figure 4-30), which is accessible from the Admin menu, gives you the ability to browse and apply skins and containers to customize the look of your site. You learned a bit about this functionality within the context of the Site Wizard, and you can access the functionality directly through this page.
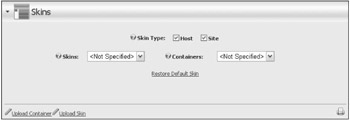
Figure 4-30
You can specify whether the drop-down containers list Host- and/or Site-supplied skins. If your Host has enabled the option, you may also see buttons to Upload Container and Upload Skin (otherwise, these buttons are not visible to you). Clicking the Restore Default Skin button changes your site's default settings to those originally specified by your Host.
Selecting a skin or container from their respective drop-down lists displays the available selections in a gallery format (see Figure 4-31). If provided by the designer, the galleries will include thumbnail previews and the skin gallery will include associated containers.
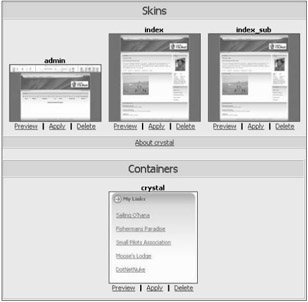
Figure 4-31
| Note | Chapter 16 covers the topic of developing custom skins and containers in detail. |
From the gallery you can click a thumbnail image to see a larger image (if provided by the designer). You can also see how a skin or container would look on your Home page by clicking Preview, or set it as the default for the portal by clicking Apply. You can specify whether it should be applied to Admin and/or Portal pages in a check box below the gallery. If you selected a Site skin from the drop-down list, you have the option to delete individual skins and containers as well.
If the skin designer included an about.htm file in the package, you'll also see an About <skin name> button below the gallery. Click it to open the designer-supplied file.
| Note | If you have pages with modules placed just the way you like them, be careful about changing your skin and moving things around. If you select a skin that has a different pane layout than the one you are currently using, DotNetNuke won't know where to put some of those modules and will temporarily display them in the ContentPane by default. Changing back to the old skin will restore the original position if you don't change anything. If you're experimenting with skins on a page with lots of content, make a copy of your existing page first and experiment on that. Or just stick with the Preview option in the gallery. |
File Manager
File management is an area that was radically improved in version 3.0 and updated with version 4.0 and the introduction of the ClientAPI. Prior to introduction of the File Manager, all files were maintained in a flat structure in the portal root directory, which could easily become unwieldy. Now files can be managed in subdirectories, and those subdirectories can be protected through role-based permissions.
Figure 4-32 shows the basic features of the File Manager. Most operations are intuitive, and the interface is pretty forgiving, providing feedback if you do something incorrectly. Group file and folder operations require that you select either a group of files or a folder first. The ClientAPI is responsible for AJAX-style smooth scrolling in the tree view.
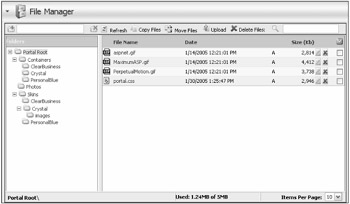
Figure 4-32
Folder Permissions
There are multiple folders within the portal root. By default, only the Administrators role has permission to view and write files in all of these folders (see Figure 4-33). If you want the users who administer your gallery to be able to upload photos, you need to grant appropriate permissions to the role that identifies them (Gallery Maintenance).
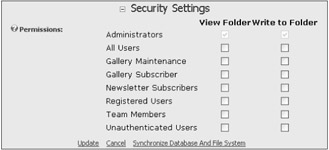
Figure 4-33
These security settings are applied everywhere that the DotNetNuke file-management controls are used. You've seen these controls in the Portal Administrators interface in a number of places, including the logo file selector in the Site Wizard (previously shown in Figure 4-11). These same controls are used in many modules (for example, the Documents module), which you'll learn more about in Chapter 6.
The Gallery Administrator needs permission to select files from the drop-down to add pictures to the gallery, and also needs to be able to write to the folder to upload new photos. So be sure to grant both View and Write permissions to the Gallery Maintenance role for the Photo folder.
Figure 4-34 shows both the Root and Photo folders available to the file upload control. Access to the portal root directory is provided by default to preserve functionality for users upgrading from version 2.x to version 3.0. It is recommended that upgraded sites review their file and folder management policies.

Figure 4-34
Uploading Files
Click the Upload button in the File Manager, and the original DotNetNuke File Upload page is displayed. The upload control provides a lot of rich functionality and is used in many places within DotNetNuke for uploading various component packages like modules, skins, language packs, and so on. This is the control in its plain vanilla state, waiting for you to specify generic files to upload.
The File Upload control includes a drop-down list that you can use to specify the target directory and an Add button that captures input from the basic file selector and includes it in a list of files to upload. This feature enables you to upload multiple files in one upload step.
The check box for Decompress ZIP Files allows you to upload a zipped file (preserving bandwidth) that is unzipped for you into the target directory. An invalid file type is stopped from unpacking in an upload. Both individual files and the content of zip files are matched against an allowable file types list, which is configurable by the Host.
| Important | Properties of the .NET Framework HttpPostedFileClass dictate the size limits for uploading files. DotNetNuke sets these properties in the default web.config file as follows:
<httpRuntime useFullyQualifiedRedirectUrl="true" |
Using FTP with File Manager
The File Manager provides a convenient way to move files through the interface. For bulk operations, however, you may prefer to utilize FTP to transfer files (if permitted by your Host). If files are added to your site through any means other than the file upload interface, you need to click the Synchronize Database and File System button. That command instructs DotNetNuke to iterate through the portal root and resolve for any files and folders that may be added or missing. Your Host may have enabled a scheduled job to perform this synchronization for you on a periodic basis, but if you do it yourself, you'll see those files in your drop-down lists immediately.
| Note | Do not delete files outside of the File Manager. Using the File Manager ensures that database references are updated appropriately throughout the application where file references are made (in other modules, for example). |
Languages
Languages and localization features are primarily controlled by the Host account; however, the Portal Administrator has limited control to override localization strings and to define the default language for your portal. These settings are specific to your portal and therefore no mechanism is provided to export or import these changes.
Changing Your Default Language
You set the default language for your site earlier in this chapter. The default language is used in cases where the user has not been authenticated, and therefore does not have a preferred language of their own (as specified in a registered user profile). Also, the default language will be used as the default choice for the preferred language when a new user registers on the portal. The default language is controlled from the Site Settings page, which you saw in Figure 4-18. After users (including the Portal Administrator and Host accounts) log on to the site, their preferred language is used instead of the default language.
The Language Editor
To create custom localization strings for the portal, select Admin ð Languages. Then from the Module Actions menu on the Languages page, select Language Editor. The Language Editor screen (see Figure 4-35) provides the ability for Administrators to customize resource strings for any of the installed locales.

Figure 4-35
The tree on the left side of the screen enables you to easily navigate to any resource file. Each resource file corresponds to the various controls or shared resources in the portal. The first time you attempt to edit a resource file, you are asked to verify that you want to create a custom resource file (see Figure 4-36). The resource file will be saved in the directory alongside the other resources.
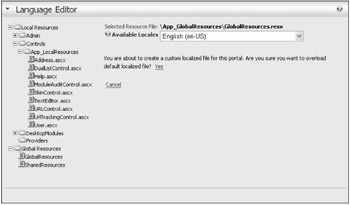
Figure 4-36
Resource files are named using a standard pattern based on the associated file: [FileName].resx for English resources, and [FileName].[Culture].resx for non-English resources. When portal-specific resource files are created, the system prepends the .resx extension with Portal-[PortalID]. In the example from Figure 4-37, the local portal copy of the English resource file would be named SkinControl.ascx .Portal-0.resx. The German (Deutsch) version would be named SkinControl.ascx.de-DE.Portal-0.resx.
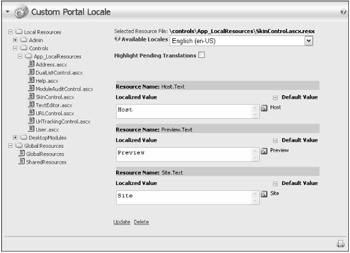
Figure 4-37
When the portal-specific localized file is created, all resource strings are included. After the portal resource file is created, any changes in the comparable host file are overridden by the portal file, even if the portal file strings were not changed. In Figure 4-37, the values for Host.Text, Preview.Text, and Site.Text are written to the resource file when the portal file is created.
Each resource displays the Resource Name, Default Value, and Localized Value. The Resource Name corresponds to the key used by the portal for looking up the localized value. The default System Locale for DotNetNuke is English (en-US). The English language resources are used for all default values.
Localized values correspond to the locale selected in the Available Locales drop-down list box. Localized values can be edited directly using the associated textarea boxes. After you have completed editing the localized values, click the Update link button to save your changes.
This works well for simple strings and enables you to edit multiple strings without requiring multiple postbacks to the server. Long strings, or resource strings that contain HTML are more difficult to edit using the text-area boxes. To edit these resources, click the arrow button to the right of the text area.
Because the button causes a postback to the server, and you are not yet ready to save changes for the associated localized value, you may lose any data that has been changed (but not updated) elsewhere on the page. To prevent data loss, DotNetNuke displays a dialog box that asks you to confirm that you want to proceed (see Figure 4-38).

Figure 4-38
Click Cancel to return to the main editing screen to save any pending changes. Click OK to proceed to the Language Editor screen (see Figure 4-39).
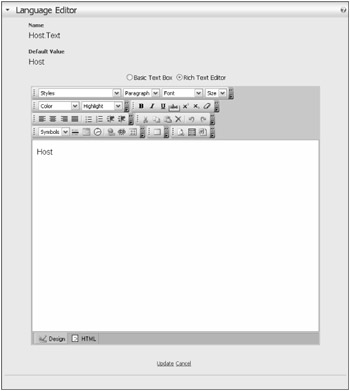
Figure 4-39
The Language Editor uses the HtmlEditorProvider defined in the web.config file. The editor provides advanced text and HTML editing functionality. After you make the changes to the resource string, select Update to save your changes and return to the Custom Portal Locale screen, or select Cancel to discard your changes and return.
Customizing Your E-mail Templates
Most Portal Administrators choose to keep almost all of the default resource strings for their web site. However, you should at least review the standard system messages used for generating e-mails to your web site users. Previous versions of DotNetNuke provided a central location for managing the e-mail templates used by the system. Starting with DotNetNuke version 3.0, the templates were incorporated into the resource files so that they could be localized like other static elements of the portal.
Because static e-mail templates would not be useful, DotNetNuke supports the use of special tokens, which are replaced at runtime with the specified property value. DotNetNuke currently recognizes six different tokens (see Table 4-11) that follow the pattern [TokenName:Property]. Valid properties for each of these tokens are defined in Appendix B.
| Token Name | Description |
|---|---|
| Host | Provides access to a limited set of HostSettings properties. |
| Portal | Provides access to the PortalSettings properties. This token also supports the URL property that corresponds to the HTTP Alias for the current portal. |
| User | Provides access to UserInfo properties. This token also supports the VerificationCode property, which is dynamically generated based on the portal ID and user ID in the form [PortalID]-[UserID]. The user token is not valid for all templates (see Table 4-12). |
| Membership | Provides access to UserMembership properties. This information is specific to the currently selected user. The Membership token can only be used for templates that also support the User token. |
| Profile | Provides access to the UserProfile properties. This information is specific to the currently selected user. The Profile token can only be used for templates that also support the User token. |
| Custom | Used when arbitrary data needs to be included in the template. The data is passed as an ArrayList and is specific to each e-mail template. Not all templates support the use of custom values (see Table 4-12). |
| Resource | User Token | Custom Token |
|---|---|---|
| EMAIL_USER_REGISTRATION_PUBLIC_SUBJECT EMAIL_USER_REGISTRATION_PUBLIC_BODY Sent to users when they register on a site that is not set to Private Registration. This e-mail is also sent when a registration is manually authorized. | Yes | None |
| EMAIL_USER_UNREGISTER_SUBJECT EMAIL_USER_UNREGISTER_BODY Sent to the Portal Administrator when a user is unregistered whether by user self-service or through deletion. | Yes | None |
| EMAIL_SMTP_TEST_SUBJECT Sent to the Host when testing SMTP configuration. | No | None |
| EMAIL_PORTAL_SIGNUP_SUBJECT EMAIL_PORTAL_SIGNUP_BODY Sent to the new Portal Administrator whenever a portal is created, whether by the Host or by a user when he or she signs up for a portal as a free trial (Host option). | Yes | None |
| EMAIL_USER_REGISTRATION_PRIVATE_SUBJECT EMAIL_USER_REGISTRATION_PRIVATE_BODY Sent to the user at the time of registration, only on sites where Private Registration is set. This is the e-mail that should explain your approval policy. | Yes | None |
| EMAIL_USER_REGISTRATION_ADMINISTRATOR_SUBJECT EMAIL_USER_REGISTRATION_ADMINISTRATOR_BODY Sent to the Portal Administrator on every registration. | Yes | None |
| EMAIL_PASSWORD_REMINDER_SUBJECT EMAIL_PASSWORD_REMINDER_BODY Sent to the user when a reminder is requested. | Yes | None |
| EMAIL_ROLE_ASSIGNMENT_SUBJECT | Yes | None |
| EMAIL_ROLE_ASSIGNMENT_BODY Sent to the user when a role is assigned by the Administrator and the Send Notification option is checked. | Yes | 0: RoleName 1: Description 2: Expiry Date |
| EMAIL_ROLE_UNASSIGNMENT_SUBJECT | Yes | None |
| EMAIL_ROLE_UNASSIGNMENT_BODY Sent to the user when a role is removed by the Administrator and the Send Notification option is checked. For the purposes of unassignment, the value of the Expiry Date is hidden. | Yes | 0: RoleName 1: Description 2: <blank> |
| EMAIL_AFFILIATE_NOTIFICATION_SUBJECT | Yes | None |
| EMAIL_AFFILIATE_NOTIFICATION_BODY Sent to the affiliate when the Send Notification button is clicked on the Edit Vendor page. | Yes | 0: VendorName 1: AffiliateURL |
| EMAIL_BANNER_NOTIFICATION_SUBJECT EMAIL_BANNER_NOTIFICATION_BODY Sent to a vendor when the Email Status To Vendor button is clicked from the Edit Banner page in Vendor Management. The custom fields are available to both the subject and body. | No | 0: BannerName 1: Description 2: ImageName 3: CPM/Cost 4: Impressions 5: StartDate 6: EndDate 7: Views 8: ClickThrus |
Table 4-12 describes each of the e-mail templates supported by the core portal. These templates can all be found in the global resources file: \App_GlobalResources\GlobalResources.resx.
The Privacy Statement and Terms of Use
Like e-mail templates, you are likely to need to customize the Terms of Use and Privacy Statement resources (see Table 4-13). Because these two resources are generic to the entire web site, the User, Membership, Profile, and Custom tokens are not usable. Links to the terms and privacy statement are included in the default skins (as previously shown in Figure 4-19).
| Resource | User Token | Custom Token |
|---|---|---|
| MESSAGE_PORTAL_TERMS | No | None |
| MESSAGE_PORTAL_PRIVACY | No | None |
Authentication
Windows Authentication was officially introduced in version 3.2 (for ASP.NET 1.1) and version 4.0 (for ASP.NET 2.0), increasing DotNetNuke's capability to provide a robust platform for intranets. If your portal is in an intranet environment, Authentication allows you to specify an external authentication source for your users (that is, Open LDAP, ADAM). The configuration screen for Authentication is illustrated in Figure 4-40.
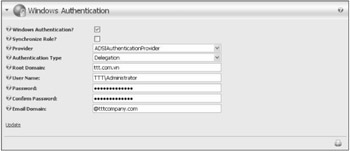
Figure 4-40
Table 4-14 explains the purpose of each of the fields and how they are configured.
| Field | Description |
|---|---|
| Windows Authentication | Indicates whether Windows Authentication is enabled for the site. |
| Synchronize Role | Indicates whether DotNetNuke should synchronize Security Role assignments to Users based on roles in the Active Directory. For this to work properly the Security Roles in the Portal must exactly match the ones in the Active Directory that you wish to replicate. This will not happen automatically, but the account will synchronize when users first log in to the portal with their Active Directory credentials. |
| Provider | Select the provider to use for the authentication of the user accounts. The ADSIAuthenticationProvider is provided with DotNetNuke and installed by default, although other providers may be available from third parties (or included with the default installation in the future). |
| Authentication Type | Specify the type of authentication you want to use (Delegation is the recommended setting and works for most instances). You may need to consult with your Network Administrator regarding Authentication Types for your network. |
| Root Domain | Specify the root domain that you want to authenticate against. If this value is left blank DotNetNuke will query the root forest of your network; however, in a strict network you may not have sufficient permissions for this default action. It is recommended that you supply a value in the yourdomain.com or DC-yourdomain,DC-com formats. |
| User Name | Specify the User Name that will access the LDAP information in Active Directory. This user must have read permissions to the AD structure and user accounts, specified in the DOMAIN\UserName format. If no User Name (and Password) is specified, DotNetNuke will attempt the operation using the credentials specified to the application in IIS. |
| Password | Specify the password associated with the User Name. |
| Confirm Password | Confirm the password. |
| Email Domain | Users in DotNetNuke are required to have an e-mail address associated with their account. If your authentication configuration does not supply an e-mail address, one will be assigned to the user in the following format:
Username + @ + email domain For most configurations, leave this field blank and accept e-mail information from your Active Directory. |
If your settings are properly configured, clicking Update generates an informational message that confirms successful access of the directory and a listing of network domains. Otherwise, an error message appears.
Table 4-15 explains four modes of Authentication that manifest different behavior. These modes are a function of whether Anonymous Access is configured in IIS for the site and for the page that invokes Windows sign-on (\Admin\Controls\WindowsSignin.aspx) and whether an HTTP module is activated for the installation.
| Mode | Description | Site | Page | HTTP |
|---|---|---|---|---|
| DNN Forms Authentication | Standard DotNetNuke user authentication with no Active Directory. This is the default mode. | Yes | Yes | No |
| Windows Authentication | Typical for an intranet environment, where sign-on to the DotNetNuke portal is also sign-on to the local network. The portal bypasses the DotNetNuke login process, validating the user against Active Directory and creating the user in DotNetNuke if he or she did not previously exist. | No | No | Yes |
| Windows / Forms (Mixed Mode) Authentication | Best suited to a mixed environment where DotNetNuke is exposed both to intranet and Internet users. Authentication is provided inside your network via Active Directory, but users from outside the network can authenticate using the standard DotNetNuke form. | Yes | No | Yes |
| ADSI Forms Authentication against Active Directory | When Active Directory is used to authenticate users in an extranet environment, this mode uses the standard DotNetNuke authentication form but validates those credentials against the Active Directory. | Yes | Yes | No |
| Note | To fully configure Authentication requires access to the server where your portal installation resides and the LDAP or Active Directory domain you will reference as well as IIS settings and the application root file system. This level of access is not typically afforded to a Portal Administrator, so assistance from your Host may be required. |
Forms Authentication is the DotNetNuke default. No changes are required because the initial setup of your web site most likely defaults Anonymous Access to both the site and the individual pages. Likewise, ADSI Forms Authentication against Active Directory is a default behavior that requires only changes to the configuration page (basically turning Windows Authentication on with the check box).
Enabling Mixed or Windows-only modes is only slightly more complex. But the first step is to get your Authentication module working properly and authenticating against AD (in ADSI Forms Authentication). After this is completed, you need to update some IIS settings to enable Integrated Windows authentication for the web site that contains DotNetNuke and set the Anonymous Access attributes for the Site and sign-on page. For details on how to enable Integrated Windows Authentication in IIS or to enable Anonymous Access, refer to the documentation for your server and the appropriate version of IIS.
Finally, to complete your Mixed or Windows-only mode setup, you need to enable the Http Authentication module by un-commenting a line in the web.config file. Open web.config, find the following commented statement (located in the HTTP Modules section), and remove the following comments:
<!-- add name="Authentication" type="DotNetNuke.HttpModules.AuthenticationModule, DotNetNuke.HttpModules.Authentication" / -->
If you're running DotNetNuke on a computer that is not a Windows server (for example, Windows XP), you might experience a "double-hop" issue (refer to http://support.microsoft.com/default.aspx?scid=kb;en-us;329986#3 for more information). To solve this problem, modify your web. config file by un-commenting identity impersonation as follows:
<identity impersonate="true"/> <!-- <authentication mode="Windows"> </authentication> -->
You also need to verify that the user account specified for Anonymous Access to your site has permission to access your Active Directory.
EAN: 2147483647
Pages: 182