Creating Monthly and Yearly Calendars
|
The Calendar template has been a favorite of many users since the early Visio days, probably because it’s so well designed and easy to use. Visio does most of the work for you. When you drag a calendar shape on the page, Visio prompts you for the date, as Figure 12-6 shows. Depending on the shape you use, you can display one month or an annual calendar on a single page.
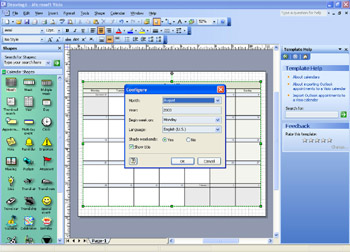
Figure 12-6: When you use a calendar shape, Visio prompts you for date and formatting information.
Creating a Monthly Calendar
Follow these steps to create a monthly calendar:
-
Choose File, New, Project Schedule, Calendar.
-
Drag the Large Month shape from the Calendar Shapes stencil onto the drawing page. The calendar snaps into place, regardless of where you drop the shape.
-
In the Custom Properties dialog box, specify date and formatting options. When you click OK, Visio creates the calendar based on your choices.
-
To add text to a specific day, click a date square, and then type.
-
To highlight important dates or events, drag the Arrow, Timeline, or one of the label shapes to a date, and then type the text you want.
-
To show the previous or next month in a miniature calendar, drag a Small Month shape onto a blank day at the start or end of the month. In the Custom Properties dialog box, specify the month you want, and then click OK.
| Tip | If you want to change an option you have selected—for example, you don’t want the default shaded weekends—right-click the calendar, and then choose Properties to display the Custom Properties dialog box. |
Creating a Yearly Calendar
Follow these steps to create a yearly calendar on one page:
-
Choose File, New, Project Schedule, Calendar.
-
Drag the Yearly Calendar shape from the Calendar Shapes stencil onto the drawing page to display the Custom Properties dialog box.

-
To specify a year other than the current one, type the year in the Year box. To change the day used as the first day of the week to Monday, select Monday from the Begin Week On drop-down list. Click OK to create the calendar.
Tip Change calendar page orientation If you’re using the Calendar template to create a yearly calendar, the default landscape orientation for the drawing page might not be appropriate, because the yearly shape is taller than it is wide. To change the page orientation, choose File, Page Setup. On the Print Setup tab, click Portrait, and then click OK.
Modifying the Look of Your Calendar
The simplicity of the calendars has its downside. Because Visio creates the calendar for you, it assumes certain formatting properties, such as shading, line, and text formatting. In addition, Visio locks calendar shapes to prevent them from being moved or deleted as you add text, as Figure 12-7 shows. Despite the locks, you can change the look of your calendar by specifying different text, line, and fill formats. The formatting task goes more smoothly when you recognize that Visio creates a calendar as a group, which allows you to subselect calendar shapes and edit them individually. For example, the default look for the days of the week for the Large Month shape is white text on a black background. If you would like something less stark, you can subselect the weekday shape, and then specify different text, line, and fill options.
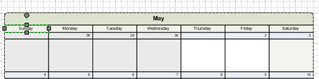
Figure 12-7: Visio locks shapes to keep them from moving, but you can still change their format.
The advantage of groups is that they’re easy to resize. To change the size of a calendar, drag a corner selection handle to the desired size.
| Cross Reference | For details about editing groups, see “Working with Groups,” page 668. |
When you try to subselect a calendar shape to format it, an error message appears
Individual days in a monthly calendar are locked against text editing. If you select the date numbers in a monthly calendar with the Text tool, a warning message appears telling you that shape protection or layer properties prevent the command’s execution. You can, however, edit the styles applied to locked calendar shapes to change their text formatting. For example, to change the font used to format the calendar day numbers, choose Format, Define Styles. In the Name box, choose Calendar Normal. Click Text, choose the font you want, and then click OK to close all the dialog boxes.
| Cross Reference | For details about editing styles, see “Editing Existing Styles,” page 691. |
| Note | You can apply a color scheme to quickly change the look of a calendar. However, if you have manually formatted calendar shapes, those shapes won’t adopt the color scheme. To apply a color scheme, choose Tools, Color Schemes. |
Importing Data from Microsoft Outlook
Many people keep track of their appointments and tasks using Microsoft Outlook. It would be time consuming and wasteful to reenter the data into Visio. The good news is that you don’t need to! You can import your scheduling data right from Outlook into your Visio 2003 calendar by following these steps:
-
Select the calendar into which you wish to import data.
-
Choose Calendar, Import Outlook Data Wizard.
-
In the Import Outlook Data Wizard, choose whether you want to import data into the selected calendar or into a new calendar that you will create.
-
Select the parameter dates, review them in the next box, and click Finish when you are ready for Visio to import the information into your calendar.
Tip You can also ask Visio to create a new calendar and import your Outlook data. To do so select New Calendar in step 3 and fill in the subsequent dialog boxes. Visio creates a brand new calendar with your Outlook data positioned on it.
|
EAN: 2147483647
Pages: 209