Exporting Shape Properties to a Database
|
When you export shape properties, you can choose the custom properties and ShapeSheet cells to export either from selected shapes or all the shapes on a drawing page. The Export To Database command on the Tools menu works with the ODBC Data Source Administrator, which is part of the operating system, to connect you to a data source or create a new one. After you have established an ODBC connection, you can export shape properties to an existing database table or to a new table in an existing database, as Figure 24-3 shows.
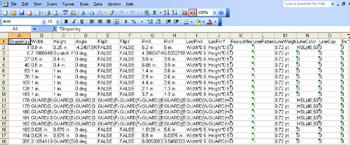
Figure 24-3: When you export shape properties, Visio creates a new table in an existing database or a NewTable worksheet in an existing Excel file, as shown here.
By default, Visio exports all the custom properties and ShapeSheet cells for each shape. At a minimum, Visio exports approximately 30 built-in size, position, and formatting properties. If you want to export only a subset of these properties, you can remove properties from the list in the Export To Database dialog box. Removing properties from the list doesn’t delete them from the shape.
Follow these steps to export shape properties:
-
If you want to export properties for certain shapes only, select the shapes you want. Otherwise, cancel all selections to export properties from all shapes on the page.
-
Choose Tools, Export To Database.
-
In the Name list, select the ODBC data source that you want to export to.
If you select Excel Files, the Select Workbook dialog box appears. Locate the file (.xls) that you want to use, and then click OK.
Cross-Reference For details about creating a data source, see “Connecting to an ODBC Data Source,” page 715.
-
If your data source supports multiple databases, type the database you want in the Qualifier list. To limit the number of tables that Visio displays, type or select the name of a database creator in the Owner list.
Note If your data source is Excel, Access, or another program that creates a single database, the Qualifier box displays the database name and the Owner box defaults to All Users.
-
In the Table list, select the specific table to which you want to export the properties. To export to a new table, select NewTable, and then type a name for the new table.
-
In the Field box, type a new name for the field that Visio will create to uniquely identify each record. By default, Visio creates a field called ShapeKey, the value of which is the shape’s internally generated ID number. To use a shape’s GUID as the unique identifier instead, select GUID from the Type list box. To mark this field as the primary key for your table, select the Make Key Field The Primary Key For Table check box.
Note NoteNot all ODBC drivers can create primary keys.
-
To limit the number of properties that Visio exports for each shape, select an unwanted property in the Cell column, and then click Delete.
-
To export a property using a different name or data type, select the property, click Modify, make the changes you want, and then click OK.
-
To export the properties, click OK.
Database Export Wizard
The Export To Database command is a more streamlined version of the Database Export Wizard. If you prefer to step through multiple screens, you can use the wizard, which does offer the ability to select shapes by layer for export. To start the wizard, choose Tools, Add- Ons, Visio Extras, Database Export Wizard.
The Add button is not available in the Export To Database dialog box
By default, Visio lists all the exportable shape properties in the Cells To Export table of the Export To Database dialog box. The Add button appears dimmed because there are no other properties you can export—they’re all listed. However, if you delete properties from the list, you can click Add to add them back. In the Add dialog box, the Name list under Cell Details lists the available shape properties. The options under Field Details indicate how to map the property to the data source. For details about these options, see the next section.
Mapping Shape Properties to an Existing Database
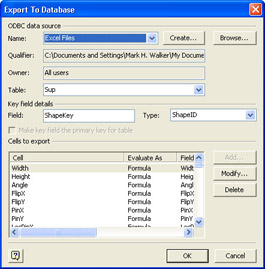
When you export shape properties, you can specify a field in an existing database table into which Visio writes property values. You can also change how Visio maps data when it exports shape properties and specify a data type to use. In the Export To Database dialog box (Cells To Export section), you can click Modify to display options for changing exported properties and specifying database fields, as Figure 24-4 shows. The next sections describe how to use the options in the Modify dialog box.
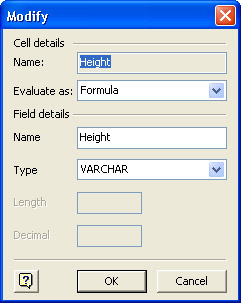
Figure 24-4: When you export shape properties, you can change how Visio maps property names and values to database fields.
Changing How Property Values Are Exported
The way that Visio exports a shape property reflects the way that data is stored in the ShapeSheet. In the Modify dialog box, you can specify how you want a value to be exported in the Evaluate As list, which provides a long list of options that boil down to three choices:
-
Value Visio exports the contents of a custom property or ShapeSheet cell as a value— a text string such as an employee name, a number–unit pair (such as 1 inch), a date, or some other value.
-
Formula A ShapeSheet cell can contain a formula, that is, an expression that can include constants, cell references, functions, and operators that evaluate to a value. In the ShapeSheet window, the default view displays cell contents as formulas (on the View menu, Formula is selected). When you export a property as a formula, Visio exports the expression in a cell without evaluating it. For example, the width of a shape can be a formula such as .5 * Height. If the shape’s height is 4 inches, the value of the Width cell will be 2 inches, but if you export the cell’s contents as a formula, Visio exports .5 * Height.
-
Measurement unit Many shape properties are dimensional. For example, a shape’s height is represented by a number and a unit of measure, such as 4 inches. You can export a value using an explicit unit of measure by selecting a unit in the Evaluate As list. If you don’t specify a unit, Visio exports a value using the default units defined for the property.
Changing How Properties Are Mapped
When you export shape properties to an existing database table, you can map the property values to existing fields. In the Modify dialog box, under Field Details, you can type the name of a field in the Name box, and then specify the field’s data type by selecting an option in the Type list. Visio writes the value of the shape property you select in the Export To Database dialog box to the field you specify in the Modify dialog box.
If the existing field is of variable length, type the size in bytes in the Length box. If the selected type supports decimal numbers, you can specify the precision by typing a number to indicate the number of decimal places in the Decimal box.
When you specify an Excel file as the data source, Visio can create a new “table” with the Table option in the Export To Database dialog box. Visio uses this option to add a new worksheet to an Excel file (if you’re connecting to Excel 5 or later). Visio marks the records as a named range. If you want to export shape properties to an existing worksheet in an Excel file, ODBC requires that you create a named range in the Excel file that includes all of the rows and columns in the worksheet. Visio can then use the text in the first row of the named range as the table’s column names.
|
EAN: 2147483647
Pages: 209