Chapter 23: Defining Styles, Patterns, and Colors
|
If you open a Microsoft Office Visio 2003 template and drag Visio master shapes onto a page to create a diagram, you typically don’t need to think much about styles, patterns, or colors. Most everything is formatted for you—styles are already included in the template, and an instant color scheme is only a click away. If you’re not content with the options Visio provides, however, you have a lot of leeway to customize, as this chapter describes.
When you want to change the way a shape looks, you probably click a formatting button. However, styles give you a faster way to consistently format all the shapes in a diagram. Shape designers need to understand style theory as well. What if a formatting button doesn’t include a satisfactory pattern or the exact color you want? This chapter goes inside Visio style theory and explains how to customize styles, patterns, and even colors and color palettes.
Understanding Text, Line, and Fill Styles
If you’ve used styles in Microsoft Office Word 2003 to format documents, you understand what a time-saver they can be. You select some text, choose a style from the style list on the toolbar, and you’re done. Styles in Visio work in much the same way to give shapes a consistent look and make them easier to revise. However, in Visio, you can apply styles to shapes as well as text. That difference makes Visio styles unique.
Think of a Visio style as a collection of text, line, and fill formats that have a name. For example, the Flow Normal style is applied to flowchart shapes to provide a consistent look. What the Flow Normal style actually applies is 8-point Arial text with 2-point margins, a black border with a specified thickness (line weight) around shapes, and solid white fill color in shapes. All Visio templates come with some styles built in. You can see the styles in the Style list on the Formatting toolbar, as Figure 23-1 shows. The five styles you always see are Guide, Normal, None, Text Only, and No Style.
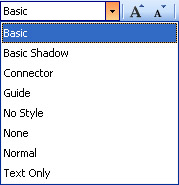
Figure 23-1: The Style list on the Formatting toolbar displays all the built-in styles that come with a template; styles from the Basic Flowchart template are shown here.
Applying Styles from the Style Lists
Visio lists all styles in the Style list on the Formatting toolbar regardless of whether they apply a line, fill, or text format. However, Visio also includes style lists on the Format Text toolbar and Format Shape toolbar, which you can display by choosing View, Toolbars as Figure 23-2 shows. You can also apply styles using the Styles command on the Format menu. Unnecessary redundancy? As it turns out, there’s a method to this madness. Depending on which style list you work from, different formats can be applied, which matters when a single style specifies text, line, and fill attributes, and you want to apply only one set of attributes.
![]()
Figure 23-2: For quick access to line and fill styles, you can display the Format Shape toolbar (top). To apply text styles, display the Format Text toolbar (bottom).
For example, the Flow Normal style appears in Text Style, List Style, and Fill Style lists, which are displayed on the Format Text and Format Shape toolbars, as Figure 23-3 shows. There is only one Flow Normal style, but its effects can differ depending on the list from which you select the style. Weird? Maybe, but it gives you flexibility. Here’s how it works:
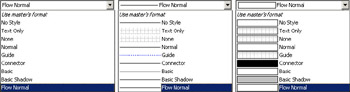
Figure 23-3: A Visio style can appear in the Text Style, Line Style, and Fill Style lists. The list’s appearance shows you whether the style applies a text (left), line (center), or fill format.
-
Text Style If you apply a style from this list, and the style also specifies line and fill attributes, Visio asks you whether you want to apply the line and fill formats.
-
Line Style If you apply a style from this list, and the style also specifies text and fill attributes, Visio asks you whether you want to apply the text and fill formats.
-
Fill Style If you apply a style from this list, and the style also specifies text and line attributes, Visio asks you whether you want to apply the text and line formats.
-
Style If you apply a style from this list, all of the style’s attributes—text, line, and fill—are applied to the selected shape, no questions asked.
Knowing how the style toolbars work will help prevent style mishaps . However, it’s hard to tell from the style name alone which type of formatting will be applied. Visio helps you out with a message as Figure 23-4 shows. When Visio asks, “Do you want to apply all of the included formatting,” you have two choices, and both result in something being formatted:
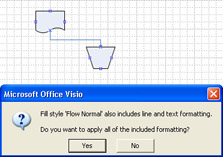
Figure 23-4: If you select a style from the Fill Style list, Visio prompts you before applying the style’s line and text formats to the shape.
-
Click Yes to apply all formatting to the shape (and risk the possibility of unexpected behavior, such as a solid black shape).
-
Click No to apply formatting for the single attribute identified by the name of the style list. That is, if you click the style in the Line Styles list, choosing No applies only the line attributes of the style.
With either option, some formatting will be applied. You can’t cancel the action, but you can click Ctrl+Z to reverse the results.
| Tip | Checking a style’s attributes To tell how many attributes a style applies, choose Format, Define Styles. In the Style list, select the style you’re interested in. In the Includes area, you’ll see a check mark beside each attribute that the style formats. |
Nothing happens when a style is applied to a shape
If you select a shape and apply a style, and nothing happens, the shape might be locked or guarded. Some shapes include built-in protections that prevent you from formatting them when the format might disrupt the shape’s smart behavior. Sometimes you can work around these protections, and sometimes you can’t. For details, see “Formatting Locked Shapes,” page 687.
Formatting Versus Applying Styles
For most people, the difference between applying a style or manually formatting a shape is really just the command they use. For Visio, the difference between manual formats and those applied by a style is in how the change is stored. Now we’re talking file mechanics, and this is an interesting topic only if you plan to design your own templates or want to understand how actions on the drawing page affect shape formats. The Visio term for the formats you apply manually is local formatting—“local” because the changes affect settings that Visio saves with each shape. You apply a local format when you select a shape and use a toolbar button or command on the Format menu to change the appearance of text, line, or fill. In contrast, a style applies a global format, because Visio stores all the style definitions for a diagram in one place—that is, globally. If you’re working with a diagram that contains many shapes, you’ll get better performance if you use styles rather than local formatting to format your shapes.
When you copy shapes to another Visio drawing file, their formatting changes
If you created or edited styles in your Visio diagram, and then copied it or parts of it to another Visio diagram, formats specified for the new diagram can override those in your shapes. This happens when the destination diagram has a style of the same name as the one you used to format your shapes. If the style in the new diagram is defined to format shapes differently, its styles will be applied to your shapes. To avoid reformatting, you can redefine your styles in the original Visio diagram to match those of the target diagram, or you can rename your Visio styles so that they don’t match and your style will be used. For details, see “Creating and Editing Styles,” page 688.
Comparing Color Schemes and Styles
Applying a color scheme is similar to applying a style in that it’s a quick technique for making widespread changes in a diagram. Color schemes, however, are different from styles in the way they interact with locally formatted shapes. When you apply a color scheme in a diagram type that supports their use (most of the business diagram types do), all the shapes, titles, borders, and backgrounds adopt coordinating colors from the scheme—unless you have locally formatted a shape’s line and fill colors. Visio ignores locally formatted shapes, including shapes you create, so the color scheme isn’t applied to them. After you apply a color scheme, the diagram’s shapes retain their original style assignments.
For example, a flowchart is a diagram type that supports color schemes. To apply a color scheme, right-click a page, and then choose Color Schemes. All the flowchart shapes you dropped into the diagram from the flowchart stencil will be filled with a color from the scheme—with the exception of any shapes that include manually formatted line and fill colors, as Figure 23-5 shows. Manually formatted colors remain unchanged.
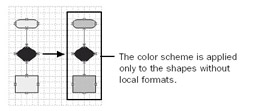
Figure 23-5: This flowchart’s locally formatted Decision shape remains the same before and after applying a color scheme to the drawing.
What if you want all the shapes to adopt the color scheme colors? This is where styles and color schemes overlap to your advantage. If you restore the original styles to a shape, it will assume the color scheme automatically. To do this, see “Restoring the Factory Default Shape Formats,” page 687.
Why does this work? The answer lies in how Visio really applies a color scheme. A color scheme maps new color values to existing style definitions. All shapes formatted with those styles adopt the new color scheme. That’s why reapplying the master’s format also applies the color scheme, and that’s why some master shapes don’t work with color schemes.
True color (32-bit) displays
If you have a true color (32-bit) display, you can see that the style definitions change to use the color scheme. After applying a color scheme, expand the Fill Style list on the Format Shape toolbar to see the new colors.
Overriding and Protecting Shape Formats
If you format a shape and then apply a style, you run the risk of losing the formats you applied. That’s because applying a style resets all the formatting options that come with the style. In Visio terms, Visio overrides local formatting. This behavior can be a little unsettling if you’re used to the way Word works. In Word, you can individually format one word in a sentence—for example, apply italics—and then choose a different style for the paragraph, and the italics format will be retained. Visio doesn’t preserve individual, local formats as Word does unless you know a few tricks.
One trick is to use the Style command on the Format menu, rather than the style lists on the toolbars. Then you can apply a style and prevent it from overriding your local formatting by selecting the Preserve Local Formatting check box, as Figure 23-6 shows. If you don’t select the Preserve Local Formatting check box, Visio applies the new style and overrides any local formatting.
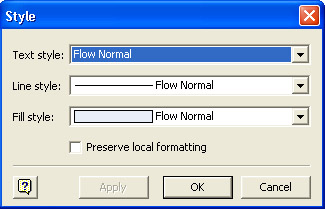
Figure 23-6: The Preserve Local Formatting check box in the Style dialog box lets you save any manual formatting you’ve applied to a shape and still apply the style.
Another trick is to use the toolbar style lists, but choose carefully. For example, if you’ve manually formatted the text for a number of flowchart shapes but want to apply a style that changes their fill color, choose a style from the Fill Styles list. When Visio displays the message that asks you whether you want to apply the style’s line and text formats as well, click No. That way, Visio applies only the fill formatting in the style, thus preserving your local text formatting.
| Tip | Format mulle shapes Of course you can also format mulle shapes by selecting them by either Shift+clicking on each in turn or lassoing them, right-clicking, and then selecting Format. The format you choose is applied to the selected shapes. By the same token, you can select a shape with the format you desire, double–click the Format Painter tool, and then click mulle shapes you wish to format. It’s no fuss, and very little muss. |
Checking for local formatting
How can you tell that a shape has been locally formatted? You can’t—not if you look on the drawing page. However, if you look at the shape in the ShapeSheet window, the settings that represent local formats—that is, your edits to the shape—appear as blue formulas.
Restoring the Factory Default Shape Formats
You can remove local formatting from a shape and restore its original styles. One reason to do this is to make sure shapes look consistent when you’re creating a new stencil or to make sure a shape adopts a diagram’s color scheme. The Styles command provides an easy way to restore the styles that came with the master shape, as Figure 23-7 shows.
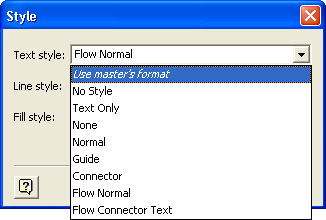
Figure 23-7: You can restore the default styles with the Format, Style command.
To restore default styles to a shape, first select a shape, and then choose Format, Style. Next, click the Text Style drop-down arrow, and then select Use Master’s Format. Repeat for the Line Style and Fill Style lists, and then click OK.
| Note | This technique works only when you’re using shapes that you dragged from a stencil. If you created the shape on the page, it didn’t come from a master, so nothing happens when you select Use Master’s Format. Conversely, if you save the shape to a custom stencil, and subsequently use that stencil in another drawing, it becomes a master, with its own master properties. |
Formatting Locked Shapes
Visio shapes can be protected against formatting. When you try to apply a style to a protected shape, you might see the error message shown in Figure 23-8, or you might see nothing at all. It depends on whether the shape was locked or guarded, two methods of protecting formatting that can affect your ability to interact with shapes on the drawing page. Shape designers usually have good reasons for locking a shape, but that doesn’t mean you don’t have an equally good reason for unlocking it. It’s always fun to defeat shape protections and have your way, but be prepared for odd results. Sometimes those locked formulas can have a domino effect on shape appearance or behavior.
![]()
Figure 23-8: Visio prevents you from editing a shape that’s been locked.
Removing Style Locks
To reset a shape so that you can apply a style, you must edit its ShapeSheet settings. To be on the safe side, make a copy of the shape first, and then edit the copy.
Follow these steps to unlock a shape:
-
Select the locked shape, and then choose Window, ShapeSheet.
-
Scroll down until you see the Protection section.

If you don’t see this section, choose View, Sections, select the Protection check box, and then click OK.
-
Click in the LockFormat cell, type 0, and then press Enter. The shape is now unlocked, because a value of 0 (or false) disables the lock. You can close the ShapeSheet window and then apply a style or format.
Tip The ShapeSheet-challenged among us might prefer to right-click on the locked shape. Next choose Format, Protection, and click None. Click OK, and you are done.
Formatting Guarded Shapes
Sometimes you try to apply a style or choose a format, and nothing happens—no error message, no format change, nothing. It might be that the shape includes guarded ShapeSheet settings that prevent you from making the change. If you’re a shape programmer, the GUARD function is a useful way to protect your formulas. If you’re a user who wants to format a guarded shape, there aren’t any simple workarounds. Formulas are guarded so that they aren’t overwritten when users interact with shapes, and usually that’s a good thing. It keeps the shape behaving the way it’s supposed to.
| Cross-Reference | For details about the GUARD function, see “Protecting Shape Formulas,” page 745. |
|
EAN: 2147483647
Pages: 209