| In Active Directory, administrators manage security by using permissions. Contacts, users, and groups all have permissions assigned to them that control their access to resources in the organization. Permissions also control the actions that users, contacts, or groups can perform. Permissions can be applied directly to an object or they can be inherited: the default process by which the creation of an object causes the object (child) to assume the permissions of its parent object. For example, the root, or parent, of the server hierarchy is the Organization node. All other nodes (child nodes) in the tree inherit the Exchange permissions of Organization node. In itself, inheritance is an essential tool for simplifying the application of permissions and makes it possible (and simple) for permissions to be applied consistently in an object hierarchy. Administrators often want to change the default permissions that are set by default when a child object inherits permissions from a parent object. Viewing security permissions for an Exchange server is accomplished by completing the following steps: 1. | In ESM, right-click the root or top-level leaf node to work with.
| 2. | Select Properties from the shortcut menu and then select the Security tab within the Properties dialog box, as shown in Figure 9.2.
Figure 9.2. Using the Security tab to view and configure permissions on Exchange objects. 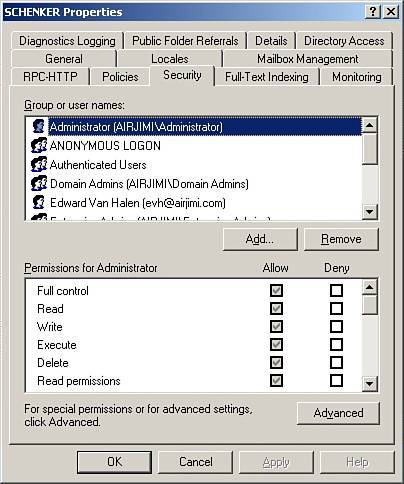
Note  | The Properties option is not available on the shortcut menu of nonroot or nonleaf nodes such as Recipients or Server nodes. Try expanding the node and selecting a lower-level node. In addition, some nodes can be viewed and configured only using the Exchange Administration Delegation Wizard. |
| 3. | In the Group or User Names list box, select the object to view the permissions. The object permissions will be displayed in the Permissions list box; inherited permissions are displayed as shaded check boxes.
|
Setting Permissions Administrators manage and control the use of Exchange server by setting permissions in various ways: Organizationwide Administrators set permissions at the organization level and the permissions are applied through inheritance to all objects in the Exchange organization. Per server Permissions are set on each server in the Exchange organization and the permissions are applied through inheritance to all child nodes on the server. Per storage group Permissions are set at the storage group level and the permissions are applied through inheritance to all mailbox and public folder stores contained in the storage group. Per individual node Permissions are set on an individual node.
Use the follow steps to configure Exchange server permissions: 1. | In ESM, right-click the top-leaf or root-level node to work with. On the shortcut menu, select Properties and then click the Security tab in the Properties dialog box.
| 2. | Groups or Users with access to the Exchange node will be listed in the Groups or User Names list box. Select a user or group to modify and then allow or deny them access permissions in the Permissions list box.
| 3. | To set permissions for additional groups, users, or computers, click the Add button. Use the Select Users, Computers, or Groups dialog box to select users, computers, or groups to set access permissions.
| 4. | In the Group or User Names list box, select the user, computer, or group to configure. Use the Permissions area to allow or deny permissions. Repeat as necessary.
| 5. | Click OK to complete configuring permissions.
|
Delegating Permissions Administrators may want to delegate control of the Exchange server without making a user a member of the Domain or Enterprise Administrators groups. An administrator may want to give his or her supervisor access to view the Exchange server settings but at the same time prevent the supervisor from modifying any settings. Exchange Administration Delegation Wizard (EADW) is the tool to use to delegate control of Exchange Server. The level of permissions is determined by the level at which the wizard is started. If the Exchange Administration Delegation Wizard is started at the organization level, users or groups will have administrative permissions throughout the whole organization. If the Exchange Administration Delegation Wizard is started at the administrative group level, users or groups will have administrative permissions for that specific administrative group only. The Exchange Administration Delegation Wizard lets administrators configure the following administrative permissions: Exchange Full Administrator Allows full administration of Exchange system information and modifying of permissions. Exchange Administrator Allows full administration of Exchange system information, but users or groups cannot modify permissions. Exchange View Only Administrator Allows only viewing of Exchange configuration information.
With Exchange Administration Delegation Wizard, you can set permissions using the following steps: 1. | In ESM, right-click the organization or administrative groups to delegate control of; then click Delegate Control. This starts the Exchange Administration Delegation Wizard. Click Next to continue.
| 2. | In the Users and Groups, click Add to grant a new user or group administrative permissions. In the Delegate Control dialog box, click Browse and then select the user or groups to delegate permissions to. Click OK to continue.
| 3. | In the Delegate Control dialog box, use the Role drop-down box to select the appropriate role to delegateExchange Full Administrator, Exchange Administrator, or Exchange View Only Administratorand then click OK. Repeat steps 2 and 3 to delegate additional permissions.
| 4. | Click Next and then click Finish to complete permissions delegation.
|
|