| Exchange 2003 supports the Post Office Protocol 3 (POP3), Internet Message Access Protocol 4 (IMAP 4), Simple Mail Transfer Protocol (SMTP), and the Hypertext Transfer Protocol (HTTP). Some clients support all these protocols; others do not. To accommodate these differences in protocol usage, Exchange supports all these protocols. These protocols help establish how mail is transported within the organization and also from outside the Exchange organization. SMTP is the native protocol for mail delivery; Outlook users and Exchange servers use SMTP to deliver messages and data. The IMAP4 protocol is used to access mail and public and private folders; users log in to Exchange to download message headers and then read messages online. POP3 is a protocol for retrieving mail from remote servers; users log in to Exchange and then use POP3 to download mail and then read offline. Each of these protocols has an associated virtual server that administrators configure with IP addressing, a port numbering assignment, and authentication settings. See Table 8.1 for IP address and port-numbering information. Table 8.1. Summary of Virtual Server IP Addresses and Port AssignmentsVirtual Server / Protocol | Receiving IP Address | Sending IP Address | Default Port | Default Secure Port |
|---|
SMTP | Any available IP address on the server | DNS MX record IP address for domain | 25 | 465, Secure Sockets Layer (SSL) and Transport Layer Security (TLS) | IMAP4 | Any available IP address on the server | IP address associated with the FQDN of the Exchange Server | 143 | 993, Secure Sockets Layer (SSL) | POP3 | Any available IP address on the server | IP address associated with the FQDN of the Exchange Server | 110 | 995, Secure Sockets Layer (SSL) | HTTP | Any available IP address on the server | IP address associated with the FQDN of the Exchange Server | 80 | 443, Secure Sockets Layer (SSL) |
Note  | The TCP port/IP address configuration must be unique on every virtual server. There can be multiple virtual servers sharing the same port, but not the same IP address. |
Managing Virtual Servers In general, managing the virtual server for one protocol is very similar to managing a virtual server for a different protocol. Administrative management of virtual servers include tasks such as enabling a virtual server, assigning ports, setting connection limits, starting or stopping a virtual server, and terminating connected users. Virtual servers run as server processes and can be started, stopped, or paused. This is typically performed by administrators during maintenance or troubleshooting. Each method provides different administrative options. Stopping a virtual server halts all server connections and delivery of email messages both in and out of the server. When a virtual server is paused, all new incoming connections are stopped but current connections are kept alive. When an IMAP4 or POP3 virtual server is paused, active clients can still receive messages. When an SMTP virtual server is paused, no new connections are accepted, but existing queued messages can be delivered and new messages can be submitted to the queue for delivery. These messages will be delivered after the virtual server is restarted. A master server process also exists for the SMTP, IMAP4, and POP3 virtual servers. This process halts all virtual servers using this process and stops delivery of messages for the service. When the master process is restarted, all associated virtual servers are restarted as well. Starting, Stopping, and Pausing Virtual Servers Use the following steps to start, stop, or pause a virtual server: 1. | In ESM, if administrative groups are enabled, expand the administrative group you want to work with. Next, navigate to the Protocols container and expand the Servers node of the server you want to work with; then expand the Protocols node.
| 2. | Expand the SMTP, IMAP4, or POP3 node and then right-click the virtual server you want to work with.
| 3. | Choose Start to start the virtual server; choose Pause to pause it or Stop to stop it.
|
Stopping, starting, or pausing the master process is accomplished using the following steps: 1. | Click Start, All Programs or Programs, Administrative Tools, and Computer Management.
| 2. | Expand the Services and Applications node and then click Services. IMAP4, POP3, and SMTP are controlled by the Microsoft Exchange IMAP4, Microsoft Exchange POP3, and SMTP services.
| 3. | In the right pane, scroll to and right-click the service to manage and then select Start, Stop, or Pause. The service can also be briefly stopped and started using the Restart command. If a service is paused, the service can be put back into operation by selecting the Resume command, as shown in Figure 8.1.
Figure 8.1. Using the Computer Management MMC to control the SMTP Master Process. 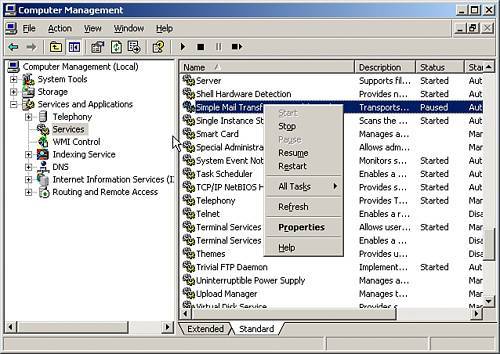
|
Changing Virtual Server Settings Administrators may want to use alternative ports, IP settings, connection limits, and timeout values when configuring a virtual server. To change these settings, use the following steps: 1. | In ESM, expand the administrative groups and then the administrative group you want to work with. In the left pane, navigate to the Protocols container. Expand Servers and then the server you want to work with.
| 2. | Expand the Protocols node and then expand the protocol to work withSMTP, IMAP4, or POP3. Right-click the protocol to administer and then select Properties.
| 3. | On the General tab, use the drop-down box to select an available IP address. Select All Unassigned to allow the protocol to respond on all unassigned IP addresses configured for use on the server.
| 4. | Click the Advanced button to display and configure the TCP port settings for the protocol. Port settings can be configured for all unassigned IP addresses or for individual IP addresses.
| 5. | In the Advanced dialog box, modify the port settings by clicking one of the following options:
- Add Add a TCP port on an individual IP address basis or all unassigned IP address basis.
- Edit Edit the current Address list box selection's TCP port settings.
- Remove Remove the current Address list box selection's TCP port settings.
| 6. | Click OK and then click OK again to complete the configuration changes.
|
Unless they are configured differently, virtual servers will accept an unlimited number of connections. In some situations, this may not be acceptable. Administrators may want to restrict incoming connections and set timeout limits for idle users. Modify the connection limits and timeout values using the following steps: 1. | In ESM, expand the administrative groups and then the administrative group you want to work with. In the left pane, navigate to the Protocols container. Expand Servers and then the server to work with.
| 2. | Expand the Protocols node and expand the protocol to work withSMTP, IMAP4, or POP3. Right-click the protocol to administer it and then select Properties.
| 3. | On the General tab, select the Limit Number of Connections To check box and then type in a limit value. To remove an existing connection limit, clear the Limit Number of Connections To check box.
| 4. | The Connection Time Out field controls the connection timeout value. Type a timeout value in the field to define an acceptable idle time for connections.
|
Tip  | Typically, the Connection Time Out value is set between 30 and 60 minutes. In most environments, 30 minutes is sufficient. If users are being disconnected during file downloads, increase this value to about 90 minutes. This should be sufficient for most file downloads. |
Each time a user connects to a virtual server, a user session is created that lasts for the duration of the user's connection. Administrators can monitor user connections to check the server load and to monitor connection times. If necessary, administrators can terminate individual user sessions or all user sessions connected to a virtual server. To view or terminate user sessions, perform the following steps: 1. | In ESM, expand the administrative groups and then the administrative group you want to work with. In the left pane, navigate to the Protocols container. expand Servers and then the server to work with.
| 2. | Expand the Protocols node and then expand the protocol to work withSMTP, IMAP4, or POP3. Double-click the virtual server to administer and then select the Current Sessions node to display a list of current sessions in the Details pane.
| 3. | To end an individual user session, right-click a user in the Details pane and select Terminate. To end all user sessions, right-click any user in the Details pane and select Terminate All.
|
|