Shortcuts for Creating Cell and Range Names
Excel provides several ways to create names for cells and ranges other than the Name Manager. I discuss these methods in this section, along with some other relevant information that pertains to names.
The New Name Dialog Box
You can access the New Name dialog box by choosing Formulas ![]() Defined Names
Defined Names ![]() Define Name. The New Name dialog box displayed is identical in form and function to the one from the New button on the Name Manager dialog.
Define Name. The New Name dialog box displayed is identical in form and function to the one from the New button on the Name Manager dialog.
Although Excel is quite flexible about the names that you can define, it does have some rules:
-
Names can't contain any spaces. You might want to use an underscore or a period character to simulate a space (such as Annual_Total or Annual.Total).
-
You can use any combination of letters and numbers, but the name must begin with a letter or underscore. A name can't begin with a number (such as 3rdQuarter) or look like a cell reference (such as Q3).
-
You cannot use symbols, except for underscores and periods. Although not documented, I've found that Excel also permits a backslash (\) and question mark (?) as long as they don't appear as the first character in a name.
-
Names are limited to 255 characters. Trust me-you should not use a name anywhere near this length. In fact, doing so defeats the purpose of naming ranges.
-
You can use single letters (except for R or C). However, generally I don't recommend this because it also defeats the purpose of using meaningful names.
-
Names are not case sensitive. The name AnnualTotal is the same as annualtotal. Excel stores the name exactly as you type it when you define it, but it doesn't matter how you capitalize the name when you use it in a formula.
Excel also uses a few names internally for its own use. Although you can create names that override Excel's internal names, you should avoid doing so unless you know what you're doing. Generally, avoid using the following names: Print_Area, Print_Titles, Consolidate_Area, Database, Criteria, Extract, FilterDatabase, and Sheet_Title.
| Note | A single cell or range can have any number of names. I can't think of a good reason to use more than one name, but Excel does permit it. If a cell or range has multiple names, the Name box always displays the name that's first alphabetically when you select the cell or range. |
A name can also refer to a noncontiguous range of cells. You can select a noncontiguous range by pressing Ctrl while you select various cells or ranges with the mouse.
Creating Names Using the Name Box
A faster way to create a name for a cell or range uses the Name box. The Name box is the drop-down list box to the left of the formula bar. Select the cell or range to name, click the Name box, type the name, and then press Enter to create the name. If a name already exists, you can't use the Name box to change the range to which that name refers. Attempting to do so simply selects the original range. You must use the Name Manager dialog box to change the reference for a name.
| Caution | When you type a name in the Name box, you must press Enter to actually record the name. If you type a name and then click in the worksheet, Excel won't create the name. |
The Name box serves double-duty by also providing a quick way to activate a named cell or range. To select a named cell or range, click the Name box and choose the name, as shown in Figure 3-3. This selects the named cell or range. Oddly, the Name box does not have a keyboard shortcut. In other words, you can't access the Name box by using the keyboard; you must use the mouse. After you click the Name box, however, you can use the direction keys and Enter to choose a name.
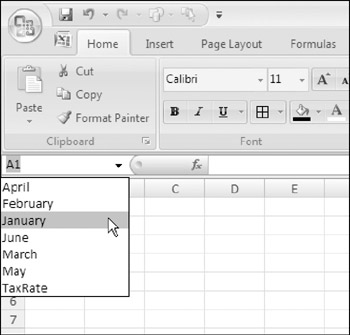
Figure 3-3: The Name box provides a quick way to activate a named cell or range.
| Tip | Names created using the Name box are workbook-level in scope by default. If you want to create a worksheet-level name, you can type the worksheet's name and an exclamation point before the name (for example, Sheet2!Total). Because the Name box works only on the currently selected range, typing a worksheet name other than the active worksheet results in an error. |
Creating Names Automatically
You may have a worksheet containing text that you want to use for names of adjacent cells or ranges. Figure 3-4 shows an example of such a worksheet. In this case, you might want to use the text in column A to create names for the corresponding values in column B. Excel makes this very easy to do.
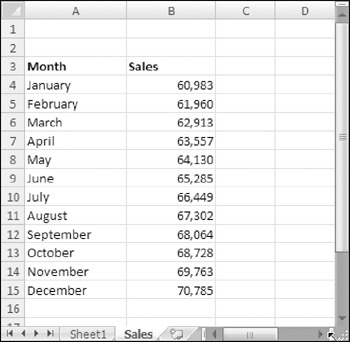
Figure 3-4: Excel makes it easy to create names by using text in adjacent cells.
To create names by using adjacent text, start by selecting the name text and the cells that you want to name. (These can consist of individual cells or ranges of cells.) The names must be adjacent to the cells that you're naming. (A multiple selection is allowed.) Then choose Formulas ![]() Defined Names
Defined Names ![]() Create from Selection (or Ctrl+Shift+F3). Excel displays the Create Names From Selection dialog box, as shown in Figure 3-5.
Create from Selection (or Ctrl+Shift+F3). Excel displays the Create Names From Selection dialog box, as shown in Figure 3-5.
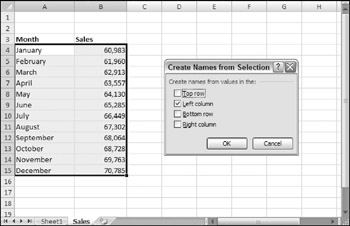
Figure 3-5: The Create Names From Selection dialog box.
The check marks in this dialog box are based on Excel's analysis of the selected range. For example, if Excel finds text in the first row of the selection, it proposes that you create names based on the top row. If Excel doesn't guess correctly, you can change the check boxes. Click OK, and Excel creates the names. Note that when Excel creates names using text in cells, it does not include those text cells in the named range.
If the text in a cell would result in an invalid name, Excel modifies the name to make it valid. For example, if a cell contains the text Net Income (which is invalid for a name because it contains a space), Excel converts the space to an underscore character and creates the name Net_Income. If Excel encounters a value or a formula instead of text, however, it doesn't convert it to a valid name. It simply doesn't create a name.
| Caution | Double-check the names that Excel creates. Sometimes, the Create Names From Selection dialog box works counterintuitively. Figure 3-6 shows a small table of text and values. Now imagine that you select the entire table, choose Formulas |
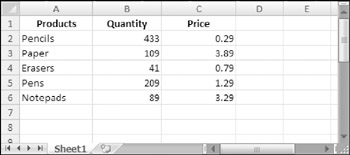
Figure 3-6: Using the Create From Selection command to create names from the data in this table may produce unexpected results.
Naming Entire Rows and Columns
Sometimes it makes sense to name an entire row or column. Often, a worksheet is used to store information that you enter over a period of time. The sheet in Figure 3-7 is an example of such a worksheet. If you create a name for the data in column B, you need to modify the name's reference each day you add new data. The solution is to name the entire column.
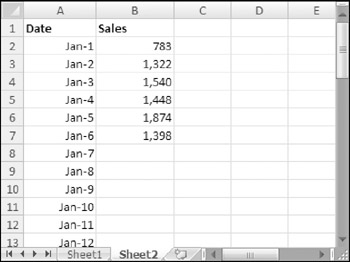
Figure 3-7: This worksheet, which tracks daily sales, uses a named range that consists of an entire column.
For example, you might name column B as DailySales. If this range were on Sheet2, its reference would appear like this:
=Sheet2!$B:$B
To define a name for an entire column, start by selecting the column by clicking the column letter. Then, type the name in the Name box and press Enter (or use the New Name dialog box to create the name).
After defining the name, you can use it in a formula. The following formula, for example, returns the sum of all values in column B:
=SUM(DailySales)
Names Created by Excel
Excel creates some names on its own. For example, if you set a print area for a sheet, Excel creates the name Print_Area. If you set repeating rows or columns for printing, you also have a worksheet-level name called Print_Titles. When you execute a query that returns data to a worksheet, Excel assigns a name to the data that is returned. Also, many of the add-ins that ship with Excel create hidden names. (See the "Hidden Names" sidebar.)
You can modify the reference for any of the names that Excel creates automatically, but make sure that you understand the consequences.
Some Excel macros and add-ins create hidden names. These names exist in a workbook but don't appear in the Name Manager dialog box or the Name box. For example, the Solver add-in creates a number of hidden names. Normally, you can just ignore these hidden names. However, sometimes these hidden names create problems. If you copy a sheet to another workbook, the hidden names are also copied, and they may create a link that is very difficult to track down.
Unfortunately, Excel doesn't make it very easy to work with names. For example, you have no way of viewing a complete list of names defined in a workbook. When you use the Name Manager dialog box, it lists only the worksheet-level names in the active worksheet. And it never displays hidden names.
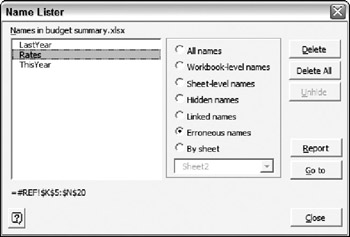
If you'd like a better tool to help you work with names, you can use the Name Lister utility, which is part of the Power Utility Pak (see the accompanying figure). This utility displays a list of all names, and you can filter the list in a number of ways-for example, you can show only sheet-level names or only linked names. The utility is also useful for identifying and deleting bad names-names that refer to an invalid range. You can download a trial version of Power Utility Pak from http://j-walk.com/ss.
EAN: 2147483647
Pages: 212