| A button is a layout object that executes an attached script when clicked. Simple rectangular buttons can be created with the Button Tool, or you can designate any object as a button, such as an imported graphic or even a text string. The purpose of adding buttons to a layout is to make common and important commands easily accessible, much like toolbars do. Investment Minder makes extensive use of buttons on all layouts other than the reports. We'll start by making the simplest buttonsthose that have only one script step. The transaction layouts (Savings, Stocks, and CDs) will each contain two such buttons; one to delete the current record and another to sort the transactions. Later in this chapter, we'll use ScriptMaker to create the scripts needed for the more complex functions performed by the other buttons.  In Layout mode, select Savings from the layouts pop-up menu. In Layout mode, select Savings from the layouts pop-up menu.
 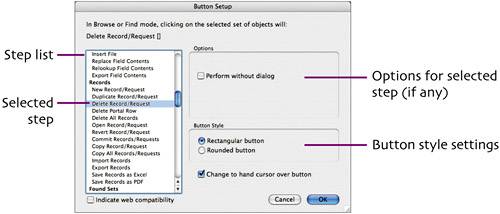  Scroll the step list to the Records section, select Delete Record/Request, and click OK. Scroll the step list to the Records section, select Delete Record/Request, and click OK.
 A blinking cursor appears in the center of the button. Type Delete Record. Click away from the button to complete the label. A blinking cursor appears in the center of the button. Type Delete Record. Click away from the button to complete the label.
 As with other objects, you can change a button's color, font, and size. Select the button. Set its fill color to the light blue used for the Body part and the font to Arial, 12 pt., bold, black text. Use the Size palette to set the button's size to 1.319" x 0.264". As with other objects, you can change a button's color, font, and size. Select the button. Set its fill color to the light blue used for the Body part and the font to Arial, 12 pt., bold, black text. Use the Size palette to set the button's size to 1.319" x 0.264".
The finished button 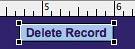
 We can now create a Sort button by duplicating the Delete Record button and making the necessary changes. Select the Delete Record button and choose Edit > Duplicate. Drag the duplicate to the right of the original button. We can now create a Sort button by duplicating the Delete Record button and making the necessary changes. Select the Delete Record button and choose Edit > Duplicate. Drag the duplicate to the right of the original button.
 With the Sort button selected, choose Format > Button Setup (or double-click the button). The Button Setup dialog box appears. With the Sort button selected, choose Format > Button Setup (or double-click the button). The Button Setup dialog box appears.
 Replace the Delete Record/Request step by selecting the Sort Records step (in the Found Sets section). Replace the Delete Record/Request step by selecting the Sort Records step (in the Found Sets section).
 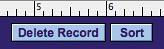
 Select the Text Tool and change the button's label to Sort. Reduce its width to 0.597". Switch to the Main layout, saving your changes. Select the Tab button and note the distance to its right edge. Return to the Savings layout, select both the Delete Record and Sort buttons, and set the distance to right edge to match that of the Tab button. Select the Text Tool and change the button's label to Sort. Reduce its width to 0.597". Switch to the Main layout, saving your changes. Select the Tab button and note the distance to its right edge. Return to the Savings layout, select both the Delete Record and Sort buttons, and set the distance to right edge to match that of the Tab button.
 Rather than re-create these buttons for the other layouts, we can use Copy/Paste to duplicate them. Rather than re-create these buttons for the other layouts, we can use Copy/Paste to duplicate them.  -click to select the two buttons and choose Edit > Copy ( -click to select the two buttons and choose Edit > Copy (  / / ). Check the Size palette, noting the distance of the selected pair from the left and top edges. ). Check the Size palette, noting the distance of the selected pair from the left and top edges.
 Select Stocks from the layouts pop-up menu, saving changes to the Savings layout when prompted. Choose Edit > Paste ( Select Stocks from the layouts pop-up menu, saving changes to the Savings layout when prompted. Choose Edit > Paste ( /), and use the Size palette to position the pair in the same spot as the originals. /), and use the Size palette to position the pair in the same spot as the originals.
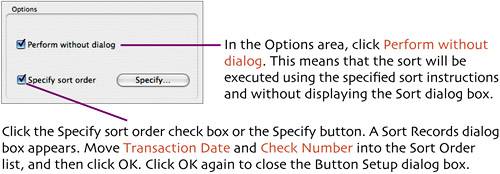
 On the Stocks layout, double-click the Sort button to open the Button Setup dialog box. Click the Specify button. On the Stocks layout, double-click the Sort button to open the Button Setup dialog box. Click the Specify button.
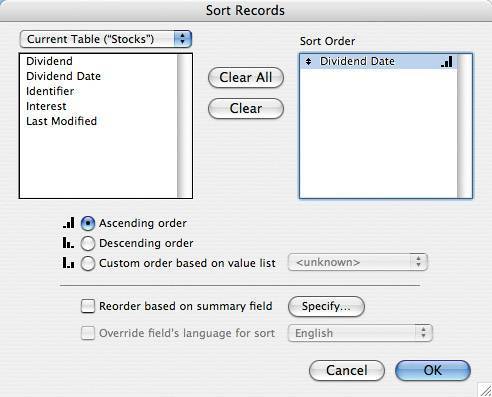
In the Sort Records dialog box, click Clear All to remove the sort fields. Select Dividend Date in the field list as the new sort field, click Move to set it as the new sort field, and click OK. Click OK again to exit from the Button Setup dialog box.  Switch to the CD layout, saving changes when prompted. Paste the two buttons here, too, and set their position as you did in Step 11. Finally, repeat Step 12, replacing the original sort fields with the Date field from the CD table. Switch to the CD layout, saving changes when prompted. Paste the two buttons here, too, and set their position as you did in Step 11. Finally, repeat Step 12, replacing the original sort fields with the Date field from the CD table.
Note: There was no reason to modify the Delete button's script step because it will perform identically on any layout; that is, when clicked, it deletes the active record. Sort instructions, on the other hand, are specific to the data table in use, so new fields had to be substituted for the originals. |