Flylib.com

Books Software


Chapter 6. creating summary reports


Chapter 6. creating summary reports

In this chapter, you'll create four reports that summarize each kind of investment: savings/money market, stocks/mutual funds, CDs, and savings bonds . Each report is a variation of the others, requiring only field and label substitutions.

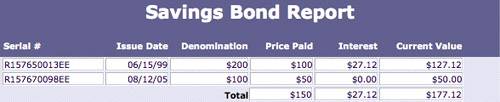
Each report shows how a class of investments has performed to-date.


create more fields

In order for a report to display summary figures (such as subtotals, totals, averages, and counts), you create Summary fields. A Summary field computes a statistic over all or a subset of records. In a sales report, for example, a Summary field could provide a separate total for each salesperson. (Summary fields perform calculations across a set of records, while Calculation fields perform calculations within a record.) Following are the additional fields you'll need to create for the reports in this chapter.

Field Name

Field Type

Formula or Statistic

CD_Appreciation

Calculation

CD_Current Value - CD_Amount

Stk_Dividend

Calculation

Sum (Stocks::Dividend )+Sum (Stocks::Interest)

Bond_Current Value Summary

Summary

Total of Bond_Current Value

Bond_Interest Summary

Summary

Total of Bond_Interest

Bond_Price Summary

Summary

Total of Bond_Price

CD_Amount Summary

Summary

Total of CD_Amount

CD_Appreciation Summary

Summary

Total of CD_Appreciation

CD_Current Value Summary

Summary

Total of CD_Current Value

Sav_Current Balance Summary

Summary

Total of Sav_Current Balance

Stk_Change in Value Summary

Summary

Total of Stk_Change in Value

Stk_Current Value Summary

Summary

Total of Stk_Current Value

Stk_Total Cost Summary

Summary

Total of Stk_Total Cost


If you haven't already done so, disable the Layout Preferences setting to Add newly defined fields to current layout (see page 58 for instructions).

Choose File > Define > Database, click the Fields tab of the Define Database dialog box, and select Main from the Table drop-down list.

Enter CD_Appreciation in the Field Name box, set Type to Calculation, and click Create. Define this formula and set the Calculation result to Number:

CD_Current Value - CD_Amount

Create another Calculation field named Stk_Dividend using the following formula and setting the Calculation result to Number:

Sum (Stocks::Dividend) + Sum (Stocks::Interest)

The fields preceded by Stocks:: must be selected from the Stocks table.

To create the first Summary field, enter Bond_Current Value Summary in the Field Name box, set Type to Summary , and click Create. The Options for Summary Field dialog box appears.

Click the Total of radio button, select a field from the Available Fields list to be totaled (in this case, Bond_Current Value), and click OK.

Repeat Steps 5 and 6 to create the other Summary fields listed in the table on the previous page. Each Summary field uses the Total of statistic. Be sure to select the proper field to be summarized for each one.

When you're finished, click OK to close the Define Database dialog box.


the Savings Report

The Savings Report shows the initial and current balance for each savings and money market account, as well as the current total for all such accounts.

Using the New Layout/Report wizard, we'll create the report layout below.

Set the following options on the first screen, and click Next.

Show records from: Main Layout name : Savings Report Layout type: Columnar list/report

Remove the check mark from Include in layout menus .

On the Choose Report Layout screen, select Report with grouped data , check the option to Include grand totals , and click Next to continue.

Click Next to continue.

On the Organize Records by Category screen, select the Sav_Institution field in the Report Fields list and click Move, adding it to the Report Categories list. Click Next to continue.

Note: Since we are going to calculate a grand total but no subtotals, we don't actually have to select a grouping field. The total will appear, anyway. But doing so will add nice section headers to the report, making it easier to read.

Click Next to continue.

Click the Specify button. In the Specify Fields dialog box, select Sav_Current Balance Summary and click OK. Ensure that End of report is selected from the drop-down list, and click the Add Grand Total button.

Click Next to continue.

The Select a Theme screen lists the layout themes you can use to format the report. Select Lavender Print , and click Next.

On the Header and Footer Information screen, you can specify text strings, logos, and the like to appear in the report's header or footer. Set the following options (shown below), and click Next to continue.

Header, Top center : Large Custom Text; and enter Savings/Money Market Report in the dialog box that appears.

Footer, Bottom left : Current Date

Footer, Bottom right : Page Number

On the Create a Script for this Report screen, select Do not create a script and click Next. Although the report will be script-controlled, it will be easier for me to explain how to create the necessary script from scratch.

On the final wizard screen, you can choose to view the report in Preview mode (without data, since we currently have none) or go directly to Layout mode to make modifications. Since it's not much to look at now, select View the report in Layout mode and click Finish.

We'll begin by fixing the field formatting.

Left-align the Sav_Institution field and right-align the others. (Number fields make nice, neat columns only when right-aligned.) With the four Number fields selected, choose Format > Number and apply our standard currency format.

Select the Sav_Institution field again. Set its fill color to the lightest shade of purple and the fill effect to Embossed . The embossed effect will turn it into a raised block, making it stand out nicely .

Select the fill color shown here.

Now we'll adjust the field widths and move them into position.

Increase the width of the Sav_Institution field to 2.250" . (You can do this using the Size palette or by dragging one of the field's right handles.) Increase the width of the Sav_Savings Account field to 1.708" . Set the width of the remaining three fields to 1.389" , and then move them as shown below.

Next, we'll fix the column labels. First, change them to Account, Initial Balance , and Current Balance . Second, right-align their text. Third, align their tops or bottoms with one another and use the cursor keys to position them closer to the Body. Finally, align the right edge of each label with the right edge of its corresponding field.

Delete the black horizontal line that's separating the Sav_Current Balance and Sav_Current Balance Summary fields. If you have difficulty selecting the line (or finding it), increase the magnification by choosing View > Zoom In. (Choose View > Zoom Out to restore normal magnification.)

FileMaker adjusts layout margins based on the selected printer. To see the correct margins, choose File > Page Setup/Print Setup. Select the printer you'll use to print the report, select portrait mode, and click OK.

Now select each placeholder in the Footer and press an arrow key ( or ) several times to nudge the item to a better position within the current margins.

Widen the Date placeholder in the Footer to 1.611" so the date can fully display.

Save changes to the layout by choosing Layouts > Save Layout.