3.3 WebSphere Portal Content Publishing
|
| < Day Day Up > |
|
3.3 WebSphere Portal Content Publishing
The WebSphere Portal Content Publishing (WPCP) system for z/OS and its prerequisites can be divided into three functional environments:
-
WPCP runtime environment:
-
Installed on WebSphere Portal for z/OS as described in Chapter 2, "Portal installation" on page 19.
-
-
WPCP authoring environment consisting of:
-
WPCP authoring server installed on a supported distributed platform.
-
-
WPCP development consisting of:
-
Wizards provided for WebSphere Studio Application Developer installed on a Microsoft platform.
-
The remainder of this chapter deals with the installation of the WPCP authoring and development environments on a distributed platform.
The README and installation guide for WPCP is contained in directory \wpcp\doc on CD-ROM number 36. Further information is available as follows:
-
The Getting Started guide at:
http://publib.boulder.ibm.com/wcmid/mp/v42/helpsystem/en/gspdf.pdf
-
The help system at:
http://publib.boulder.ibm.com/wcmid/mp/v42/helpsystem/en/index.html
3.3.1 Installing the WPCP authoring environment
The WPCP authoring environment is installed on WebSphere Application Server, Advanced Edition 4.0.3 or later, and uses either a DB2 or Oracle database, or the IBM Content Manager, as a data repository. User authentication is done via LDAP or the operating system registry.
Workflow for the authoring environment can be done with either Lotus Workflow installed on Domino Application Server and managed using Lotus Workflow Architect, or Lite Workflow which is provided as part of WPCP.
To install the WPCP authoring environment using the software provided on CD-ROMs with WebSphere Portal on z/OS we installed the following components on a Windows 2000 system:
-
DB2 Enterprise Edition V7.2 with Fixpack 7
-
WebSphere Application Server Advanced Edition V4.0.4
-
WPCP authoring server using Lite Workflow
We performed the following steps to install the authoring environment on a Windows 2000 system.
Install DB2 version 7.2
We installed DB2 Enterprise Edition using CD-ROM number 1 by running setup.exe from directory \db2\win.
Install DB2 fixpack 7
CD-ROM number 10 contains DB2 fixpack 7 which we installed by running setup.exe from directory \db2fp\win.
Configure the JDBC driver to use Java 1.2
Figure 3-3 on page 100 shows the successful completion of configuring the JDBC by running usejdbc2.bat.
WebSphere Application Server Advanced Edition
We used CD-ROM number 17 to install WebSphere Application Server Advanced Edition and ran setup.exe from directory \was\win.
We chose a typical install, which installs IBM HTTP Server, WebSphere Application Server, the Administrative Server, the Administration Console, and JDK 1.3.0.
WebSphere PTF4
CD-ROM number 17 contains WebSphere PTF4 in directory \fixpack4 and we followed the instructions in the directory to install the PTF by running install.bat.
Additional WebSphere fixes
CD-ROM number 17 contains four additional fixes in directory \was\efixes, that we installed by following the instructions in the README supplied for each fix.
Enabling WebSphere security
On completion of installing WebSphere Application Server, PTF4, and the additional fixes, we re-booted the system, started the Administrative Server and Default Server, and then tested whether it was working by browsing to:
-
http://localhost/servlet/snoop
We decided to enable security from the WebSphere Security Console at this stage (because WPCP will need it, once it is installed) and configure the WebSphere Application Server to use the LDAP running on our z/OS system for authentication.
Figure 3-8 on page 108 shows the settings for Authentication in the Security Console specifying our LDAP server on z/OS. Note that we specified a Custom Directory Type, port 2389, suffix dc=ibm,dc=com and host wtsc58.itso.ibm.com® which was our z/OS system for WebSphere Portal.
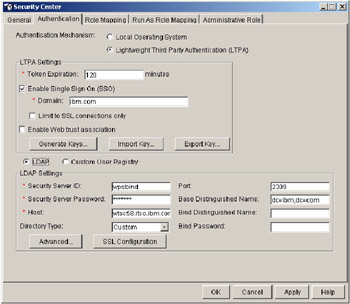
Figure 3-8: Security console settings for Authentication
Finally, because we have specified a custom directory, we clicked on the Advanced button and specified inetOrgPerson in the User Filter as shown in Figure 3-9 on page 109.
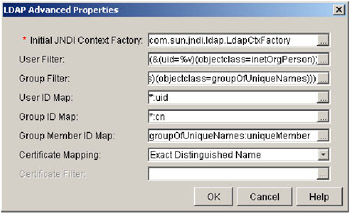
Figure 3-9: LDAP settings WPCP Authoring Server
Installing the WPCP Authoring Server
We started the installation of the WPCP Authoring Server by running wcpinstallwin.exe from directory \wpcp\wcpinstallwin.exe on CD-ROM number 36.
Because we had enabled security in the WebSphere Application Server, we were prompted for the security userid and password and we logged in.
From the installation options screen we selected to install the Authoring Server and Sample.
We selected to install the Authoring Server on the WebSphere Application Server Default Server and default_host.
We selected a Database as the repository and not IBM Content Manager.
For workflow, we selected Lite Workflow, because this is the simplest configuration that does not require installation of Domino Application Server, Lotus Workflow, and Lotus Workflow Architect.
For the authentication mechanism we chose LDAP with settings as shown in Figure 3-10 on page 110.
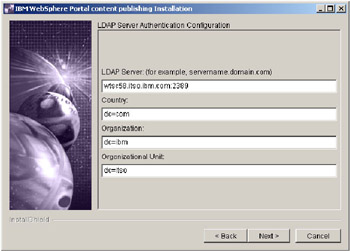
Figure 3-10: WPCP settings for LDAP
| Tip 1: | The suffix settings do not get recorded correctly in the configuration file used to store them and will need to be corrected in the next step after installation. |
| Tip 2: | The release of WebSphere Portal for z/OS, that we tested with, did not support three fields in the LDAP suffix, so although we have entered dc=itso,dc=ibm,dc=com we need to change this after the installation as well. |
We chose the option to pre-compile JSPs and then completed the installation.
Configuring and testing the WPCP Authoring Server
We performed the following post-installation configuration steps:
-
Edited <WAS_ROOT>\wcp\author\WCM.properties to correct the LDAP suffix as follows: wcm.workflow.ldapBase=dc=ibm,dc=com. Note that we have changed this to use only two fields in the suffix.
-
Added users rob, tara, greg, dave and WCPAdmin used by the WPCP sample to the LDAP server running on z/OS.
| Tip | We added users by using the Directory Management Tool that comes with IBM Directory Server and which can be installed from CD-ROM number 20. Alternatively, if WebSphere Portal on z/OS is up and running, then an easy way to do this is by adding users from a browser through the portal interface. |
After stopping and restarting the default_server application server, where we had installed WPCP Authoring Server, we used a browser to access the WPCP system (Figure 3-11) by going to:
-
http://<ourhost>/wps/wcp/index.jsp
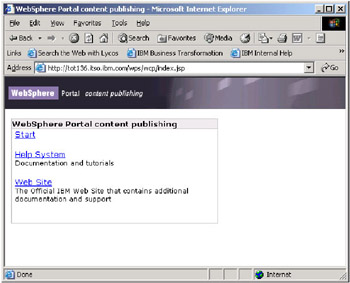
Figure 3-11: WPCP index
By clicking Start and logging in with userid WCPAdmin we accessed the WPCP administrators panel as shown inFigure 3-12 on page 112.
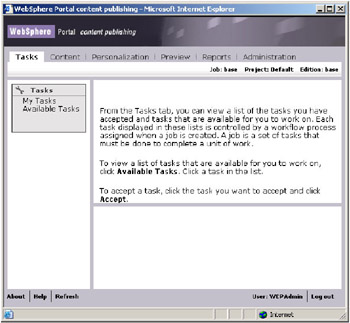
Figure 3-12: WPCP Administration page
Installation of the WPCP Authoring environment is now complete and we recommend that users new to WPCP refer to the Getting Started Tutorial available from the Help System.
Testing the runtime publishing server
Having installed WPCP authoring server on our development system, we wanted to test whether we could publish to the WPCP publisher runtime server running on z/OS. The WPCP publisher runtime installation is covered in 2.7, "WebSphere Portal Content Publishing PTF2" on page 64.
The Getting Started Tutorial available from the WPCP Help System describes a tutorial that can be used with a sample demo that is installed with WPCP authoring. We decided to use this demo, create a project, and publish it to our runtime server on z/OS.
We do not repeat all of the steps from the tutorial here - creating and adding new content, managing workflow between different users - but performed the basic steps needed to create and publish a project. These are the key steps we performed, taken from the tutorial, as follows:
Tutorial step: Setting up the project
We added the WCPDemo example to a new project in our Authoring Server by following the help instructions (Figure 3-13 on page 114).
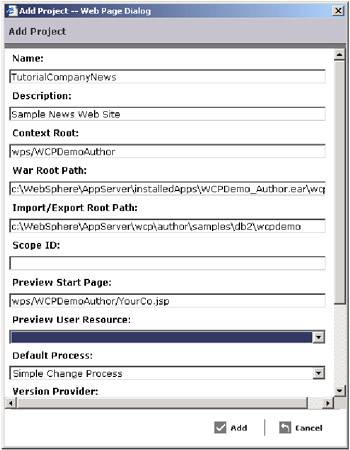
Figure 3-13: Add the sample demo project to WPCP authoring server
Tutorial step: Setting up a publish server
In this step we defined our z/OS WPCP publisher runtime server, that was installed in 2.7, "WebSphere Portal Content Publishing PTF2" on page 64, to the project as shown in Figure 3-14 on page 115.
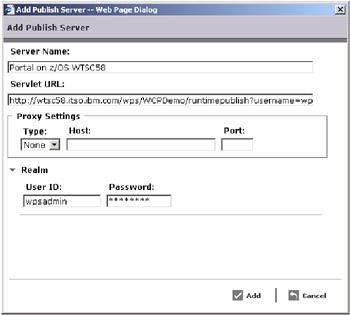
Figure 3-14: Defining the z/OS WPCP publishing server to the authoring server project
Tutorial step: Publishing the project
The next to last step is to actually publish the project from the Authoring server to the Publisher runtime server on z/OS as shown in Figure 3-15 on page 116.
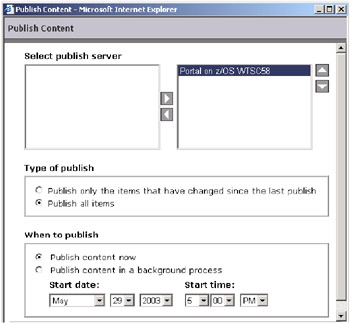
Figure 3-15: Publishing the project to z/OS Portal system
After publishing the project to the WPCP runtime server our final check was to verify that the server was operational and users were able to access the content published from the project. The tutorial describes that this is done by accessing the URL http://<yourruntimeserver>/wps/WCPDemo/YourCo.jsp, which we did as shown in Figure 3-16 on page 117.
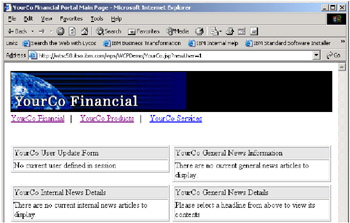
Figure 3-16: WPCP runtime publisher for sample project
Although the displayed published project content is devoid of any information, that was merely because we had not followed all the tutorial steps for adding content to the project from the demo. However, we have proved that we can author content in our development environment and publish it to the z/OS WPCP runtime environment.
3.3.2 Installing the WPCP development environment
To install the WPCP development environment, consisting of plug-ins for WebSphere Studio Application Developer we performed the following steps using the same Windows 2000 system used in 3.2, "Portlet development and debugging" on page 97.
-
Using CD-ROM number 36 we ran wcpinstallwin.exe from directory \wpcp.
-
Selected the WebSphere Studio wizards to be installed as shown in Figure 3-17 on page 118 and completed the installation using the install wizard.

Figure 3-17: Wizard selection for WebSphere Studio -
Verified the installation by checking that the following folders had been created:
-
C:\Program Files\IBM\WebSphereStudio\ApplicationDeveloper\plugins\com.ibm.wcm.resource.wizards
-
C:\Program Files\IBM\WebSphereStudio\ApplicationDeveloper\plugins\com.ibm.wcm.resource.wizards.doc
-
-
Opened WebSphere Studio Application Developer, clicked on Perspective-> Customize, then expanded Other and selected WebSphere Portal content publishing toolbar, and then clicked OK.
-
This results in two WPCP wizards shown in the toolbar of the active Perspective, as shown in Figure 3-18 on page 119.
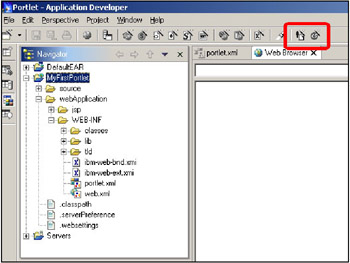
Figure 3-18: WPCP wizards installed for WebSphere Studio
The WPCP development environment for WebSphere Studio was now installed and we recommend that users new to WPCP refer to the section on Wizards in the Developers Guide in the WPCP Help System.
|
| < Day Day Up > |
|