Linking Files
You can link tables from other Access databases-whether the other databases are local or on a network-and work with the data as if these tables were defined in your current Access database. If you want to work with data stored in another database format supported by Access (dBASE, Paradox, or any SQL database that supports ODBC, including Visual FoxPro), you can link the data instead of importing it.
| Note | Although you can import queries, forms, reports, macros, and modules from another Access database file, you cannot link these types of objects. Any object that Access needs to run (rather than simply be a container for data) must be in your local database. |
In most cases, you can read data, insert new records, delete records, or change data just as if the linked file were an Access table in your database. You can also link text and spreadsheet format data so that you can process it with queries, forms, and reports in your Access database. You can only read the data in linked text and spreadsheet files.
This ability to link data is especially important when you need to access data on a host computer or share data from your application with many other users.
| Note | Access 2007 supports linking to dBASE or Paradox versions 5.0 and earlier, and it allows full update if it can find the associated index files. If you need to work with later versions, you must install the Borland Database Engine (BDE). |
Security Considerations
If you attempt to link a file or a table from a database system that is protected, Access 2007 asks you for a password. If the security information you supply is correct and Access successfully links the secured data, Access optionally stores the security information with the linked table entry so that you do not have to enter this information each time you or your application opens the table. Access stores this information in the hidden Connect property of a linked table, so a knowledgeable person might be able to retrieve it by writing code to examine this property. Therefore, if you have linked sensitive information to your Access database and have supplied security information, you should consider encrypting your database. Consult Chapter 25 for information about encrypting your Access database.
If you are linking your database to SQL Server tables and are using Windows domain security, you can set options in SQL Server to accept the Windows domain user ID if the user logs on correctly to the network. Therefore, you won’t need to store security information with the link. If your server contains particularly sensitive information, you can disable this option to guard against unauthorized access from logged on but unattended network workstations.
Performance Considerations
Access 2007 always performs best when working with its own files on your local computer. If you link tables or files from other databases on other computers, you might notice slower performance. In particular, you can expect slower performance if you connect over a network to a table or a file in another database, even if the remote table is an Access table. You won’t see any performance difference if you link to Access tables in another .accdb file on your local computer.
When sharing data over a network, you should consider how you and other people can use the data in a way that maximizes performance. For example, instead of working directly with the tables, you should work with queries on the shared data whenever possible to limit the amount of data you need at any one time. When inserting new data in a shared table, you should use an Access form that is set only for data entry so that you don’t have to access the entire table to add new data.
You can view and set options for multiple users sharing data by clicking the Microsoft Office Button, clicking Access Options, and then clicking the Advanced category in the Access Options dialog box, as shown in Figure 6–12. The original settings for these options are often appropriate when you share data over a network, so it’s a good idea to consult your system administrator before making changes.
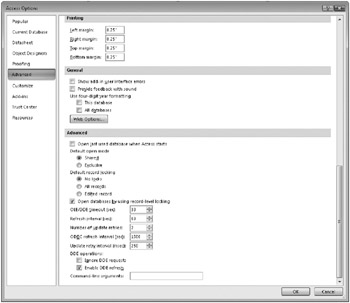
Figure 6–12: In the Advanced section of the Advanced category in the Access Options dialog box, you can set options that affect the performance of linked tables.
One very important consideration is record locking. When Access 2007 needs to update data in a shared file, it must lock the data to ensure that no other computer is trying to write the same data at the same time. You should set options so that records are not locked if you are simply browsing through data. Even if your application frequently updates and inserts data, you should leave Default Record Locking set to No Locks. With this setting, Access 2007 locks individual records only for the short period of time that it is writing the row, so the chance of receiving an update error while two users are trying to update the same row at the exact same time is very small.
If you want to ensure that no one else can change a record that you have begun to update, you should set Default Record Locking to Edited Record. Note, however, that no other user will be able to edit a record that another has begun to change. If a user begins to type a change in a record and then goes off for lunch, no one else will be able to change that record from another computer until that user either saves the row or clears the edit.
| Inside Out-Leave Default Record Locking Alone | We never set either All Records or Edited Record as the default. Either one can cause extra overhead while updating data and can lock out other users unnecessarily. In the rare case that an update conflict occurs with No Locks, Access gives the second user the opportunity to refresh the data and reenter the blocked update. Also, you can set record locking individually in forms and reports. See Chapter 12, “Customizing a Form,” and Chapter 16, “Advanced Report Design,” for details. |
You can set options to limit the number of times Access 2007 will retry an update to a locked record and how long it will wait between retries. You can also control how often Access reviews updates made by other users to shared data by setting the refresh interval. If this setting is very low, Access will waste time performing this task repeatedly.
Access 97 (version 8) and earlier locked an entire 2-KB page each time you updated, inserted, or deleted rows. This meant that only one user could update any of the rows stored physically within the page. The page size in Access 2000 increased to 4. KB, but Access 2000 (version 9) and later also support record-level locking that eliminates locking collisions when two users attempt to update different rows stored on the same data storage page. Unless you are designing an application that frequently needs to update hundreds of rows at a time (for example, with action queries), you should leave the Open Databases By Using Record-Level Locking check box selected.
Linking Access Tables
To link a table from another Access database to your database, do the following:
-
Open the Access database to which you want to link the table. If that database is already open, close any objects so that only the Navigation Pane is visible.
-
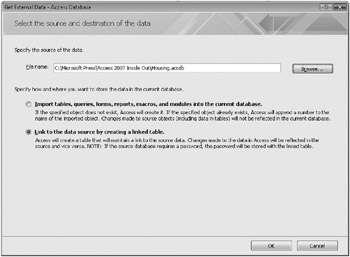
On the External Data tab, in the Import group, click the Access command, and then select Link To The Data Source By Creating A Linked Table in the Get External Data-Access Database dialog box shown next.
-
Click the Browse button to open the File Open dialog box shown earlier on page 262, which lists the types of databases you can link. Select the folder and the name of the .accdb, .mdb, .mda, .accda, .mde, or .accde file that contains the table to which you want to link. (You cannot link tables from an .adp or .ade file because those are actually tables in SQL Server-use an ODBC link to the server directly as explained in “Linking SQL Tables” on page 301.) If you’re connecting over a network, select the logical drive that is assigned to the network server containing the database you want. If you want Access to automatically connect to the network server each time you open the table, type the full network location (also known as the UNC or Universal Naming Convention name) in the File Name box instead of selecting a logical drive. For example, on a Windows network you might enter a network location such as
\\dbsvr\access\shared\northwi nd.accdb
After you select the Access database file you want, click the Open button to return to the Get External Data-Access Database dialog box, and then click OK to see the tables in that database.
-
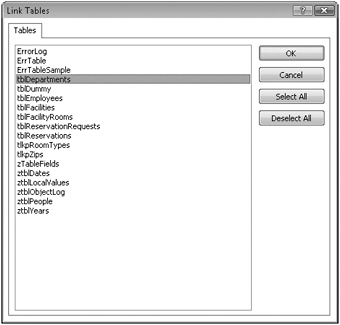
Access opens the Link Tables dialog box, shown next, which lists the tables available in the database you selected. Select one or more tables, and click OK to link the tables to the current database. If the link procedure is successful, the new table will have the name of the table you selected.
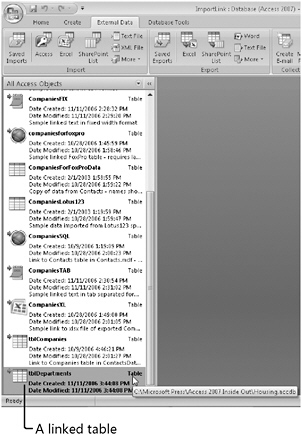
Access marks the icon for linked tables in the Navigation Pane with an arrow, as shown next. If Access finds a duplicate name, it generates a new name by adding a unique integer to the end of the name as described earlier. Because objects such as forms, reports, macros, and modules might refer to the linked table by its original name, you should carefully check name references if Access has to rename a linked table.
| Inside Out-Keeping the Connect Property Current | One problem with using linked data in an application that you’re going to distribute to someone else is the location of the linked files on your computer might not be exactly the same as it is on your user’s computer. For example, the internal Connect property might point to D:\MyDatabases\MyData.accdb, but your user installs the application on the C drive. You might have noticed that a form always opens when you open the Conrad Systems Contacts sample database and that it takes a few seconds before it returns you to the Navigation Pane. We wrote code behind this initial form that verifies the table links and fixes them. You can learn how we built this code in Chapter 25. |
Linking dBASE and Paradox Files
Linking files from a foreign database is almost as easy as linking an Access table. To link to a file from dBASE or Paradox, do the following:
-
Open the Access database to which you want to link the file. If that database is already open, close any objects so that only the Navigation Pane is visible.
-
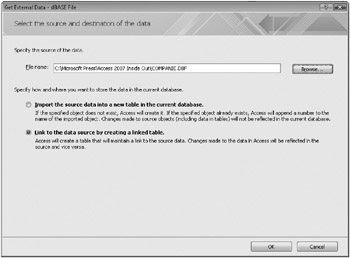
On the External Data tab, in the Import group, click the More command, and then click dBASE File or Paradox File, as appropriate. Select Link To The Data Source By Creating A Linked Table in the Get External Data-dBASE File (or Get External Data-Paradox File) dialog box, as shown next.
-
Click the Browse button to open the File Open dialog box shown earlier on page 262, which lists the types of dBASE or Paradox files to which you can link. Select dBASE III, dBASE IV, dBASE 5, or Paradox, as appropriate, in the list to the right of the File Name box, and then select the folder and the name of the file to which you want to link. If you’re connecting over a network, select the logical drive that is assigned to the network server that contains the database you want. If you want Access to automatically connect to the network server each time you open the linked file, type the full network location in the File Name box instead of selecting a logical drive. For example, on a Windows network you might enter a network location such as
\\dbsvr\dbase\shared\newstore.dbf
-
Click the Open button to return to the Get External Data-dBASE File dialog box, and then click OK to link to the selected dBASE or Paradox file.
-
If you selected an encrypted Paradox file, Access opens a dialog box that asks you for the correct password. Type the correct password and click OK to proceed, or click Cancel to start over. If the link procedure is successful, the new table will have the name of the file you selected (without the file name extension). If Access finds a duplicate name, it will generate a new name by adding a unique integer to the end of the name.
Linking Text and Spreadsheet Files
Linking a text file or an Excel spreadsheet file is almost identical to importing these types of files, as discussed earlier in this chapter. (You cannot link Lotus 1-2-3 files; you can only import them.) As noted, you can only read linked text and Excel spreadsheet files.
To link a spreadsheet file or a text file, do the following:
-
Open the Access database to which you want to link the file. If that database is already open, close any objects so that only the Navigation Pane is visible.
-
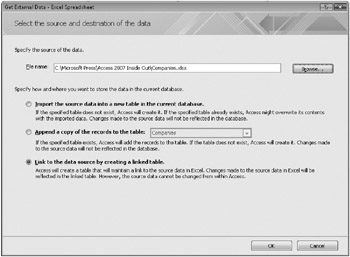
On the External Data tab, in the Import group, click the Excel or Text File command. Select Link To The Data Source By Creating A Linked Table in the Get External Data dialog box, as shown here.
-
Click the Browse button to open the File Open dialog box shown earlier on page 262. Select the folder and the name of the file to which you want to link. If you’re connecting over a network, select the logical drive that is assigned to the network server that contains the database you want. If you want Access to automatically connect to the network server each time you open the linked file, type the full network location in the File Name box instead of choosing a logical drive, path, and file name. For example, on a Windows network you might enter a network location such as
\\fi1esvr\excel\shared\compani es.xlsx
-
Click the Open button to return to the Get External Data dialog box, and then click OK to start the Link Spreadsheet Wizard or the Link Text Wizard.
-
Follow the steps in the wizard, which are identical to the steps for importing a spreadsheet or text file, as described earlier in this chapter.
| Caution | You can have the same problems with delimiters, text qualifiers, data types, and primary keys noted under importing. You might need to correct or reformat the data in your text or spreadsheet file to be able to successfully link to it. For example, if Access guesses the wrong data type for a column in an Excel file, you will see #Error in fields that have the incorrect data type. |
Linking SQL Tables
To link a table from another database system that supports ODBC SQL, you must have the ODBC driver for that database installed on your computer. Your computer must also be linked to the network that connects to the SQL server from which you want to link a table, and you must have an account on that server. Check with your system administrator for information about correctly connecting to the SQL server.
If you have SQL Server 2005 installed or have downloaded and installed SQL Server 2005 Express Edition, you already have an SQL server at your disposal. See the Appendix for instructions about how to install SQL Server 2005 Express Edition. One of the best ways to be sure SQL Server is running on your computer is to use the SQL Server Configuration Manager. You can start the Configuration Manager from the Windows Start menu in the Configuration Tools folder under Microsoft SQL Server 2005. You can also start the Configuration Manager by running C:\Windows\System32\SQLServerManager.msc. In the Configuration Manager, choose SQL Server 2005 Services and be sure the SQL Server (MSSQLSERVER) service is marked as Running. If it is not running, right-click the service name and click Start on the shortcut menu.
To link an SQL table, do the following:
-
Open the Access database to which you want to link the SQL table. If that database is already open, close all open objects so that you see only the Navigation Pane.
-
On the External Data tab, in the Import group, click the More command, and then click ODBC Database. Access opens the Get External Data-ODBC Database dialog box. Make sure the Link To The Data Source By Creating A Linked Table option is selected and then click OK.
-
Access opens the Select Data Source dialog box, shown earlier on page 267, in which you can select the data source that maps to the SQL server containing the table you want to link. Select a data source, and click OK. If you don’t see the data source you need, see “Creating a Data Source to Link to an ODBC Database” on page 255 for instructions. The ODBC driver displays the SQL Server Login dialog box for the SQL data source that you selected if the server is not set up to accept your Windows login. If you are linking to a Visual FoxPro database or file, the ODBC driver displays the Configure Connection dialog box.
-
When you are required to enter a login ID and password, and if you are authorized to connect to more than one database on the server and you want to connect to a database other than your default database, enter your login ID and password. Then click the Options button to open the lower part of the dialog box. When you click in the Database box, Access logs on to the server and returns a list of available database names. Select the one you want, and click OK. If you don’t specify a database name and if multiple databases exist on the server, Access will connect you to the default database for your login ID.
Troubleshooting

You can’t connect to a specific database using trusted authentication because you use more than one data source.
When you connect to a server using trusted authentication (your Windows user ID), you automatically connect to the database specified in the data source. You might need to create more than one data source if you need to connect to more than one database on that server. See “Creating a Data Source to Link to an ODBC Database” on page 255 for details about defining ODBC data sources.

For Visual FoxPro, specify the database name or FoxPro file folder and click OK.
When Access connects to the server or Visual FoxPro database, you’ll see the Link Tables dialog box, similar to the Import Objects dialog box shown earlier on page 269, which lists the available tables on that server.
-
From the list of tables, select the ones you want to link. If you select a table name in error, you can click it again to deselect it, or you can click the Deselect All button to start over. Click OK to link to the tables you selected.
-
If the link procedure is successful, the new table will have the name of the SQL table or Visual FoxPro file (without the file name extension). If Access finds a duplicate name, it will generate a new name by adding a unique integer to the end of the name.
Modifying Linked Tables
You can make some changes to the definitions of linked tables to customize them for use in your Access 2007 environment. When you attempt to open the table in Design view, Access opens a dialog box to warn you that you cannot modify certain properties of a linked table. You can still click OK to open the linked table in Design view.
You can open a linked table in Design view to change the Format, Decimal Places, Caption, Description, and Input Mask property settings for any field. You can set these properties to customize the way you look at and update data in Access forms and reports. You can also give any linked table a new name for use within your Access database (although the table’s original name remains unchanged in the source database) to help you better identify the table or to enable you to use the table with the queries, forms, and reports that you’ve already designed.
Changing a table’s design in Access has no effect on the original table in its source database. However, if the design of the table in the source database changes, you must relink the table to Access. You must also unlink and relink any table if your user ID or your password changes.
Unlinking Linked Tables
It is easy to unlink tables that are linked to your Access database. In the Navigation Pane, simply select the table you want to unlink and then press the Delete key or click the Delete command in the Records group on the Home tab of the Ribbon. Access displays the confirmation message shown in Figure 6–13. Click Yes to unlink the table. Unlinking the table does not delete the table; it simply removes the link from your table list in the Navigation Pane.

Figure 6–13: Access displays a message to confirm that you want to unlink a table.
| Note | If you click the Cut command in the Clipboard group on the Home tab of the Ribbon to unlink a table, Access does not display the confirmation message shown in Figure 6–13. |
Using the Linked Table Manager
If you move some or all of your linked tables to a different location, you must either delete your linked tables and relink them or update the location information before you can open the tables. You can easily update the location information in the table links by using the Linked Table Manager. To use this handy utility, open the database that contains linked tables that you need to relink, and on the Database Tools tab, in the Database Tools group, click the Linked Table Manager command. The utility opens a dialog box that displays all the linked tables in your database, as shown in Figure 6–14. Simply select the check boxes for the ones that you think need to be verified and updated, and then click OK. If any linked table has been moved to a different location, the Linked Table Manager prompts you with a dialog box so that you can specify the new file location. You can also select the Always Prompt For New Location check box to verify the file location for all linked tables.
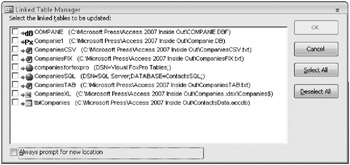
Figure 6–14: You can use the Linked Table Manager to correct links to files that have moved.
Now you have all the information you need to import and link data using Access 2007. For information on how to export data see Article 3, “Exporting Data,” on the companion CD.
EAN: 2147483647
Pages: 234