Defining Switchboard Forms
Usually the last forms that you build are the switchboard forms that give the user direct access to the major tasks in your application.
Designing a Switchboard Form from Scratch
Your main switchboard form should be a simple form with a logo, a title, and perhaps as many as eight command buttons. The command buttons can be used to open the forms that you defined in the application. Figure 24–10 shows the main switchboard form for the Conrad Systems Contacts database in Design view.
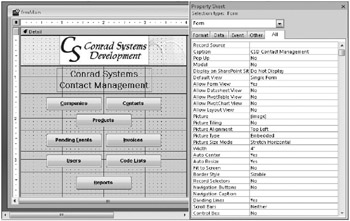
Figure 24–10: The main switchboard form for the Conrad Systems Contacts database has command buttons to guide users through the application.
One feature worth mentioning here is the use of the ampersand (&) character when setting each control’s Caption property. You can use the ampersand character to define a shortcut key for the control. In the Caption property for the Companies command button, for example, the ampersand precedes the letter C. The letter C. becomes the shortcut key, which means that you can choose the Companies button by pressing Alt+C as well as by more traditional methods such as clicking the button with the mouse or tabbing to the button and pressing the Spacebar or the Enter key. You must be careful, however, not to duplicate another shortcut key letter. For example, the shortcut key for the Contacts command button in this example is O, to avoid conflict with the C. access key for the Companies command button.
| Inside Out-Let Access Show You Any Keyboard Shortcut Duplicates | If you select the Check For Keyboard Shortcut Errors check box in the Error Checking section in the Object Designers category in the Access Options dialog box, Access displays a smart tag next to any command button or label that has a duplicate shortcut key defined. |
You can use a shortcut key to make it easier to select any control that has a caption. For command buttons, the caption is part of the control itself. For most other controls, the caption is in the attached label. For example, you can define shortcut keys to select option buttons or toggle buttons in an option group by including an ampersand in the caption for each button in the group.
For each command button, you need a simple event procedure to handle the Click event and to open the appropriate form. Here is the procedure for the Products button:
Private Sub cmdProducts_C1ick() ' Open the Product edit/create form DoCmd.OpenForm "frmProducts" End Sub
If you have a custom Ribbon, you should set the Ribbon Name property of your switchboard form to point to the name of the custom Ribbon. If you also have a custom Ribbon used for data entry forms, you should set the form’s Ribbon Name property to it. In the Conrad Systems Contacts and Housing Reservations applications, a single custom Ribbon is used for all data entry forms, and a different Ribbon is used for navigation forms-such as frmCodeLists, frmProductReports, and frmSignOn.
Using the Switchboard Manager to Design Switchboard Forms
If your application is reasonably complex, building all the individual switchboard forms you need to provide the user with navigation through your application could take a while. Access has a Switchboard Manager utility that helps you get a jump on building your switchboard forms. This utility uses a creative technique to handle all switchboard forms by dynamically modifying a single form. It uses a driver table named Switchboard Items to allow you to define any number of switchboard forms with up to eight command buttons each. Information in the table tells the code behind the switchboard form how to modify the buttons displayed and what to do when the user clicks each of the buttons.
| Note | The Conrad Systems Contacts application (Contacts.accdb) has a SwitchboardSample form that we created with the Switchboard Manager. Because we renamed the objects and fixed the embedded macros behind the SwitchboardSample form to use the SwitchboardDriver table, you can’t use the Switchboard Manager to modify this form. You can open the SwitchboardSample form to see how a form built by the Switchboard Manager works, and you can follow along with the steps in this chapter to build your own switchboard. |
To start the Switchboard Manager, click the Switchboard Manager button in the Database Tools group on the Database Tools tab. The utility checks to see whether you already have a switchboard form and a Switchboard Items table in your database. If you don’t have these, the Switchboard Manager displays the message box shown in Figure 24–11, which asks you whether you want to build them.

Figure 24–11: This message box appears if the Switchboard Manager does not find a valid switchboard form and Switchboard Items table in your database.
Click Yes to allow the Switchboard Manager to continue. After it builds a skeleton switchboard form and a Switchboard Items table (or after it establishes that you already have these objects in your database), it displays the main Switchboard Manager window. Unless your application is very simple, you won’t be able to provide all the navigation your users need on one switchboard with eight options-especially considering that you should use one of the options to provide a way for the user to exit the application. So, you should plan additional switchboards that the user can navigate to from the main switchboard. One way to lay out the additional switchboards is to plan one switchboard for each major subject or group of similar features in your database.
You should first define all the switchboards that you need (called pages in the Switchboard Manager) because a page must be defined before you can create a button to navigate to or from the page. To build an additional switchboard page, click the New button, and enter a name for the new switchboard in the Create New dialog box, as shown in Figure 24–12. Click OK to create the page.
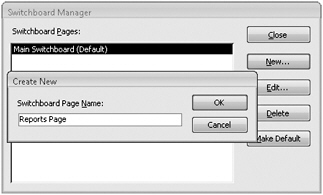
Figure 24–12: To add a switchboard page to the main switchboard form, click the New button, and give your page a name.
After you create the additional switchboard pages that you need, you can select one in the main Switchboard Manager window and click the Edit button to begin defining actions on the page. You’ll see a window similar to the one shown in the background in Figure 24–13. Use this window to create a new action, edit an existing action, or change the order of actions. Figure 24–13 shows a new action being created. When you create a new action, the Switchboard Manager places a button on the switchboard page to execute that action. In the Text box, enter the caption that you want displayed next to the button. (Note that if you enter an ampersand (&) before one of the letters in the caption to make that letter the access key for the button, the switchboard form does not recognize it as a keyboard shortcut.) Choose the action you want from the Command drop-down list. The Switchboard Manager can create actions such as moving to another switchboard page, opening a form in add or edit mode, opening a report, switching to Design view, exiting the application, or running a macro or a Visual Basic procedure. If you choose an action such as opening a form or report, the Edit Switchboard Item dialog box shows you a list of appropriate objects in the second drop-down list.
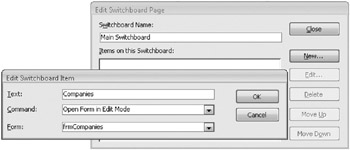
Figure 24–13: Click the New button to create a new action on a switchboard page.
On the main switchboard page, you should create actions to open other pages and an action to exit the application. On each subsequent page, you should always provide at least one action to move back through the switchboard-page tree or to go back to the main switchboard page, as shown in Figure 24–14.
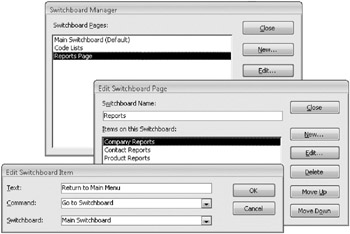
Figure 24–14: Make sure you create an action to return to the main switchboard form from another switchboard page.
On the SwitchboardSample form, we created buttons to open Companies, Contacts, Products, Pending Events, and Invoices. We also created buttons to open pages to show code lists that can be edited and the available reports. On the Code Lists page, we added entries to open Contact Types, Event Types, Product Categories, Person Titles, Person Suffixes, and Users. We also added a button to return to the main menu. On the Reports page, we added entries to open Company Reports, Contact Reports, and Product Reports as well as a button to return to the main menu.
After you finish, the Switchboard Manager saves the main switchboard form with the name Switchboard. You can rename this form if you want. If you want to rename the Switchboard Items table, be sure to edit the embedded macro in the On Open property of the Switchboard form so that it refers to the new name. You’ll also need to change the record source of the form and edit the embedded macro in the On Click property of both the Optionl command button and the OptionLabel1 text box control.
Figure 24–15 shows an example Switchboard form for the Conrad Systems Contacts database (the SwitchboardSample form). We edited the form design to add the Conrad Systems logo. You can further customize the look of this form as long as you don’t remove an option button or attached label or change the names of these controls.
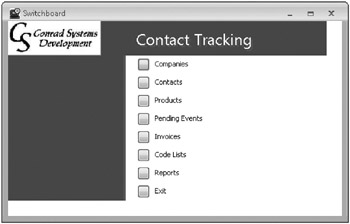
Figure 24–15: The main switchboard form of our example shows options to other areas of the application.
We personally prefer to design our own switchboard forms so that we can add specialized code behind some of the command buttons. But you can see that the Switchboard Manager is a handy way to quickly design a complex set of switchboard pages without a lot of work.
EAN: 2147483647
Pages: 234