| One of the issues I've had with earlier versions of Visual Studio is the inability to create SQL queries to incorporate the T-SQL in an ad hoc query or to simply query the database to sample the data or test performance. While Microsoft has incorporated the Query Designer in a number of earlier versions (clear back to earlier versions of Visual Basic), it was not always easy to find. In Visual Studio 2005, the Query Designer can be addressed from a number of places. You'll be able to get to it when customizing a Visual Studio Data Source, creating the SQL for a stored procedure, creating a "DataSet" for a BI report, and here in the Server Explorer. IMHO Yes, the Query Designer used to be called the Query Builder. Tomorrow, there's no way to predict what it will be called.
I expect that you might be familiar with the Query Designer by now, and I don't want to kill any more trees than absolutely necessary as I teach you how to use it. However, I do want to discuss a few new features that you'll find useful and a few other (sinister) issues[11] that might bite you in the butt as you walk by. Let's walk through a number of typical scenarios. [11] One of these issues was pointed out to Peter as he worked on a Reporting Services dataset. His wife saw a mistake as she passed by (vacuuming the room).
Getting Familiar with the Query Designer Navigate to the Server Explorer, right-click the Table (or View) icon, and choose "New Query". This opens a four-pane tabbed window (see Figure 4.57) and a dialog that asks which tables should be included in the query. Figure 4.57. Setting up the Query Designer. 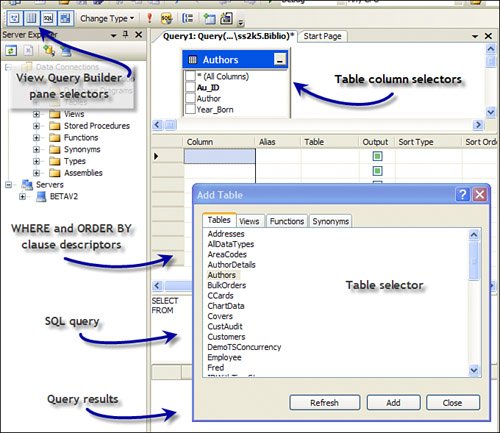
Here's your first trick: If you want to create a query window and don't really care about the graphical part, click "Close" on the Add Table dialog without selecting any tables. This opens a blank "diagram" (top) window (what I call the table column selector). Use the pane selectors to turn off all of the windows except the SQL and query results windows. At this point, you can enter a query in the SQL window, and while the Query Designer might complain that it can't create a graphical representation of your query, clicking OK executes the query anyway and returns the rows affected or rowset in the query results window. The Query Designer Panes Note that the four panes can be toggled on and off with the pane selectors, the Query Designer menu, or keyboard shortcuts. As you modify each pane, the Query Designer attempts to build a SQL query and change the other panes to match these changes. For example, as you select columns in a table column selector (the top pane that Microsoft calls the "Diagram" pane), the SELECT statement is coded to include these columns and the "criteria" pane (the second pane from the top) reflects these changes as well. The columns are placed in the SELECT clause and the "criteria" pane based on the order in which they are checked off in the column selector. If you choose more than one table to include in the query in the "Diagram" pane (from the Table selector), the Query Designer creates appropriate (and sometimes inappropriate) JOIN syntax to return the SQL product. This is the issue that Peter's wife pointed out. Because the Query Designer creates one or more JOIN statements for each possible relationship, if you aren't careful, it can get a bit too aggressive and create JOIN statements that don't really make sense. The Criteria Pane The "criteria" (second) pane also determines which columns are included and aliased, and which order they appear in the SELECT. This pane also permits you to set the ORDER BY clause as well as the WHERE clause criteriaup to a point. To change the order in which rows are returned, set the "Sort Type" for the column(s) that you wish to sort by. You can change the sequence of this sort by setting the Sort Order. For example, you can sort on Year_Born and then by Author name. The Filter criteria column is used to generate the WHERE clause criteria. This permits you to specify criteria that must be met for each column for which you need to test. For example, you can set the Filter on the Year_Born column to accept only authors born in1947 (a good year for authors). The Filter criteria also includes several "Or" columns that can be used to add filters to your WHERE clause. These settings are shown in Figure 4.58. Figure 4.58. Configuring the WHERE and ORDER BY clauses with Sort and Filter. 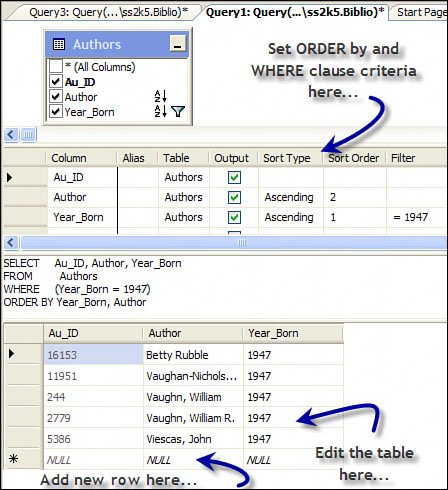
Eventually, you'll discover that the Query Designer has indeterminate limits, so as your query gains in complexity, you'll find that the generated SQL stops working as expected. The SQL Pane The "SQL" query pane (third from the top) shows the generated SQL. The SQL dialect used matches that of the selected data provider. Yes, you can directly edit the generated SQL, but if you make a mistake (or the Query Designer simply can't understand the SQL), the Query Designer returns an error. I often find it handy to copy and paste from the SQL pane when I need to build a SQL string to paste directly into a prototype query in our code. The query results pane (bottom pane) shows the results of the query after you click the "Execute Query" button (see Figure 4.59). This pane also permits you to change the database table in question if the query addresses a single table. Figure 4.59. The Query Designer toolbar. 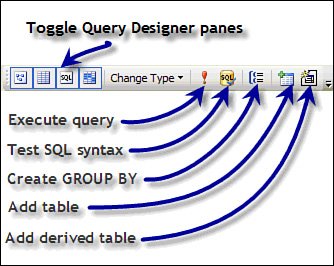
You can also validate your hand-coded SQL by clicking the Test SQL Syntax button. You can also incorporate a GROUP BY clause or a derived table in the T-SQL by clicking the appropriate buttons in the Query Designer toolbar. What's a "Derived" Table? One of the other options in the Query Designer toolbar is "Add Derived Table". Simply put, a "derived" table is not unlike what I call a "subquery". It's a SELECT statement that returns an in-memory rowset referenced as a database table or VIEW in a query. Derived tables are saved (only) in memory and not persisted to the database. Think of a derived table as a temporary rowset that lives for the duration of the query. This approach can simplify your query by permitting you to gather rows to join in a separate phrase. For example, the following query (see Figure 4.60) uses a derived table to return a rowset from the TitleAuthor table and use it to JOIN with the Authors table. Figure 4.60. Using a derived table. 
Changing the Query Type Sure, I expect that only some of the queries you'll want to generate are SELECT queries. The Query Designer is capable (to an extent) of creating action commands as well. Let's walk through these options, as you'll find them useful in many circumstances as you manage your database. The Change Type drop-down (see Figure 4.61) permits you to select one of six options. Note that the Filter and other criteria settings are made available in these other query types where it makes sense. Figure 4.61. The Change Type options for the Query Designer. 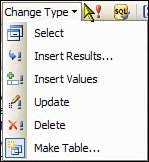
Select: The "Select" query type generates a SELECT query, which I've already discussed. However, we need to revisit this for a minute, as I didn't talk about how to change the JOIN behavior. When you drag two or more tables to the diagram pane, the Query Designer scans the tables looking for matching column names. If it finds a match, it codes an SQL JOIN to interrelate the tables. For example, if I drag the Titles and Title_Author tables to the diagram pane, the Query Designer creates an INNER JOIN between the ISBN columns, as shown in Figure 4.62. Figure 4.62. The Query Designer creates an INNER JOIN by default on matching columns. 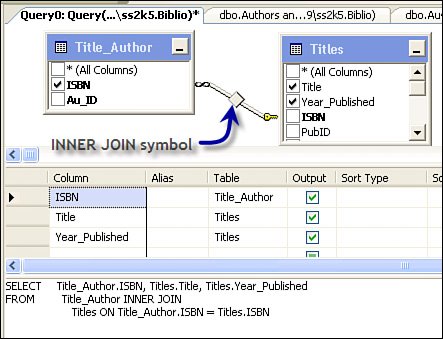 Okay, but what if that's not the type of JOIN you want to use between the two tables? Well, the Query Designer permits you to alter the SQL JOIN generated by a couple of techniques. | | 1. | First, hover over the INNER JOIN symbol (as shown in Figure 4.63). This displays the current JOIN configuration.
Figure 4.63. The Query Designer showing how the JOIN is configured.  | | | 2. | Next, right-click the join graphic. This opens a selection dialog that lets you choose the type of JOIN to generate, as shown in Figure 4.64.
Figure 4.64. Choose the type of JOIN from the selection dialog. 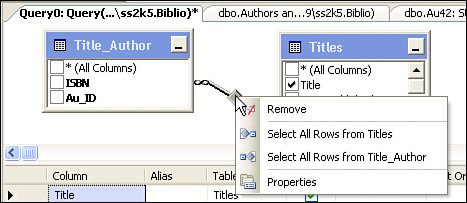 By using the GUI interface in the Query Designer you can choose whatever JOIN makes sense for your query. However, there is yet another way to set up the JOIN.
| | | 3. | Choose "Properties" from the JOIN-type dialog (shown in Figure 4.64). This opens the Visual Studio properties page for the Query Designer Join Condition and Type, as shown in Figure 4.65.
Figure 4.65. The JOIN properties page. 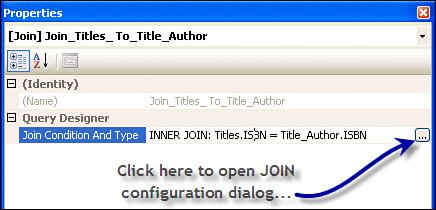 | 4. | Click on the ellipsis (...) button to expose the JOIN configuration dialog, shown in Figure 4.66. From here, you can choose from a list of expressions to construct the JOIN. Again, it's up to you to decide what makes sense for your query. Any change you make here is reflected in the graphic diagram tab, as well as in the generated SQL in the SQL tab in the Query Designer.
Figure 4.66. The JOIN configuration dialog. 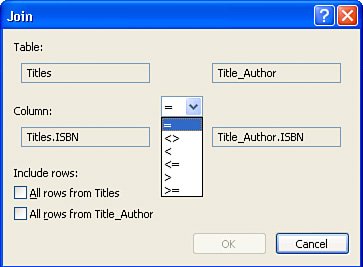 We're ready to move on to the other types of queries that the Query Designer can generate.
|
Insert Results...: This query type is useful to extract a subset of the rows from one table (or query JOIN product) and insert them into another (permanent) table. Once you select a source table, you can use the Insert Results query type to insert all or a subset of rows into another target table (assuming it has a compatible schema), as shown in Figure 4.67. You can also use this query type to insert rows from the product of a JOINsimply select multiple tables and make sure the JOIN syntax returns the appropriate rows and columns to match the target table. Setting up the Insert Results query is fairly easy: 1. | Choose the source table(s) using the Add Table dialog. These are added to the diagram pane.
| 2. | Choose appropriate columns in the source table(s) in the diagram pane.
| 3. | Once the Insert Results query type is selected, you're prompted for the target table. Make sure its schema matches that of the source table or JOIN product.
| 4. | Set any Filter criteria to generate a WHERE clause that returns only the desired rows.
| 5. | Add whatever columns you need to the criteria pane (non-output) to further filter the source rows.
| | | 6. | Add whatever TOP or other WHERE clause arguments are needed to limit the number of rows inserted into the target table.
Figure 4.67. Insert Results Query type. 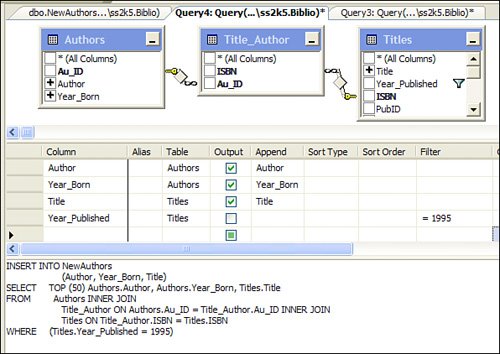 In the example in Figure 4.70, I join three tables (Authors, Title_Author, and Titles) and return columns from Authors and Titles. I added a filter on Year_Published in the Filter pane to restrict the rows returned to just authors whose books were published in 1995. In a practical sense, this Filter value should probably be handled as a query parameter. When the Insert Results query is executed, Visual Studio returns a "rows affected" message. In the example in Figure 4.70, I join three tables (Authors, Title_Author, and Titles) and return columns from Authors and Titles. I added a filter on Year_Published in the Filter pane to restrict the rows returned to just authors whose books were published in 1995. In a practical sense, this Filter value should probably be handled as a query parameter. When the Insert Results query is executed, Visual Studio returns a "rows affected" message.
Okay, let's change the criteria for Year_Published to "@YearWanted" (see Figure 4.68). By preceding the filter value with an "@", I indicate that I want this value captured as a parameter and that the SQL is to be modified to accept this parameter at runtime.
Figure 4.68. Using an input parameter in an Insert Results query. 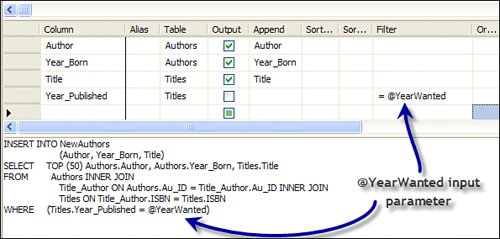 Now, when the query is executed, Visual Studio prompts us for the input parameter, as shown in Figure 4.69. Visual Studio remembers the value you used from the previous execution but defaults to NULL. You might want to phrase your query to "ignore" the input parameter if the value passed in the parameter is NULL or some special string. Now, when the query is executed, Visual Studio prompts us for the input parameter, as shown in Figure 4.69. Visual Studio remembers the value you used from the previous execution but defaults to NULL. You might want to phrase your query to "ignore" the input parameter if the value passed in the parameter is NULL or some special string.
Figure 4.69. Visual Studio prompts for query parameters. 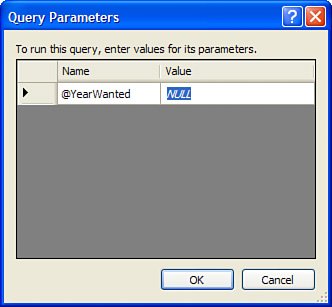 |
Insert Values: This query type generates a single INSERT statement, as shown in Figure 4.70. For this query type, you'll need to choose the columns that are to accept new values. Don't select any Identity or Timestamp columns, as the Query Builder blindly assumes you know what you're doing. Set the values for each of the columns selected in the (top) "diagram" pane. These values can be literals, dates, numbers, or expressions, but the value must match the datatype and size of the target datatype, as dictated by the table schema definition. This means that the dates must be valid and strings must be no longer than the string length defined for the target column, and the numbers you supply must conform to the range limits defined for the target datatype. Figure 4.70. The Insert query type. 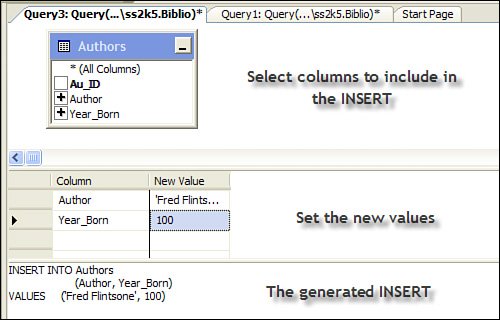 Unfortunately, someone at Microsoft was asleep when they wrote the Insert Values and Update query type Command Builder code. The problem occurs when you fill in the "criteria" pane with New Column values: The CommandBuilder routine that captures these values doesn't know how to deal with the "O'Malley" issue. For instance, if you enter the name "George O'Malley" as a New Value, the Query Designer strips the interior single quote instead of doubling it up (as it should). This means that if you don't catch it, Visual Studio creates an INSERT statement and sets the Author name to "George OMalley". Thankfully, George is used to this abusebut his wife is not, so you had best fix it before she finds out. When working with the Query Designer and Input Values or Update query types (and you have embedded special characters in a string literal), you'll need to "double" up the special characters to get them to work correctly. So to fix George, I need to enter his name as "George O''Malley"and don't forget about his wife. Nope, I don't expect you'll use the Insert Values query type oftenat least, not from the Visual Studio IDE. It's useful, however, to remind you of the correct INSERT query syntax so you can paste the (corrected) T-SQL into your application's ad hoc commands. As with the Insert Results query, you can set the criteria pane to prompt for input parametersthese values are fed to the INSERT statement at runtime. Most of these query types accept input parameters as placeholders for Filter criteria and some other values (such as the TOP operand that limits the number of rows returned by the query). Fortunately, the code to manage inbound parameters knows how to deal with the "O'Malley" issueso does ADO.NET (assuming you use a Command object with input parameters). Update: This query type is used to generate a single T-SQL UPDATE statement. Let's step through the process of setting up an Update query type. 1. | Click the Table (or View) icon in the Server Explorer and choose "New Query".
| 2. | Select the database table to update.
| 3. | Choose the column(s) to change. Note that the PK column is not shown as updateable. As a general principle, you should never change the PK, as this violates fundamental relational database principles. If you need to change the PK, you should drop (delete) the row and add (insert) it with a new PK.
| | | 4. | In the criteria pane, choose the PK column from the drop-down list and set the Filter to select the row(s) that are to be updated. If you don't specify a set of rows to change, all rows are updatedgenerally, this is not desirable. Sure, you can also set the Filter value for one or more of the columns to be updated.
In this case, I'm updating any row with the author name (Author) of "Fred Flintstone" and Year_Born = 100 or with a PK (Au_ID) of 99999. Note that when you enter more than one value in the Filter column, the SQL logic uses "AND" to combine the logic. If you want an alternative (OR) Filter, enter the value in one of the Or... columns. Check out the SQL in Figure 4.71. Note how the WHERE clause is constructed using the Filter expressions and how the AND and OR clauses are generated.
Figure 4.71. Using more complex AND/OR logic in an Update query type. 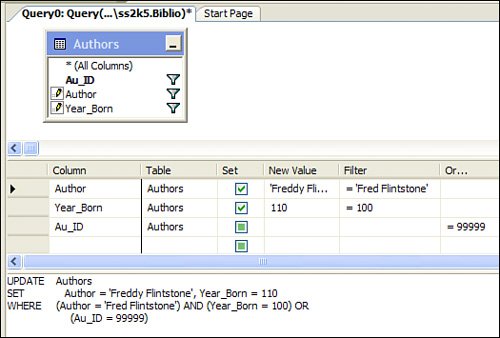 | 5. | In the criteria pane, set New Value to the new value to be set for the specific row(s) targeted in the Filter criteria. Yes, these values can be set up to accept parameters as described earlier.
| 6. | Click the "Run" icon when you're ready to make the change.
|
Delete: The delete query type is designed to construct a simple DELETE SQL statement that (like the update query type) can delete a specific row or an entire set of rows. The questions you need to ask when deleting rows from your database table include: Is the row you're deleting a parent of a parent/child (PK/FK) relationship? Remember, you should not delete parents that have children (FK-related rows). Yes, you can program SQL Server to "cascade" deletes so children are automatically deleted when parents are deleted. Are you deleting all of the rows in a table? If so, it's probably faster to execute the T-SQL TRUNCATE TABLE command. Do you want to be able to roll back this change? That is, is this delete part of another T-SQL operation that must succeed before the row(s) is deleted? If so, consider use of transactions that wrap the delete statement with the other interdependent (atomic) statements. Have you considered simply updating the database to mark "deleted" rows instead of removing them from the database? This might be faster to execute and leave the rows around so they can be "undeleted" later.
In this example (see Figure 4.72), I simply changed the query type from the previous update query type example. Notice how the SQL is morphed to keep the WHERE clause but discard the SET statements. Figure 4.72. Configuring the delete query type. 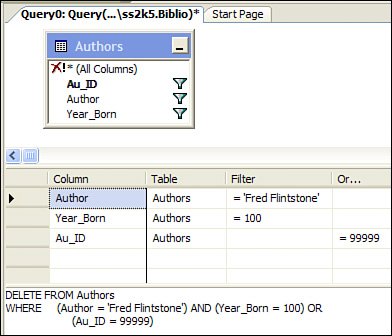 Make Table...: When you want to create a new table from a rowset or product created by a SELECT query, you can choose the make table query type. In this case, you'll be prompted for the new target table. Nope, this query type won't work if the target table already existsyou'll need to use the insert results query type if the table already exists. I use this approach quite often to create temporary (#temp) tables that contain products that are pertinent to the current logic context. For example, when working with a large database, one could "pre-fetch" a set of pertinent data row keys that apply to the current user. These can be persisted in tempdb (in a Smart Client [Windows Forms]) "connected" application so when the client needs to execute a query, a JOIN can be made against the #temp table. This has been shown to dramatically improve performance in many situations. The problem with using #tempdb tables from Visual Studio is that, behind the scenes, Visual Studio opens a new connection to SQL Server and closes this connection as soon as the test query is executed. This flushes the #temp database tables so they can't be seen after the query is executed.
The Query Designera Recap For the most part, the Query Designer can be a useful tool to help generate simple queries to test a concept or provide tested SQL to incorporate into an ad hoc query. It is fine as far as it goes. However, it won't be long before your skills outgrow its usefulness. The Query Designer is virtually useless for stored procedures or complex queries, as the GUI-generation code gets in the way. If you need a more sophisticated tool to test and debug queries of any type, I recommend using SQL Management Studio or the new SQL Express Database Management tools. SQL Management Studio also includes a query analyzer to tune the performance and resource footprint of your queriesit's a far cry from what Visual Studio 2005 affords. You might also find that SQLCMD (the replacement for OSQL and ISQL) command-line tool is handy. One of the more irritating problems with the Query Designer is that these queries cannot be saved with a normal Visual Basic or C# project. You can save them only in a "Database" (.dtq) project. This is an issue that Microsoft wants to fixif they have time to spare after adding all of their new features.
Managing Database Views Using the Query Designer Just as with database tables, you can use the Server Explorer to create and edit database views. Remember that an SQL view is simply a T-SQL query that's used like a macro in T-SQL queriesit can be used anywhere you can use a table. Views can be indexed and, in some cases, can be updateable. See Chapters 2 and 12 for more details. At this point, I want to (briefly) discuss creating views with the Server Explorer. 1. | Right-click the Views icon in the Server Explorer and choose "Add New View".
| | | 2. | Just as with the Query Designer select query type, add one or more tables (or views) to the diagram (top) pane. If these tables are related, the Query Designer automatically tries to create appropriate JOIN syntax. Note that if there is more than one possible way to JOIN the tables, all are included in the JOIN clauses created. This might not be what you have in mind.
| 3. | Set the Alias column in the criteria pane to rename any columns generated from expressions or with unsuitable column names.
| 4. | As with the other query types discussed earlier in this chapter, set the Filter and Sort columns in the criteria pane to define the WHERE and ORDER BY clauses to filter and sort the view's rowset.
| 5. | Add whatever TOP or other expressions to the SELECT statement to further restrict the number of rows returned or to expose the rowset in a special wayunique to this view. In the example in Figure 4.73, I set the collating sequence to return a case-sensitive view of the author's table. This means when I SELECT against this view, I can differentiate between "MacDonald" and "MACDonald"if ever that becomes an issue.
Figure 4.73. Creating a view with a special collation sequence. 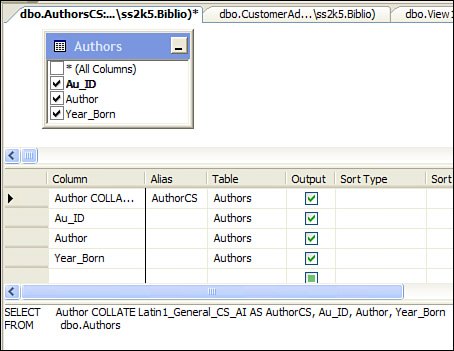
|
|