| Security Templates are preconfigured files that store typical security configurations for workstations and servers. Windows Server 2003 is shipped with a selection of templates that are stored in the %systemroot%\security\templates directory. The supplied templates cover a wide selection of security scenarios, from a typical low security domain client to a high security domain controller. The attributes of the templates can be copied, pasted, imported, or exported into other templates. This allows the templates to be used as is, or they can be used as the basis for a custom security scheme. A security template can be imported into a local or a nonlocal Group Policy Object, so that any computer or user accounts that the Group Policy Object controls will receive the security settings. If security settings have already been configured in the Group Policy Object, they can be exported to create a new security template that can be applied to other objects. The predefined security templates that are supplied with Windows Server 2003 are designed to provide an appropriate level of security on a Windows Server 2003 domain controller, server, or client computer. However, you must be aware that the default clean-install permissions given to user groups in Windows Server 2003 provide a significant increase in security over previous versions of Windows NT. The local Power Users group in Windows Server 2003 will have security settings roughly equivalent to those granted to the Local Users group in Windows 4.0. The security settings for the Administrators group has not changed. This can create a problem if your network is running applications that are not fully Windows Server 2003 compatible. Part of the specification for applications designed for Windows Server 2003 is that the applications are required to be designed to operate in a more secure environment, by users with fewer security rights. If all your applications are Windows Server 2003 compatible, the security rights that are granted to members of the Users group should be sufficient. If you are still running noncompliant applications on your network, it is possible that your users will have to be members of the Power Users group in order to have the rights necessary to run these applications. Note: Default Security Settings The default security settings are not automatically applied to Windows Server 2003 systems that have been upgraded from Windows NT 4.0 or earlier. On these systems, whatever security was already in place still applies. The default security settings are applied only when Windows Server 2003 is clean-installed onto an NTFS partition. If Windows Server 2003 is installed onto a FAT file system, the security templates cannot be applied.
The security templates are supplied for several security levels: Default The Default security templates (Setup Security.inf) are configured with the default security settings for Windows Server 2003 computers. These templates are created during the installation process and will differ depending on whether the install was a clean install or an upgrade. Although this template can be used as a basis for other servers and workstations, it cannot be applied to domain controllers. This template is very large, so it should not be applied via Group Policy. Domain Controller Default Security This template (DC Security.inf) is created when a member server is promoted to a domain controller. Compatible To provide backward compatibility, the default in Windows Server 2003 is for users to be members of the Power Users group. This allows the users to have access to most legacy applications. Most network administrators are not going to allow this because the Power Users group has far more rights than are necessary to run legacy applications. By using the Compatible template (Compatws.inf), the Users group is granted sufficient rights to run most legacy applications. In addition, the security levels are lowered on the files, folders, and Registry keys that are commonly used by legacy applications. In addition, all members of the Power Users group will be removed. Secure The Secure template (Securedc.inf or Securews.inf) modifies security settings for areas of the operating system that are not covered by permissions. This includes tighter settings for password policy, auditing, and any security-related Registry keys. Access Control Lists are not modified, because the secure configurations assume that the default Windows Server 2003 security settings are in place. However, it does remove all members from the Power Users group. Highly Secure The priority of the Highly Secure template (Hisecdc.inf or Hisecws.inf) is to lock down the security of the network without regard for performance, operational ease of use, or connectivity. This template can be used only in a native Windows Server 2003 environment because no pre-Windows 2000 clients or servers are supported. All network communications are digitally signed and encrypted. System Root Security This template (Rootsec.inf) is used to reapply the Windows Server 2003 default system root permissions to a system drive.
Creating Security Templates The Security Templates snap-in is used to work with security templates. You have the option of adding the snap-in to an existing console or creating a new one. To create a new Security Templates console, follow the procedure in Step by Step 16.13. Step by Step 16.13 Creating a Security Templates MMC 1. | Click Start, Run, and then type in MMC. Click OK.
| 2. | Click Console; then from the pop-up menu, select Add/Remove Snap-In. Click Add.
| 3. | The Add Standalone Snap-In window appears. Scroll down and select the Security Templates snap-in, and then click Add.
| 4. | If this is the only snap-in that you will be adding, click Close.
| | | 5. | Click OK to finish.
| 6. | From the Console window select Console, and then click Save As. The Save As window appears.
| 7. | Type in Security Templates for the filename, and then click Save.
|
|
Now that you have a console to use to work with the security templates, you have the following options: Create a new security template Import a security template into a Group Policy Object Export Security settings to a security template Customize one of the supplied security templates
Customizing Security Templates One of the quickest ways to apply security is to use one of the templates that Microsoft supplies as a foundation for your own security policy. Then you can just make the necessary configuration changes to fit the needs of your organization. To customize a supplied or existing security template, follow the procedure in Step by Step 16.14. Step by Step 16.14 Customizing a security template 1. | Select Start, All Programs, Administrative Tools, Security Templates.
| | | 2. | From the Security Templates console, click Security Templates, and then click the %windir%\Security\Templates folder (see Figure 16.24).
Figure 16.24. The Security Templates MMC, showing the default templates for a domain controller. 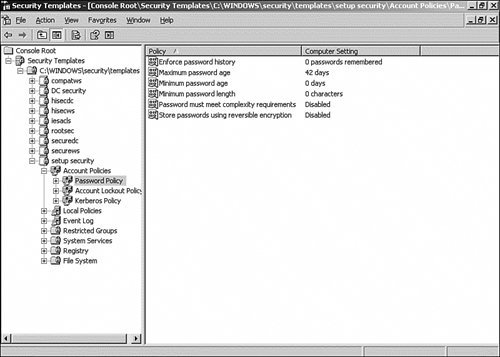
| 3. | The Templates folder opens and displays the predefined security templates.
| 4. | Right-click the desired template. Then select Save As from the pop-up menu.
| 5. | Type in an appropriate name for the new template, and then click Save.
| 6. | In the right pane of the Security Templates console, right-click the template that you just saved. When the pop-up menu appears, select Set Description.
| 7. | The Security Template Description window appears. Type in a description for the template, and then click OK.
| | | 8. | In the Security Templates console, double-click the template that you created, and then select the Event Log node.
| 9. | We want to change an entry for the Application Log size, so we double-click the Application Log entry in the right pane.
| 10. | The Maximum Application Log Size window appears. Select the define this policy check box, and then enter 40000, as shown in Figure 16.25. Click OK to save.
Figure 16.25. Using the Security Templates MMC to change the default value for the Application log. 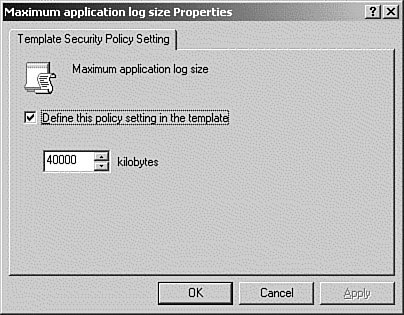
| 11. | If this is the first setting that relates to this particular category, you might get an additional prompt to adjust the values of related settings. If so, accept the required adjustments (you can always change them later), and then click OK to continue.
| 12. | Right-click the name of the template and select Save from the pop-up menu.
|
|
Now that we have a custom security template, we need to apply it to a workstation or member server to test it. This is where the Security Configuration and Analysis Tool comes in. Using the Security Configuration and Analysis Tool Managing the security of a network is an ongoing task. There will always be those occasions where, for the sake of expediency a security setting might have been changed to allow a user temporary access or to allow a process to run. These temporary changes often are forgotten and not restored to their proper state. There will also be users or junior network administrators that will make unauthorized changes that are detrimental to network security. These types of incidents can cause a security exposure that could prove costly to your network. The Security Configuration and Analysis tool will compare the security settings of a computer to those of a template, view the results, and resolve any discrepancies that were revealed by the analysis. The tool allows you to perform comparisons with either the standard templates or custom templates that you have created. The tool can also be used to import or configure security settings and apply them to the Group Policy Object for a computer or multiple computers. The Security Configuration and Analysis tool is a standard MMC snap-in that uses a database of security configuration settings to perform its analysis and configuration functions. The database allows templates to be imported or exported, multiple templates to be combined into a common template, and new templates to be created. After the templates are stored in the database, they can be used as the basis for a security analysis. When performing an analysis, the administrator is presented with the current system settings, and the areas where the current settings do not match the template are flagged. While performing the analysis, any discrepancies can be corrected. The Security Configuration and Analysis snap-in is used to work with security templates. You have the option of adding the snap-in to an existing console, or creating a new one. To create a new Security Configuration and Analysis console, follow Step by Step 16.15. Step by Step 16.15 Creating a Security and Configuration Analysis MMC 1. | Click Start, Run, and then type in MMC. Click OK.
| 2. | Click Console, and then from the pop-up menu, select Add/Remove Snap-In. Click Add.
| 3. | The Add Standalone Snap-In window appears. Scroll down and select the Security Configuration and Analysis snap-in, and then click Add.
| 4. | If this is the only snap-in that you will be adding, click Close.
| 5. | Click OK to finish.
| 6. | From the Console window select Console, and then click Save As. The Save As window appears.
| 7. | Type in Security Configuration and Analysis for the filename, and then click Save.
|
|
Now that we have a console to use to work with the Security Configuration and Analysis tool, we have the following options: Create a new security database Import a security template into the security database Export security database settings to a security template Configure system security Perform a system security analysis Work with the results of the Security Analysis
Before the Security Configuration and Analysis console can be used, you will have to create a database to store the security configuration settings. To create a new Security Configuration and Analysis console, follow Step by Step 16.16. Step by Step 16.16 Creating a Security and Configuration Analysis database 1. | Select Start, All Programs, Administrative Tools, Security Configuration and Analysis.
| 2. | From the Security Configuration and Analysis console, right-click Security Configuration and Analysis. From the pop-up menu, select Open Database.
| 3. | The Open Database dialog box appears. Type in the desired name and directory, and then click open.
| 4. | Because we are creating a new database, the Import Template dialog box appears. This will allow us to import a security template to use as a basis for our analysis. Select test.inf (the template we created in the previous exercise), and then click Open.
|
|
Note: Clear This Database There is a check box on the Import Template dialog box labeled Clear This Database Before Importing. This is selected if you want to delete the previous templates that were being used for analysis and start fresh. This does not delete the template files from the disk; it removes them only from the database.
After the template is imported into the database, you can change the configuration, import attributes from other templates, or merge it with other templates. The steps needed to configure the settings of the template are similar to those performed when using the other policy tools. Now that we have added the template to the database, we are ready to use it as a basis for the analysis of a computer. The Security Configuration and Analysis tool will compare the settings in the database with those on the chosen system and flag the differences. Then you can use the tool to make configuration changes to the machine, if desired. To analyze system security using the Security Configuration and Analysis tool, follow the procedure in Step by Step 16.17. Step by Step 16.17 Analyzing system security 1. | Select Start, All Programs, Administrative Tools, Security Configuration and Analysis.
| 2. | From the Security Configuration and Analysis console, right-click Security Configuration and Analysis. From the pop-up menu, select Open Database.
| 3. | The Open Database dialog box appears. Type in the desired name and directory, and then click open.
| 4. | Right-click Security Configuration and Analysis, and then from the pop-up menu, select Analyze Computer Now.
| | | 5. | The Perform Analysis dialog box appears. This prompts you for the path and name for the log file. The default path is fine. Click OK to continue.
| 6. | The status window appears, and indicates the progress of the various processes. When the process is complete, you will be returned to the main console window.
| 7. | In the left pane, click the Event Log node.
| 8. | The detail pane of the console displays the analyzed policies along with the results of the comparisons. As you can see in Figure 16.26, one column shows the settings from the database and another column shows the actual settings on the machine. In addition, to the left of the policy name is an icon representing the status of the analysis. The following describes what the icons indicate:
A green check mark indicates that the settings were the same. A red X means there was a difference. No icon means that the policy was not included in the template and no analysis was performed.
Figure 16.26. The results of the comparison. 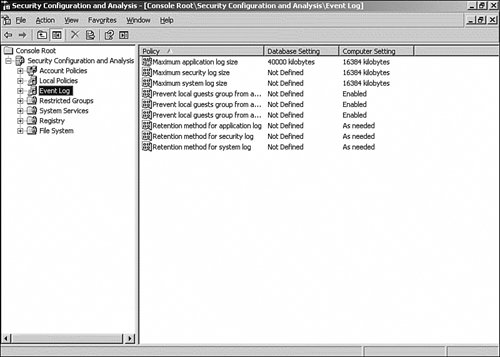
| 9. | If you want the settings on the computer to be configured to match the template in the database, right-click Security Configuration and Analysis; then from the pop-up menu, select Configure Computer Now.
| 10. | The Configure System dialog box appears. This prompts you for the path and name for the error.log file. The default path is fine. Click OK to continue.
| 11. | To verify that the security settings were applied correctly, repeat the analysis steps.
|
|
To provide a properly secured network, it is important to perform a regular security analysis of each computer. By using the Security Configuration and Analysis tool and database to keep a record of what the proper settings are, this allows the administrator to quickly detect any security exposures and easily correct them. The proper use of security templates requires the network administrator to not only analyze the needs of the users, but also the needs of the installed base of applications. Certain templates are dependent on the presence of only Windows Server 2003 applications and could conceivably prevent legacy applications from running, or they could prevent the users from having access to them. Because the security templates can also modify operating system settings, it is essential that they be thoroughly tested on a test network before they are applied in a production network. |