| Windows Server 2003 includes two types of file and folder compression: NTFS-based file system compression and the compressed folders feature, which is equivalent to the various Zip file utilities that have been available from sources other than Microsoft. Compression allows you to store more files on a volume because a compressed file takes up less space. Typically, files such as text files, documents, spreadsheets, and bitmaps will gain the most benefit from compression, because they generally contain a lot of blank space and redundant data. Other files such as compressed graphics files (JPEG, PNG), video files, or Zip files provide the least benefit because they already use their own form of compression. Using either method to compress files and folders gives you the same result: decreasing the amount of space that a file, folder, or program uses on your hard drive or removable media. Configuring NTFS File and Folder Compression NTFS compression allows you to compress a single file or even the entire volume. Because compression is built in to the file system, working with compressed files and folders is invisible to the end user. When you open a file, Windows Server 2003 automatically decompresses the file, and when you close the file, it is recompressed. Because NTFS compression is a property of a file, folder, or volume, you can have uncompressed files on a compressed volume or a compressed file in an uncompressed folder. Native file and folder compression is one of the many benefits of using NTFS; native compression is not available on the File Allocation Table (FAT) file system. Unfortunately, this capability comes at a priceNTFS compression and Encrypted File System (EFS) encryption are mutually exclusive. That is, you cannot both compress and encrypt a file or folder at the same time. You can manage compression from the command line by running the compact command or from the Windows GUI in the applicable folder or file Properties dialog box. Step by Step 13.1 outlines how to enable NTFS compression on a folder. Step by Step 13.1 Compressing a folder on an NTFS volume 1. | Open either My Computer or Windows Explorer. Right-click the folder that you want to compress and select Properties from the pop-up menu.
| | | 2. | From the folder's Properties page, click the Advanced button, as shown in Figure 13.1.
Figure 13.1. Compression is an attribute of a folder. 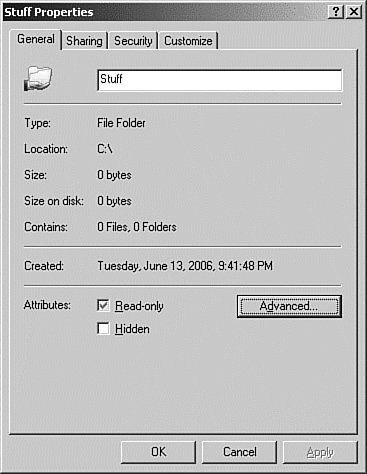
| 3. | In the Advanced Attributes dialog box, shown in Figure 13.2, select the Compress Contents to Save Disk Space check box. Click OK to save.
Figure 13.2. To compress a folder, select the Compress Contents to Save Disk Space check box. Notice that you can check either Compress Contents or Encrypt Contents, but not both. 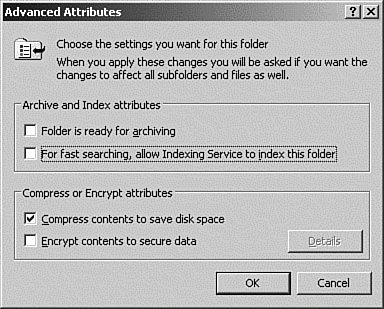
| 4. | Click OK on the folder's Properties page.
| | | 5. | If the Confirm Attribute Changes dialog box appears, as shown in Figure 13.3, choose whether you want to apply the changes to only the selected folder or to the folder and all its subfolders and files. Click OK.
Figure 13.3. Select what you want compressed. 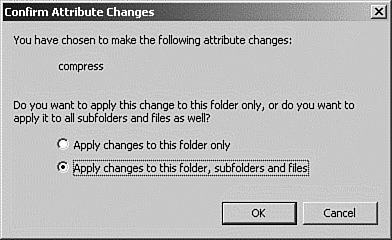
|
|
As mentioned earlier, you can choose to compress a single file, or a group of files, without compressing the folder or the volume that the file resides in. To compress a single file or group of files, consult Step by Step 13.2. Step by Step 13.2 Compressing a file on an NTFS volume 1. | Open either My Computer or Windows Explorer. Right-click the file that you want to compress and select Properties from the pop-up menu.
| 2. | From the file's Properties page, click the Advanced button.
| 3. | In the Advanced Attributes dialog box, select the Compress Contents to Save Disk Space check box. Click OK to save.
| 4. | Click OK on the file's Properties page.
|
|
If you need to conserve a lot of space, you can choose to compress an entire NTFS volume. However, remember that it takes a certain amount of system overhead to work with compressed files, so you probably won't want to compress a volume that contains files that are frequently accessed, such as your boot drive. Also, there will always be certain files in use that cannot be compressed, such as ntoskrnl and pagefile.sys. To compress an NTFS volume, follow the procedure outlined in Step by Step 13.3. Step by Step 13.3 Compressing an NTFS volume 1. | Open either My Computer or Windows Explorer. Right-click the drive that you want to compress and select Properties from the pop-up menu.
| 2. | From the local disk's Properties page shown in Figure 13.4, click the Compress Drive to Save Disk Space check box.
Figure 13.4. Compressing a volume. 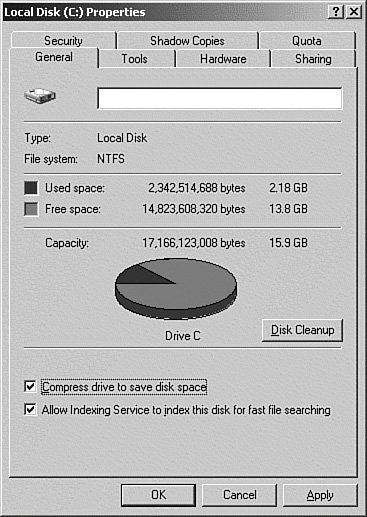
| 3. | From the Confirm Attribute Changes dialog box, choose whether you want to turn compression on for the volume or compress all its subfolders and files. Click OK.
| 4. | Click OK on the local disk's Properties page.
|
|
By looking at the Properties page for the file or folder, you can determine how much physical space was saved by comparing the entries for Size and Size on Disk, as shown in Figure 13.5. Figure 13.5. Comparing compressed and uncompressed sizes. 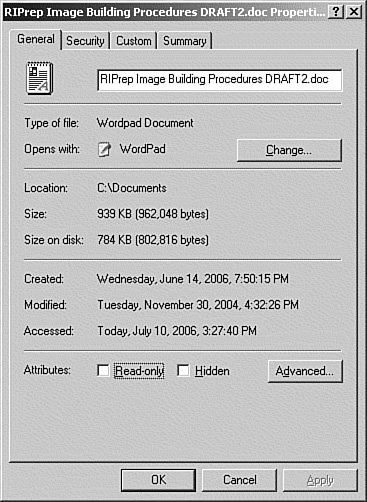
It's important to note that if you compress a volume or folder, you can choose to not compress the files and subfolders. However, any new files or folders created on a compressed volume or in a compressed folder will be compressed. New objects automatically inherit the compression attribute of the container in which they are created. Challenge You are the administrator of a network for a manufacturing company that includes multiple Windows Server 2003 servers used for file and print services. Your company is currently having financial problems, so the hardware budget for this fiscal year is limited. The legal department is required to have all its documents available for at least 10 years because of a pending wrongful-death lawsuit. Unfortunately, you are running out of drive space and the voluminous amount of data consumed by these documents isn't going away anytime soon. You must find a way to provide more free space for your users while keeping the documents for the legal department readily availableall without funding for new hardware! What is the best way to solve this issue in Windows Server 2003? On your own, try to develop a solution that would involve the least amount of downtime and expense. If you would like to see a possible solution, follow the procedure outlined here. This is a fairly straightforward decision, mainly because without a budget, you can't use features such as remote storage and offline backups, which require additional hardware. Your only option is to compress the old documents using the file and folder compression feature in Windows Server 2003. Fortunately, document files usually have a high compression ratio, so you should be able to gain a large amount of free space. Here are the steps to follow: 1. | Using either Windows Explorer or My Computer, navigate to the folder on the volume you want to compress.
| 2. | Right-click the folder and select Properties. From the Properties dialog box, write down the Size and the Size on Disk entries.
| 3. | Click the Advanced box. From the Advanced Attributes dialog box, select Compress Contents to Save Space, and then click OK.
| 4. | Click OK again to close the dialog box.
| 5. | When you are presented with the dialog box asking whether you want to apply the changes to the selected folder or to the folder, subfolder, and all files, select the check box to apply the changes to the folder, subfolder, and all files. Click OK to save.
| 6. | After the compression completes, right-click the folder, select Properties, and compare the Size on Disk entry with the numbers you recorded earlier.
|
|
The nice thing about the Windows Server 2003 implementation of compression is that it allows you to apply compression at the volume, folder, or file level. This allows you to selectively compress older files that are not frequently used, yet you do not disrupt the files that are always in use. Copying or Moving Compressed Files or Folders Several rules apply when you move or copy compressed files and folders. The possible outcomes of moving or copying NTFS compressed files or folders are as follows: Moving an uncompressed file or folder to another folder on the same NTFS volume results in the file or folder remaining uncompressed, regardless of the compression state of the target folder. Moving an uncompressed file or folder to another folder on a different NTFS volume results in the file or folder inheriting the compression state of the target folder. Moving a compressed file or folder to another folder on the same NTFS volume results in the file or folder remaining compressed after the move, regardless of the compression state of the target folder. Moving a compressed file or folder to another folder on a different NTFS volume results in the file or folder inheriting the compression state of the target folder. Copying a file to a folder causes the file to take on the compression state of the target folder, whether on the same or a different volume. Overwriting a file of the same name causes the copied file to take on the compression state of the target file, regardless of the compression state of the target folder. Copying a file from a FAT folder to an NTFS folder results in the file taking on the compression state of the target folder. Copying a file from an NTFS folder to a FAT folder results in all NTFS permissions being lost.
Identifying Compressed Objects So that you can easily identify files and folders that have been compressed, you can turn on a view property in Windows Explorer or My Computer. When this property is turned on, files and folders that are compressed are displayed in blue text. To enable this option, use the instructions in Step by Step 13.4. Step by Step 13.4 Changing the view property to identify compressed objects 1. | Open either My Computer or Windows Explorer. From the system menu, click Tools, Folder Options.
| 2. | In the Folder Options dialog box, click the View tab.
| 3. | In the Advanced Settings window of the Folder Options dialog box, shown in Figure 13.6, select the Show Encrypted or Compressed NTFS Files in Color check box. Click OK to save.
Figure 13.6. Turn on the view property for compressed objects. 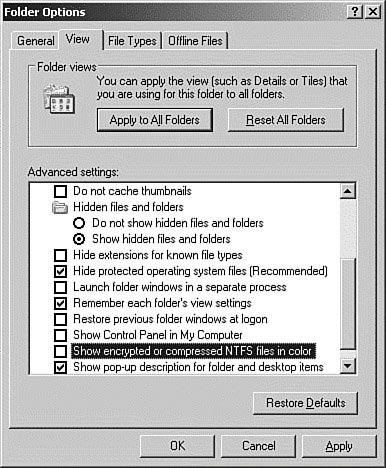
|
|
Managing Compression from the Command Line In addition to the GUI method of compressing files, Windows Server 2003 also has a command-line utility, COMPACT.EXE. The command-line utility is handy for use with scripting, or it can be used in those situations where you want to compress only certain types of files. For example, if you wanted to compress only the document files on your volume, you could use wildcards to specify that only those types of files should be compressed. The compact command has the following syntax: compact [{/c|/u}] [/s[:dir]] [/a] [/i] [/f] [/q] [fileName[...]]
Table 13.1 presents the available options for use with the compact command. Table 13.1. The Options for the compact CommandSwitch | Description |
|---|
/c | Specifies that the directory or file is to be compressed. | /u | Specifies that the directory or file is to be decompressed. | /s | Specifies that the compression action is to be performed on all subdirectories of the specified directory. | /a | Specifies the display of hidden or system files. | /I | Specifies that errors are to be ignored during the compression process. | /f | Specifies that the compression operation is to be forced on the specified directory or file. This is useful in cases in which a directory is only partly compressed. | /q | Specifies that only the most essential information is to be reported. | FileName | Specifies the file or directory. You can use multiple filenames and wildcard characters (* and ?). |
Exam Alert: Expect a compact Question Expect at least one exam question that deals with compressing files and folders from the command line.
Compressed (Zipped) Folders The second form of compression available in Windows Server 2003 is compressed folders. As stated earlier, the compressed folders feature uses the industry-standard Zip format to compress files into a folder. Unlike NTFS compression, compressed folders can be copied or moved to other computers, and they retain their compressed format. Compressed folders can be created in My Computer or Windows Explorer using the procedure outlined in Step by Step 13.5. Step by Step 13.5 Creating a compressed folder 1. | Open either My Computer or Windows Explorer. Highlight the drive or folder that you want to create the compressed folder in. Then, from the system menu, select File, New, Compressed (Zipped) Folder, as shown in Figure 13.7.
Figure 13.7. Creating a compressed folder. 
| 2. | Key in a name for the new folder, and then press Enter to save.
|
|
After you have created the compressed folder, shown in Figure 13.8, you can add and remove files and folders to and from it by dragging and dropping, just like any other folder in Windows Server 2003. In addition, you can run most programs and open and edit files in the compressed folder. For extra security, you can password protect the compressed folders. Figure 13.8. Compressed folders are identified by the zipper icon. 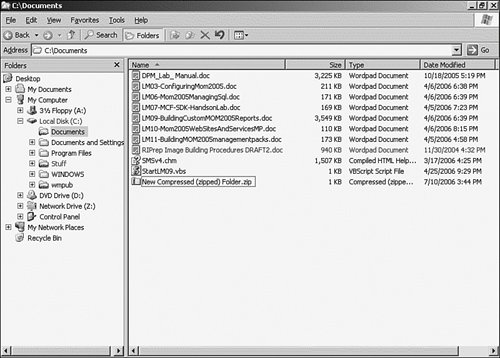
Because compressed folders are essentially just common Zip files, they can also be manipulated by most third-party Zip utilities. Best Practices for Compressed Files and Folders File compression isn't a panacea for file storage problemsit's just another tool that should be used in association with the other tools in this chapter. However, used properly, it can help you to manage your storage efficiently. There are certain points to remember: Compress only file types that will benefit from compression This includes text files, documents, spreadsheets, and bitmaps. Don't use compression for compressed files This includes files such as compressed graphics files (JPEG, PNG), video files, or other files that already use some form of compression. Don't compress live data This includes databases that host a lot of write activity and other files that are constantly changing.
|