Lesson 2: Exchange 2000 Tools and Snap-Ins
Dedicated management tools for Exchange 2000 Server are installed during a typical server or custom installation when you select the Microsoft Exchange System Management Tools on the Component Selection page of the Setup Wizard. You don't need to set up an entire server to install the management utilities. For flexible administration of distributed Exchange 2000 servers, put the Exchange System Manager on your workstation PC. In fact, many administrators appreciate the convenience of managing their environment from the desktop. However, your workstation must run under Windows 2000 because other operating systems are not supported. You can read more about the installation of Exchange 2000 components in Chapter 5, "Installing Microsoft Exchange 2000 Server."
This lesson briefly lists the Exchange System Management Tools and focuses on the most important Exchange 2000 management utility—the Exchange System Manager. Among other things, you will learn how the System Manager provides the administrator with management capabilities. The features of the Exchange System Manager are illustrated throughout this book.
At the end of this lesson, you will be able to:
- List the Exchange System Management Tools and describe their purpose.
- Explain how the stand-alone Exchange System snap-in is extended to provide the full set of Exchange 2000 administration features.
- Use the Exchange System Manager to configure server policies.
Estimated time to complete this lesson: 45 minutes
Exchange System Management Tools
In a typical installation, four shortcuts to management tools are created in the Microsoft Exchange program group: Active Directory Cleanup Wizard, Active Directory Users and Computers, Migration Wizard, and System Manager. The Active Directory Cleanup Wizard allows you to merge duplicate user accounts that might have been created during a phase of coexistence with Exchange Server 5.5, as explained in Chapter 6, "Coexistence with Previous Microsoft Exchange Server Versions." The Migration Wizard enables you to migrate user data and address information from foreign mail systems. The Active Directory Users and Computers shortcut points to the Users and Computers.MSC file, which launches the Active Directory Users and Computers snap-in that was introduced earlier in this chapter. By default, the Users and Computers.MSC file resides in the \Program Files\Exchsrvr\Bin directory. The System Manager utility, to complete the list, is the universal administration tool that enables you basically to manage all aspects of your Exchange 2000 Server platform.
Management Tools and Outlook 2000
The Exchange System Management Tools come with a new version of Messaging Application Programming Interface (MAPI) that causes Outlook 2000 to display warning messages. Because those conflicts cannot be resolved, it is not advisable to install Outlook 2000 and the Exchange System Management Tools on the same computer. Windows 2000 Terminal Services, for instance, enables you to manage Exchange 2000 resources remotely without directly deploying the management utilities for Exchange 2000 Server on the workstation. Terminal Services also gives you the option to manage the whole organization remotely from a computer running Microsoft Windows 98, Windows NT Workstation, or any other supported operating system.
Exchange 2000 Snap-Ins
The management tools in the Microsoft Exchange program group are only the tip of the iceberg. To check out the components that actually perform the work, click Start, select Run, and type mmc in the Run dialog box. Click OK to launch the MMC. Click Console and select Add/Remove Snap-In. In the Add/Remove Snap-In dialog box, click Add, and, from the Available Standalone Snap-Ins list, select Exchange System. Click Add, examine the options in the Change Domain Controller dialog box, accept the defaults by clicking OK, and then click Close. In the Add/Remove Snap-In dialog box, click on the Extensions tab. From the Snap-Ins That Can Be Extended list box, select Exchange System. In the Available Extensions list box, notice that the Exchange System Manager relies on 19 extension snap-ins to unfold its capabilities.
Let's go ahead and experiment a little. Deselect the Add All Extensions check box, clear all the check boxes from the Available Extensions list, then click OK to return to the management console. Without extensions, the Exchange System snap-in gives a rather lean impression. You can configure global settings, such as Internet Message Formats, and define parameters for outgoing and incoming messages via the Message Delivery object. However, apart from that, the server properties, and the Connectors container, which allows you to add messaging connectors to the configuration, not much of the original Exchange System Manager's functionality remains.
Extensions of Extensions
Extension snap-ins can also extend the functionality of other extensions. For illustration, let's continue the previous example. Click Console again and select the Add/Remove Snap-In command. In the Add/Remove Snap-In dialog box, double-click Blue Sky Airlines (Exchange), and then click on the Extensions tab. Select the Add All Extensions check box, and then, from the Snap-Ins That Can Be Extended list box, select Exchange Protocols. Notice that this extension snap-in relies in turn on eight other extensions. Click OK and then close the MMC without saving the results of the experiment.
Snap-In Registration
With stand-alone snap-ins relying on extensions, which in turn rely on other extension snap-ins, how many MMC components does the Exchange 2000 Setup program register on the local computer when installing the Microsoft Exchange System Management Tools? To count the registered Exchange snap-ins, launch the Registry Editor (REGEDIT.EXE), and open the following key:
HKEY_LOCAL_MACHINE \SOFTWARE \Microsoft \MMC \SnapIns
All MMC snap-ins must be registered in this location. From the Edit menu, select Find, and, in the Find dialog box under Find What, type Exchange, then click OK. The Exchange Schedule+ FreeBusy Connector snap-in will be found first. Press F3 to continue the search and advance through the entries. The Setup program of Exchange 2000 has registered 29 snap-ins in the Windows 2000 MMC.
NOTE
Most of the management components for Exchange 2000 Server are implemented in a single DLL called EXADMIN.DLL, which resides in the \Program Files\Exchsrvr\Bin directory.
Exchange System Manager and Active Directory Directory Service
Exchange System Manager must communicate with a Windows 2000 domain controller to maintain configuration information. Changes are first written to the domain controller that is selected by default and then replicated to the other domain controllers in the forest. The Active Directory replication process performs this job.
As explained earlier, you can specify the domain and domain controller in the Change Domain Controller dialog box when adding the Exchange System snap-in to a custom management console. In a single forest environment, it is usually sufficient to accept the default settings and allow the System Manager to connect to any writeable domain controller. However, you have the option of changing the domain and selecting a specific computer. Because configuration changes are replicated to all domain controllers in a forest, it is typically not required that you connect to a particular machine explicitly (see Figure 12.7).
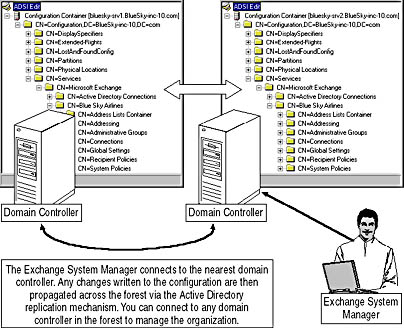
Figure 12.7 Changing the Exchange 2000 Server configuration
The Exchange System Manager Window
When you launch Exchange System Manager, a window with two panes is displayed as a child window of the MMC. This is the Exchange System Manager window, which shows the directory information of the Exchange 2000 organization from the selected domain controller.
NOTE
Exchange 2000 configuration information is stored in the Microsoft Exchange container under Services in the Configuration partition of Active Directory. You can use Active Directory Sites and Services or the ADSI Edit utility to view the complete directory tree.
New Window From Here
The MMC is capable of displaying multiple Exchange System Manager windows at the same time. Just right-click the desired node and, from the shortcut menu, select New Window From Here, which opens a new Exchange System Manager window with the right-clicked object as the root of the console tree. This feature allows you to focus on the tasks you want to accomplish during a particular session. For instance, if you only want to manage public folders, right-click the Folders object, and select New Window From Here. A new window is displayed, providing access to public folders only. The management of public folders is the topic of Chapter 17, "Public Folder Management."
Hidden Directory Objects
Unlike the ADSI Edit utility, which generally displays the complete set of directory objects, Exchange System Manager suppresses several structures by default to simplify the console tree. To give an example, in an organization with only one administrative and one routing group, these containers are not displayed. To work with these structures, right-click the organization object, such as Blue Sky Airlines (Exchange) on the top of the console tree, and select the Properties command. In the General tab, activate the Display Routing Groups and Display Administrative Groups check boxes. An Exchange System Manager dialog box will appear, informing you that you need to restart the program. Click OK.
Notwithstanding the Exchange System Manager notification, the containers called Administrative Groups, underneath First Administrative Group, Routing Groups, and again underneath First Routing Group are displayed in the console tree immediately. However, it is a good idea to follow Exchange System Manager's advice; otherwise, you might be confronted with unnecessary error messages when continuing the administration. The configuration of administrative and routing groups is covered in Chapter 14, "Managing the Server Configuration."
System Policies
Administrative groups within Exchange System Manager allow you to configure multiple Exchange 2000 servers from a central point of view by creating a single or multiple system policies. A particular system policy applies to all those servers that are associated with it. System policies can simplify the work, especially if you have to manage numerous servers in an administrative group. Instead of applying the same or similar settings multiple times, create one policy, configure the settings once, and then apply the policy to those computers to which it is relevant (see Figure 12.8).
NOTE
The property sheets for mailbox and public store policies correspond to those displayed for each individual mailbox or public store when right-clicking on the store and selecting the Properties command. Some settings, such as database locations, however, can only be applied to individual stores and are deactivated in the store policies.
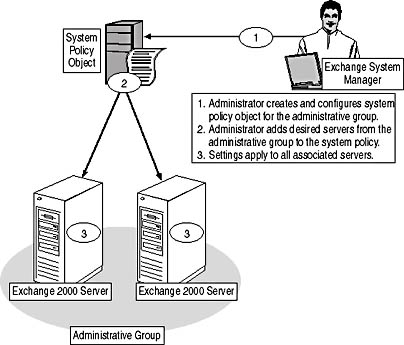
Figure 12.8 Configuring system policies for multiple Exchange 2000 servers
Creating the System Policies Container
System policies are maintained in the System Policies container. By default, however, this container does not exist. You need to add it explicitly to your administrative group by right-clicking the group, pointing to New, and then selecting System Policies Container. Right-clicking the System Policies Container and pointing to New, you can create new server, public store, and mailbox store policies.
Server Policies
Server policies serve the purpose of maintaining message tracking options for multiple servers. Message tracking is a feature that logs information about message transfers in a tracking log file. When enabled, tracking logs are written to the \Program Files\Exchsrvr\<SERVER NAME>.LOG directory (for example, \Program Files\Exchsrvr\BLUESKY-SRV1.LOG) that is shared as <SERVER NAME>.LOG for network access. Every day a new log file is created, named according to the format YYYYMMDD.LOG. You can use the Message Tracking Center to access the <SERVER NAME>.LOG share on all Exchange 2000 servers over the network and track the flow of messages across your organization. The Message Tracking Center is covered in Chapter 20, "Microsoft Exchange 2000 Maintenance and Troubleshooting."
Mailbox Store Policies
Mailbox store policies give you the ability to schedule database maintenance cycles, define storage limits, and configure full-text indexing, among other things. The management of mailbox resources is the topic of Chapter 13, "Creating and Managing Recipients."
You can configure the following tabs for mailbox store policies:
- General. To specify a default public store (see Chapter 17, "Public Folder Management") and an offline address list (see Chapter 14, "Managing Server Configuration"), and to archive all messages sent by users that fall under this policy. Message archiving allows you to keep a history of all the e-mail communication in an organization. You can save the messages in an archival mailbox or public folder. In addition you can specify whether your users' messaging clients support Secure/Multipurpose Internet Mail Extensions (S/MIME) signatures (which is usually the case) and whether to display plain text messages in a fixed-size font.
- Database. To specify the maintenance interval during which the system attendant will defragment the databases online of the servers placed under this policy. (All other settings are deactivated because they are specific to the individual servers.)
- Limits. To set storage quotas (for storage warnings, prohibit send, and prohibit send and receive) and set the warning message interval. You also have the option of defining retention times for deleted items (see Chapter 20, "Microsoft Exchange 2000 Server Maintenance and Troubleshooting").
- Full-Text Indexing. To specify an update interval and a rebuild interval during which the Indexing service refreshes its indexes for the data in mailboxes on the servers placed under this policy.
Public Store Policies
Public store policies enable you to configure similar settings to mailbox store policies. You can configure database maintenance cycles, storage limits, retention times, and full-text indexing. In addition, you can configure a public folder replication interval and replication limits. Public store administration is covered in Chapter 17, "Public Folder Management."
You can configure the following tabs for public store policies:
- General. To specify that messaging clients support S/MIME signatures and whether to display plain text messages in a fixed-size font.
- Database. To specify the maintenance interval during which the system attendant will defragment the databases online.
- Replication. To set a replication interval during which new, modified, and deleted items are replicated to other instances of the same public folders across the organization, and to specify replication limits for the interval and the message sizes. Public folder replication is covered in detail in Chapter 18, "Public Folder Replication."
- Limits. To set storage quotas (for storage warnings to public folder contacts, prohibit post, and maximum item size) and set the warning interval. You also have the option of defining retention times and age limits for deleted items.
- Full-Text Indexing. To specify an update interval and a rebuild interval during which the Indexing service refreshes its indexes for the data in public folders on the servers placed under this policy.
Policy Conflicts
When configuring multiple policies for different configuration scenarios, specific settings in two policies might exclude each other. For example, you may specify to archive messages in one policy and not in another. Exchange System Manager protects you from assigning a single server to multiple conflicting policies. When you add the object to a conflicting policy, a warning message will be displayed. You have the choice of removing the object from all other conflicting policies or refusing the removal and not adding the server to the current policy.

Exercise 2: Defining a Server Policy for Message Tracking
In this exercise you will define a server policy for message tracking across multiple Exchange 2000 servers. You will use Exchange System Manager to manage settings for an entire administrative group.

To view a multimedia demonstration that displays how to perform this procedure, run the EX2CH12.AVI files from the \Exercise_Information\Chapter12 folder on the Supplemental Course Materials CD.
Prerequisites
- Exchange 2000 Server is installed and operational on BLUESKY-SRV1 and you are logged on as Administrator.
- It is assumed that the Administrative Groups container is not displayed in the console tree of the Exchange System Manager (otherwise, skip Steps 1 through 5).
To configure server policies for the first administrative group
- Click the Start button, point to Programs, point to Microsoft Exchange, and then click System Manager.
- In the Exchange System Manager, right-click Blue Sky Airlines (Exchange), and then select Properties.
- Select the Display Administrative Groups check box, and then click OK.
- In the Exchange System Manager dialog box that is informing you that you need to restart the Microsoft Exchange System Manager, click OK.
- Close and restart the Exchange System Manager.
- In Exchange System Manager, expand Administrative Groups, and then right-click on First Administrative Group.
- In the shortcut menu, point to New, and then select System Policy Container.
- A new container object called System Policies is added to the First Administrative Group. Right-click it, point to New, and then select Server Policy.
- In the New Policy dialog box, select the General check box, and then click OK.
- In the General tab, type Message Tracking Policy, and then click on the General (Policy) tab.
- Enable the Enable Subject Logging And Display, Enable Message Tracking, and Remove Log Files check boxes, and then, under Remove Files Older Than (Messages), type 7.
- Click OK and verify that a new policy object has been created in the System Policy container (see Figure 12.9).
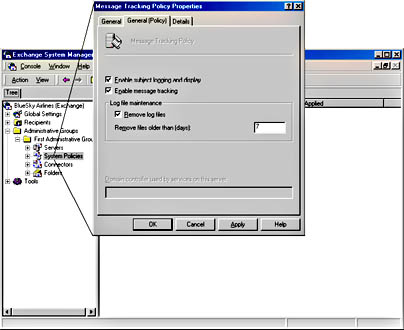
Figure 12.9 Creating a system policy for message tracking
- Right-click Message Tracking Policy, and, from the shortcut menu, select Add Server.
- In the Select The Items To Place Under The Control Of This Policy dialog box, from the upper list, select all server objects, and then click Add.
- Verify that all existing servers are listed in the lower list, and then click OK.
At this point, you have configured a policy for message tracking, which causes all servers in the First Administrative Group to keep a history of messages that pass through the local system (see Figure 12.10).
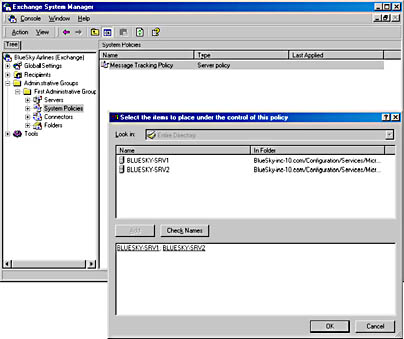
Figure 12.10 Placing servers under the control of a policy
- In the Exchange System Manager dialog box asking you whether you are sure you want to add the times to this policy, click Yes.
- Right-click Message Tracking Policy again, and, from the shortcut menu, select Apply Now.
- In the console tree, open the System Policies container, and select Message Tracking Policy. Notice that all the Exchange 2000 servers from the First Administrative Group are listed in the contents pane.
- In the console tree, right-click the System Policies container, point to New, and select Server Policy again.
- In the New Policy dialog box, select General, and then click OK.
- In the General tab, type Conflict Policy. Do not specify any other settings, and click OK.
- Right-click Conflict Policy and then select Add Server.
- Select BLUESKY-SRV1, click Add, and then click OK.
- In the Exchange System Manager dialog box asking you whether you want to add items to this policy, click Yes.
- Notice the Exchange System Manager conflict warning that the object BLUESKY-SRV1 is already under the control of another policy. The message tracking policy is listed (see Figure 12.11). Click No to leave BLUESKY-SRV1 under the control of the message tracking policy.
- In the Exchange System Manager dialog box informing you that the object BLUESKY-SRV1 could not be associated with the conflict policy because you refused to remove the object from the control of conflicting policies, click OK.
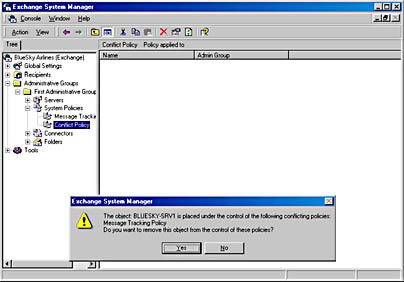
Figure 12.11 Resolving a policy conflict
Exercise Summary
Administrative groups assemble Exchange 2000 servers for easier administration. One way to achieve simplified system management is to configure system policies and apply them to multiple servers. Server policies, for instance, serve the purpose of enabling message tracking to trace the path a message has taken through the organization. Exchange System Manager will protect you from assigning a single server object to multiple conflicting policies.
EAN: N/A
Pages: 186