Lesson 1: Windows 2000 Tools and Snap-Ins
More than 100 MMC snap-ins exist for Windows 2000 Server, and Exchange 2000 Server adds additional components to this collection. To be a professional administrator, you don't necessarily need to be familiar with all the available snap-ins, but you do need to know the most important tools and their key features. Typical Windows 2000 management tools that every Exchange administrator should know about are Active Directory Users and Computers, Computer Management, Event Viewer, Internet Services Manager, Performance, Services, Task Manager, and the Backup utility. Depending on the situation, you might need to use additional tools, such as the Registry Editor or the ADSI Edit utility.
This lesson cannot cover all of the Windows 2000 management utilities or all of their features and doesn't intend to. However, it does give a brief summary about important tools that you might find helpful when accomplishing your tasks as an Exchange 2000 administrator.
At the end of this lesson, you will be able to:
- List the important features of typical Windows 2000 management utilities.
- Describe when to use which utility.
Estimated time to complete this lesson: 60 minutes
Active Directory Users and Computers
The Active Directory Users and Computers snap-in is the central tool for user and computer account management in Windows 2000 Server domains. This snap-in allows you to, among other things, create and manage user accounts, contacts, computer accounts, groups and group memberships, organizational units, printers, and shared folders.
When you install the Exchange 2000 management utilities on a computer running Windows 2000, the Active Directory Users and Computers snap-in is extended to support the management of mailbox settings. Typical Exchange- related tasks involve the creation of mailboxes, their transfer to another server, and mailbox deletion. You can read more about mailbox management in Chapter 13, "Creating and Managing Recipients."
Services Snap-In
The Services snap-in, which you can find in the Administrative Tools group, is also an important Exchange 2000 administrative tool. It allows you to control all of the services running on your server (Start, Stop, Pause, and Resume), including the Exchange 2000 services. You can set various configuration parameters, such as the Startup Type and the Log On account. Exchange 2000 Server services typically run in the context of the LocalSystem account, which provides a high security standard under Windows 2000 Server, as explained in Chapter 5, "Installing Microsoft Exchange 2000 Server."
NOTE
The standard Services utility is designed to manage local resources only. However, you can use the Services snap-in for remote administration when you add it to a custom MMC. In the Services dialog box that appears during the configuration, instruct the snap-in to connect to another computer.
Recovery Options
You can also exclude services from specific hardware profiles (Log On tab) and determine the server's reaction if a service fails (Recovery tab). The operating system performs recovery actions automatically if a critical state has been detected. You can choose Take No Action, Restart The Service, Run A File, or Reboot The Server. These actions can be set for three different levels independently. One escalation level will follow the other if a previous action does not solve the critical state. It is possible to try restarting the critical service twice before the third level will be reached, which may force restarting the entire server.
Rebooting the Server
It is advisable to warn your users to save their work before a server is restarted automatically; otherwise, they may lose data when working with documents stored on this Windows 2000 server. When specifying to reboot the server at any escalation level, the Restart Computer Options button becomes available. Click it, and configure a restart notification and a restart delay. The restart notification will inform all users that are connected to the affected server about the scheduled shutdown. The delay should give them enough time to save their work. The default delay is 1 minute, but it is a good idea to increase it to 2 or 3 minutes.
NOTE
Reboot The Server may cause the server to reboot repeatedly if the system restart does not solve the problem. Hence, allow for enough time to log on and step in; otherwise, the server may become unmanageable.
Computer Management
Under Microsoft Windows NT, many administrators preferred to place a shortcut to the Services program of the Control Panel on the desktops of their servers. Under Windows 2000, you may do the same for the Services snap-in, but you might find it more advantageous to use the Computer Management utility instead. This tool provides far more capabilities than the Services snap-in.
Using the Computer Management utility, you can conveniently manage services and applications on the local computer as well as remote servers. You also get access to system tools, such as System Information and the Event Viewer, and storage utilities, such as Disk Management and Removable Storage. If you want to manage a remote server instead of the local machine, right-click Computer Management (Local) in the console tree, and select Connect To Another Computer. In the Select Computer dialog box, double-click the computer that you want to administer. The Computer Management utility is covered in more detail in Chapter 14, "Managing Server Configuration."
Performance Utility
You can use either the Computer Management snap-in or the Performance utility to monitor the state of your systems. Both utilities give you access to the Performance Logs and Alerts tool, but the Performance utility also provides the System Monitor, which allows you to display performance data in real-time charts. When you add counters to a chart, you have the option to specify different computers. You can monitor the performance of local and remote computers anywhere in your network and summarize the performance data. Exchange 2000 Server adds numerous counters to the server that let you monitor the health of the system permanently (see Figure 12.1). You can read more about the Performance tool in Chapter 20, "Microsoft Exchange 2000 Maintenance and Troubleshooting."
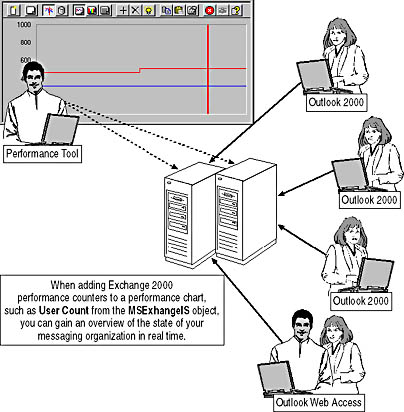
Figure 12.1 Monitoring the number of users currently working with Microsoft Exchange 2000 Server
Internet Services Manager
If you have installed Exchange 2000 Server on the computer, you should not configure settings for the Internet protocols in the Internet Services Manager—with the exception of the default Web site, as mentioned in Chapter 11, "Internet-Based Client Access." The Internet Services Manager is available as a stand- alone snap-in from the Administrative Tools program group and as part of the Computer Management tool.
Generally, use the Exchange 2000 management utilities to set the configuration parameters of Internet Information Services (IIS) in the Active Directory directory service. The metabase update service will then transfer the changes into the IIS metabase. This is a one-way replication. If you use the Internet Services Manager to manage the settings of a Web site, these changes are written directly to the metabase and not passed on to Active Directory. You can read more about the Internet Services Manager in the Internet Information Services Resource Guide of the Microsoft Windows 2000 Server Resource Kit.
Event Viewer
The Event Viewer snap-in, available as a stand-alone snap-in and as part of the Computer Management utility, enables you to analyze system events, such as application or system errors. It allows you to examine the error information returned by failed services. Events are recorded in event logs (Application, Directory Service, DNS Server, File Replication Service, Security, and System). Exchange 2000 services keep a record of their activities primarily in the application event log. You can read more about Exchange-related application events in Chapter 20, "Microsoft Exchange 2000 Maintenance and Troubleshooting." For more information about the Event Viewer, consult the Windows 2000 Server online help.
NOTE
After installing Exchange 2000 Server, it is a good idea to check the application event log to make sure that the system is not reporting any problems.
Backup and Restore Utility
All versions of Windows 2000 provide you with a backup utility that enables you to back up your system files, user documents, and network data. When Exchange 2000 Server has been installed on the local machine, you also can save the storage groups of the Information Store online, meaning you don't need to shut down the server services. The backup and restore procedures for Exchange 2000 Server are discussed in detail in Chapter 20, "Microsoft Exchange 2000 Maintenance and Troubleshooting."
The Backup utility allows you to schedule jobs to run automatically, for instance, every night at midnight. Running backups at off-peak hours can ensure that server performance is not degraded during normal business hours. In addition to determining a backup schedule, however, it is important to check how long it takes to complete backup and restore operations. The Windows 2000 Backup utility is optimized for fast backups. Depending on your backup media and system configuration, you may achieve backup rates of up to 40 GB per hour. However, the same is not true for restore procedures, which usually progress at half or even less than half of the backup speed. The overall time it takes to restore a server is an important factor in designing an appropriate disaster recovery plan.
Task Manager
The Task Manager allows you to monitor, control, start, and terminate programs and processes that are running on a Windows 2000 computer. You can launch this tool by right-clicking the clock on the Windows toolbar and selecting Task Manager from the shortcut menu. Alternatively, press Ctrl + Alt + Del, and then click Task Manager in the Windows Security dialog box. In the Task Manager program window, you will find the Processes and Performance tabs. The Processes tab lists all of the active processes on the server and their resource consumption. The Performance tab, on the other hand, provides a graphical overview of central processing unit (CPU) and memory usage.
The End Task button in the Applications tab and the End Process button in the Processes tab enable you to terminate running processes. Terminating a process this way, nevertheless, is not the same as closing an application or stopping a service in the Services utility. The affected process has no chance to notify any attached DLLs that it is terminating. For instance, memory-mapped objects might remain orphaned, consume server resources unnecessarily, and cause problems themselves. Rebooting the server will reset the system state properly after terminating an Exchange 2000 service. You can read more about troubleshooting Exchange 2000 Server in Chapter 20, "Microsoft Exchange 2000 Maintenance and Troubleshooting."
NOTE
You might get the impression that an Exchange 2000 Server service stops responding and hangs for no apparent reason, occupying close to 100 percent of the CPU's capacity. This does not necessarily indicate a critical system state, as the server might be busy with a processor-intensive task, such as the expansion of a very large distribution group. Use the Performance tool to monitor the affected system for a period of time, and don't terminate server processes if you are not absolutely sure that the suspicious component is malfunctioning.
Windows 2000 Registry Editors
The Windows 2000 Registry Editors (REGEDT32.EXE and REGEDIT.EXE) can be used to inspect and modify the startup parameters of Exchange 2000 Server services because their settings are maintained within the Windows 2000 Registry. REGEDIT.EXE is more convenient to use, whereas REGEDT32.EXE provides more functionality (such as the Security menu). With both utilities you need to be very careful when modifying parameters directly because modifications are usually written to the Registry immediately without activating an explicit Save command. In addition, no security mechanism exists to prevent you from entering invalid parameters or values. It is possible to damage an installation seriously, either by accident or on purpose, due to invalid configuration settings.
On the other hand, some configuration parameters cannot be specified using any other administration tool. For example, you have to use Registry Editor if you need to adjust the remote procedure call (RPC) binding order for your Microsoft Outlook client, as illustrated in Exercise 4 of Chapter 8, "Microsoft Outlook 2000 Deployment."
Caution
Using the Registry editors incorrectly can cause serious problems that may require you to reinstall Windows 2000. Use the Registry editors only if no other administrative tool is available.
Active Directory Service Interface Edit
The Active Directory Service Interface (ADSI) Edit snap-in (ADSIEDIT.DLL) is not included in the standard Windows 2000 Server installation for good reasons. Similar to the Registry editors for the Registry database, ADSI Edit enables you directly to access, modify, and delete Active Directory information from the Domain, Configuration, and Schema partitions. This risks seriously damaging the Active Directory environment. However, ADSI Edit is a very powerful utility that displays Active Directory objects in a hierarchical view and allows modifications through a standard properties page. ADSI Edit gives you access to all attributes of a directory object.
Although it isn't installed by default, the ADSI Edit snap-in still ships with the Windows 2000 Server CD. You can find it in the Support\Tools folder. To install it, launch the Setup program from the same location. Product documentation is available in the form of an online help file for all Windows 2000 Support Tools. ADSI Edit is also part of the Microsoft Windows 2000 Resource Kit.

Exercise 1: Managing Exchange 2000 Server with Windows 2000 Administrative Utilities
In this exercise you will use several of the management tools discussed in this lesson to manage Exchange 2000 resources. You will use these utilities to manage local and remote server components.

To view a multimedia demonstration that displays how to perform this procedure, run the EX1CH12*.AVI files from the \Exercise_Information\Chapter12 folder on the Supplemental Course Materials CD.
Prerequisites
- Exchange 2000 Server is installed and operational on BLUESKY-SRV1 and BLUESKY-SRV2.
- Log on as Administrator to BLUESKY-SRV1 and BLUESKY-SRV2.
To manage Exchange 2000 Server resources with standard admin utilities
- On BLUESKY-SRV1, click Start, point to Programs, point to Administrative Tools, and then click Active Directory Users and Computers.
- In the console tree, expand the Bluesky-inc-10.com container, and then click View, and select Advanced Features. Notice that additional containers are now displayed underneath the domain, such as Microsoft Exchange System Objects, which provides access to recipient objects for system mailboxes and public folders.
- Click View, and select Filter Options. In the Filter Options dialog box, activate Create Custom Filter, and then click Customize.
- In the Find Custom Search dialog box, click Field, point to User, and then select Exchange Home Server.
- From the Condition list box, select Not Present.
- Click Add, and then click OK twice.
At this point, you have successfully created a filter to display only those user accounts that don't own a mailbox (see Figure 12.2). Select the Users container and verify the results.
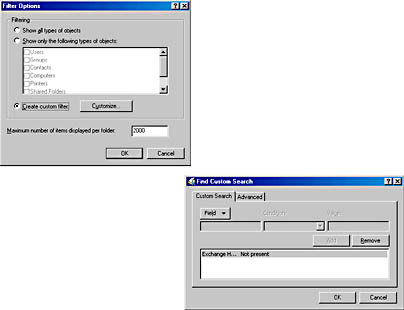
Figure 12.2 Filtering objects based on account attributes in the Active Directory Users and Computers snap-in
- Click View again, select Filter Options, and, in the Filter Options dialog box, activate Show All Types Of Objects, then click OK. Notice all users now appear under the Users folder. Close the Active Directory Users and Computers snap-in.
- Launch the Services utility from the Administrative Tools program group.
- In the console tree, right-click on Services (Local), point to All Tasks, and select Send Console Message.
- In the Send Console Message dialog box, under Message, type The server will shut down in approximately 1 minute.
- Under Recipients, click Add, and, in the Add Recipients dialog box, type BLUESKY-SRV2, then click OK.
- In the Send Console Message dialog box, click Send.
- Verify that a Messenger Service dialog box pops up on BLUESKY-SRV2, then click OK (see Figure 12.3).

Figure 12.3 Sending console notifications with the Services utility
- In the contents pane, right-click Microsoft Exchange System Attendant, and, from the shortcut menu, select Stop.
- In the Stop Other Servicesdialog box, verify that all Exchange 2000 services will be stopped as well. Click Yes to continue and shut down Exchange 2000 Server on the local computer.
- Launch the Event Viewer from the Administrative Tools program group.
- In the console tree, select Application Log.
- Verify that numerous Exchange-related events are displayed in the contents pane. Double-click on the last event where the source is MSExchangeSA.
- In the Event Properties Description, you can verify that the service was stopped cleanly (see Figure 12.4). Click OK.
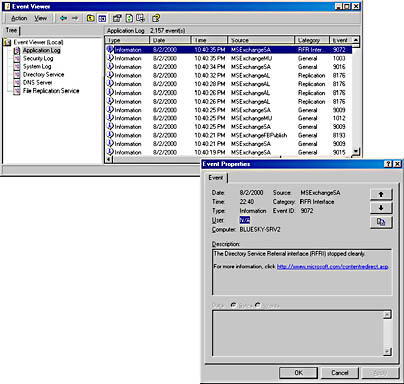
Figure 12.4 Examining Exchange 2000-related events in the Event Viewer
- Click View and then select Filter to display the Application Log Properties dialog box.
- Under Event Source, select MSExchangeSA, and then click OK. Notice that at this point only the events of the Exchange System Attendant are displayed in the contents pane.
- To display all events again, click View and select All Records.
- In the console tree, right-click Application Log, and, from the shortcut menu, select Properties.
- In the Application Log Properties dialog box, under Log Size, enter a Maximum Log Size of 2048, and activate the Overwrite Events As Needed option.
- Click OK and then close the Event Viewer.
- Launch the Performance tool from the Administrative Tools program group.
- In the console tree, make sure System Monitor is selected, and then, in the chart, click the plus sign (+) to display the Add Counters dialog box.
- By default, the counter % Processor Time is selected from the Processor object. Click Add.
- In the Add Counters dialog box, under Performance Object, select MSExchangeIS.
- From the Select Counters From List list box, select User Count, which displays the number of users connected to this Information Store, and then click Add.
- In the Select Counters From Computer list box, type \\BLUESKY-SRV2. Select the User Count counter for this server's MSExchangeIS, and click Add. If a System Monitor Control dialog box appears informing you that the data collection takes longer than expected, click OK.
- Click Close.
- Switch to the Service utility, make sure that the Performance tool is still visible on your screen, then right-click Microsoft Exchange Information Store, and select Start.
At this point, you can notice some processor activities on the local machine because several important Exchange 2000 services are starting (see Figure 12.5). The number of users, however, remains null because no users are currently working with the test environment.
- Close the Services utility and the Performance tool.
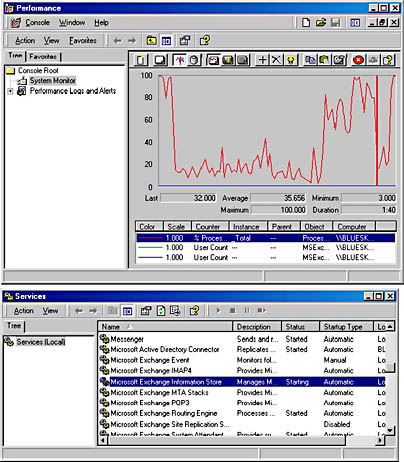
Figure 12.5 Checking the system performance with the Performance utility
- Click Start, point to Run, and, in the Run dialog box, type ntbackup. Click OK.
- In the Backup utility, click on the Backup tab.
- In the left pane, expand all nodes under Microsoft Exchange Server.
- Notice that you are able to back up the existing storage groups of all servers over the network (see Figure 12.6).
- Select the Microsoft Information Store under BLUESKY-SRV1 and BLUESKY-SRV2.
- Under Backup Destination, make sure File is selected (this exercise assumes that no tape drives are installed on your test computer; otherwise, you may select your backup media instead and skip Step 41).
- Click Browse, and, in the Open dialog box, under File Name, type C:\Exchange Backup\Online Backup, then click Open.
- Click Start Backup, and, in the Backup Job Information dialog box, click Start Backup again.
- If a Folder Does Not Exist dialog box appears, click Yes to create the folder (C:\Exchange Backup).
- When the backup operation is complete, click Report in the Backup Progress dialog box to verify the success of the backup and the performance.
- Close all applications and log off from Windows 2000.
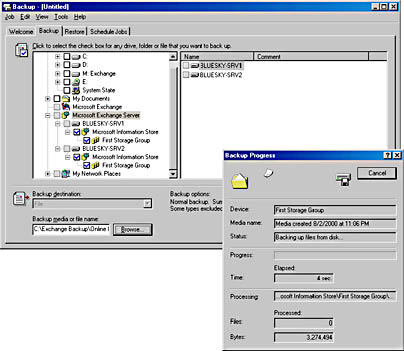
Figure 12.6 Backing up information stores over the network
Exercise Summary
Most of the standard Windows 2000 utilities are extended when Exchange 2000 Server is installed. Others, such as the Services tool, don't require extensions. The Active Directory Users and Computers snap-in is one of the most important standard management utilities because it allows you to manage user accounts in your Windows 2000 environment. The Exchange 2000 Setup program extends this tool to enable the administrator to manage mailbox resources. The filter capabilities of the Active Directory Users and Computers snap-in are very powerful and can help you facilitate the maintenance of recipient objects. You could, for instance, select all user accounts without an Exchange Home Server conveniently and create mailboxes for all of them at once. The management of mailboxes is covered in Chapter 13, "Creating and Managing Recipients."
EAN: N/A
Pages: 186