Lesson 2: Preparing the Server Installation
System requirements for a successful server installation will vary. You will need to address architectural issues, server roles, requirements for system performance, and questions regarding system maintenance. You need to decide between single-server and multiserver environments, and it might be advantageous to consider advanced configurations for load balancing and fault tolerance.
This lesson covers important tasks that demand your attention prior to installing Exchange 2000 Server. These include various dependencies, the delegation of administrative permissions for subsequent installations, and advanced configurations for hosted environments intended to support thousands of users.
At the end of this lesson, you will be able to:
- Describe the hardware requirements for a successful installation of Exchange 2000 Server.
- Identify important tasks that need to be accomplished before running the Setup program.
- Explain how to install and configure Exchange 2000 Server in large hosted environments.
- Describe the requirements for installing Exchange 2000 Server in a clustered system.
Estimated time to complete this lesson: 90 minutes
Exchange 2000 Requirements
During the setup of the first server, you need to define the organization name. This name cannot be changed later. Subsequent installations, on the other hand, introduce new questions. You must decide whether to add the server to the default administrative and default routing group or to new groups that you created with the Exchange System Manager. Several other necessities, such as software and hardware requirements, must also be met.
Hardware Requirements
The actual hardware requirements for Exchange 2000 Server are difficult to ascertain. Although minimum requirements can be determined quickly, they are seldom sufficient for a server that must cope with real-world demands. Nevertheless, if you check the product documentation, you will not find much discussion about detailed sample configurations—the flexibility of this system is simply too enormous to calculate the actual hardware requirements for every possible scenario beforehand.
Microsoft recommends, at a minimum, a Pentium 300 or faster processor and 128 or 256 megabytes (MB) of random access memory (RAM). This is appropriate for small- to medium-sized organizations, but does not achieve best system performance. For better performance, consider more powerful and sophisticated hardware configurations such as multiprocessor computers, 512 megabytes of RAM, and caching disk array controllers. It may seem that the minimum recommendation is fine to start with because you have the option to add further hardware, such as more memory or more processors, at a later time. Keep in mind, however, that the hardware industry is quickly introducing new systems. If you start with a single-processor system today and plan to add new hardware in the future, you may find that your processor type or memory bank is no longer available.
Microsoft recommends the following equipment for a typical computer running Exchange 2000 Server:
- 128 to 256 MB of RAM
- 2 gigabytes (GB) of available disk space on the drive for Exchange 2000 Server
- 500 MB on the system drive
- CD-ROM drive
- Intel Pentium or compatible at 300 Megahertz (MHz) or faster
- Paging file set to twice the amount of RAM or larger
- VGA-compatible display adapter
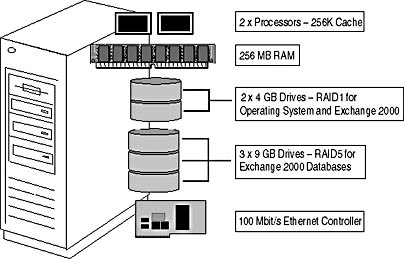
Figure 4.7 Exchange 2000 Server hardware configuration for small- to medium-sized environments
In addition, consider the two reference configurations shown in Figure 4.7 and Figure 4.8 when planning your server hardware. It is also a good idea to build a test system to simulate any number of users sending and receiving messages and working with public folders.
You can find a discussion about advanced hard disk arrangements and their purposes in Chapter 20, "Microsoft Exchange 2000 Server Maintenance and Troubleshooting."
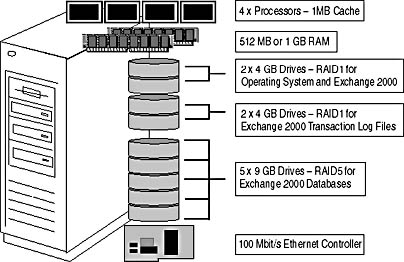
Figure 4.8 Exchange 2000 Server hardware configuration for medium- to large-sized environments
Software Requirements
Exchange 2000 Server can be installed on Microsoft Windows 2000 Server, Windows 2000 Advanced Server, or Windows 2000 Datacenter Server with Service Pack 1. It is important to note that the Internet Information Services (IIS) 5.0 with SMTP and Network News Transfer Protocol (NNTP) service must be installed prior to launching the Exchange 2000 Setup program. During the installation of Windows 2000, you will need to add the NNTP service manually. The SMTP service is part of the default installation.
NOTE
You need to install Exchange 2000 Server on an NT file system (NTFS) partition.
Exchange 2000 Server supports Windows 2000 clustering. To benefit from such a configuration, however, you need to install the Advanced Server or Datacenter Server edition of Windows 2000.
Active Directory Dependencies
You need to prepare Active Directory and the underlying Windows 2000 domain structure of your organization. This is important because you must have administrative permissions on the computer on which you will install Exchange 2000 Server. The computer needs to be located in your own domain or in a domain that trusts your domain. If this is not the case—if you cannot access the computer using your account—you will not be able to install or manage the Exchange 2000 computer. A single Exchange 2000 organization cannot span multiple Active Directory forests.
Licensing
Licensing is an important issue, but Microsoft's licensing agreements are not always easy to understand. You need to exercise care not to violate the software copyright. Finding the best options for you can help to maximize your financial investments. To give an example, if you are responsible for an educational institution, you may find appropriate options through Microsoft's special educational licensing program. Companies in the private business sector, in turn, may be eligible for a variety of different discounts through Microsoft's volume licensing, depending on the number of licenses obtained. Small companies with five or more PCs will find the Microsoft Open License Program attractive, and large organizations with hundreds of PCs are better off with the Select License Program.
NOTE
If you have any doubts, go to http://www.microsoft.com/ and search on the word "license" for the product you're looking for.
Installation Preparation
If you are planning to install Exchange 2000 Server in an environment with multiple domains in a forest, it might be advantageous to import the Exchange-specific schema extensions prior to the actual installation. This eliminates the need to be a Windows 2000 Schema Admin when installing Exchange 2000 Server at a later time. The Setup program of Exchange 2000 Server offers two specific modes for the purpose of preparing Active Directory, which you can launch through the command line switches /ForestPrep and /DomainPrep.
Preparing the Active Directory Forest
If you are responsible for messaging administration and have forestwide permissions to mange Active Directory, no special preparation is required. Make sure you have the permissions mentioned in Lesson 1, start the Exchange 2000 Setup program, and install the first server. All of the required forest modifications are then performed automatically.
NOTE
You need to install the first instance of Exchange 2000 Server into the domain where the schema master resides. By default, this is the first Windows 2000 domain controller installed in your forest. Only one domain controller in the forest can be the schema master.
However, should your messaging management be separated from Windows 2000 administration, you need to ask the Active Directory administrators to prepare the forest for you by launching ForestPrep. To run ForestPrep successfully, you need to be a member of the Enterprise Admins and Schema Admins groups and you need to be a member of the local Administrators group on the computer where you are running ForestPrep. Launch the Setup program from the \Setup\i386 directory on your Exchange 2000 installation CD using the command setup /ForestPrep. Accept the welcome page and end-user license agreement, enter your product key on the third wizard screen, and then, on the Component Selection page, make sure that the action next to Exchange 2000 Server is set to ForestPrep. Click Next, and on the Installation Type wizard screen, select Create An Exchange 2000 Organization. Subsequently, you need to specify the name of your new organization and the name of the administrator account or group responsible for installing Exchange 2000 Server. After that, ForestPrep is ready to go and prompts you a last time to verify the schema update. Click OK to start the processing.
Launched using the /ForestPrep switch, the Setup program extends the Active Directory Schema to add Exchange-specific classes and attributes as outlined in Chapter 2. These extensions affect the entire forest and may take a considerable amount of time to replicate throughout the forest. ForestPrep also creates the container object for the Exchange 2000 organization in Active Directory and assigns to the account that you specified Exchange Full Administrative permissions to the organization object. This account then has the authority to install and manage Exchange 2000 Server throughout the forest, and it has the authority to assign further administrators Exchange Full Administrative permissions once the first server is installed.
Preparing Windows 2000 Domains
To simplify the deployment of Exchange 2000 in your forest, run Setup with the option /DomainPrep in each domain including the domain where you ran ForestPrep to add further Exchange-specific configuration information to Active Directory. You need to be a member of the Domain Admins group for the domain that you want to prepare, and you also need to have administrative permissions on the computer from which you are running DomainPrep.
Launch Setup from the \Setup\i386 directory on your Exchange 2000 installation CD using the command setup /DomainPrep. Again, accept the welcome page and end-user license agreement, enter your product key on the third wizard screen, and then, on the Component Selection page, make sure that the action next to Exchange 2000 Server is set to DomainPrep. Click Next and complete the domain preparation. The server on which you run DomainPrep will become your domain's Recipient Update Server (RUS). This is especially important if you do not plan to fully deploy Exchange 2000 Server in the domain (the Exchange 2000 server for your users resides in another domain). You can read more about the management of recipients and the Recipient Update Service in Chapter 13, "Creating and Managing Recipients."
NOTE
When installing Exchange 2000 at a later time, you should install it on the server where DomainPrep was performed.
Exchange 2000 Roles and Permissions
Although an Exchange 2000 administrator is typically a Windows 2000 administrator, the reverse is not necessarily true. By default, only the administrator who has installed the first server or was specified during the preparation of the domain forest receives explicit administrative privileges at the Exchange level. Members of the Enterprise Admins and local Domain Admins groups inherit administrative permissions. They remain able to manage the entire domain environment as well as e-mail addresses and mailbox resources for Windows 2000 user accounts. Permissions for additional users must be granted manually to selected Windows 2000 accounts. Once this is done, these accounts can start the Exchange System Manager to accomplish configuration tasks or perform subsequent Exchange 2000 Server installations.
The Exchange System Manager includes a tool called the Exchange Administration Delegation Wizard that simplifies permission management. Similar to its Windows 2000 counterpart, used to delegate administrative control for OUs to individual administrators, the Exchange Administration Delegation Wizard simplifies permission management for Exchange administrators. You will use the Exchange Administration Delegation Wizard in Exercise 4 to prepare a subsequent Exchange 2000 Server installation.
Using the Administration Delegation Wizard, you can assign the following roles to your Exchange 2000 Server administrators (and security groups):
- Exchange Full Administrator. Can administer the Exchange organization and modify permissions on Exchange configuration objects.
- Exchange Administrator. Can administer the Exchange organization, yet does not have the ability to modify permissions on Exchange configuration objects.
- Exchange View-Only Administrator. Can only display the Exchange configuration information in read-only mode.
Microsoft recommends running the Exchange Administration Delegation Wizard after the first Exchange 2000 Server installation and before any subsequent installations. You cannot utilize this utility until the first Exchange 2000 server is installed.
NOTE
Enterprise and domain administrators that have been granted the role Exchange View-Only Administrator will remain fully capable of managing the Exchange 2000 organization due to permissions inherited from the Enterprise Admins or Domain Admins security groups. The Exchange Administration Delegation Wizard will list those accounts with the Exchange View-Only Administrator role although they are full administrators.

Exercise 4: Preparing and Performing a Subsequent Installation in a Subdomain
In this exercise you will prepare the domain CA.BlueSky-inc-10.com for Exchange 2000 Server. You will assign the administrator of CA.BlueSky-inc-10.com the responsibility to maintain the Exchange 2000 resources in CA.BlueSky-inc-10.com. You don't need to run Setup in ForestPrep mode because you already installed Exchange 2000 Server on BLUESKY-SRV1 in BlueSky-inc-10.com, which took care of the forest preparation.

To view a multimedia demonstration that displays how to perform this procedure, run the EX4CH4*.AVI files from the \Exercise_Information\Chapter4 folder on the Supplemental Course Materials CD.
Prerequisites
- Make sure BLUESKY-SRV1 and BLUESKY-SRV2 are up and running.
- Log on as Administrator to BLUESKY-SRV1 running Exchange 2000 Server.
- Insert the Exchange 2000 Enterprise Server CD into the CD-ROM drive (E drive) of BLUESKY-SRV2.
To change the Active Directory forest to native mode and install Exchange 2000 Server in a sublevel domain
- To switch the domain BlueSky-inc-10.com into native mode, on BLUESKY-SRV1, start the Active Directory Domains and Trusts utility from the Administrative Tools program group.
- In the console tree, expand all nodes, and then right-click on BlueSky-inc-10.com.
- From the shortcut menu, select Properties to display the BlueSky-inc-10.com Properties dialog box.
- Click Change Mode. An Active Directory warning message appears informing you that this is an irreversible process. Click Yes.
- In the BlueSky-inc-10.com Properties dialog box, click OK.
- In the Active Directory dialog box that appears to inform you that the configuration change was completed successfully and may take up to 15 minutes for replication to all domain controllers, click OK.
- Repeat Steps 1 through 6 for the domain CA.BlueSky-inc-10.com.
At this point, all your Windows 2000 domains operate in native mode (see Figure 4.9). This gives you more control over the forest and the ability to manage universal groups.
- To add the Administrator account from CA.BlueSky-inc-10.com to the Enterprise Admins group, start the Active Directory Users and Computers utility by right-clicking on BlueSky-inc-10.com and selecting Manage.
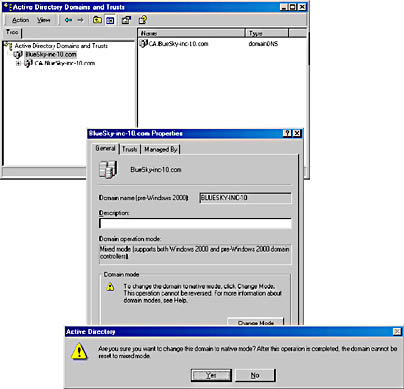
Figure 4.9 Switching Active Directory to native mode
- Make sure the Users container is selected in the Active Directory Users and Computers utility, and, in the details pane, double-click the Enterprise Admins group to display its properties.
- Switch to the Members tab, and click Add to display the Select Users, Contacts, Computers, Or Groups dialog box.
- Under Look In, select CA.BlueSky-inc-10.com, select the Administrator from the list of accounts and groups, click Add, and then click OK.
- In the Enterprise Admins Properties dialog box, click OK.
At this point, you have assigned the administrator from CA.BlueSky-inc-10.com the permissions to manage the entire Active Directory forest (see Figure 4.10). This was outlined for demonstrative purposes. The privileges of an enterprise administrator, however, are not required to successfully install Exchange 2000 Server.
- Start the System Manager from the Microsoft Exchange program group.
- Right-click on the organization object Blue Sky Airlines (Exchange) and, from the shortcut menu, select Delegate Control to start the Exchange Administration Delegation Wizard.
- On the wizard Welcome screen, click Next, and then, on the Users Or Groups wizard screen, click Add to add the administrator from the CA.BlueSky-inc-10.com domain (CA\Administrator) to the list of Users And Groups.
- In the Delegate Control dialog box, under Role, select Exchange Full Administrator, and then click OK.
- Click Next and, on the next wizard screen, click Finish to complete the delegation process, and then close all applications and log off.
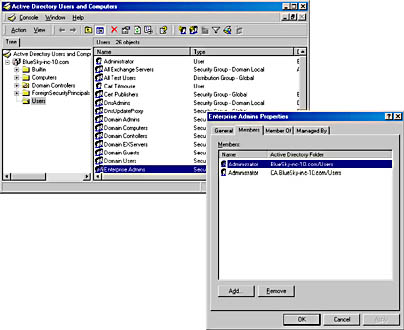
Figure 4.10 Adding the administrator from CA.BlueSky-inc-10.com to the Enterprise Admins
At this point, you have granted the administrator from CA.BlueSky-inc-10.com Exchange Full Administrator permissions, which is required to successfully install an Exchange 2000 server in an existing organization (see Figure 4.11).
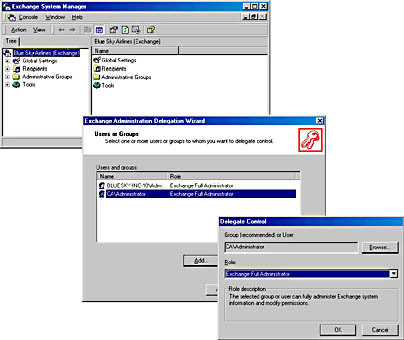
Figure 4.11 Making the administrator from CA.BlueSky-inc-10.com an Exchange Full Administrator
- On BLUESKY-SRV2, log on as Administrator from the domain BlueSky-inc-10.com (in the Log On To Windows dialog box under Log On To, make sure BLUESKY-INC-10 is selected).
- Click Start, select Run, and type: e:\setup\i386\setup.exe /domainprep, as shown in Figure 4.12.
- The Welcome To The Microsoft Exchange 2000 Installation Wizard screen appears. Click Next to start the preparation.
- In the End-User License Agreement dialog box, select I Agree, and then click Next to continue the installation successfully.
- On the Product Identification wizard screen, under CD Key, enter your CD key, and then click Next.
- On the Component Selection wizard screen, under Action, in the first row for Microsoft Exchange 2000, make sure DomainPrep is selected, and then click Next.
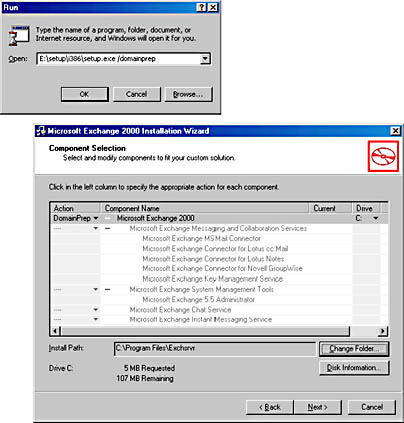
Figure 4.12 Running DomainPrep in CA.BlueSky-inc-10.com
- At this point, the Exchange 2000 Setup program is copying required support files to the computer and updates Active Directory using the specified computer account. If a dialog box appears informing you that the domain CA.Bluesky-inc-10.com has been identified as an insecure domain, click OK.
- On the final wizard screen that informs you about the completion of the preparation, click Finish.
- Log off and on again as Administrator from CA.BlueSky-inc-10.com (make sure CA is selected in the Log On To list box of the Log On To Windows dialog box).
- Click Start and select Run to run the command e:\setup\i386\setup.exe.
- On the Welcome To The Microsoft Exchange 2000 Installation Wizard screen, click Next to start the installation.
- In the End-User License Agreement dialog box, select I Agree, and then click Next.
- On the Product Identification wizard screen, enter your CD key, and then click Next.
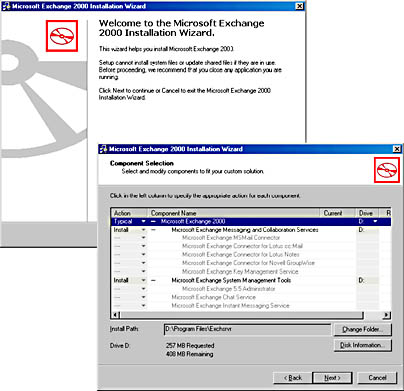
Figure 4.13 Installing Exchange 2000 in a prepared Windows 2000 domain
- Under Action, in the first row for Microsoft Exchange 2000, make sure Typical is selected, and then click Next.
- On the Licensing Agreement wizard screen, select I Agree That: if you want to successfully install Exchange 2000 Server, and then click Next.
- In case multiple administrative or routing groups exist in your organization, a Routing Group wizard screen will be displayed prompting you to select the location for the server. Make sure First Administrative Group/First Routing Group is selected, and then click Next. On the Component Summary wizard screen, verify the components included in a typical installation, and then click Next to start the actual installation of Exchange 2000 Server.
- On the final Microsoft Exchange 2000 Installation Wizard screen, click Finish.
Exercise Summary
Forest preparation is not necessary if you install Exchange 2000 Server immediately in the domain where the schema master resides. Likewise, you can skip the domain preparation, but domain preparation will be required if you need to support users in domains where you do not plan to install an Exchange 2000 server. The DomainPrep mode creates a global security group named Exchange Domain Servers and a domain local security group called Exchange Enterprise Servers. Exchange Domain Servers is then added as a member to the Exchange Enterprise Servers group, which grants appropriate rights to the RUS.
Front End/Back End Configurations
Configurations where numerous servers function as front end systems handling incoming client connections and fewer function as back end servers hosting the actual mailboxes are only interesting if you plan to support Internet-based client programs, such as IMAP4 messaging clients or Outlook Web Access. Support of Internet-based clients is the topic of Chapter 11, "Internet-Based Client Access."
Back End Server Configuration
Back end servers are ordinary Exchange 2000 servers hosting mailboxes and public folders. Because these servers are dedicated to handling the actual messaging databases, they are sometimes also called information store servers.
Front End Server Configuration
Front end servers are servers that proxy incoming client connections to the back end systems, which actually contain the users' mailboxes (see Figure 4.14). You configure a front end server by activating the This Is A Front-End Server check box in the server's properties within the Exchange System Manager. No further configuration is required. The information store remains intact on the front end servers, yet Internet-based clients will not access this repository.
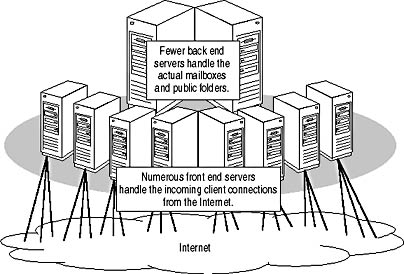
Figure 4.14 Concentration of incoming client connections through front end servers
Advantages of Front End/Back End Architectures
The main advantage of a front end/back end (FE/BE) architecture is the concentration of incoming client connections through front end servers. Every client connection consumes resources on the server and adds traffic to the network. Hence, incoming client connections from millions of potential users would certainly overwhelm a single system. You will need to split the incoming connections across multiple servers, which then concentrate and proxy the connections to the actual back end server where the mailboxes reside.
Front end servers are able to retrieve information about the location of a particular mailbox, or the home server attribute, from Active Directory. This information is available to all of the front end servers, which means that your users can connect to any of the front end servers, which then determine the user's home server and proxy the connection to the correct information store server. Hence, you can use software or hardware load-balancing mechanisms to randomly distribute the load of incoming connections across all of your front end systems. It is also easy to move mailboxes between servers in the back end, for instance, when troubleshooting a particular back end server.
Internet Security Issues
In an FE/BE configuration, you have the option to enforce encrypted connections between front end servers and Internet-based client programs using Secure Sockets Layer (SSL), whereas the servers themselves can communicate nonencrypted over the backbone without any SSL overhead. In this way, processing required for encryption and decryption is only necessary on the front end systems. The workload on the back end servers is not affected.
For maximum security, you can implement advanced firewall configurations between the clients and the front end servers and between the front end and back end systems. Large-scale hosted environments will find this deployment especially appropriate. You can read more about firewall configurations in Chapter 19, "Implementing Advanced Security."
Exercise 5: FE/BE Configuration Options
In this exercise you will configure one computer in your test environment as a front end server and another as the back end system. You will then use Outlook Web Access on the front end server to access your mailbox residing on the back end server running Exchange 2000 Server.
To view a multimedia demonstration that displays how to perform this procedure, run the EX5CH4*.AVI files from the \Exercise_Information\Chapter4 folder on the Supplemental Course Materials CD.
Prerequisites
- You must have successfully completed Exercise 4.
- Log on as Administrator of BlueSky-inc-10.com to BLUESKY-SRV1 running the first Exchange 2000 server in your test environment.
- Log on as Administrator of CA.BlueSky-inc-10.com to BLUESKY-SRV2 running the second Exchange 2000 server in your test environment.
To configure BLUESKY-SRV2 as a front end Server
- On BLUESKY-SRV2, start the System Manager from the Microsoft Exchange program group.
- Under Administrative Groups, select First Administrative Group, then Servers, and then select BLUESKY-SRV2.
- Right-click on BLUESKY-SRV2, and then click Properties.
- Select the This Is A Front-End Server check box and click OK.
- In the Exchange System Manager dialog box informing you that you need to reboot the server or restart the IIS services, click OK.
- Close the Exchange System Manager.
At this point, you have configured BLUESKY-SRV2 as a front end server proxying incoming Internet-client connections to further Exchange 2000 servers in the backbone (see Figure 4.15).
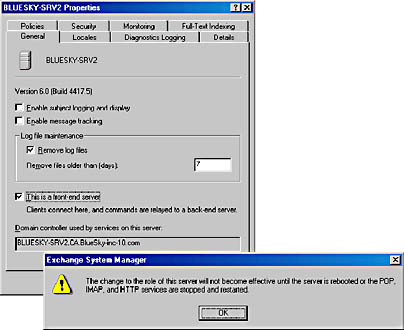
Figure 4.15 Configuring a front end server
- Click Start, then Run, and, in the Run dialog box, type iisreset, and click OK. This will stop and restart all IIS service and put your changes into effect.
- To create a mailbox for the administrator of CA.BlueSky-inc-10.com, start the Active Directory Users and Computers utility from the Microsoft Exchange program group, select the Users organizational unit from within CA.BlueSky-inc-10.com, right-click on Administrator, and, from the shortcut menu, select Exchange Tasks.
- On the Welcome page of the Exchange Task Wizard, click Next.
- On the Available Tasks wizard screen, make sure Create Mailbox is selected, and then click Next.
- On the Create Mailbox wizard screen, specify the following information:
Alias AdminCA Server Blue Sky Airlines/First Administrative Group/BLUESKY-SRV1 Mailbox Store First Storage Group/Mailbox Store (BLUESKY-SRV1) - Click Next to create the mailbox on server BLUESKY-SRV1, and, after completion, click Finish in the final wizard screen.
- On BLUESKY-SRV1, click Start, and then Run again. In the Run dialog box, type http://bluesky-srv2/exchange/AdminCA, and click OK to start Outlook Web Access via the front end server BLUESKY-SRV2.
- If the Internet Connection Wizard appears, select I Want To Set Up My Internet Connection Manually, or I Want To Connect Through A Local Area Network (LAN), and click Next. On the next wizard screen, select I Connect Through A Local Area Network (LAN), and click Next. On the third wizard screen, accept the defaults, and click Next again to reach the next page, where you need to select No to avoid setting up an Internet mail account. Click Next one more time, and then Finish to finally start Internet Explorer.
- The Enter Network Password dialog box appears because the Administrator account from the BlueSky-inc-10.com domain is not the owner of the mailbox AdminCA (which is the Administrator from the CA.BlueSky-inc-10.com domain). Under User Name, type CA\Administrator, and, under Password, type password, then click OK.
At this point, you should be able to verify that you can log on to the AdminCA mailbox using Outlook Web Access. Although it appears as if the resources reside on BLUESKY-SRV2, you are actually working with a mailbox on BLUESKY-SRV1 (see Figure 4.16). If your browser returns an error message, wait several minutes and try again—the Exchange server may still be creating the necessary resources.
- Close all programs and log off.
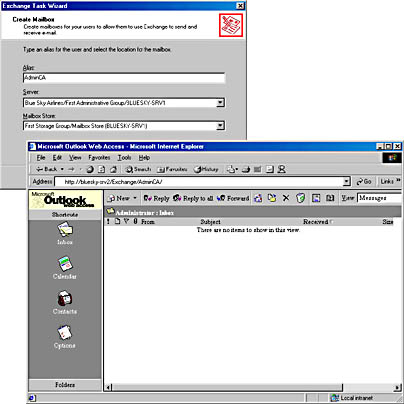
Figure 4.16 FE/BE and Outlook Web Access
Exercise Summary
It is relatively easy to configure a front end server to proxy HTTP, IMAP4, and POP3 traffic to a back end server that actually contains the user's mailbox. The information store on the front end server is not utilized. Instead the front end system accesses the information store server on behalf of the client. The user is not aware that the resources reside on another system somewhere in the provider's network and indeed don't require any direct network connection.
Installing Exchange 2000 Server in a Clustered Environment
The Advanced Server and Datacenter Server editions of Windows 2000 support the cluster technology, which can be used to bind multiple servers so tightly together that they will act as one logical unit. Clustering is a method that provides reliability through complex hardware redundancy. Servers within a cluster interact with each other to provide failover support in emergencies. If a particular process fails on one server, another server takes over, thus continuously providing server-based resources to the network. Clustering can thus significantly improve the reliability of your server-based applications, such as Microsoft SQL Server or Exchange 2000 Server.
Configuration Requirements
The purpose of a cluster is to provide multiple servers to the network as one virtual server. Hence, a cluster requires a LAN-like connection for client access, and the protocol used in the LAN must be TCP/IP. You must bind the nodes of a cluster server using a separate, isolated LAN. The cluster nodes must also share a common central hard disk system, which becomes the storage media for the cluster-aware applications. All nodes can then have access to the cluster resources. In addition, each node requires a local (not shared) hard disk that will host the operating system and the Exchange 2000 Server program files.
NOTE
Use of identical hardware platforms and configurations for all nodes of a particular cluster server is recommended.
The hardware requirements for a cluster server configuration are as follows:
- Central hard disk system, which is shared between the nodes
- Dedicated and isolated LAN link between the nodes
- LAN-like connection and TCP/IP support between cluster and clients
- Local hard disk on each node for the operating system and other program files
The installation of Exchange 2000 Server in a clustered environment is covered in more detail in Chapter 7, "Microsoft Exchange 2000 Server in Clustered Environments."
EAN: N/A
Pages: 186