Lesson 1: Deployment Considerations
Exchange 2000 Server is enormously flexible and offers numerous mutually exclusive deployment options. You have to decide what is best for your organization. Would you prefer centralized or decentralized system administration? Centralized management is usually preferable, but not always appropriate. Therefore, it is important to define a suitable deployment plan designed around your infrastructure needs. This will give you a clear direction for your Exchange 2000 environment. It also benefits your users because it ensures that Exchange 2000 Server will meet their requirements. Finally, a deployment plan benefits your organization's management because it outlines business goals, time frames, and necessary investments.
This lesson discusses aspects that you should take into consideration when planning your Exchange 2000 infrastructure. Even if your environment concentrates all its resources in one location and is easy to manage, give some thought to administrative dependencies and infrastructure.
At the end of this lesson, you will be able to:
- Identify the advantages and disadvantages of centralized and decentralized management structures.
- Describe the purpose of administrative and routing groups.
- Explain the restrictions that apply to mixed-mode environments in comparison to native-mode organizations.
Estimated time to complete this lesson: 75 minutes
Distributed Versus Centralized Management
The dynamics of distributed PC-based networks are challenging to the people in charge of their maintenance: You simply can't be in more than one place at the same time. Because of this, distributed configurations have a higher total cost of ownership than their centralized counterparts. Directory services offer the ability to centralize administration and provide a simplified, faster, and more coordinated organization (see Figure 4.1). That is why Microsoft, Novell, and Banyan have each developed their own directory services.
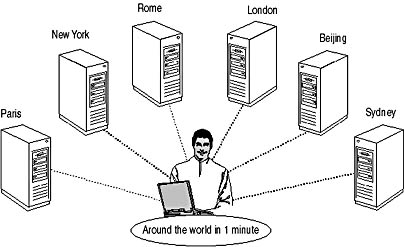
Figure 4.1 Benefits of centralized administration
Windows 2000 Permissions
In a standard Windows 2000 domain environment, only the administrator of the top-level domain has the required permissions to install Exchange 2000 Server. In other words, no sublevel domain administrator can just set up Exchange 2000 Server in your domain environment without prior coordination. This restriction applies no matter how complicated your domain forest. If you are the administrator of the top-level domain, you are in total control. You may assign other administrators the required permissions or perform the installation tasks yourself.
To first install Exchange 2000 Server, you need to use an account that is a member of one of the following Windows 2000 security groups:
- Domain Admins
- Enterprise Admins
- Schema Admins
Schema Admins membership is only required for the installation of the first Exchange 2000 server in a forest.
NOTE
To install Exchange 2000 Server successfully, you need to run the Setup program in an Active Directory environment on Windows 2000 Server, Windows 2000 Advanced Server, or Windows 2000 Datacenter Server. The installation must be updated with Windows 2000 Service Pack 1.
Exchange 2000 Server Permissions
In addition to Windows 2000 requirements, you need explicit administrative permissions in Exchange 2000 if you want to add another server to an existing organization. You will set the required permissions in Lesson 2of this chapter to prepare a subsequent Exchange 2000 Server installation.
Windows 2000 Server and Exchange 2000 Administration
If you are working in a single domain environment as the only administrator for both Windows 2000 Server and Exchange 2000 Server, you don't need to delegate authority to any additional accounts. Just install Exchange 2000 Server using the default Administrator account. If you are working in a more complex environment, however, consider the following aspects of Windows 2000 before installing Exchange 2000 Server:
- Consolidate multiple existing domains into fewer Windows 2000 Server domains if possible to simplify the environment prior to the installation of Exchange 2000 Server.
- Create individual security groups for each administrative role in your environment, such as administrators for user accounts and mailboxes and administrators for system configuration. Add members to those groups accordingly and assign them the required permissions.
- Form a deployment team with members of both messaging administrators and administrators managing Active Directory. If your enterprise has a separate team for each platform, careful coordination is essential. Assign at least one administrator the permissions to manage both Windows 2000 Server and Exchange 2000 Server.
- Review your Windows 2000 Active Directory design prior to the installation of Exchange 2000 Server. As outlined in Chapter 2, "Integration with Microsoft Windows 2000," the load on the Global Catalog will increase due to address lookups of Messaging Application Programming Interface (MAPI)-based clients and other messaging components.

Exercise 1: Centralized Exchange 2000 Administration
In this exercise you will verify that only the administrator of the top-level domain BlueSky-inc-10.com is allowed to manage and add Exchange 2000 resources to your test environment. In other words, you will check whether the administrator from the subdomain CA.BlueSky-inc-10.com has the ability to install Exchange 2000 Server.

To view a multimedia demonstration that displays how to perform this procedure, run the EX1CH4.AVI files from the \Exercise_Information\Chapter4 folder on the Supplemental Course Materials CD.
Prerequisites
- Restart BLUESKY-SRV1 and BLUESKY-SRV2 to bring the test environment into a standard operational state.
- Log on as Administrator@CA.Bluesky-inc-10.com to the computer BLUESKY-SRV2 running Windows 2000 Advanced Server without Exchange 2000 Server.
- Insert the Exchange 2000 Enterprise Server CD into the CD-ROM drive (E drive) of BLUESKY-SRV2.
To verify required permissions for setting up Exchange 2000 Server
- Start the Exchange 2000 Setup program from the \Setup\i386 directory on the installation CD.
- The Welcome To The Microsoft Exchange 2000 Installation Wizard screen appears. Click Next to start the installation.
- In the End-User License Agreement dialog box, click I Agree, and then click Next to continue the installation successfully.
- In the Product Identification page, under CD Key, enter your CD key, and then click Next.
- In the Component Selection page, under Action, in the first row for Microsoft Exchange 2000, select Minimum. Verify that a Microsoft Exchange 2000 Installation Wizard dialog box appears.
At this point, you will be informed that you don't have the required permission to set up Exchange 2000 Server (see Figure 4.2). Although you are using an administrator account fully capable of managing the sublevel domain (decentralized), you are unable to install Exchange 2000 Server because this enterprisewide messaging and collaboration system favors a centralized management by default.
- Click OK to close the dialog box, and then click Cancel to abort the installation.
- In the final Microsoft Exchange 2000 Installation Wizard dialog box asking you whether you are sure you want to cancel, click Yes.
Exercise Summary
Exchange 2000 Server administration is bound to Windows 2000 administration because both use Active Directory to store configuration and security-related information. Someone who plans to set up Exchange 2000 Server on any given network must have access to update Active Directory.
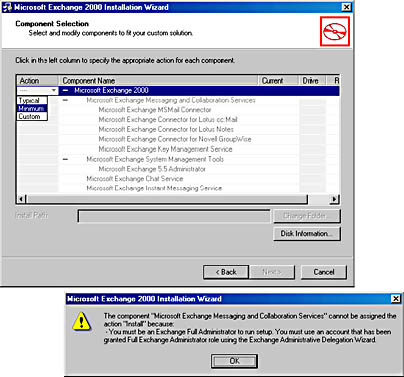
Figure 4.2 An unsuccessful Exchange 2000 installation attempt
Exchange 2000 Hierarchy
Although desirable, it is not always practical to enforce a centralized administrative model, for instance, if you are in charge of a large computer network with server resources in different geographic locations. User account administration, however, should not be affected by physical system arrangements.
NOTE
Exchange 2000 Server allows you to design the system administration independently of physical network links and server arrangements and can be adapted to both centralized and decentralized infrastructures.
Exchange 2000 Boundaries
There are three separate boundaries you need to take into consideration when planning your Exchange 2000 infrastructure. These are namespace, administrative groups, and routing groups (see Figure 4.3). The namespace is your Active Directory forest, which contains all of the directory information for your Exchange 2000 environment. To subdivide the management of resources within a particular namespace, use administrative groups. It's often applicable to define your administrative topology according to departments or divisions. The physical network topology should dictate the configuration of routing groups because they define how messages are actually transferred across the network. They also help you to optimize access to public folder resources. Servers are set in routing groups, and routing groups are typically collected into administrative groups, although you can split a routing group across multiple administrative groups (see Figure 4.3).
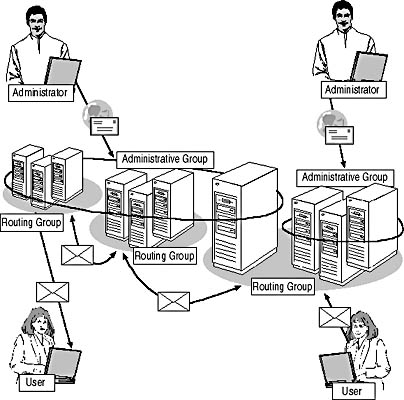
Figure 4.3 Administrative groups and routing groups
NOTE
The relationship between routing groups and administrative groups is not necessarily hierarchical.
Exchange 2000 Namespace
The namespace represents the core of the Exchange 2000 hierarchy. It exists in Active Directory in the form of a domain forest and contains directory information about all of the Exchange 2000 resources, for instance, to map user accounts to their corresponding mailboxes. Hence, within the namespace, user accounts can be resolved to their corresponding mailboxes.
NOTE
All Exchange 2000 resources must exist in the same namespace (such as the Active Directory forest). Consequently, Exchange 2000 organizations cannot span multiple namespaces (such as multiple forests).
Administrative Groups
Use administrative groups to define the management topology of your organization. Administrative groups help to simplify system management, for instance, to define groups of administrators separately responsible for servers in different departments. In another scenario, you may group dedicated servers, such as public folder servers, together in an administrative group and assign them a group of administrators specifically responsible for public folder maintenance. You can read more about public folder management in Chapter 17, "Public Folder Management."
Routing Groups
Similar to Windows 2000 sites, you should define routing groups primarily to describe regions of high-speed connections within your network. For instance, if your enterprise is located in one physical location relying on one high-speed local area network (LAN), you don't need to configure routing groups at all. Placing all servers in the first routing group that is automatically created by Exchange 2000 Server guarantees simple and fast delivery of messages. Messages sent between servers in the same routing group are transferred directly and immediately using the Simple Mail Transfer Protocol (SMTP) transport service.
Manual administration becomes necessary only when you need to connect two or more routing groups or when you need to install connectors to foreign messaging systems. You can use a Routing Group Connector, X.400 connector, or an SMTP Connector to provide a message path between Exchange 2000 routing groups.
Grouping of Servers
When installing the very first server, you are automatically creating an administrative group and a routing group (see Exercise 2). You are not prompted for their creation. However, when you install subsequent Exchange 2000 servers, you need to specify an administrative and a routing group in which to add the server. Every server in your organization must belong to an administrative and a routing group. After installation, you can move servers between groups, which might be advisable if management or physical conditions in your network have changed.
Exercise 2: Default Administrative and Routing Group Configuration
In this exercise you will examine the hierarchal structure of your test environment. Specifically, you will look for administrative and routing groups, which are hidden by default. You can easily make them visible with the Exchange System Manager utility.
To view a multimedia demonstration that displays how to perform this procedure, run the EX2CH4.AVI files from the \Exercise_Information\Chapter4 folder on the Supplemental Course Materials CD.
Prerequisites
- Log on as Administrator to BLUESKY-SRV1 running Exchange 2000 Server.
To configure System Manager to display routing and administrative groups
- Start the System Manager from the Microsoft Exchange program group.
- Right-click the top-level node Blue Sky Airlines (Exchange), and, from the shortcut menu, select Properties.
- In the Blue Sky Airlines (Exchange) Properties dialog box, select the Display Routing Groups and Display Administrative Groups check boxes, and then click OK. In the message box informing you that you need to restart the System Manager, click OK and restart the System Manager.
- At this point, you should be able to find a container called Administrative Groups in the console tree. Most of the other nodes are now placed underneath this node for better orientation. Expand all the nodes. By selecting the Members container within the First Routing Group object, you will see that the server BLUESKY-SRV1 is the Master server in the First Routing Group, which you can find under Routing Groups (see Figure 4.4).
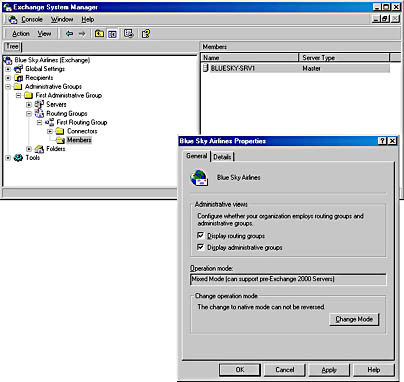
Figure 4.4 Identifying the Master Server
Exercise Summary
If your situation permits a centralized administration, use a single administrative group containing all server resources, which may then be split across a number of routing groups. This allows you complete control over Exchange 2000 Server with minimal coordination overhead for administration tasks. The centralized model is most suitable for small- and medium-sized organizations.
If your environment has several departments independently maintaining their own server resources and user accounts, configure multiple administrative groups with the Exchange System Manager—one or more for each department or division—and assign permissions to establish a decentralized administrative model. Each of the departments and divisions is then able to define its own routing group topology. This model is suitable for large companies in which a central information technology bureau may be responsible for managing standards and guidelines but not for daily system administration. You can read more about the management of administrative groups in Chapter 14, "Managing Server Configuration."
Mixed Mode and Native Mode
If you have administered previous versions of Exchange Server, you will find many of the structural elements in Exchange 2000 Server familiar, especially if you operate in mixed mode for backward compatibility. For example, you will be limited to a 1:1 relationship between administrative and routing groups in regard to Exchange Server sites.
If you are not using an earlier version of Exchange Server and are not planning to connect your Exchange 2000 environment to a server running Exchange Server 5.5 in the future, don't worry about mixed mode and native mode. Go to Exercise 3 and switch the environment into native mode to gain the full flexibility of Exchange 2000 Server.
Mixed Mode
In mixed mode, administrative groups map directly to sites in an Exchange Server 5.5 organization. This means that Exchange Server sites replicated to Active Directory appear as administrative groups and administrative groups replicated to the Exchange Server directory appear as sites. For backward compatibility reasons, the mixed mode limits Exchange 2000 Server to constraints imposed by earlier software releases.
The following limitations apply in mixed mode:
- Administrative groups are handled similar to Exchange Server 5.5 sites.
- It is impossible to move mailboxes between servers in different administrative groups.
- Routing groups can only contain servers from the same administrative group. Although one administrative group may contain multiple routing groups, routing groups cannot span multiple administrative groups (see Figure 4.5).
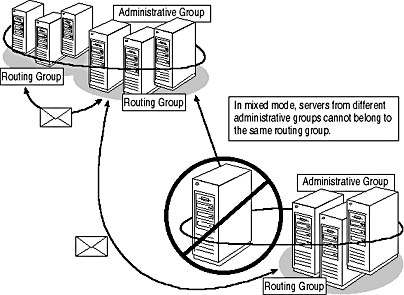
Figure 4.5 Exchange 2000 Server routing in mixed mode
However, it is possible to move servers between routing groups in the same administrative group.
NOTE
By default, Exchange 2000 Server operates in mixed mode to ensure maximal interoperability with previous Exchange Server versions.
Native Mode
You can switch Exchange 2000 Server to native mode if you don't plan to use previous versions of Exchange Server or as soon as you have upgraded all of your servers. In native mode, earlier release restrictions, which limit the flexibility of routing groups, don't apply. Hence, routing groups can contain servers from multiple administrative groups, and you gain the ability to create administrative groups independently of the routing infrastructure for your organization. It is also possible to move servers between administrative groups should the underlying infrastructure require this kind of change.
NOTE
Keep in mind that switching to native mode is an irreversible process; you cannot go back to mixed mode. It is likewise impossible to install earlier versions of Exchange Server into a native mode organization.
Exercise 3: Checking the Mixed/Native Mode Attribute
In this exercise you will check whether your organization operates in mixed mode. If it does, you will switch it to native mode. You will use the Active Directory Services Interface (ADSI) Edit tool to check where the Exchange System Manager keeps track of the mode of your organization.
To view a multimedia demonstration that displays how to perform this procedure, run the EX3CH4.AVI files from the \Exercise_Information\Chapter4 folder on the Supplemental Course Materials CD.
NOTE
You should use the ADSI Edit utility to view the settings, but generally use the Exchange System Manager to configure your system. Using ADSI Edit incorrectly can seriously damage your Active Directory information and may require you to reinstall your entire test environment.
Prerequisites
- Install the support tools from the Windows 2000 Server installation CD (\Support\Tools directory) on BLUESKY-SRV1 using the default installation options. If the software is not at hand, skip the steps that require ADSI Edit, yet make sure you follow the procedure to switch the organization into native mode using Exchange System Manager.
- Log on as Administrator to BLUESKY-SRV1 running Exchange 2000 Server.
To change from mixed mode to native mode
- Click Start, point to Programs, then to Windows 2000 Support Tools, then Tools, and then select ADSI Edit.
- Open the Configuration container [Bluesky-srv1.Bluesky-inc-10.com], then the container labeled CN=Configuration,DC=Bluesky-inc-10,DC=com, then the container named CN=Services, then CN=Microsoft Exchange, and right-click on CN=Blue Sky Airlines.
- From the shortcut menu, select Properties to display the CN=BlueSky Airlines Properties dialog box.
- On the Attributes property page, in the Select Which Properties To View list box, make sure Optional is displayed, and then, under Select A Property To View, select msExchMixedMode. Verify that the Attribute Value is set to True, which indicates mixed mode operation. Click OK.
- Start the System Manager snap-in from the Microsoft Exchange program group.
- Right-click the top-level node Blue Sky Airlines (Exchange), and from the shortcut menu, select Properties.
- In the Blue Sky Airlines Properties dialog box, in the General tab, click Change Mode.
- An Exchange System Manager warning message will be displayed, informing you that this operation is irreversible. Click Yes to confirm that you want to switch your organization to native mode.
- In the Blue Sky Airlines Properties dialog box, click OK.
At this point, you should switch back to the ADSI Edit utility and repeat Steps 2 through 4. Note that the msExchMixedMode attribute is now set to False, indicating that the organization is operating in native mode (see Figure 4.6).
- Close ADSI Edit and the Exchange System Manager.
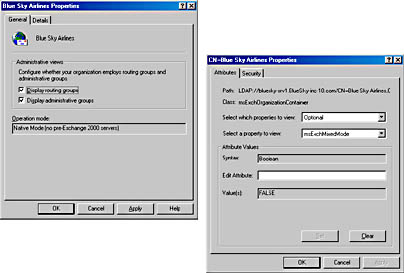
Figure 4.6 Switching to native mode
Exercise Summary
The msExchMixedMode attribute in Active Directory defines the mode of your Exchange 2000 Server organization as mixed mode or native mode. Using the ADSI Edit utility, you can verify that your organization is operating in native mode. However, you should not set the msExchMixedMode attribute back to True manually to attempt to switch your organization back into mixed mode. This only switches back the display in the Exchange System Manager. Do not manipulate the msExchMixedMode attribute in ADSI Edit to avoid configuration inconsistencies.
EAN: N/A
Pages: 186