Lesson 2: Managing Outlook Forms
Applications based on Outlook forms are not like typical Windows-based applications because they are available only in Outlook. In other words, they are client application dependent. Workgroup applications are also network dependent because they rely on storage and deployment mechanisms provided by Exchange 2000 Server. You only have to publish a custom form in one step, and it will be available to all users in the organization.
This lesson deals with the management of Outlook forms. It introduces available forms libraries and their specific purposes and covers important management aspects related to send and post forms.
At the end of this lesson, you will be able to:
- Describe the purposes of forms libraries and decide which library to use in a given situation.
- Manage forms libraries available on Exchange 2000 Server.
- Install forms using Outlook 2000.
Estimated time to complete this lesson: 45 minutes
Forms Libraries
Exchange 2000 Server provides three types of libraries where you can store Outlook forms: the folder forms library (FFL), the organizational forms library (OFL), and the personal forms library (PFL). All three let you maintain electronic forms applications centrally on the server (see Figure 21.4).
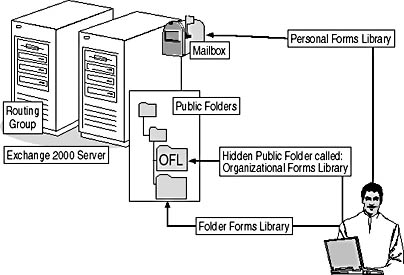
Figure 21.4 Possible server-based repositories for Outlook forms
Folder Forms Library
An FFL associates Outlook forms with message folders, which is the best place for post forms. Whether you install a form in a public, mailbox, or personal folder, the FFL keeps track of the association and provides the form only if the corresponding folder has been opened. For an example, assume that you have installed a Candidates form in a public folder called Job Applicants. Because of the association between the form and the folder, the New Candidates command is available on the Actions menu only if you have already selected the Job Applicants folder.
Public folders are the foundation of workgroup applications because they share their FFLs and all the electronic forms they contain. However, you should not publish workgroup applications during the development phase because they will be replicated between routing groups and made available to users. To test your prototypes, use mailbox and personal folders instead. Alternatively, you may restrict access to the public folder during the forms development phase in the Administration tab by setting the folder's This Folder Is Available Only setting to Owners Only.
Organization Forms Library
An OFL is a system public folder that you can use to maintain send forms, which are not associated with a particular folder. OFLs are commonly available to all users in the organization. To select a form published in an OFL, open the Tools menu, point to Forms, and then select the Choose Form command. In the Choose Form dialog box, under Look In, select Organizational Forms Library, and then double-click the form you want to launch.
By default, no OFL exists. To create an OFL, launch Exchange System Manager. Expand your administrative group, expand Folders, and then right-click Public Folders and select View System Folders. Expand Public Folders, right-click EFORMS REGISTRY, point to New, and then click Organizational Form. You need to define a name for the folder and specify an appropriate language that corresponds to your clients. It is a good idea to include a hint about the OFL language in the name of the OFL folder. Optionally, you may provide a description of the library.
You cannot create more than one OFL per client language. Outlook 2000 will look for an OFL folder that corresponds to the client language before it defaults to the first available library on the server. You must implement separate OFLs for each client language in your organization if you want to provide localized send forms to your users.
OFLs are replicated across the organization through replication of the MAPI-based public folder hierarchy. You may configure content replication to provide access to the organizational forms in all locations. Public folder replication was covered in Chapter 18, "Public Folder Replication."
Personal Forms Library
A PFL maintains the send forms that you don't want to share with other users. This library resides in your mailbox and is not replicated anywhere. An installed form is available only in the Choose Form dialog box of your Outlook client. Other users cannot launch your private form unless they install it manually in their own PFL as well. Certain forms, such as send forms in the development stage, should be installed in a PFL to prevent their distribution across the entire organization.
If you are developing a send form that you are not planning to register in a public forms library (where recipients would have access to it), select the Send Form Definition With Item check box, which you can find in the Properties tab of your form in design mode. Sending the form definition with the message ensures that the recipient will be able to display the custom form when the item is opened. Depending on the size of your forms project, this can significantly increase the size of your messages.
Managing Forms
Forms libraries require minimal administration. It is mainly an issue with OFLs because they do not exist by default. FFLs are created implicitly along with their message folders; they inherit the folders' configurations and user permissions. Only a folder owner can install Outlook forms. PFLs do not require extensive administration either because they are associated with mailboxes. Only the mailbox owner and privileged delegates can install private forms.
OFL Security
By default, only the administrator who created the library can install Outlook forms in an OFL. Consequently, you might have to designate additional privileged OFL owners who can publish send forms in your organization. In Exchange System Manager, right-click the OFL public folder under EFORMS REGISTRY, select Properties, click on the Permissions tab, and click Client Permissions to designate the OFL owners. The configuration of public folders was covered in Chapter 17, "Public Folder Management."
NOTE
You cannot manage permissions for OFLs using Outlook because OFLs are hidden public folders.
Using Applications Offline
Outlook forms are typically maintained centrally on the server. This can be a problem if users want to open forms messages while working offline. The associated form is not available during offline operation. To work around this problem, you need to configure an offline folder store (.ost), as explained in Chapter 9, "MAPI-Based Clients." Outlook forms are then downloaded implicitly into the local storage file when mailbox and public folders are synchronized. Once the forms are available locally, users can work as if they were online.
NOTE
You can install post forms in a personal folder (a .pst file) so that they are available for use offline. However, personal folders cannot be shared with other users in your organization.
Installing Outlook Forms
Although you can use Exchange System Manager to create OFLs and manage public folder owners, you cannot use this utility to install Outlook forms in a forms library you need to use Outlook.
To publish an Outlook form, display the desired form as if you want to create a new item, open the Tools menu, point to Forms, and then select Publish Form As. This command is also available in design mode when working with the Outlook Forms Designer. In the dialog box that appears, specify a Display Name and a Form Name, specify a forms library under Look In, and then click Publish to complete the installation. If you have developed a custom send form, Outlook 2000 will display a message box asking you whether you want to send the form description with the messages. Clicking Yes in this box corresponds to selecting the Send Form Definition With Item check box in the Properties tab.
Managing Installed Outlook Forms
At times you might want to delete installed forms or change a form's properties. For this purpose, use Forms Manager. You can launch this tool in a variety of ways. For instance, you can right-click a public folder, select Properties, click on the Forms tab, and click Manage. Another way is to open the Tools menu, select Options, click on the Others tab, click Advanced Options, click Custom Forms, and then click Manage. Forms Manager allows you to copy forms between forms libraries, update or delete them, or change form properties. You also can use this tool to install legacy 16-bit forms developed with the old Microsoft Exchange Forms Designer. Use the Set button in the upper right corner to select the desired forms library you want to work with.
Working with Outlook Forms
Perhaps the most amazing feature of Outlook forms is their automatic distribution and installation: You simply install the form in a forms library and the system takes care of the rest. For instance, if you have implemented a workgroup solution based on a public folder, associated this folder with a custom form, and used this form to create items in this folder, Outlook will use the correct form automatically when you open these items again. Even if a user has never used your form before, Outlook will determine the form, download it into the user's local forms cache, and use it to display the information. Outlook forms installed in a public forms library are available to all users in your organization who can access the folder contents.
Outlook 2000 associates items with electronic forms based on their message class. Custom forms write message class information into each item's Message Class field. Custom message classes are derived from the standard forms originally used to create the forms. The form name, defined when publishing a form, is appended to create the new message class. To give an example, a Job Candidate form might have the message class IPM.Contact.Job Candidate.
Outlook checks the item's message class and looks for the associated form in the following locations (see Figure 21.5):
- Local forms cache. For improved performance, Outlook will load the form from its cache if it was used (and downloaded) previously. However, before the form is launched, Outlook checks for an updated version in the corresponding forms library. The last modified time of the cached form is compared to the last modified time of the form in the forms library. Outlook will update its forms cache if the forms library contains an updated version.
- Currently selected folder. If the form was not downloaded beforehand but is installed in an FFL, Outlook will find the form in the currently selected folder, download it into the cache, and launch it.
- Personal Forms Library. If the form is not in the FFL, it might be in the PFL of the current user.
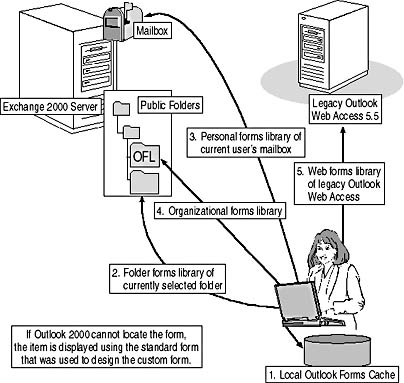
Figure 21.5 Locating an Outlook form
- Organizational Forms Library. OFLs are checked according to the language of the Outlook client. If the form is available in an OFL, it is downloaded and displayed.
- Web Forms Library. Outlook can launch HTML forms in your default Internet browser, which can be useful for workgroup applications that rely entirely on HTML forms compatible with earlier versions of Outlook Web Access (OWA). However, OWA of Exchange 2000 Server relies on the Web Storage System, which cannot be used with Outlook 2000 directly. You can read more about the design of Web Storage System solutions in Chapter 23, "Microsoft Exchange 2000 Web Storage System."
If the form cannot be found, the item is displayed using the standard form that was used to create the form, such as IPM.Contact.
Exercise 2: Designing a Custom Outlook Form

In this exercise you will design a Job Applicants solution using the Outlook Contacts form as a template. You will publish your custom form in a public folder.

To view a multimedia demonstration that displays how to perform this procedure, run the EX2CH21.AVI files from the \Exercise_Information\Chapter21 folder on the Supplemental Course Materials CD.
Prerequisites
- Restart BLUESKY-SRV1 and BLUESKY-WKSTA.
- Log on as Administrator to BLUESKY-WKSTA, and make sure Outlook 2000 is started.
To implement a job applicant's workgroup solution based on a public folder
- In Outlook 2000, open the File menu, point to Folder, and then select New Folder.
- In the Create New Folder dialog box, under Name, type Job Applicants.
- Under Folder Contains, select Contact Items.
- Under Select Where To Place The Folder, expand the Public Folders tree, select All Public Folders, and then click OK.
- If a dialog box appears asking you whether you want to create a shortcut on your Outlook toolbar, click Yes.
- On the Outlook toolbar, click My Shortcuts to display the list of your shortcuts, and then click the Job Applicants icon to open the newly created public folder.
- Open the Actions menu, and click New Contact.
- The Untitled—Contact dialog box appears. Open the Tools menu, point to Forms, and click Design This Form.
- The Untitled — Contact (Design) dialog box appears. Maximize the dialog box, and, in the General tab, delete the Business, Business Fax, Categories, Company, Contacts, Job Title, and Web Page Address fields (and their labels), and arrange all remaining fields as shown in Figure 21.6.
- In the Field Chooser list box (that is displaying Frequently-Used Fields by default), select Personal Fields from the drop-down list box.
- From the options that appear, drag the Birthday, Hobbies, and Profession fields to a free area in the General tab (see Figure 21.6).
- At the bottom of the Field Chooser dialog box, click New.
- In the Name box, type Invite for Interview. From the Type list, select Yes/No. Under Format, select True/False, and then click OK.
- Click New again. Under Name, type Applicant Rating, and then click OK.
- Drag the Invite For Interview and Applicant Rating fields to the form. Notice that the Yes/No option is translated to a check box.
- Open the Tools menu, point to Forms, and then click Publish Form As.
- In the Publish Form As dialog box, under Display Name and Form Name, type Job Candidate, and then click Publish.
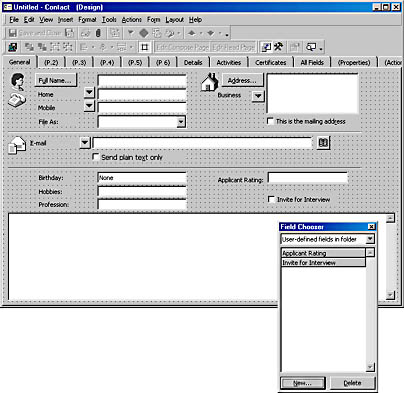
Figure 21.6 Designing an Outlook form
- On the File menu, click Close, and, in the Microsoft Outlook dialog box asking you whether you want to save the changes, click No.
- On the Outlook toolbar, right-click Job Applicants, select Properties, and click on the Forms tab. Notice that the Job Candidate form is displayed under Forms Associated With This Folder. Under Allow These Forms In This Folder, select Only Forms Listed Above (see Figure 21.7).
- Click on the General tab, and, from the When Posting To This Folder, Use list box, select Job Candidate (see Figure 21.7).
- Click OK, and test the configuration and new form by double-clicking in the empty details pane of the Job Applicants folder, which should launch the Job Candidate form. Alternatively, you may open the Actions menu and select New Job Candidate.
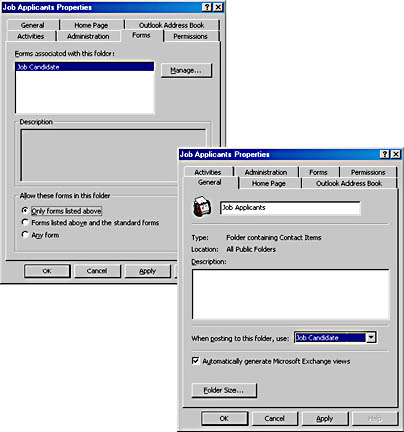
Figure 21.7 Defining a default custom form for a public folder
Exercise Summary
Outlook's standard forms can be customized using the Outlook Forms Designer, which makes it possible to create powerful workgroup solutions in minutes. Instead of their paper equivalents, Outlook forms applications based on public folders can provide a large variety of information to all or specific users. The content of a public folder can be displayed in various ways by means of folder views, and the content of contact-based folders can be made available through the Outlook Address Book, as mentioned in Chapter 9, "MAPI-Based Clients."
EAN: N/A
Pages: 186