Lesson 3: Backup, Restore, and Disaster Recovery
Exchange 2000 Server provides a dedicated API for backing up and restoring databases. This API, implemented in ESEBCLI2.DLL, gives backup applications, such as Microsoft Windows 2000 Backup, the ability to perform backup and restore operations online, without the need to stop database-related services. You can back up and restore mailbox or public stores individually while other stores are mounted. Backup and restore operations can be performed remotely over the network.
This lesson covers backup, restore, and disaster recovery procedures available when using Exchange 2000 Server-enabled backup applications. These procedures are essentially vendor independent because all Exchange 2000 Server-aware backup programs make use of the same backup API.
CAUTION
Follow the exercises outlined in this lesson in a test environment only. Performing disaster recovery where not needed can cause loss of user data. You should never test disaster recovery procedures in a production environment.
At the end of this lesson, you will be able to:
- Perform live backups that do not interrupt the services of Exchange 2000 Server.
- Restore Exchange 2000 Server from an online backup to recover from various critical situations.
Estimated time to complete this lesson: 5 hours
Backing Up the Databases
You should only use an Exchange 2000 Server-enabled backup program to perform backup and restore operations. The Windows 2000 Backup utility, for example, is made Exchange 2000 Server-aware when you install the Microsoft Exchange System Management Tools using the Exchange 2000 Server Setup program. The actual server services do not need to be installed. This makes it possible to configure a dedicated system for backup operations over the network. To back up system files and databases, you must be an administrator or a backup operator.
NOTE
In addition to backing up databases, you need to keep a record of the system configuration. It is important to document the installed components, their installation directories and drive letters, service accounts and passwords, and the names of servers, stores, storage groups, administrative groups, and the organization. This information may be required to successfully recover a server.
Offline Backups
An offline backup is a regular file-based backup of the \Program Files\Exchsrvr directory and its subdirectories. It can be performed only when the server services are stopped (offline). Offline backups have an advantage in that they can include the MS Mail Dirsync database, the binary files of Exchange 2000 Server, and message queues of the MTA or gateway connectors. It is a good idea to perform an offline backup immediately after the installation of Exchange 2000 Server and periodically when new components are added to the server (for example, KMS, gateway connectors, or service packs).
IMPORTANT
If you have placed transaction log files and databases on separate hard disks (highly recommended), you need to include all disk drives in the offline backup to completely save the Exchange 2000 server.
Offline backups have several disadvantages. Most obviously, Exchange 2000 Server is unavailable during backup operations because all services are stopped. Furthermore, you must always perform a complete backup of the entire server, which consumes time and tape space. The offline backup is not aware of databases or transaction log files. It does not detect committed transactions and does not purge transaction log files. However, it is possible to exclude database directories from offline backups and perform an online backup for these files separately. A recent file-based backup that was prepared in addition to online database backups can significantly simplify disaster recovery.
Online Backups
An online backup is performed while the server services are running (online). In fact, the services must be running because the backup application needs to communicate with the services to request the data. Active server services also ensure that users can work with their messaging clients during the backup operation. As mentioned in Lesson 2, patch files guarantee that current transactions are included in the backup. Online backups are aware of the Exchange Server databases and their transaction log files. They guarantee that entire stores are covered even if only transaction log files are written to tape. This can save backup time and tape space. A significant disadvantage of online backups is that they do not include binary files or configuration data.
The following are the four different types of online backups (see Figure 20.9):
- Full backup. Covers the entire information store. It saves databases as well as transaction log entries that have not yet been committed to the databases. In addition, transaction log files whose content is already committed to the actual database files are purged from the system. It enables you to restore the databases from a single backup, but it requires more tape space than any other online backup type. The full backup sets the context for all other backup types.
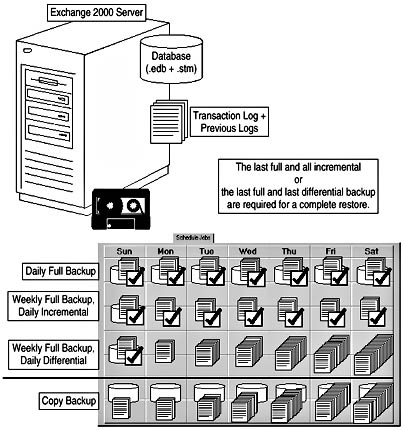
Figure 20.9 Backup strategies for Exchange 2000 Server
- Incremental backup. Saves only new transaction log files, which are purged once they have been backed up, setting the context for the next incremental or differential backup. It is important to understand that the incremental backup does not save any database files, which means that it is useless without a previous full backup. A successful restore requires the last full backup plus all incremental backups since that time. While incremental backups use tape storage media efficiently, they are the most time consuming to restore from. Incremental backups are not supported on storage groups where circular logging is enabled.
- Differential backup. Works similar to the incremental backup, but does not purge transaction log files. Therefore, it does not change the context for the next backup. It is dependent on a previous full backup or incremental backup. A successful restore requires the last full backup plus the last differential backup. This backup type is not supported on servers or storage groups where circular logging is enabled.
- Copy backup. Saves databases and transaction logs, but does not purge any files from the system. The copy backup does not change the context for any other backup types. It is useful for archive purposes. It is a good idea to perform a copy backup monthly and whenever you change the configuration or work with offline database utilities.
NOTE
Using online backups, you can save databases and storage groups separately, but it is impossible to back up individual mailboxes or public folders. You may use the Microsoft Exchange Mailbox Merge Wizard from the \Support\Utils\ i386\Exmerge directory on the Exchange 2000 Server CD (covered later) to perform such operations. Microsoft recommends that you always back up entire storage groups.
Backup Type Dependencies
You should back up your servers at least once every day. Perform full backups, also called normal backups, if the size of your databases and the capacity of your backup media allow it. Full backups do not depend on other backups. The incremental backup, on the other hand, has significant disadvantages because it imposes previous backups. If your backup from yesterday is destroyed, the backup from today is also useless. In this case, only the incremental backups from the days before yesterday can be restored in addition to the last full backup, so the server has effectively lost the most current information. Differential backups overcome this disadvantage, but they require more server disk and tape space than incremental backups because transaction log files are not purged between full backup cycles. If you performed a full backup the day before yesterday and differential backups yesterday and today, only the last full backup and the differential backup from today are required to fully restore the server.
Automating the Backup Process
The Windows 2000 Backup utility provides you with the option to schedule backup jobs (in the Schedule Jobs tab). You should make use of this feature to ensure timely database backups. At a minimum, a full backup should be performed weekly, perhaps over the weekend (see Figure 20.9). Differential or incremental backups may be performed between weekdays if full backups would interfere with normal business hours. Scheduled backup jobs are added to the server's Scheduled Tasks container and executed by the Windows 2000 Task Scheduler service. It is possible to schedule online and offline backups. For more information about scheduling backup jobs and other tasks, see the Windows 2000 product documentation.
NOTE
Make sure that the maintenance intervals configured for your databases do not conflict with your backup schedule.
Backing Up the Configuration
Backing up the Exchange 2000 Server databases is not sufficient for complete server recovery. The databases do not contain the organization's configuration information, for example. Active Directory maintains this information. Likewise, several service startup parameters are kept in the server's Registry database. The IIS and its associated virtual servers, again, retrieve their configuration information from the IIS metabase. Windows 2000 Server also depends on its boot environment. All of this information and additional data (such as Certificate Services data) must be backed up and can be included when selecting the System State check box in the Windows 2000 Backup utility (in the Backup tab), provided that your Exchange 2000 server is a domain controller.
NOTE
System state information must be backed up locally and can only be restored on a computer that has the same name as the original server.
Domain Controllers and Exchange 2000 Server
Most computer specialists prefer to install Exchange 2000 Server on member servers. This frees the server from Active Directory replication and other domain controller tasks, such as client authentication. However, member servers have disadvantages because a local copy of the Active Directory database does not exist. You must ensure that your Windows 2000 administrators are backing up Active Directory (which contains the configuration information for your Exchange organization) properly. It is not possible to backup Active Directory information remotely.
The installation of Exchange 2000 Server on member servers has implications of great consequence because the server must establish a connection to an Active Directory domain controller to read and write directory information. Directory information is cached locally (DSAccess) to reduce the impact of Active Directory communication on the network, as explained in Chapter 3, "Microsoft Exchange 2000 Server Architecture." Yet, if domain controllers are unavailable, users cannot get access to Exchange 2000 Server. Consequently, it is vital to provide domain controller redundancy. Small environments should implement a minimum of two Active Directory domain controllers; medium and large organizations should not go with less than three. It is a very good idea to install Exchange 2000 Server on a domain controller if your Active Directory environment is understaffed.
NOTE
Exchange 2000 servers that hold user data (mailboxes and public folders) should be installed on domain controllers. Dedicated servers that do not hold user data, such as bridgeheads or front end servers exposed to the Internet, are best installed on member servers.
Verifying Database Backups
Professional backup solutions, including Windows 2000 Backup, are able to verify the successful completion of backup jobs. During the data verification process, Backup compares the data that was written to tape with the data in the databases and detects possible damage. Any errors written to the backup logs or the application event log can indicate that the backup ended in a critical state. Corrupted backups do not allow you to recover the server.
Even if the verification process does not indicate any problems, you should not simply assume that your data is recoverable. Your backup of today may be in perfectly good shape. Yet, you might not be able to restore it. Just imagine a situation where yesterday's incremental backup was lost. As mentioned earlier, your current incremental backup would be lost as well. Thus, it is important to verify backups by restoring the data to a reference computer. If it is not feasible to verify all backups from all servers, rotate the restore process and test backups from various machines. It is not a bad idea to plan a monthly test recovery to check the system, identify potential problems, and practice the worst-case scenarios.
You should have at least one nonproduction reference server available at all times for software and disaster recovery tests. This server must not contain any production data and must not be part of the production Active Directory environment. As explained later, it is vital to use a domain controller from a different Active Directory forest for recovery of Exchange 2000 Server databases. The reference server needs enough disk space for restoring an entire information store. Ideally, the reference server is equipped with hardware similar to the production systems. The tape drives must be compatible.

Exercise 5: Backing Up Exchange 2000 Server
In this exercise you will back up Exchange 2000 Server plus other information required to perform server recoveries, which will be the objective of later exercises. You will use the Windows 2000 Backup utility to carry out a full backup.

To view a multimedia demonstration that displays how to perform this procedure, run the EX5CH20.AVI files from the \Exercise_Information\Chapter20 folder on the Supplemental Course Materials CD.
Prerequisites
- Restart BLUESKY-SRV1 and BLUESKY-SRV2 and make sure they are operational.
- Make sure Drive D on BLUESKY-SRV1 is formatted with NT file system (NTFS) and has enough free space to hold the backup file of BLUESKY-SRV2 (approximately 500 MB).
- Log on as Administrator to BLUESKY-SRV2.
- If you have completed the exercises of Chapter 19, "Implementing Advanced Security," make sure the Microsoft Exchange Key Management Service (KMS) is started.
To backup Exchange 2000 Server and system state information
- On BLUESKY-SRV2, click Start, point to Programs, point to Accessories, point to System Tools, and launch Backup.
- Click on the Backup tab and select the System State check box.
- Expand Microsoft Exchange Server (the Microsoft Exchange node is for earlier versions of Exchange Server), expand BLUESKY-SRV2, and select the Microsoft Information Store and Microsoft Key Management Service check boxes (the latter is only available if you have installed and started the KMS as outlined in Chapter 19, "Implementing Advanced Security").
- Under Backup Destination, make sure File is selected, and then under Backup Media Or File Name type \\bluesky-srv1\d$\bluesky-srv2.bkf. (You need to place the backup file on BLUESKY-SRV1 because BLUESKY-SRV2 will be crashed in Exercise 8.)
- Click Start Backup, and in the Backup Job Information dialog box, click Advanced.
- Select the Verify Data After Backup (see Figure 20.10) check box, click OK, and then click Start Backup to launch the backup process.
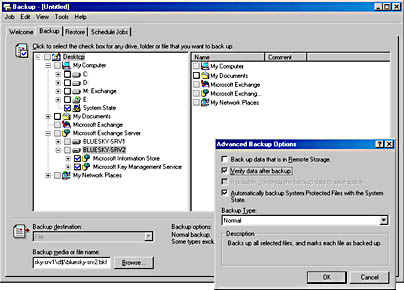
Figure 20.10 Backing up offline data, the system state, and Exchange 2000 Server databases
- When the backup is finished, click Report in the Backup Progress dialog box. Verify in the backup log that no errors occurred.
- In the Backup Progress dialog box, click Close.
Exercise Summary
It is easy to back up the entire configuration, including Active Directory, if you have installed Exchange 2000 Server on a domain controller. You only need to include the system state in the backup. Databases can be saved online. If you have a tape drive with sufficient capacity, the server's local drives can be included to perform a file-based backup simultaneously. In this case, exclude the directories of the Exchange 2000 Server databases. Database files are kept open by their respective services and cannot be saved properly using the file-based backup. You would need to stop the services, which in turn would prevent the online backup. To exclude databases from offline backups, open the Tools menu, select Options, click on the Exclude Files tab, and under Files Excluded For All Users, click Add New. In the Add Excluded Files dialog box, under Custom File Mask, type *, and then click Browse to launch the Exclude Path dialog box where you need to specify the database directories, such as \Program Files\Exchsrvr\Mdbdata, \Kmsdata, or \Srsdata.
Designing a Disaster Recovery Plan
It is vital to document your backup and restore procedures, label backup media properly, and store the media in a secure location. Many organizations keep full backups offsite in a separate geographical place for maximum security. The recovery document must provide instructions describing where to obtain the most recent backup media and how to use it to restore data according to various possible scenarios. Responsible contacts and escalation procedures must be defined. Ideal documentation would allow an arbitrary administrator to recover the system. To protect your organization in the event of a natural disaster, a copy of the recovery document and a set of backup tapes should be stored offsite in a secure location. This as well as a dedicated recovery server can help to minimize system downtime.
In addition to policies and procedures, your disaster recovery kit should contain the following items:
- A copy and documentation of any other software, such as service packs or configuration changes applied to the system.
- A copy of the original Windows 2000 Server and Exchange 2000 Server product CDs.
- A file containing exported recipient information in a supported LDIFDE or CSVDE format, as explained in Chapter 13. "Creating and Managing Recipients."
- An emergency repair disk.
- Backups of system state information, which covers Active Directory, Registry, IIS metabase, and data from other system components, such as Certificate Services. System state information must be recent enough to include up-to-date configuration information.
- Descriptions of hard drive partitions and their purposes (system drive, transaction log drives, database drives, and so forth).
- Documentation about the configuration of hardware and the operating system.
- File-based backups of the system and other drives.
- Information about the configuration of Exchange 2000 Server, including installation directories, installed components, configured virtual servers and protocol settings, as well as connector configurations and server passwords.
- Offline backups of Exchange 2000 Server databases (MS Mail Dirsync, MTA message queues, and so on).
- Online backups of Exchange 2000 Server databases (information store, KMS, and SRS).
Restoring to the Same Server
It is straightforward to restore Exchange 2000 Server databases to their original location. You don't even have to stop the server. In fact, you should verify that the services are running, but you have to dismount the problematic store using Exchange System Manager. Other databases can remain mounted to avoid affecting users unnecessarily. Unfortunately, it is not possible to dismount KMS or SRS databases in Exchange System Manager. You will need to stop the service (KMS or SRS), move all existing database files from the work directory (KMSData or SRSData) to a safe location, and then start the corresponding service again. The service will still start in semirunning mode, which allows you to restore the databases using Windows 2000 Backup.
NOTE
Move old databases to another directory; do not delete them. Your backup sets may turn out to be useless, in which case you may need to fix corrupted databases using ESEUTIL.EXE. It is generally advisable to back up the system before performing any database maintenance.
Restoring a Full Backup with Incremental or Differential Backups
When restoring a full backup with incremental or differential backups, make sure you restore the full backup first. During the restore, you need to specify a temporary location where Backup will place transaction log and patch files. Restoring the full backup will also create a RESTORE.ENV file in this location, which contains, among other things, information about the original and the path to the destination database. RESTORE.ENV controls how old transaction log and patch files are applied to restored databases. This process is generally known as hard recovery, which is triggered when you select the Last Backup Set check box during the last restore cycle.
You should not select the Last Backup Set check box before all incremental or differential backups have been restored. If you forget to activate this option for the last backup set, the databases cannot be mounted. Correspondingly, the Mount Database After Restore check box is only available when the Last Backup Set check box is selected beforehand. If you are restoring a full backup without any incremental backups, do not forget to select the Last Backup Set check box right away.
Performing a Manual Hard Recovery
Nobody is perfect and you may forget to select the Last Backup Set check box. In this situation, Exchange System Manager will not mount restored databases and will report an internal processing error. The error message will suggest that you try restarting Exchange System Manager or the Microsoft Exchange Information Store service, or both. Do not follow this advice. Restarting the Information Store will trigger a soft recovery, but what your databases actually need is a hard recovery. The application event log contains a more precise description of the problem. Check for Event ID 619 where the source is ESE98. The following is a sample error description: "Information Store (1764) Attempted to attach database 'C:\Program Files\Exchsrvr\Management Group\VIP Mailboxes.edb' but it is a database restored from a backup set on which hard recovery was not started or did not complete successfully."
You have two options: You can restore the last backup set again with Last Backup Set activated, or you can run a hard recovery manually. Open the Windows 2000 command prompt, switch to the temporary folder of the transaction log files (where RESTORE.ENV exists), and then type "c:\Program Files\Exchsrvr\Bin\eseutil" /cc. The transaction logs, patch files, and RESTORE.ENV are purged during this process. To preserve them, use the /K switch. It is possible to view the contents of RESTORE.ENV using ESEUTIL.EXE with the /CM switch instead of /CC. ESEUTIL.EXE was introduced in Lesson 2.
IMPORTANT
Do not restore databases from the same storage group sequentially to the same temporary folder without running hard recovery at the last backup set of each restore cycle. Otherwise, subsequent restores will overwrite the RESTORE.ENV from previous rounds, thus preventing all databases recovered earlier from being mountable. If you restore multiple storage groups simultaneously, subfolders will be created in the temporary folder automatically for each group. To avoid conflicts with production databases, never restore transaction log files to the original database locations.
Exercise 6: Restoring a Database to the Same Server
In this exercise you will damage a mailbox store intentionally and restore it using a recent backup. You will not destroy the transaction log files to preserve the most recent information.
To view a multimedia demonstration that displays how to perform this procedure, run the EX6CH20*.AVI files from the \Exercise_Information\Chapter20 folder on the Supplemental Course Materials CD.
Prerequisites
- Complete Exercise 2, earlier in this chapter.
- Start BLUESKY-SRV1, BLUESKY-SRV2, and BLUESKY-WKSTA, and make sure they are operational.
- Log on as Administrator to BLUESKY-SRV1 and BLUESKY-WKSTA.
To restore a database to the same server and recover the most recent mailbox state
- On BLUESKY-WKSTA, launch Outlook 2000, and make sure you are working with the Administrator mailbox.
- On the toolbar, click New, click To, and select the Administrator account. Click To -> and then click OK to address the message to your own mailbox.
- In the Subject line, type Recovery Test Message.
- In the Message Body, type This message was not included in the most recent backup.
- Click Send, verify that the test message was received, and then close Outlook 2000.
- On BLUESKY-SRV2, launch Exchange System Manager from the Microsoft Exchange program group, and expand the administrative groups and server objects.
- Under BLUESKY-SRV2, expand Management Group, right-click VIP Mailboxes, and select Dismount Store.
- In the VIP Mailboxes dialog box informing you that this store will be unavailable to any user, click Yes.
- Right-click VIP Mailboxes again, select Properties, click on the Database tab, and note the directory and names of the databases (C:\Program Files\Exchsrvr\Management Group\VIP MAILBOXES.EDB). Click OK.
- Launch Windows Explorer, open the directory of the database, and delete the files VIP MAILBOXES.EDB and VIP MAILBOXES.STM. Leave all other files in place.
- Open the Tools menu, select Folder Options, switch to the View property sheet, and then deselect the Hide File Extensions For Known File Types check box. Click OK, and then create two empty files called VIP MAILBOXES.EDB and VIP MAILBOXES.STM to simulate corrupted databases.
- Switch back to Exchange System Manager, right-click VIP Mailboxes, and select Mount Store. You will be informed that the database files in this store are corrupted (see Figure 20.11). Click OK.
- On BLUESKY-SRV1, from the System Tools program group, start Backup. Click on the Restore tab, right-click File, and select Catalog File.
- In the Backup File Name dialog box, under Catalog Backup File, type d:\bluesky-srv2.bkf, and then click OK.
- Expand the nodes that correspond the to the backup media, and click OK if the Backup File Name dialog box appears.
- Expand the node BLUESKY-SRV2\Microsoft Information Store\Management Group (click OK in the Backup File Name dialog box), and then select the Log Files and VIP Mailboxes check boxes. Click Start Restore.
- In the Restoring Database Store dialog box, under Temporary Location For Log And Patch Files, type c:\winnt\temp. Select the Last Backup Set and Mount Database After Restore check boxes, and then click OK.
- In the Enter Backup File Name dialog box, make sure d:\bluesky-srv2.bkf is specified, and then click OK.
- Verify that the restore operation is performed without problems. In the Restore Progress dialog box informing you that the restore was completed, click Close (see Figure 20.11).
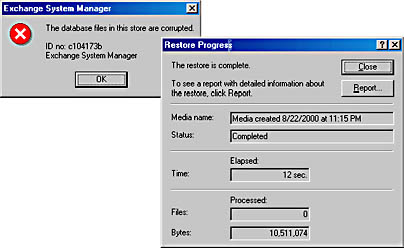
Figure 20.11 Recovering a corrupted database
- On BLUESKY-WKSTA, launch Outlook 2000 again, and check that the Recovery Test Message is displayed in your mailbox although it was not included in the backup.
Exercise Summary
Before you can restore a database onto an Exchange 2000 server, you need to dismount the affected store—corrupted stores will most likely be dismounted already. The Windows 2000 Backup utility cannot restore over mounted databases and their files would be skipped. An error would be written to the application event log with the Event ID 8012: "The 'Microsoft Information Store' returned 'Database is in use.' from a call to 'HrESERestoreAddDatabase()'…"
When restoring databases and transaction log files, under Temporary Location For Log And Patch File, specify a working directory for the Backup utility. As mentioned, it is important to specify a folder different from the production log file location. A temporary directory, such as \Winnt\Temp is appropriate. During hard recovery, older logs are applied from the temporary directory to the databases before the more recent logs from the production location are replayed. This allows you to recover even those items that have not been included in the backup.
NOTE
To restore Exchange 2000 databases, you need to have the permissions of an Administrator or Backup Operator.
Complete Disaster Recovery
In a complete disaster recovery, you will restore Exchange Server to a different physical computer. This is required if the original server has been fully destroyed. Complete disaster recoveries should also be practiced periodically on a dedicated, nonproduction reference server, just to make sure that the backup media is in good shape and that you are ready to react when disasters strike.
Disaster Recovery Procedure
The desired result of a disaster recovery is a 1:1 copy of the original server. Consequently, the hardware configuration of the recovery server should match the configuration of the original machine. If this is not the case, drivers may be incompatible with the new hardware and may require manual adjustments. The disks must have the same partitioning. They should also have the same capacity (or more).
The following procedure outlines general disaster recovery steps.
- Reinstall the operating system. Use the same version of Windows 2000 Server that was previously installed, such as Microsoft Windows 2000 Advanced Server. Specify the original system drives, directories, and the old server name during the installation. You also need to reapply any service packs.
It is vital that you install the same Windows 2000 components that were previously installed. The only difference is that the reinstalled server is a member of a workgroup instead of the production domain.
- When you reboot the newly installed machine and log on as Administrator, you can restore any file-based backups to the drives plus the original system state information. Restoring the system state will turn the new server into a member of the production domain and will bring back the IIS metabase and other information. You need to reboot the server for the changes to take effect.
NOTE
If you can restore a full offline backup and the system state information, it may not be necessary to continue. The server may be operational already. Therefore, you should prepare full offline backups whenever the software installation changes, for instance when you apply hot fixes or service packs. - Without a full offline backup, when the system is rebooted, you will be greeted with an error message that one or more services could not be started, which is understandable because Exchange 2000 Server databases have not been restored yet, while the corresponding services are referenced in the system configuration. At this point, run the Setup program of Exchange 2000 Server in /DisasterRecovery mode. It is important to note that disaster recovery requires that the old server object still exists in the Exchange 2000 Server configuration in Active Directory. This information is required to restore the previous configuration on the server, such as mailbox and public stores. When running Setup /DisasterRecovery, make sure all the components that were previously installed on the server are marked for disaster recovery on the Component Selection wizard screen.
NOTE
If the Active Directory information was lost (for instance, an administrator has removed the server object from the Exchange organization), you cannot use Setup /DisasterRecovery. However, you can still install Exchange 2000 Server as usual, configure the system manually, and then restore the databases. - As soon as Setup completes the disaster recovery, you can restore the databases (including the KMS and SRS databases if necessary) as outlined earlier in this lesson.
- Reboot the server, and test whether you can log on to your mailbox successfully.
Forklifting Users by Means of a Complete Disaster Recovery
Many organizations use the complete disaster recovery methodology to replace existing server hardware. The idea is simple: You fully restore the server to the new machine including all security and configuration information as well as the databases, and then replace the old hardware with the new system. After a brief period of downtime during the transition, users can use their current account information to log on to their mailboxes as if nothing happened. This procedure is also called forklifting mailboxes to a new server.
Although this strategy sounds promising, you should not use it without careful preparation. For instance, you should not dismantle the old server until you have restored the system to the new machine successfully. Should any of your tapes turn out useless, you may want to switch back to the old server. However, the old server must be disconnected from the production network before you can begin the disaster recovery. The larger your databases (some might be larger then 100 GB), the longer it takes to complete this process. Business processes may be interrupted and you may lose messages if you do not have the most recent transaction logs in your backup.
Replacing Server Hardware with Mailbox Move and Public Folder Replication
There is a better alternative that does not put your data in jeopardy. Move all mailboxes away from the aging server using Active Directory Users and Computers. This has little impact on the client side. Users need to reconnect to Exchange 2000 Server, their MAPI profiles will be updated automatically, and the environment will appear as if nothing happened. You should also move all local public folders, as explained in Chapter 18, "Public Folder Replication."
Server Name Dependencies
Give the old server some time to clear its message queues before replacing the hardware. It is important to note that the automatic redirection of Outlook users to their mailboxes on another server only works as long as a machine with the old server name is running Exchange 2000 Server in the network. A MAPI-based client with outdated profile information will contact this server first. The server will then inform the client about the new location of the mailbox. Hence, try to replace the old system when few users are working, such as over the weekend.
Replacing the Hardware
At this point, when the old server does not contain user data anymore, perform a full backup of the system. Include all drives in a file-based backup, back up the system state information as well, and do not forget KMS or SRS databases, should they exist. Because large databases are not a concern, disaster recovery will not require an extensive amount of time, and the new server will be available quickly. You may then move resources back to the new Exchange 2000 server.
Exercise 7: Performing a Complete Disaster Recovery
In this exercise you will perform a complete disaster recovery for an Exchange 2000 server without a full offline backup. You will reinstall Windows 2000 Server on BLUESKY-SRV2 and format its C drive to simulate a total disaster.
To view a multimedia demonstration that displays how to perform this procedure, run the EX7CH20*.AVI files from the \Exercise_Information\Chapter20 folder on the Supplemental Course Materials CD.
Prerequisites
- Complete Exercise 5 and test the state of the backup file in Exercise 6.
- Install Windows 2000 Server on BLUESKY-SRV2 as outlined in the "Getting Started" section of "About This Book," but do not promote this server to a domain controller, and do not add it to the domain. Install this server in a workgroup called WORKGROUP.
NOTE
You must not add the newly installed server to the existing Active Directory forest. Otherwise, you would lose the configuration information of BLUESKY-SRV2 that is required to perform a disaster recovery. - Update the installation of BLUESKY-SRV2 with Windows 2000 Service Pack 1.
- Make sure that all drives are formatted with NTFS.
- You will need the Windows 2000 Server and Exchange 2000 Server, Enterprise Edition, evaluation software installation CD included in the book.
- Log on as Administrator to BLUESKY-SRV1 and BLUESKY-WKSTA.
To perform a complete disaster recovery for BLUESKY-SRV2
- At this point, you have installed the same version of Windows 2000 Server in the same way onto BLUESKY-SRV2 as it was previously installed.
- Log on as Administrator to BLUESKY-SRV2, and, in the Windows 2000 Configure Your Server application, deselect the Show This Screen At Startup check box. Close this application, and then start the Windows 2000 Backup utility.
- Click on the Restore tab, right-click File, and select Catalog File.
- In the Backup File Name dialog box, type \\bluesky-srv1\d$\bluesky-srv2.bkf, and then click OK.
- Open the File and Media nodes, and in the Backup File Name dialog box, click OK.
- Select the System State check box, and click Start Restore.
NOTE
If you would have backed up the entire server using a file-based backup, you should restore these files before restoring the system state information. - In the Warning dialog box, informing you that the current system state will be overwritten, click OK (see Figure 20.12).
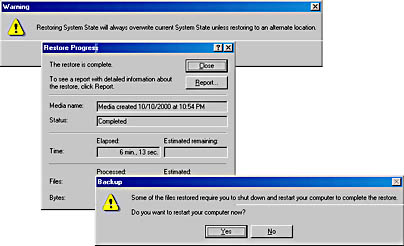
Figure 20.12 Recovering system state information
- In the Confirm Restore dialog box, click OK, and then in the Enter Backup File Name dialog box, click OK again.
- If a Windows File Protection dialog box appears prompting you for the Windows 2000 Server CD, insert the CD into the CD-ROM drive and then click Retry. (Close the auto starting Microsoft Windows 2000 CD application by clicking Exit.)
- At completion of the backup process, in the Restore Progress dialog box, click Close.
- A Backup dialog box will appear asking you whether you want to restart the server. Click Yes (see Figure 20.12).
- When the server has been successfully restarted, log on as Administrator again. Notice that the server is now a domain controller in the original domain again because the Active Directory information was restored as part of the system state information.
- The system state also contains information about Exchange 2000 Server services, which cannot be started because they do not exist yet. In the Service Control Manager dialog box informing you that some services could not be started, click OK.
- In the Windows 2000 Configure Your Server application, deselect the Show This Screen At Startup check box, and then close this application.
- Insert the Exchange 2000 Server, Enterprise Edition, evaluation software installation CD into the CD-ROM drive on BLUESKY-SRV2.
- On the Start menu, point to Run, and in the Run dialog box, type e:\setup\i386\setup.exe /DisasterRecovery, and then click OK. You may use the Browse button to conveniently select the Setup executable from the installation CD, but do not forget to add the /DisasterRecovery switch (see Figure 20.13).
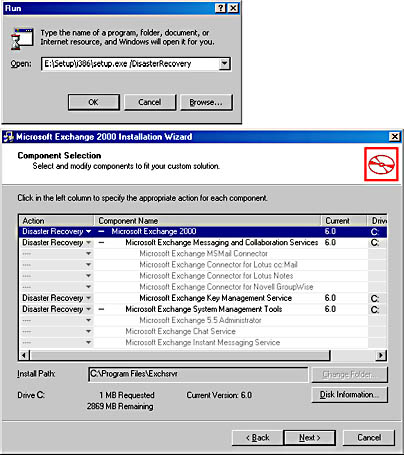
Figure 20.13 Exchange 2000 Server setup in disaster recovery mode
- On the Microsoft Exchange 2000 Installation Wizard Welcome screen, click Next.
- On the Component Selection wizard screen, verify that all previously installed components are displayed with an Action column set to Disaster Recovery (see Figure 20.13). Click Next.
- A Microsoft Exchange 2000 Installation Wizard dialog box appears reminding you that you need to ensure that the original server still exists in Active Directory to complete the disaster recovery successfully. Click OK.
- A Microsoft Exchange 2000 Installation Wizard dialog box appears informing you that you need to restore the databases after Setup is completed and then reboot the system. Click OK.
- On the final wizard screen, click Finish.
- On BLUESKY-SRV1, start Backup, click on the Restore tab, right-click File, and select Catalog File.
- In the Backup File Name dialog box, under Catalog Backup File, verify that d:\bluesky-srv2.bkf is displayed, and then click OK.
- Expand the File and Media nodes that correspond to the backup media.
- Select the BLUESKY-SRV2\Microsoft Information Store\First Storage Group and BLUESKY-SRV2\Microsoft Information Store\Management Group check boxes.
NOTE
It is assumed that you did not save the password of the Key Management Service. Without this password, you are unable to start the KMS, and therefore you are not able to restore the data under BLUESKY-SRV2\Microsoft Key Management Service\Key Management Service. This demonstrates how vital it is to perform test recoveries. Your backup is perfectly fine, your system is recovered correctly, and still, you are not able to restore all data. Your users' security key histories are lost. Only a test recovery can reveal weaknesses in your recovery procedures. You can find more information about the KMS in Chapter 19, "Implementing Advanced Security." - Click Start Restore.
- In the Restoring Database Store dialog box, under Temporary Location For Log And Patch Files, type c:\winnt\temp. Select the Last Backup Set check box, and then click OK (see Figure 20.14).
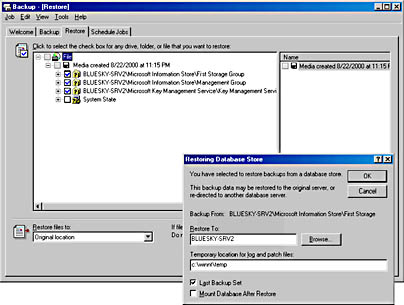
Figure 20.14 Completing the disaster recovery
- In the Enter Backup File Name dialog box, make sure d:\bluesky-srv2.bkf is specified, and then click OK.
- Verify that the restore operation is performed without problems. In the Restore Progress dialog box informing you that the restore was completed, click Close.
- Reboot BLUESKY-SRV2 and, when the server is restarted, launch Exchange System Manager.
- Expand Administrative Groups, First Administrative Groups, and all server objects, and then, under BLUESKY-SRV2, expand First Storage Group and Management Group.
- Right-click Mailbox Store (BLUESKY-SRV2) and select Mount Store.
- In the Mailbox Store (BLUESKY-SRV2) dialog box informing you that the store was mounted successfully, click OK.
- Repeat steps 32 and 33 for Public Folder Store (BLUESKY-SRV2) and VIP Mailboxes, and then close the Exchange System Manager.
- On BLUESKY-WKSTA, launch Outlook 2000 to check that you can connect to the Administrator mailbox.
Exercise Summary
Depending on the situation, a complete disaster recover may involve more or less administrative work. At a minimum, you need to configure new hardware according to the former system. You also need to install a minimal version of the operating system. With a full offline backup, you may complete the disaster recovery right away by restoring all data including the system state. Otherwise, you need to recover Exchange 2000 Server using Setup. Fortunately, the majority of the old configuration information will be available in Active Directory on the local computer or a remote domain controller. Based on this configuration information, Setup /DisasterRecovery will reconfigure the local server, including program files, registry settings, and database paths. You need to make sure all previously installed components are selected on the Component Selection wizard screen; otherwise, they will not be restored. After disaster recovery is finished, you can restore databases online.
NOTE
Even small organizations should configure two Active Directory domain controllers in their environment. With domain controller redundancy, Active Directory will always survive a single-server disaster.
Restoring to a Different Server
First, a disclaimer: Restoring mailbox stores to a different production server is not recommended. Restoring to a server with the same name as the original server ensures that users can work with their mailboxes without reconfiguring MAPI profiles. Furthermore, if you need to restore Active Directory information, the server name must always remain the same.
Mailbox Identifiers
When you mailbox-enable a user account in Active Directory, you assign this account a mailbox repository in an information store. A globally unique identifier (GUID) associates the user account with its mailbox. This identifier is called mailbox GUID, and it must be unique within the Active Directory forest. It is important to note that the mailbox GUID is maintained inside the mailbox store, and mailbox-enabled user accounts have an msExchMailboxGuid attribute. For example, if you want to examine the administrator's mailbox GUID in your test environment, use the following command: ldifde -m -f c:\export.ldf -s bluesky-srv1 -d "CN=Administrator,CN=Users,DC=BlueSky-inc-10,DC=com" When you open EXPORT.LDF in Notepad, you can find the GUID in the msExchMailboxGuid line.
Because mailbox GUIDs must be unique in the Active Directory forest, you cannot have two copies of the same database on different servers in the same organization. Exchange 2000 Server does not allow you to reconnect a mailbox from a restored database to the same or another user, so long as the mailbox from the production database is connected to a user account. A particular mailbox GUID can only be assigned to one account at a time. Therefore, to successfully perform a database recovery in the production forest, you would have to delete all user mailboxes from the original database first. This is accomplished implicitly when you remove the destroyed production server from the Exchange organization in Active Directory.
NOTE
If you want to perform database recovery operations while the original production server is available and users are connected to their mailboxes, you must install Exchange 2000 Server in a different forest. It is generally not advisable to perform recovery operations in the production forest. Recovering databases to a different production server is a last resort if you cannot bring back the original server.
Restoring Databases to a Different Server
If the old machine is out of order and a new system is not immediately available, you will be forced to recover the databases onto a different existing production Exchange 2000 server. Restoring to a different server introduces a number of critical issues. For instance, all users will need to update their MAPI profiles manually to connect to their new home server, which may generate many user help desk calls. The configuration of the Exchange transport service was covered in Chapter 8, "Microsoft Outlook 2000 Deployment."
When recovering to a different production server, the following issues are critical:
- Before restoring databases to a different server, original mailbox references of affected users must be deleted. After the restoration, user accounts must be reconnected to the restored mailboxes using Exchange System Manager or the Mailbox Reconnect utility (MBCONN.EXE). You can find MBCONN.EXE on the Exchange 2000 Server CD in the \Support\Utils\i386 directory.
- Client-based MAPI profiles must be updated manually to direct Outlook 2000 to the new home server. You may need to create entirely new profiles to remove cached information that still points to the old server.
- Databases restored to a different server require new database GUIDs. You need to select the This Database Can Be Overwritten By A Restore check box for all those databases that you intend to recover. This causes the Information Store to patch the databases and assign new database GUIDs.
- Public stores are associated with public folder hierarchies. It is not possible to restore a public store to a server that already has a store with a different name for the same hierarchy. Stores with the same storage group and store names would be overwritten, which may lead to lost public folders.
- Stores contain several system mailboxes that are server specific and cannot be reconnected. These mailboxes need to be purged from the databases.
- The target Exchange 2000 server must belong to the same organization and administrative group as the old server.
- The target Exchange 2000 server cannot contain databases with duplicate physical names. Database filenames must be unique across all storage groups. For instance, the default mailbox store databases are always called PRIV1.EDB and PRIV1.STM. Therefore, use different names for the new database files. It is not necessary to keep the original database filenames unless you are restoring offline backups. (In this case you need to rename the existing databases. Renaming database filenames will temporarily dismount the affected store.)
- The target Exchange 2000 server must not contain databases with duplicate logical names (that is, storage group and store name). Otherwise, existing databases will be overwritten. To rename existing storage groups or stores, right-click on the corresponding items in Exchange System Manager, and then choose Rename. (Renaming a storage group or store will not disconnect the users.)
- When removing the first server in the administrative group by manually deleting its reference from the organization and then not restoring public stores, you will lose system folders, such as the offline address book containers and Schedule+ Free/Busy information. You will have to relocate these folders to another server in the administrative group, as discussed in Chapter 18, "Public Folder Replication." Users should start Outlook 2000 with /CleanFreeBusy option (Outlook /CleanFreeBusy) to update the current free and busy information for existing appointments.
- You need to create storage groups and databases on the target server using the same names as on the original server. For instance, to restore the default mailbox store from BLUESKY-SRV2 to BLUESKY-SRV1, you will have to create a database called Mailbox Store (BLUESKY-SRV2) in the First Storage Group on BLUESKY-SRV1.
- You should perform a full backup of the entire system before and after the restoration. Make sure Active Directory information is backed up as well.
Exercise 8: Restoring a Database to a Different Server
In this exercise you will restore a mailbox store to the last remaining Exchange 2000 server in your organization. You will permanently remove BLUESKY-SRV2 from the test environment.
To view a multimedia demonstration that displays how to perform this procedure, run the EX8CH20*.AVI files from the \Exercise_Information\Chapter20 folder on the Supplemental Course Materials CD.
Prerequisites
- Complete at least Exercise 5, earlier in this chapter.
- Reboot BLUESKY-SRV1 and BLUESKY-WKSTA, and then log on to these machines as Administrator.
- Shut down BLUESKY-SRV2 to simulate a destroyed server. This Exchange 2000 server must not be switched on again.
To restore a database to a different Exchange 2000 server
- On BLUESKY-WKSTA, try to launch Outlook 2000, and verify that you cannot connect to your mailbox because the server was destroyed.
- On BLUESKY-SRV1, launch Exchange System Manager, and expand all administrative groups and servers.
- Right-click BLUESKY-SRV2, point to All Tasks, and select Remove Server.
- In the Exchange System Manager dialog box informing you that this step will cause loss of mailbox and public folder data, click Yes.
- After a few minutes, right-click Servers, and select Refresh. Make sure that BLUESKY-SRV2 was deleted successfully, then right-click BLUESKY-SRV1, point to New, and select Storage Group.
- In the Name text box, type Management Group, and then click OK.
- Right-click Management Group, point to New, and select Mailbox Store.
- In the Name text box, type VIP Mailboxes, and then click on the Database tab.
- Select the Do Not Mount This Store At Start-Up and This Database Can Be Overwritten By A Restore check boxes (see Figure 20.15). (Selecting the Do Not Mount This Store At Start-Up check box disables the automatic mounting of the database on service startup.)
- Click OK, and in the VIP Mailboxes dialog box informing you that the store was created successfully, click No to avoid mounting this store.
- Launch the Windows 2000 Backup utility, click on the Restore tab, right-click File, and select Catalog File.
- In the Backup File Name dialog box, under Catalog Backup File, verify that D:\Bluesky-Srv2.bkf is displayed, and then click OK.
- Expand the nodes that correspond the to the backup media, expand the node BLUESKY-SRV2\Microsoft Information Store\Management Group, click OK in the Backup File Name dialog box, and then select the Log Files and VIP Mailboxes check boxes. Click Start Restore.
- In the Restoring Database Store dialog box, under Restore To, type bluesky-srv1. Under Temporary Location For Log And Patch Files, type c:\winnt\temp. Select the Last Backup Set and Mount Database After Restore check boxes, and then click OK (see Figure 20.15).
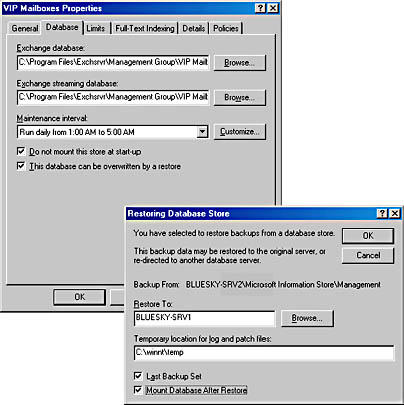
Figure 20.15 Restoring a database to a different server
- In the Enter Backup File Name dialog box, make sure d:\bluesky-srv2.bkf is specified, and click OK again.
- After Backup completes, in the Restore Progress dialog box, click Close, and then close the Backup utility.
- Switch back to Exchange System Manager, expand Management Group, expand VIP Mailboxes (if the store is marked as dismounted, right-click on it, and select Refresh), and then select Mailboxes.
- Notice that the Administrator mailbox is not marked as deleted. Right-click Mailboxes and select Run Cleanup Agent to update the mailbox information. At this point the Administrator mailbox should be marked with a red cross as deleted.
- Right-click Administrator and select Reconnect.
- In the Select A New User For This Mailbox dialog box, double-click Administrator. In the Reconnect dialog box informing you that the operation was performed successfully, click OK.
- If an Exchange System Manager dialog box appears informing you that the object has not been replicated to the destination server yet, click OK.
- Wait for the Recipient Update Service to assign the Administrator account valid e-mail addresses. Launch Active Directory Users and Computers, double-click the Administrator account, click on the E-Mail Addresses tab, and verify that e-mail addresses are assigned. Click OK.
- Switch back to Exchange System Manager, right-click Mailboxes again, and select Run Cleanup Agent. Notice that the mailbox is now reactivated.
- Right-click the system mailboxes that have been marked as deleted one at a time, select Purge, and in the dialog boxes asking you whether you are sure, click OK to remove these mailboxes.
- On BLUESKY-WKSTA, on the desktop, right-click Outlook 2000, and then select Properties.
- In the CIW Generated Profile Properties dialog box, click Show Profiles, and then delete all existing profiles by clicking on the Remove button. In the Microsoft Outlook dialog box asking you whether you are sure, click Yes.
- Make sure that no profiles are listed and then click Close.
- On the desktop, double-click Microsoft Outlook.
- In the Microsoft Outlook Setup Wizard dialog box, select the Microsoft Exchange Server check box, and then click Next.
- In the second Microsoft Outlook Setup Wizard screen, under Microsoft Exchange Server, type bluesky-srv1. Make sure Administrator is displayed under Mailbox, and then click Next.
- In the next wizard screen, make sure No is selected under Do You Travel With This Computer, and then click Next.
- In the final Microsoft Outlook Setup Wizard screen, click Finish. Verify that you can successfully connect to the Administrator mailbox.
Exercise Summary
It is possible to restore databases to a different server in the same organization and administrative group. This recovery strategy should only be used as a last resort if the original production server cannot be restored and must be removed from the Exchange organization. You need to create storage groups and databases on the target server that use the same name as the original resources. For all databases that you intend to restore, select the This Database Can Be Overwritten By A Restore check box. Restoring to a different server requires working with the Information Store and Active Directory. You will need to reconnect the users to their restored mailboxes and update MAPI-based client profiles.
High-Speed Recovery with Delayed Restore
Restoring databases directly to the production server implies that users cannot work with their mailboxes during the restoration. The larger the databases, the longer the interruption of business processes. A sophisticated recovery strategy with delayed restore operations can help to minimize system downtime.
The basic idea behind delayed restores is to recover the system very quickly with empty databases first, then restore the databases to another server, and use recovery utilities, such as the Microsoft Exchange Mailbox Merge Wizard, to extract the messages from the recovery server and play them back into the production system. Outlook 2000 initializes new production mailboxes automatically based on mailbox-enabled user account information (see Exercise 1 of Chapter 13, "Creating and Managing Recipients"). Your users will be able to work with their mailboxes right away. Messages and data are restored later.
NOTE
Because Outlook 2000 initializes new mailboxes in new and empty databases, users cannot continue to work with existing offline folder stores. It is required to disable offline folders and reconfigure them using a new .ost file. The configuration of offline folders and the offline folder synchronization are covered in Chapter 9, "MAPI-Based Clients."
Preparing the Recovery Server
Most important, your recovery server must not become part of your production Active Directory forest. As explained earlier, it is impossible to reconnect duplicated mailboxes to user accounts, which effectively prevents access to the restored data. Mailboxes must be unique in the forest. Consequently, it is vital to install the recovery server in a separate forest and reconnect restored mailboxes to recovery accounts.
Consider the following issues when setting up the recovery system:
- Install Windows 2000 Server and promote the server to a domain controller in the recovery forest. Be sure to use names that are different from those in your production environment. During the domain controller promotion, install and configure the Windows 2000 DNS, but do not configure the Dynamic Host Configuration Protocol (DHCP) to avoid interference with the production environment.
- Set up Exchange 2000 Server using the organization and administrative group names of the production system. If these names do not match, databases cannot be mounted.
- Manually create storage groups and stores using the original names. The actual database filenames and log file prefixes, however, do not need to match. The names of storage groups and stores will be listed in your backup sets. You need to dismount the newly created databases and select the This Database Can Be Overwritten By A Restore check box.
- Ensure that the LegacyExchangeDN information matches its counterpart in the production environment.
Correcting LegacyExchangeDN Values
Most Exchange 2000 Server directory objects have a LegacyExchangeDN attribute, which is used to identify items in a way that is compatible with Exchange Server 5.5. As its name implies, this attribute refers to the legacy distinguished name (DN) in the form of /O=<organization>/OU=<site>/CN=<container>/CN=<sub-container>/CN=<object>.
When you upgrade to Exchange 2000 Server, the LegacyExchangeDN will be derived from the existing organization and site names. Installing Exchange 2000 Server without upgrading, on the other hand, results in a LegacyExchangeDN containing the new organization name and administrative group name, such as /O=Blue Sky Airlines/OU=First Administrative Group. Consequently, the LegacyExchangeDN values may not match if the original server was upgraded from Exchange Server 5.5 while the recovery system was directly installed, or the recovery server was installed in an administrative group with a different name.
Unfortunately, it is not possible to specify an administrative group name during the installation of the first server in a forest. The first sever will always be installed in First Administrative Group. Renaming administrative groups in Exchange System Manager does not change the LegacyExchangeDN information. The best idea for solving this naming issue is to install Exchange Server 5.5 using the original organization and site names on the recovery system first, and then upgrade the installation to Exchange 2000 Server. Another option is to install a first Exchange 2000 server in First Administrative Group, create an additional administrative group with the correct name, and then install the actual recovery server into this group.
You can also use LDIFDE to export the Exchange 2000 Server objects from the Configuration naming context in Active Directory, then edit the export file to correct the LegacyExchangeDN values, and then import this file to update the directory objects. The following command line exports all objects with a LegacyExchangeDN value that starts with "/O=Blue Sky Airlines/OU=First Administrative Group": ldifde -f c:\export.ldf -p Subtree -l legacyExchangeDN -s Bluesky-srv1 -r "(legacyExchangeDN= /O=Blue Sky Airlines/OU=First Administrative Group*)" -d "CN=Microsoft Exchange, CN=Services,CN=Configuration,DC=BlueSky-inc-10,DC=com".
An import file that changes "/O=Blue Sky Airlines/OU=First Administrative Group" to "/O=Blue Sky Airlines/OU=Exchange 55 Site Name" would have the following format (changes are in boldface):
dn: CN=First Administrative Group,CN=Administrative Groups,CN=Blue Sky Airlines, CN=Microsoft Exchange,CN=Services,CN=Configuration,DC=BlueSky-inc-10,DC=com changetype: modify replace: legacyExchangeDN legacyExchangeDN: /o=Blue Sky Airlines/ou=Exchange 55 Site Name
You can read more about LDIFDE in Chapter 13, "Creating and Managing Recipients."
Reconnecting Mailboxes
A properly prepared recovery server allows you to restore and mount databases from the production system. The mailboxes will be disconnected because the original user accounts do not exist. You will have to create new accounts in the recovery forest and reconnect the mailboxes. It is possible to use Active Directory Users and Computers as well as Exchange System Manager for this purpose, but reconnecting numerous users calls for a different approach. Bulk operations in Active Directory are best performed using the LDIFDE utility. You can use this tool to export organizational units (OUs) and user accounts from the production environment, then edit the export file to adjust the domain name information, and then use LDIFDE again to import the information into the recovery forest.
Another, perhaps easier way is to use the Mailbox Reconnect utility (MBCONN.EXE), which allows you to generate an .ldf file based on information from the restored mailbox stores. This .ldf file will contain all it needs to create the required user accounts using LDIFDE. You may want to edit this file to remove accounts for system mailboxes before importing the information into the recovery forest. As soon as the user accounts exist, you can reconnect them to their mailboxes with the Mailbox Reconnect utility. You can find further information in the MBCONN.CHM file, which is on the Exchange 2000 Server CD in the \Support\Utils\i386 directory.
Data Retrieval and Playback
It is not possible to reconnect multiple mailboxes to a single account. You have two options: You can either work with individual accounts to extract the data from each mailbox separately, or you can give your administrator account the permission to open all mailboxes simultaneously. To gain full permissions over all mailboxes in a store, display the store's property sheets in Exchange System Manager, click on the Security tab, and grant your account full mailbox permissions including Receive As and Send As. Administrators have inherited implicit denials for Receive As and Send As (as indicated by grayed checkmarks), but you can override those denials by granting yourself explicit permissions. You need full permissions on the recovery and production stores.
NOTE
Members of the Domain Admins or Enterprise Admins group inherit default denials for Receive As and Send As permissions to prevent automatic access to user mailboxes. You need to grant your administrator account explicit permissions at the store level to override the defaults. Accounts that are not members of these groups can gain access to all mailboxes if you add them to the Exchange Domain Servers group.
With full access permissions including Receive As and Send As, it is easy to extract and play back user data. You may use Outlook 2000 to log on to one mailbox at a time, download the folders and messages in a personal folder store (.pst), and then log on to the production system to restore the data from the .pst file. The configuration of .pst files was covered in Chapter 9, "MAPI-Based Clients."
To retrieve and restore data from numerous mailboxes, use the Microsoft Exchange Mailbox Merge Wizard (EXMERGE.EXE), also known as Exmerge. You can find Exmerge on the Exchange 2000 Server CD in the \Support\Utils\i386\Exmerge directory. You need to copy the files to the c:\Program Files\Exchsrvr\Bin directory because Exmerge requires several DLLs that come with Exchange System Manager. For detailed information about Exmerge, read the documentation available in the \Support\Utils\i386\Exmerge directory.
NOTE
Essentially, Exmerge is a MAPI-based client that copies messages from mailboxes into .pst files and then imports the data into target mailboxes. Exmerge supports scheduled batch-mode operations. This allows you to use this utility as a mailbox-level backup agent to save single mailbox data to .pst files.
Exercise 9: Performing a High-Speed Recovery with Delayed Restore
In this exercise you will assume a damaged database on an Exchange 2000 server. You will recover the information store with minimum downtime, restore the database to a recovery server, and then use available recovery tools to play back user data.
This exercise is very time consuming. It may require several hours to complete. If you don't have the time or patience to work through this 83-step procedure, you may skip it and view the multimedia demonstration instead. It is also a good idea to display the demonstration before engaging in the task of completing the exercise yourself. Launch the EX9CH20*.AVI files, which you can install on your computer by running the self-extracting executable from the \Exercise_Information\Chapter20 folder on the Supplemental Course Materials CD-ROM.
Prerequisites
- Install Windows 2000 Server with Service Pack 1 on BLUESKY-SRV2 as outlined in the "Getting Started" section of "About This Book," but do not promote this server to a domain controller, and do not add it to the domain. Install this server in a workgroup called WORKGROUP.
NOTE
Recovery servers must not be added to the production Active Directory forest.
- Complete Exercise 8 (the Administrator mailbox resides on BLUESKY-SRV1 in the Management Group/VIP Mailboxes store).
- Log on as Administrator to BLUESKY-SRV1.
- Log on as Carl Titmouse to BLUESKY-WKSTA.
- You will need the Windows 2000 Server, Windows 2000 Service Pack 1, and Exchange 2000 Server Enterprise Edition installation CDs.
To recover user data using the Mailbox Reconnect and Mailbox Merge utilities
- At this point, you have installed Windows 2000 Server and Service Pack 1 on BLUESKY-SRV2. Log on as Administrator to BLUESKY-SRV2, and close the Windows 2000 Configure Your Server application that is launched automatically.
- Click Start, then click Run. In the Run dialog box, type dcpromo, and then click OK to start the Active Directory Installation Wizard.
- On the first wizard screen click Next. On the Domain Controller Type wizard screen, accept the default selection Domain Controller For A New Domain, and then click Next again.
- On the Create Tree Or Child Domain wizard screen, accept the default selection Create A New Domain Tree, and then click Next.
- On the Create Or Join Forest wizard screen, accept the default selection Create A New Forest Of Domain Trees, and then click Next.
- On the New Domain Name wizard screen, under Full DNS Name For New Domain, type BlueSky-Recovery.com (see Figure 20.16), and then click Next.
- On the NetBIOS Domain Name wizard screen, under Domain NetBIOS Name, verify that BLUESKY-RECOVER is displayed, and then click Next.
- On the Database And Log Locations wizard screen, accept the default settings, and then click Next. On the Shared System Volume wizard screen, click Next.
- A dialog box will be displayed informing you that a DNS server could not be contacted. Click OK.
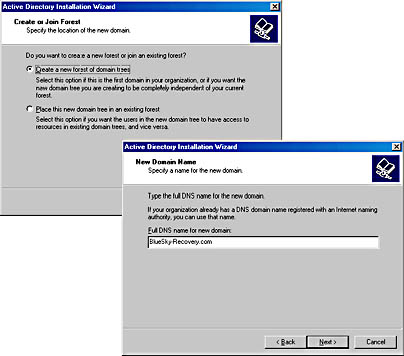
Figure 20.16 Creating a recovery forest in Active Directory
- On the Configure DNS wizard screen, accept Yes, Install And Configure DNS On This Computer (Recommended), and then click Next. It is not advisable to integrate the recovery system with the product DNS environment.
- On the Permissions wizard screen, accept the default setting, and click Next.
- On the Directory Services Restore Mode Administrator Password wizard screen, under Password and Confirm Password, type password, and then click Next.
- On the Summary wizard screen, verify the settings, and then click Next to start the configuration of Active Directory.
- If an Insert Disk dialog box appears prompting you for the Service Pack 1 CD, insert the CD into the CD-ROM drive, and then click OK.
- If a Files Needed dialog box is displayed, make sure the E:\i386 directory is selected under Copy Files From, and then click OK.
- When the Insert Disk dialog box appears again prompting you this time for the Windows 2000 Server CD, insert the CD into the CD-ROM drive, and then click OK.
- On the final wizard screen, click Finish to complete the configuration procedure. A dialog box will be displayed, prompting you to restart the computer. Click Restart Now.
- When BLUESKY-SRV2 is rebooted, log on as Administrator again, insert the Exchange 2000 Server, Enterprise Edition installation CD into the CD-ROM drive, and then launch Setup from the \Setup\i386 directory.
- On the Welcome wizard screen, click Next, accept the license agreement on the End-User License Agreement wizard screen, and click Next. Type your CD Key on the Product Information wizard screen, and click Next.
- On the Component Selection wizard screen, verify that Typical is displayed under Action for Microsoft Exchange 2000, and then click Next.
- On the Component Selection wizard screen, accept the default setting Create A New Exchange Organization, and then click Next.
- On the Organization Name wizard screen, under Organization Name, type Blue Sky Airlines (the name must match the configuration of the production organization), and then click Next.
- On the License Agreement wizard screen, select I Agree That and then click Next.
- On the Component Summary wizard screen, click Next to start the installation. When a Microsoft Exchange 2000 Installation Wizard dialog box appears, informing you that the domain has been identified as an insecure domain, click OK.
- On the final wizard screen, click Finish.
- On BLUESKY-SRV1, perform a full online backup of the entire Microsoft Information Store using Windows 2000 Backup, as illustrated in Exercise 5, earlier in this lesson. Specify D:\BLUESKY-SRV1.BKF as the backup filename.
- On BLUESKY-WKSTA, launch Outlook 2000, and make sure you are working with the mailbox of Carl Titmouse.
- On the toolbar, click New, click To, select Carl Titmouse, click To ->, and then click OK to address the message to Carl's mailbox.
- In the Subject line, type Exmerge Recovery Test Message.
- In the Message Body type This message was not included in the most recent full backup of BLUESKY-SRV1.
- Click Send and verify that the test message was received. Leave Outlook 2000 running.
- On BLUESKY-SRV1, launch Exchange System Manager, expand the First Administrative Group and the server object BLUESKY-SRV1, then expand First Storage Group, right-click Mailbox Store (BLUESKY-SRV1), and select Dismount Store.
- In the Mailbox Store (BLUESKY-SRV1) dialog box informing you that the store will be inaccessible, click Yes.
- Right-click Mailbox Store (BLUESKY-SRV1) again, select Properties, click on the Database tab, and check the path to and the names of the database files (such as, C:\Program Files\Exchsrvr\Mdbdata\MAILBOX STORE (BLUESKY-SRV1).EDB). Click Cancel.
- At this point it is assumed that the database files have been corrupted—and that it would take an extended period of time to restore them. Launch Windows Explorer, open the \Program Files\Exchsrvr\Mdbdata directory, and move the database files (such as, MAILBOX STORE (BLUESKY-SRV1).EDB and MAILBOX STORE (BLUESKY-SRV1).STM) to the C:\Winnt\Temp directory. (If you are working with a fresh installation of Exchange 2000 Server, your database files are called PRIV1.EDB and PRIV1.STM.)
NOTE
Do not delete damaged databases before the restore process has been finished successfully. Corrupted backup media will prevent a successful data restoration. In this situation, repairing the damaged databases using ESEUTIL.EXE may be the only rescue. - Launch Windows 2000 Backup again to perform an incremental backup of the entire Microsoft Information Store. Specify D:\BLUESKY-SRV1-INC.BKF as the backup filename, click Start Backup, then click Advanced, and select Incremental under Backup Type. Click OK, then Start Backup. Backup will complete without errors because the nonexisting databases of the Mailbox Store (BLUESKY-SRV1) are not included in the backup; however, the current transaction logs are saved.
- Switch to Exchange System Manager, right-click Mailbox Store (BLUESKY-SRV1), and select Mount Store.
- A Mailbox Store (BLUESKY-SRV1) dialog box will appear informing you that at least one of this store's database files is missing. Click Yes to force the creation of an empty database (see Figure 20.17).
- In the Mailbox Store (BLUESKY-SRV1) dialog box informing you that the store was mounted successfully, click OK.
IMPORTANT
At this point, you should perform another full backup of this information store because you will not be able to restore any former backups successfully without manually deleting all files of this storage group beforehand. - On BLUESKY-WKSTA, try to work with Outlook 2000. Outlook will not be able to work with Exchange 2000 Server. Restart Outlook 2000; a Microsoft Outlook dialog box will appear, asking you to recreate the shortcuts. Click Yes.Notice that the mailbox is empty, but Carl Titmouse can continue to send and receive messages or access public folders.
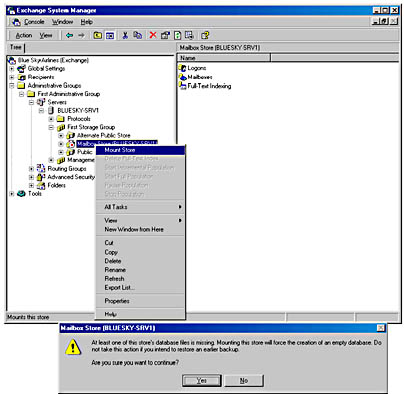
Figure 20.17 Forcing the creation of an empty database
Important
Outlook users cannot continue to use existing offline folders with newly created mailboxes. The offline folder configuration must be disabled and re-enabled, thus creating a new offline folder store (.ost file). The configuration of .ost files is covered in Chapter 9, "MAPI-Based Clients." - On BLUESKY-SRV2, launch Exchange System Manager, expand Servers, and then BLUESKY-SRV2. Right-click First Storage Group, and then select Rename. Change the name to Standard Storage Group.
- Right-click BLUESKY-SRV2, point to New, and select Storage Group.
- In the Properties dialog box, under Name, type First Storage Group, and then click OK.
- Right-click First Storage Group, point to New, and select Mailbox Store.
- In the Properties dialog box, under Name, type Mailbox Store (BLUESKY-SRV1).
- Click on the Database tab and select the This Database Can Be Overwritten By A Restore check box, then click OK.
- In the Mailbox Store (BLUESKY-SRV1) dialog box asking you whether you want to mount this store now, click No.
- Launch Windows 2000 Backup and restore the database of the Mailbox Store (BLUESKY-SRV1) and log files from the backup catalog \\BLUESKY-SRV1\D$\BLUESKY-SRV1.BKF to BLUESKY-SRV2, as outlined in Exercise 8. Make sure BLUESKY-SRV2 is displayed (without any backslashes) under Restore To in the Restoring Database Store dialog box and do not yet select the Last Backup Set check box.
- In a second cycle, restore the log files from the incremental backup (catalog file \\BLUESKY-SRV1\D$\BLUESKY-SRV1-INC.BKF) to BLUESKY-SRV2. This time select both the Last Backup Set and Mount Database After Restore check boxes.
NOTE
Although BLUESKY-SRV1 and BLUESKY-SRV2 are domain controllers in different Active Directory forests, the Administrator account has the same password in both domains. Therefore, file-based access over the network works without being prompted for user credentials. - Switch back to Exchange System Manager, open First Storage Group, and verify that the Mailbox Store (BLUESKY-SRV1) is displayed as mounted (you may need to right-click First Storage Group and select Refresh).
- Expand Mailbox Store (BLUESKY-SRV1), select Mailboxes, and notice the mailbox resources in the details pane.
- Right-click Mailboxes, and then select Run Cleanup Agent. Notice that most mailboxes are now displayed with a red cross to indicate that they are not connected to user accounts (see Figure 20.18).
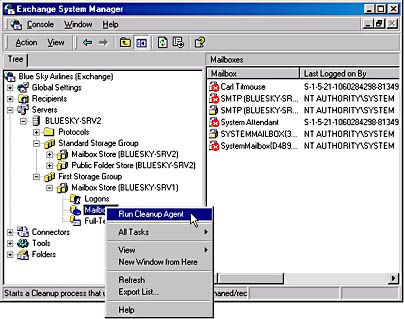
Figure 20.18 A recovered mailbox store with disconnected mailboxes
- From the \Support\Utils\i386 directory on the Exchange 2000 Server CD, launch the MBCONN.EXE utility. The Mailbox Reconnect utility attempts to write a log file to the local directory; because it's being launched from a CD, this will fail. In the Mailbox Reconnect dialog box, click OK. In the Save As dialog box, click Cancel. In the second Mailbox Reconnect dialog box asking if you are sure that you do not want the log file to be generated, click Yes.
- Click Next on the Welcome wizard screen.
- On the Connect To Exchange Server wizard screen, under Exchange Server, type bluesky-srv2, and then click Next. Because BLUESKY-SRV2 is a domain controller, you do not need to specify a domain controller explicitly.
- On the Select Database wizard screen, select Mailbox Store (BLUESKY-SRV1), and then click Finish.
- A number of disconnected mailboxes will be listed in the Mailbox Reconnect utility (see Figure 20.19). Open the Actions menu and select Export Users.
- In the Export Users To LDF File dialog box, click on the button that is labeled with '…' (which you can find to the right side of Container), expand BlueSky-Recovery, select the Users container, and then click OK.
- Under File Name type c:\import.ldf, and then click Generate.
- In the Mailbox Reconnect dialog box informing you that the users have been exported, click OK.
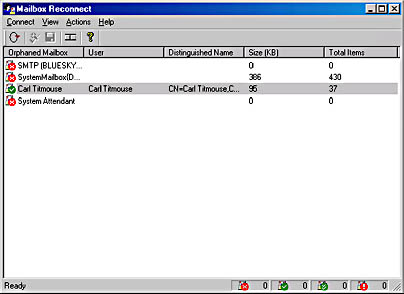
Figure 20.19 Reconnecting restored mailboxes using the Mailbox Reconnect utility
- Click Start, click Run, and in the Run dialog box, type cmd. Click OK.
- At the command prompt, type notepad c:\import.ldf, and then press Enter.
- Delete the entries of system mailboxes, save the changes, and then close Notepad. The following is an example IMPORT.LDF file:
dn: CN=Carl Titmouse,CN=Users,DC=BlueSky-Recovery,DC=com changetype: add UserAccountControl: 66048 displayName: Carl Titmouse cn: Carl Titmouse objectclass: user samAccountName: CarlTitmouse givenName: Carl sn: Titmouse
- At the command prompt, type ldifde -i -f c:\import.ldf -s bluesky-srv2, and then press Enter. Verify that the command completes successfully.
- Switch back to the Mailbox Reconnect utility, open the Actions menu, and select Preview All. In the Browse For Container dialog box, select the Users container, and click OK.
- Verify that Carl Titmouse is displayed as a mailbox-enabled account (see Figure 20.19). Switch back to the Exchange System Manager, right-click Carl Titmouse, and then select Reconnect.
- In the Select A New User For This Mailbox dialog box, double-click Carl Titmouse. In the Reconnect dialog box informing you that the operation was completed successfully, click OK again.
- If an Exchange System Manager dialog box appears informing you that the object has not been replicated to the destination server yet, click OK.
- Wait for the Recipient Update Service to assign the account of Carl Titmouse valid e-mail addresses. Launch Active Directory Users and Computers, double-click the account of Carl Titmouse, click on the E-Mail Addresses tab, and verify that e-mail addresses are assigned. Click OK.
- Switch back to Exchange System Manager, right-click Mailboxes again, and select Run Cleanup Agent. Notice that the mailbox is now reactivated.
- Now that you have reconnected the mailbox of Carl Titmouse to a newly created user account, you need to grant the Administrator additional permissions to open this mailbox. In Exchange System Manager, right-click Mailbox Store (BLUESKY-SRV1). Select Properties, click on the Security tab, and make sure the Administrator account is selected. Under Permissions, select the Receive As and Send As check boxes. Click OK and repeat these steps on BLUESKY-SRV1 because these access rights are required on both servers.
- On BLUESKY-SRV2, copy all files from the \Support\Utils\i386\Exmerge directory on the Exchange 2000 Server CD to the \Program Files\Exchsrvr\Bin directory, and then launch EXMERGE.EXE from this location.
- On the Microsoft Exchange Mailbox Merge Wizard Welcome screen, click Next.
- On the Procedure Selection wizard screen, select Extract And Import (One Step Procedure), and then click Next.
- On the Source Server wizard screen, under Microsoft Exchange Server Name, type bluesky-srv2, and then click Next. (You may click Options if you want to explore the capabilities of the Mailbox Merge utility.)
- On the Destination Server wizard screen, under both Microsoft Exchange Server Name and Microsoft Windows 2000 Domain Controller (DC) Name, type bluesky-srv1. Under Port Number For LDAP Queries, type 389, and then click Next.
- On the Database Selection wizard screen, select the First Storage Group/Mailbox Store (BLUESKY-SRV1) check box, and then click Next (see Figure 20.20).
- On the Mailbox Selection wizard screen, select the mailbox of Carl Titmouse, and click Next. (If you need to work with numerous mailboxes, you may find the Select All button useful.)
- On the Locale Selection wizard screen, accept the defaults, and click Next.
- On the Target Directory wizard screen, make sure the \Exmergedata directory is located on a drive with sufficient capacity, and then click Next.
- On the Save Settings wizard screen, click Next.
- The Microsoft Exchange Mailbox Merge Wizard will now move existing messages into Carl Titmouse's mailbox on BLUESKY-SRV1. When this process completes, click Finish.
- On BLUESKY-WKSTA, verify that all messages have been restored including the Exmerge Recovery Test Message (see Figure 20.20).
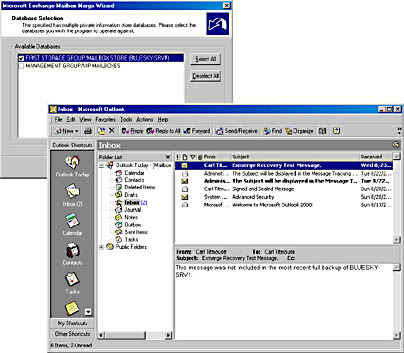
Figure 20.20 Performing a delayed restore using the Exchange Mailbox Merge Wizard
Exercise Summary
Following a successful restore of databases to a recovery server outside the production forest, you need to reconnect the mailboxes that you are interested in to newly created user accounts. If the number of mailboxes is small (for instance, if you want to recover only a single mailbox or even just a few messages from a single mailbox), you can work with Active Directory Users and Computers and Exchange System Manager. For numerous mailboxes, on the other hand, use the Mailbox Reconnect utility to generate an .ldf import file, and then use LDIFDE to create the required user accounts in the recovery forest. After that, it is easy to reconnect the mailboxes. Next, grant your account Receive As and Send As permissions on the production and recovery stores to open all mailboxes using your account, and then use the Exchange Mailbox Merge Wizard to play back the data from the recovery server to the production systems. Outlook users do not need to disconnect from their mailboxes during that time. Their mailboxes can be filled in the background while they continue to send and receive messages.
EAN: N/A
Pages: 186