| In "Creating New Gradients" earlier in this chapter, you learned how to create color blends. Flash treats gradients just like any other fill. You use the paint-bucket tool to fill outline shapes with a gradient and the brush tool to create freeform swashes of gradient color. To fill a shape (or replace a solid fill) with a linear gradient: -
In the Toolbox, select the paint-bucket icon. -
In the Color Mixer panel, define a new linear gradient. or From the Color Swatches panel or from the fill-color box in the Toolbox or Property Inspector, choose an existing linear gradient. -
Click the paint bucket's hot spot (the tip of the drip of paint) somewhere inside the outline shape or within the existing fill (Figure 3.108). Figure 3.108. You can use the paint-bucket tool to apply a linear-gradient fill. 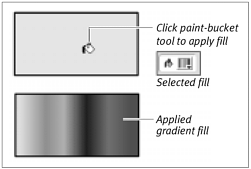 The shape fills with the linear gradient currently displayed in the fill-color boxes. To fill a shape (or replace a solid fill) with a radial gradient: -
In the Toolbox, select the paint-bucket tool. -
In the Color Mixer panel, define a new radial gradient. or From the Color Swatches panel or from the fill-color box in the Toolbox or Property Inspector, choose an existing radial gradient. -
Click the paint bucket's hot spot (the tip of the drip of paint) somewhere inside the outline shape or within the existing fill (Figure 3.109). Figure 3.109. The paint-bucket tool can also apply a radial-gradient fill. 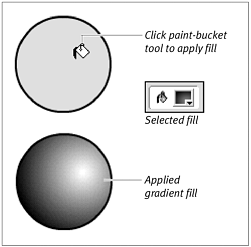 The shape fills with the radial gradient currently displayed in the fill-color boxes. To paint with an unlocked gradient: -
In the Toolbox, select the brush tool. -
Make sure that the Lock Fill modifier is deselected (Figure 3.110). Figure 3.110. Deselect the Lock Fill modifier to paint with an unlocked gradient.  -
Using one of the methods described in the preceding exercises, choose a gradient. -
Paint with the brush as described in Chapter 2. Flash cannot preview the shape you paint with the gradient you chose, as it can do with solid-color fills. The preview shape has a black-and-white pattern. -
When you finish your brush stroke, release the mouse button. Flash redraws the painted shape, using the gradient currently selected in the fill-color box. Flash fills the shape's bounding box (an invisible rectangle that's just the right size to enclose the shape) with the gradient. The painted shape reveals portions of that gradient pattern ( Figures 3.111 and 3.112). Figure 3.111. A painted shape with a linear-gradient fill. 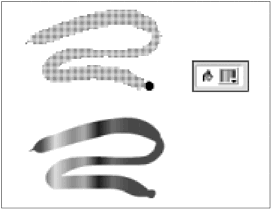 Figure 3.112. A painted shape with a radial-gradient fill. 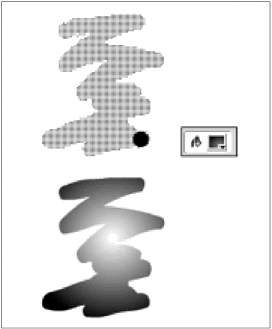  Tip Tip -
You can also create a single underlying gradient for several shapes on the Stage by using the Lock Fill modifier. With the paint-bucket tool selected, choose a gradient fill. Then click the Lock Fill modifier. Flash creates an underlying hidden rectanglethe same size as the Stage filled with the locked gradient. Wherever you paint with the locked gradient by using the brush tool (or apply the locked fill to a shape by using the paint-bucket tool), Flash reveals that hidden gradient.
Gradients Add Overhead Gradients are lovely, but they do increase file sizes and thereby slow the loading of published movies. Each area of gradient fill requires an extra 50 bytes of data that a solid fill doesn't need. In addition, gradients take processsor power. If you use too many, you may see slower frame rates, or slower animations, in your finished movie. | |