| In addition to solid colors, Flash works with gradients bands of color that blend into each other. Gradients can be linear (parallel bars of color) or radial (concentric rings of color ). Gradients can create interesting visual effects and are useful for adding shadingto make a circle look like a sphere, for example. Flash defines each gradient with a set of markers, called gradient pointers , that indicate which color goes where in the lineup of color bands. You define the color for each pointer. By positioning the pointers on the gradient-definition bar, you control how wide each band of color is. Each gradient can contain as many as eight colors. You define new gradients in the Color Mixer panel. To create a three-color linear gradient: -
Open the Color Mixer panel. -
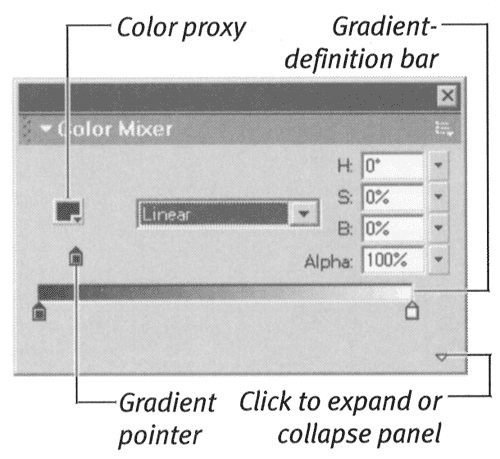
From the Color Mixer panel's Fill Style menu, choose Linear. The tools for defining gradientsa color-proxy box (a set of swatches for setting a gradient pointer's color ) and a gradient-definition barappear (Figure 3.98). Figure 3.98. Choose Linear from the Fill Style menu to access the tools for defining linear gradients.  -
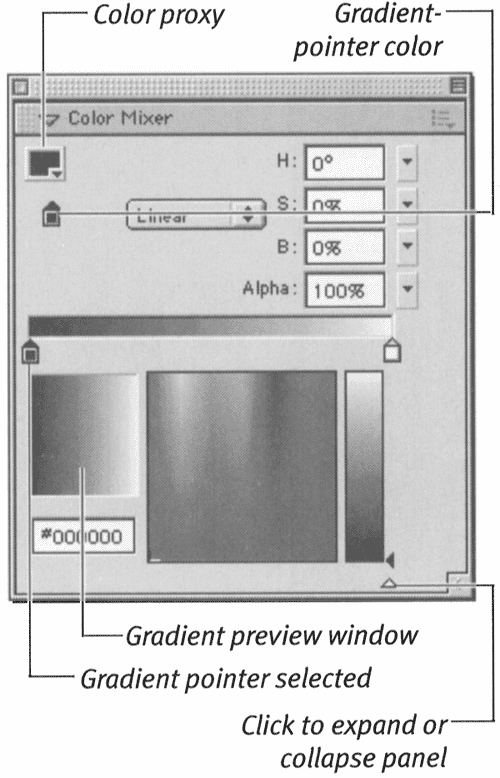
Click the triangle in the bottom-right corner of the panel. The HSL Color Picker and gradient-preview window appear (Figure 3.99). Figure 3.99. Expand the Color Mixer panel to access the gradient-preview window and HSLColor Picker.  -
Position the pointer on or below the gradient-definition bar. Flash adds a plus sign to the pointer, indicating that you can add a new gradient pointer in this area. -
To add a new pointer, click anywhere along the gradient-definition bar. Flash adds a new gradient pointer containing the color currently specified in the Color Mixer. -
To change the leftmost pointer's color, select it and then do one of the following: -
Click the color-proxy box in the top half of the Color Mixer panel, and choose a color from the set of swatches that appears. -
Enter new values in the Alpha and/or RGB or HSB fields. -
Choose a new color in the HSL Color Picker. -
Enter a new value in the Hex field. -
Repeat step 6 for the middle and rightmost pointers. -
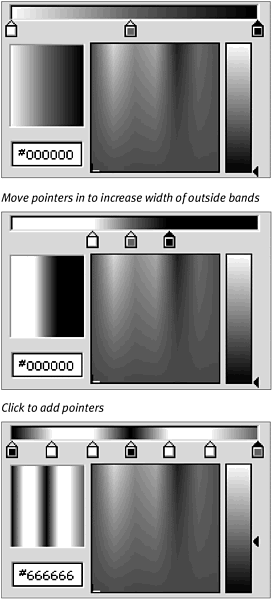
Drag the pointers to position them on the gradient-definition bar (Figure 3.100). Figure 3.100. Choose a color for each gradient pointer. The colors and positions of the pointers on the bar define a gradient's color transitions.  Place pointers closer together to make the transition between colors more abrupt; place them farther apart to spread the transition out over more space. As you modify the gradient, your changes appear in the Toolbox's fill-color box. The new gradient also appears in the Property Inspector for any tools that create a fill say, the oval tool. Those tools are now loaded and ready to create shapes using that gradient.  Tips Tips -
During each work session, the first time you define a gradient fill, the default two-color gradient appears in the Color Mixer panel: black on the left, blending to white on the right. You can add up to six additional colors. -
To reduce the number of colors in a gradient, with the gradient selected in the Color Mixer, drag one or more gradient pointers downward, away from the gradient-definition bar. The pointer disappears as you drag. The gradient changes to blend the colors in the remaining gradient pointers. -
When a gradient pointer is set to black, the Color Picker's Luminosity setting gets set to 0% (for white, Luminosity gets set to 100%). That setting means that the color-proxy window is going to show a solid black (or solid white) square even if you enter new RGB values or use the crosshair cursor to choose a new color. To change the color of a pointer that's set to black (or white), you must choose a new color from the color-proxy window's pop-up swatch set, reposition the Luminosity slider (on the right side of the Color Picker window), or enter a new Brightness value. -
To modify an existing gradient, choose it in the Color Swatches panel. Flash switches the Color Mixer panel to gradient mode and displays the selected gradient. Now you can make any changes you need. -
To reverse the direction of a gradient's color transition, drag one gradient pointer over another. In a white-to-black gradient (a white pointer on the left and a black pointer on the right), drag the white pointer to the right past the black one. Your gradient goes from black to white.
To create a new radial gradient: -
Open the Color Mixer panel. -
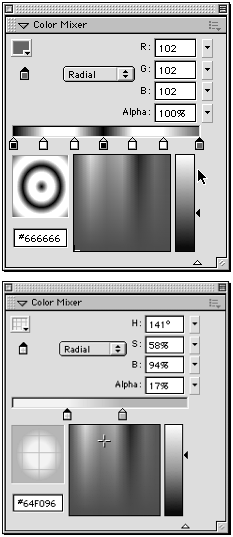
From the Fill Style menu, choose Radial. The tools for defining circular gradients appear. The gradient-definition bar looks the same as it does for linear gradients, but the preview shows your gradient as a set of concentric circles (Figure 3.101). The leftmost pointer defines the inner ring; the rightmost pointer defines the outer ring. Figure 3.101. Choose Radial from the Fill Style menu to create a circular gradient. The preview window translates the horizontal gradient-definition bar into the appropriate circular color transitions.  -
Follow steps 4 through 8 of "To create a three-color linear gradient" earlier in this chapter to define the color transitions in the radial gradient.  Tips Tips -
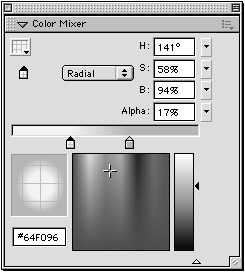
Gradients can have transparency. You simply use a transparent color in one or more gradient pointers (see "To define a color's transparency" earlier in this chapter). If a gradient has transparency, a grid shows up in the gradient pointer, in the color-proxy box, and in the transparent part of the gradient in the preview window (Figure 3.102). Figure 3.102. When transparent colors make up part of a gradient, grid lines appear in the gradient pointer, the color-proxy window, and the gradient-preview window.  -
Each pointer in a gradient can have a different alpha setting. To create fade effects, try creating a gradient that blends from a fully opaque color to a transparent one.
You can save a new gradient by adding it to the Color Swatches panel. To add a gradient to the Color Swatches panel: -
Create a new gradient, using any of the techniques outlined in the preceding sections. -
In the Color Mixer panel, do one of the following: -
From the Options menu, choose Add Swatch. -
Position the pointer over the gray empty area of the Color Swatches panel, and when the paint-bucket tool appears, click. Flash adds the new gradient to the gradients section of the Color Swatches panel.  |
