Flylib.com

Books Software


Understanding Library Hierarchy


Understanding Library Hierarchy

Flash lets you create folders and subfolders to organize assets hierarchically within the library.

To create a library folder

1.

Open the Library panel.

2.

To select a location, do either of the following :

  • To add a root-level folder, select an item at the root level.

  • To add a subfolder, select an item within the folder where you want to add the new subfolder. (Do not select the folder itself.)

3.

To create the new folder, do either of the following :

  • From the pop-up Options menu in the top-right corner of the window, choose New Folder ( Figure 7.8 ).

    Figure 7.8. From the Options menu in the Library panel, choose New Folder to create a library folder.


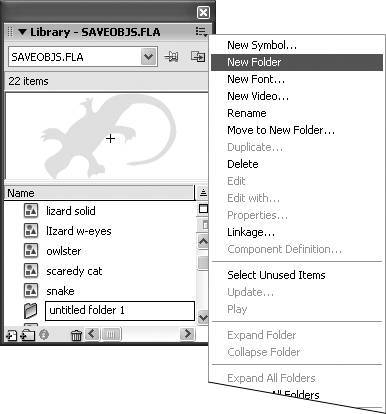
  • At the bottom of the window, click the New Folder button ( Figure 7.9 ).

    Figure 7.9. To create new folders and subfolders, click the New Folder button.


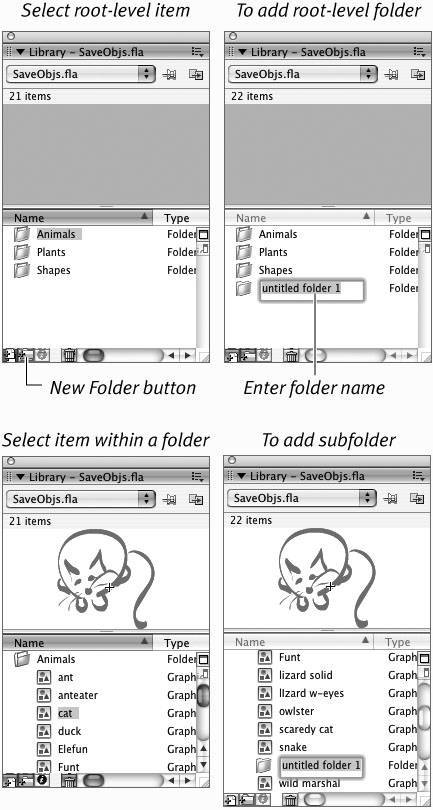
Flash creates a new folder, selects it, and activates the text entry field.

4.

Type a name for your folder.

5.

Press Enter.

To work with library folders

1.

In the Library panel, select a closed folder.

2.

To open a closed folder, do either of the following :

  • Double-click the folder icon.

  • From the Library panel's Options menu, choose Expand Folder.

The folder's contents appear in the Library panel ( Figure 7.10 ).

Figure 7.10. Open folders in the Library panel to display their contents.
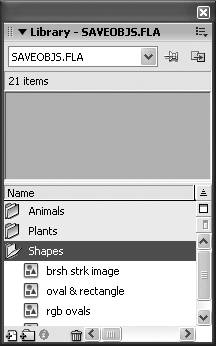

3.

To close an open folder, do either of the following :

  • Double-click the folder icon.

  • From the Library panel's Options menu, choose Collapse Folder.

Tip

  • To open all library folders at the same time, from the Library panel's Options menu, choose Expand All Folders. To close all folders, choose Collapse All Folders.


To move items between library folders

1.

In the open Library panel, select the item you want to move.

2.

Drag the selected item over the icon of the destination folder.

Flash highlights the target folder ( Figure 7.11 ).

Figure 7.11. In the Library panel, you can drag items between folders. The target folder highlights when it's ready to receive the dragged item.
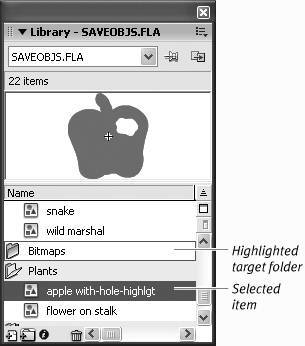

3.

Release the mouse button.

Flash moves the item into the new folder.

{% if main.adsdop %}{% include 'adsenceinline.tpl' %}{% endif %}

Tips

  • To move an item to a new folder quickly, from the Library panel's Options menu, choose Move to New Folder. A dialog for naming the new folder appears. Type a name and press Enter. Flash creates a folder on the same level as the selected item and places that item inside.

  • To sort library items, in the Library panel, click the heading of the column you want to sort by. To sort items by name, for example, click the Name column header. Flash highlights the chosen column header and sorts the Library panel by the items in that column.

  • To change the sort order, click the Sort button, which toggles between alphanumeric and reverse alphanumeric order. In Windows, the button always appears on the far-right side of the column headings; on a Mac, the Sort button appears as a small triangle next to the heading of the currently selected column (see Figure 7.2).


Converting Graphics to Symbols

Not all graphics in a Flash movie are symbols; you need to take special steps to define the items you create as symbols. You can convert elements you've already created into symbols or create symbols from scratch in the symbol editor. Symbols reside in the library of the document in which you create them. You can copy a symbol from one document to another or from one library to another document; the symbol then resides separately in each document's library.

The standard library of a Flash document contains all the symbols used in that document; it can also contain unused symbols.

The following task covers creating static graphic symbols. But you can also turn graphics into symbols that are animations (see Chapter 11) or buttons (see Chapter 12).

Why Use Symbols?

Flash uses vectors to hold down file size : Each vector shape is just a set of instructionsa recipe for creating the shape. This fact makes vector shapes efficient to begin with. Symbols allow you to reuse elements in a way that's more efficient than duplicating vector shapes .

A symbol is a master recipe. Imagine a busy restaurant that serves three kinds of soupchicken noodle, cream of chicken rice, and chicken with garden vegetablesand each pot of soup has its own cook. The head chef could go over with each cook all the steps required to make chicken broth, but that would involve a lot of repetition and take a lot of time. If the restaurant has a master recipe for chicken broth, the chef can instruct all the cooks to make a pot of chicken broth and then tell each cook just those additional steps that distinguish each dishadd noodles for chicken noodle; add rice and cream for cream of chicken rice; and add potatoes, carrots , and peas for garden vegetable.

Symbols act the same way in Flash. The full recipe is in the library. Each instance on the Stage contains just the instructions that say which recipe to start with and how to modify itfor example, use the recipe for the red rectangle, but make it twice as large, change the color to blue, and rotate it 45 degrees clockwise. Because symbols can themselves contain other symbols, it really pays to break your graphic elements into their lowest -common-denominator parts, make each individual part a symbol, and then combine the parts into larger symbols or graphics.

Each instance of a symbol (each place you use the same symbol in your Flash document) is linked to one master symbol. Instead of adding a full set of instructions for each instance, Flash adds a note to repeat the instructions, possibly with certain modifications. This method of reusing elements helps keep the published file size small. In addition, if you decide you want the symbol to look different (you want a perfect circle instead of an oval in your logo, for example), you can update one master graphic element instead of making the same change over and over in your document.


To turn an existing graphic into a symbol

1.

On the Stage, select the graphic element(s) you want to convert to a symbol.

Flash highlights the selected element(s).

2.

Choose Modify > Convert to Symbol ( Figure 7.12 ), or press F8 on the keyboard.

Figure 7.12. Choose Modify > Convert to Symbol to turn a selected existing graphic into a symbol.


The Convert to Symbol dialog appears ( Figure 7.13 ). Flash gives the symbol a default namefor example, Symbol 16based on the number of symbols previously created for the library.

Figure 7.13. The Convert to Symbol dialog lets you name your symbol, define its type, and set its registration point. (Click the Advanced button to expand the box to set linkages for sharing and import/export.)


3.

If you don't want to use the default name, type a new name for your symbol.

4.

Choose Graphic as the symbol type.

5.

To set the symbol's registration mark (see the sidebar "Registration Mark vs. Transformation Point vs. Info Panel Coordinates"), click one of the squares in the registration model.

By default, Flash registers a symbol by the upper-left corner of its bounding box. Click a different square on the registration modelanother corner, the center, or the middle of a sideto make Flash register the symbol by the corresponding point on the symbol's bounding box.

6.

Click OK.

Flash adds the symbol to the library. The selected graphic element(s) on the Stage become an instance of the symbol. A crosshair appears, indicating the location of the registration mark; a circle, known as the transformation point , appears at the center of the symbol ( Figure 7.14 ). You can no longer edit the item directly on the Stage; you must open it in one of Flash's symbol-editing modes.

Figure 7.14. A selected merge-shape on the Stage is highlighted with dots. When you convert that shape to a symbol, the bounding box is the only item that gets highlighted. A crosshair indicates where the symbol's registration mark is. A circle indicates the symbol's transformation point.


Tips

  • A graphic symbol can consist of one or more merge-shapes, drawing-objects, grouped shapesyou name it. You can even include symbols within symbols. Whatever is selected on the Stage when you choose Convert to Symbol becomes part of the symbol.

  • To convert graphic elements to a symbol quickly, select the elements on the Stage and drag the selection to the lower half of the document's Library panel. The Convert to Symbol dialog appears. Name and define your symbol as described in the preceding task.

  • The registration model is elusive . It appears only in the Convert to Symbol dialog. That means you get one chance to select a point on the symbol's bounding box or at its center and make that the registration point. However, you can always go into symbol-editing mode and reposition the graphic elements in relation to the registration mark (see "Editing Master Symbols," later in this chapter).


About Symbol Types

In Flash, you must specify a symbol type for each symbol. (In previous versions of Flash, this was called the symbol's behavior.) You have three choices: graphic, button, and movie clip.

Graphics are, as you might expect, graphic elements, but they can also be animated graphic elements. The feature that distinguishes one symbol type from another is the way the symbol interacts with the Timeline of the movie in which it appears. Graphic symbols operate in lock step with the Timeline of the movie in which they appear. A static graphic symbol takes up one frame of the movie in which you place it (just as any graphic element would). A three-frame animated graphic symbol takes up three frames of the movie (see Chapter 11).

Buttons have their own four-frame Timeline; a button sits in a single frame of the main movie Timeline but displays different frames as a user 's mouse interacts with the button (see Chapter 12).

Movie clips have their own multiframe Timeline that plays independently of the main movie Timeline (see Chapter 11).


Registration Mark vs. Transformation Point vs. Info Panel Coordinates

The symbol's registration mark (the small crosshair) is the point that Flash considers to be the 0, 0 point for the symbol at runtime. Flash uses that point to register the symbolthat is, to locate it via coordinates on the Stage, during playback (for example, when you use ActionScript to move a symbol in response to user input). The registration mark stays the same for all instances of the symbol.

The transformation point (the small circle) is the point you can use for snapping operations. It's the reference point Flash uses for transforming the symbol. When you rotate a symbol by using the free-transform tool in Rotate and Skew mode, for example, the transformation point is the pivot around which the symbol spins . Flash places the transformation point in the center of the master symbol, but you can change the location of the transformation point of individual symbol instances by using the free-transform tool.

The Info panel locates symbols in space during authoring; the Info panel doesn't use the registration mark to position elements, however. The Info panel positions elements by the top-left corner of their bounding box or by the transformation point, whichever one is selected in the panel's coordinate grid (see Chapter 4).

The fact that Flash positions symbols differently during authoring and at runtime can be very confusing. One way to insure that you see runtime coordinates in the Info panel (and Property inspector) is to position a symbol's registration mark at the top-left corner of a bounding box containing all the graphic-objects in the symbol; then position the transformation point at the center of that bounding box. This is what happens by default when you select elements on the Stage and convert them to a symbol (choose Modify > Convert). A registration mark in this position may not be ideal for positioning a symbol via scripting though. (Imagine scripting the movement of a flying bird, you might prefer to calculate its position using a reference point at the tip of the beak, not a point in the top-left corner of an imaginary rectangle surrounding the bird.) Alternatively, you could position the registration mark and transformation point in the same location, then always select the central square in the Info panel's coordinate grid. For symbol instances, use the free-transform tool to double-click the transformation point; it centers itself on the registration mark.