| When you create movies to show over the Web, you must face the issue of quality versus quantity. Higher quality (smoother animation and better, longer sounds) increases file size. The larger the file, the longer the download time and the slower your movie will be. Things that add to your file's size include lots of bitmaps (especially animated bitmaps), video clips, sounds, multiple areas of animation at one time, embedded fonts, gradients, and separate graphic elements instead of symbols and groups. To help you find out where your movie is bogging down, Flash offers simulated streaming. The Size Report and Bandwidth Profiler reveal which frames will cause hang-ups. You can then rethink or optimize the problem areas. To use the Bandwidth Profiler 1. | Open the Flash document that you want to test for playback over the Web.
| 2. | Choose Control > Test Movie (or Test Scene).
Flash exports the movie and opens it in Flash Player.
| 3. | From Flash Player's View menu, choose Download Settings, and select the download speed you want to test.
The menu lists eight speeds, all of which are customizable. To change them, choose View > Download Settings > Customize (Figure 16.1). By default, Flash lists five common connection speeds14.4 Kbps, 28.8 Kbps, 56 Kbps, DSL, and T1with settings that simulate real-world data-transfer rates. You can see the settings in the Custom Download Settings dialog (Figure 16.2). To create a custom setting, enter new values, and then click OK.
Figure 16.1. To create a custom connection speed for simulating playback over the Web, from the test environment's View menu, choose Download Settings > Customize. 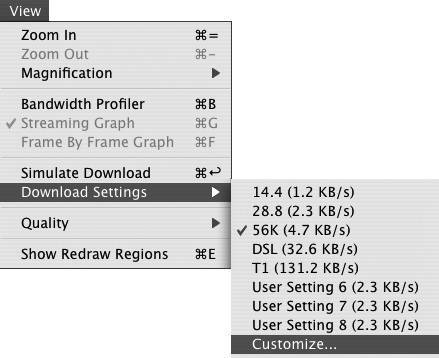
Figure 16.2. At its default setting, Flash offers choices for simulating five standard connection speeds. You can change the names and rates for these speeds in the Custom Download Settings dialog. 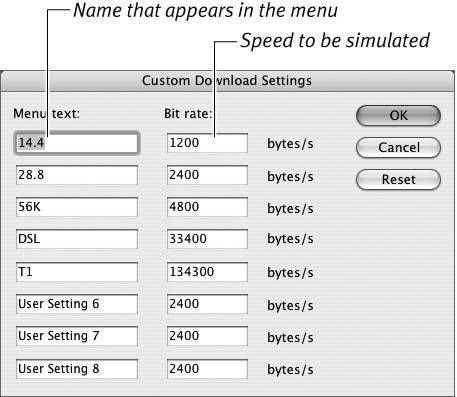
| 4. | From Flash Player's View menu, choose Bandwidth Profiler (Figure 16.3).
Figure 16.3. To view a graph of the amount of data in each frame, choose View > Bandwidth Profiler when a Flash Player window is open. 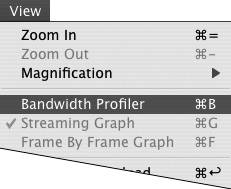
At the top of the Test Movie window, Flash graphs the amount of data that is being transmitted against the movie's Timeline (Figure 16.4). The bars represent the number of bytes of data per frame. The bottom line (highlighted in red) represents the amount of data that will safely download fast enough to keep up with the movie's frame rate. Any frame that contains a greater amount of data forces the movie to pause while the data downloads.
Figure 16.4. The Bandwidth Profiler graph at the top of the Flash Player window shows how much data each movie frame contains. Each bar in this version of the graph represents a frame of the movie. 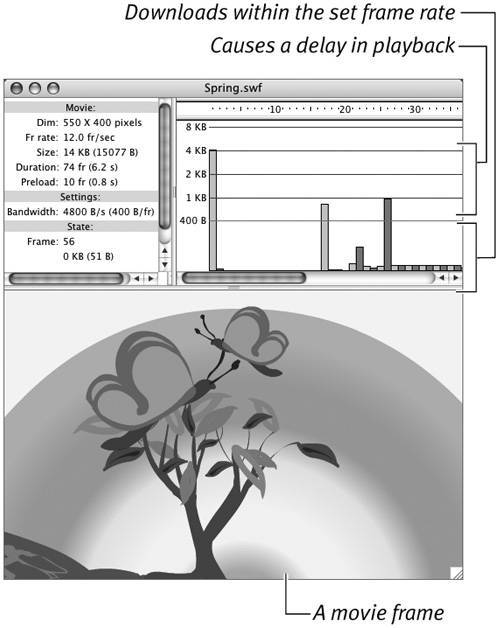
|
To view the contents of each frame separately 1. | From the Flash Player's View menu, choose Frame by Frame Graph, or press  -F (Mac) or Ctrl-F (Windows). -F (Mac) or Ctrl-F (Windows).
Flash presents a single bar for each frame in the Bandwidth Profiler graph. The numbers along the top of the graph represent frames (Figure 16.5). The height of the bar represents the amount of data in that frame.
Figure 16.5. In Frame by Frame Graph mode, the height of each bar indicates how much data the frame holds. 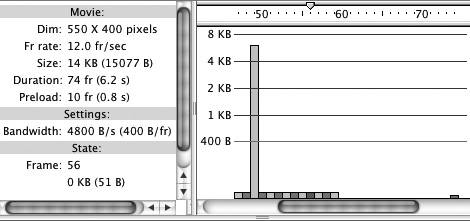
| 2. | Select a bar.
Specifics about that frame and the movie in general appear in the profile window.
|
To see how frames stream 1. | Choose View > Streaming Graph, or press -G (Mac) or Ctrl-G (Windows).
Flash displays the frames as alternating bars of light and dark gray, sized to reflect the time each one takes to download (Figure 16.6). The numbers along the top of the streaming graph represent frames as a unit of time based on the frame rate. (In a 12 fps movie, for example, each number represents 1/12 second.) For frames that contain very little data, you may see several bars in a single time unit in the graph. Frames that have lots of data stretch out over several time units.
Figure 16.6. In Streaming Graph mode, the width of each bar indicates how long the frame takes to download at the given connection speed and frame rate. In this movie, frame 49 contains 6 KB of data and takes roughly 5 seconds to download at a frame rate of 12 fps over a 14.4 Kbps modem. Each number along the top of the graph is a frame, and at 12 fps, this equals 1/12 second. 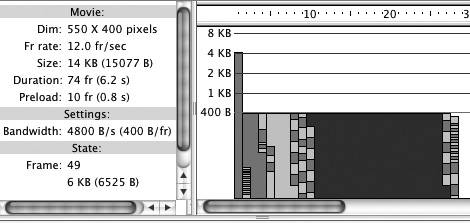
| 2. | Select a bar.
Specifics about that frame and the movie in general appear in the profile window (Figure 16.7).
Figure 16.7. The profile window to the left of the graph displays information about the movie. The State section identifies the selected frame (the frame highlighted in red) and lists the amount of data in that frame. You can see that frame 26 (top) has 1016 bytes of information, whereas frame 58 (bottom) contains only 51 bytes. 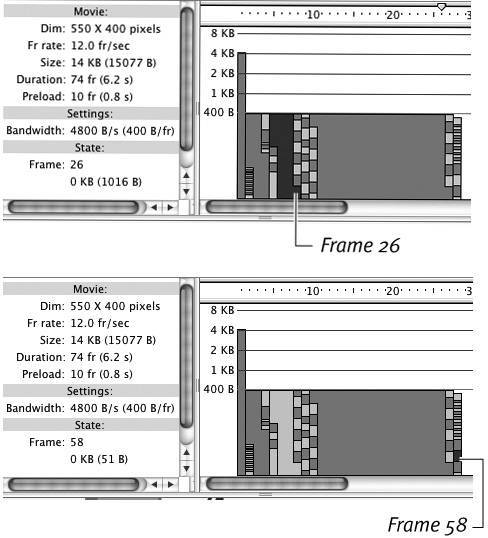
|
To display a download-progress bar With Bandwidth Profiler active, from Flash Player's View menu, choose Simulate Download, or press -Return (Mac) or Ctrl-Enter (Windows). As the animation plays in the test window, Flash highlights the numbers of the Timeline in green to show where you are in the download process.
To exit Bandwidth Profiler  Tips Tips
After you set up a test environment incorporating the Bandwidth Profiler, you can open any SWF file directly in test mode. Choose File > Open, navigate to the file you want to test, and then click Open. Flash opens the movie in a Flash Player window, using the Bandwidth Profiler and other viewing options you selected. You can get a printed version of the information about the amount of data in each frame. Choose the Generate Size Report option in the Export Flash Player dialog or the Flash tab of the Publish Settings dialog (for more information, see "Exporting vs. Publishing," later in this chapter). During the export or publishing process, Flash simultaneously creates a text file documenting how many bytes of information each frame of the movie contains.
A Note About Accessibility As you think about the best ways to deliver Flash movies to your audience, also consider the fact that some members of the audience may have physical conditions that affect the way they interact with your site. As the Web has become more visually interesting, it presents challenges to users with visual impairments who want to take advantage of the many resources available. Our society is becoming more sensitive to the ways in which activities and resources exclude people with disabilities. Web designers need to use Flash not only to make eye-catching Web sites that dazzle with artwork, animation, interactivity, sound, and video, but also to make sites that can convey information to a wide range of people. Remember that some of your users are unable to view or hear a site's content; some need to navigate and explore the site strictly through an input devicefor example, by tabbing to each element in turn. Flash addresses the issue of accessible Web sites by allowing you to make Flash content available to screen-reading software that uses Microsoft Active Accessibility (MSAA) technology. (At the time Flash 8 was released, MSAA was available only for Windows.) Screen readers provide audio feedback about a variety of elements on a Web site, reading aloud the labels of buttons, for example, or reading the contents of text fields. Through Flash's accessibility features, you can create descriptions of objects for the screen reader; prevent the screen reader from attempting to describe certain objects (such as purely decorative movie clips); and assign keyboard commands that let the user manipulate objects by pressing keys or tabbing through text fields, for example. The considerations that go into making an effective, accessible site are too numerous and complex to cover in this book. But you can check out the tools for defining accessible objects in the Accessibility panel. Choose Window > Other Panels > Accessibility to open the panel, or click the Accessibility icon in the bottom-right quadrant of the Properties tab of the Property inspector (Figure 16.8). The accessibility parameters for selected objects appear in the panel. Figure 16.8. Clicking the Accessibility icon (left) in the Properties tab of the Property inspector opens the Accessibility panel (right). Use these settings to make selected objects in your movie available (or unavailable) to screen-reader software. 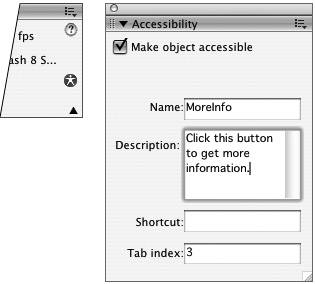
Macromedia outlines some of the basic concepts of accessible Web design in the Help panel (see the topic Using Flash > Creating Accessible Content). More information is available on Macromedia's Accessibility page (http://www.macromedia.com/resources/accessibility/). |
|