| In the previous tasks, you control sound playback by adding and removing sound instances directly in the Timeline during authoring. ActionScript allows you to control sounds during playbackloading, playing, and stopping sounds as needed at runtime. Scripting sounds is a complex task, but Flash 8 provides a set of sound behaviors for common sound-related tasks. You can use these behaviors to attach ActionScript to button symbols, button components, or movie clips, setting them up to load and play a specific sound, to replay a loaded sound, or to stop all event sounds that are currently playing whether they were loaded with ActionScript or placed in the Timeline during authoring. To target a sound with a behavior, you must set the sound's Linkage properties so that ActionScript can locate and work with the sound. To set a sound's Linkage properties 1. | Open a new copy of the SoundSyncTemplate you created earlier in this chapter.
The document contains three Timeline layers (Sound 1, Sound 2, and Objects); identifying text in keyframes 1, 5, 10, 15, and 20; and several sounds in the library (Rhythm.AIFF, Melody.AIFF, Drip.AIFF, and Scale.AIFF).
| 2. | Select Rhythm.AIFF in the Library panel.
| 3. | From the Library panel's Options menu, choose Linkage (Figure 15.26).
Figure 15.26. To prepare a sound to be targeted by ActionScript, you must set its Linkage properties. Select the sound in the Library panel; then, from the Options menu, choose Linkage to see a dialog with linkage settings. 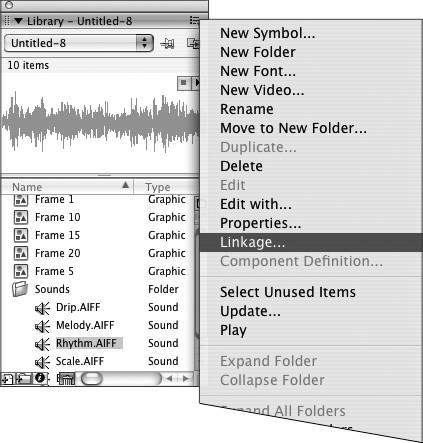
The Linkage Properties dialog appears.
| 4. | Select the Export for ActionScript check box.
Flash automatically enters the sound's name (here, Rhythm.AIFF) as the default Identifier and selects the "Export in first frame" check box. For this task, keep these default settings (Figure 15.27).
Figure 15.27. When you select Export for ActionScript in the Linkage Properties dialog, Flash assigns a default identifier. You can change the ID if you wish. 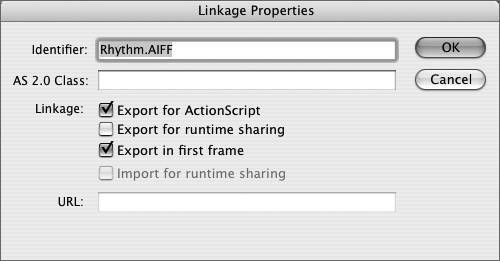
| 5. | Click OK.
| 6. | Repeat steps 24 for all the sounds that you plan to control with ActionScript.
For the following task, you need at least two sounds, Rhythm.AIFF and Melody.AIFF.
|
To load and play a sound with a button 1. | Continuing with the file you created in the preceding task, insert a new layer in the Timeline and name it Buttons.
| 2. | With keyframe 1 of the Buttons layer selected, place an instance of a button symbol on the Stage.
For more detailed instructions about using button symbols, see Chapter 12. To keep the button visible throughout the entire movie during playback, make sure the Buttons layer extends the whole length of the movie (if it doesn't, select frame 20 in the Buttons layer and press F5 to insert in-between frames). Your document should look like Figure 15.28. It's a good idea to give the button an instance namefor example, Drum_btn (for details about naming button instances, see Chapter 13).
Figure 15.28. Open a copy of the SoundSynchTemplate you created; add a button symbol instance in its own layer. Now you can assign a behavior to the button to load and play a sound. 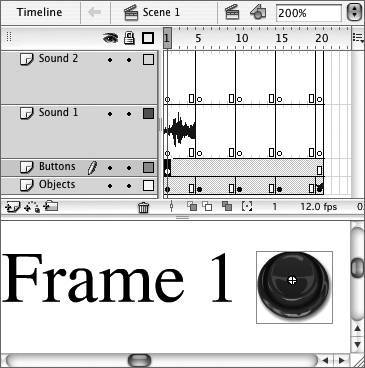
| 3. | Access the Behaviors and Actions panels.
| 4. | Select the button-symbol instance on the Stage.
| 5. | From the Add Behavior menu (the plus sign) in the Behaviors panel, choose Sound > Load Sound from Library (Figure 15.29).
Figure 15.29. Choose Sound > Load Sound from Library to script a button that loads (and plays) a sound when a user clicks the button during playback of your movie. 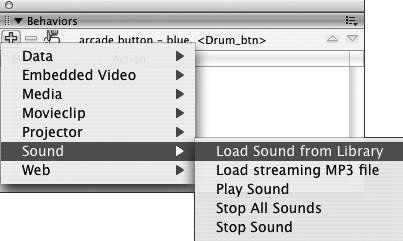
The Load Sound from Library dialog appears.
| 6. | In the Load Sound from Library dialog, do the following:
- Type the linkage identifier in the first field. This is the name you assigned when you set the sound's Linkage properties in the preceding task. The Linkage ID tells ActionScript which master sound to use. In the preceding task, you used the default linkage ID, Rhythm.AIFF.
- Type an instance name in the second field; for this example, type Rhythm_DrumBtn_sound. You can only assign instance names to sound instances via ActionScript. The behavior will take care of the scripting for you, using the name you enter here.
- Leave the "Play this sound when loaded" check box selected (Figure 15.30). This setting tells Flash to load the sound and play it immediately when the user clicks the button during playback. To load a sound for future use, deselect this check box.
Figure 15.30. When the "Play this sound when loaded" check box is selected, clicking the button during playback both loads and plays the sound. Deselect the check box to load the sound now but play it later. In that case, you'll need another triggering object and event to play the sound. 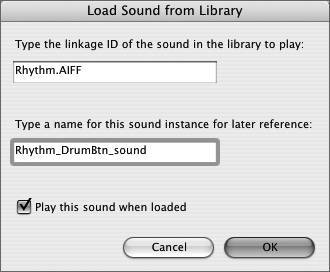
| 7. | Click OK.
Flash adds the behavior to the Behaviors panel and adds the appropriate ActionScript to the Script pane of the Actions panel (Figure 15.31).
Figure 15.31. The behavior-created script that loads a sound from the library is quite complex. Flash targets the instance name you created for your sound and issues a command for it to start playing. 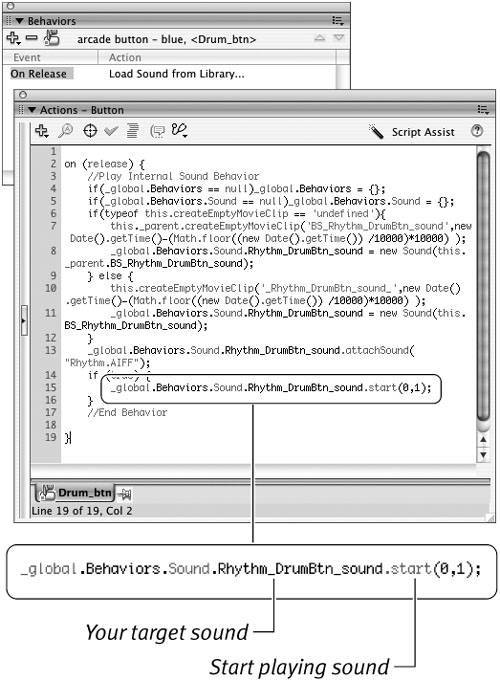
| 8. | Repeat steps 27 for a second button.
Set this button to load and play a different soundfor example, Melody.AIFF. Give the button an instance name, such as SongBtn_sound (Figure 15.32). For clarity, add text boxes (to the Button layer or a separate Text layer) to indicate which button plays which sound.
Figure 15.32. Set up a second sound to load from the library. In the Load Sound from Library dialog, enter the sound's identifier and give the sound an instance name. 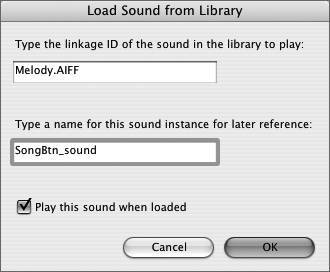
| 9. | Choose Control > Test Movie to try out your buttons.
The first time you click the Drum_btn button, Flash loads the Rhythm.AIFF sound and starts it playing; click the Song_btn button, and Flash loads and plays the Melody.AIFF sound. On subsequent clicks, Flash starts each sound playing again; there's no need to reload it.
|
 Tips Tips
If you can't remember the Linkage ID for a sound, you can see it in the Library panel. Linkage is the fourth column in the window and often gets hidden when you size panels to take up as little screen real estate as possible. Resize the window, or scroll to see the Linkage column (Figure 15.33). Figure 15.33. The Linkage column of the Library panel shows the linkage name of each sound asset. You can resize the panel to view the column. 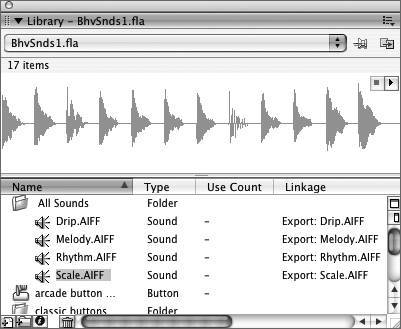 It's a good idea to add your own comments to a script created by a behavior. With ScriptAssist inactive, in the Script pane of the Actions panel, click the first line (which the behavior leaves blank). Type two slashes and your comment text: for example, //This script makes the Drum button load and play the Rhythm sound.
To replay loaded sounds 1. | Continuing with the file from the preceding task, add a third button to keyframe 1 of the Buttons layer.
You can add a text box to label this button Play Rhythm.
| 2. | With the Play Rhythm button selected on the Stage, from the Add Behavior menu in the Behaviors panel, choose Sound > Play Sound.
The Play Sound dialog appears.
| 3. | Type the sound's instance name that you created in step 6 of the preceding task: Rhythm_DrumBtn_sound (Figure 15.34).
Figure 15.34. To replay a loaded sound, you need to tell Flash which precise sound instance to play. Use the instance name you assigned when you set up the behavior, Load Sound from Library. 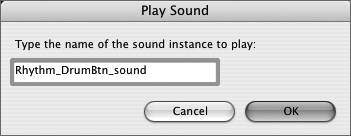
| 4. | Click OK.
| 5. | Choose Control > Test Movie to try out your buttons.
Click the Drum_btn and Song_btn buttons to load those sounds and start them playing. Now click the Play Rhythm button; Flash starts the Rhythm sound playing again.
|
To stop individual loaded sounds 1. | Continuing with the file from the preceding task, add a fourth button to keyframe 1 of the Buttons layer.
You can add a text box to label this button Stop Rhythm.
| 2. | With the Stop Rhythm button selected on the Stage, from the Add Behavior menu in the Behaviors panel, choose Sound > Stop Sound (Figure 15.35).
Figure 15.35. Choose Add Behavior > Stop Sound to target a specific loaded sound you want to control and stop. 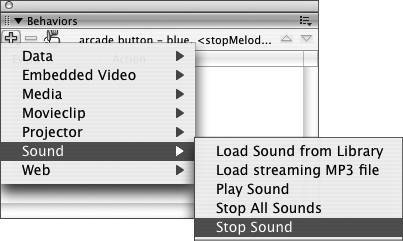
The Stop Sound dialog appears.
| 3. | Type the Linkage ID for the sound you want to stop: Rhythm.AIFF.
| 4. | Type the sound's instance name that you created in the first task in this section (when you added the behavior for loading the sound): Rhythm_DrumBtn_sound (Figure 15.36).
Figure 15.36. In the Stop Sound dialog, enter the Linkage ID and instance name of the target sound. 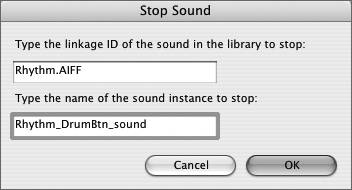
| 5. | Click OK.
Flash adds the behavior to the Behaviors panel and the script to the Script pane (Figure 15.37).
Figure 15.37. The behavior appears in the Behaviors panel, and its script appears in the Script pane of the Actions panel. 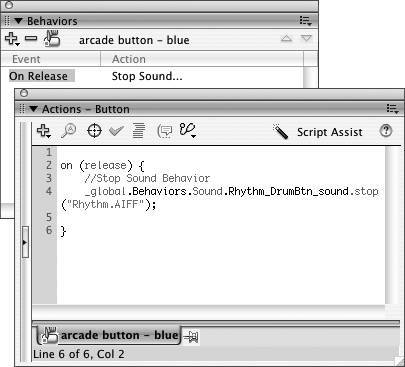
| 6. | Choose Control > Test Movie.
Click the Drum_btn button to start the Rhythm sound playing, and then click the Stop Rhythm button. Flash stops playback of the Rhythm sound immediately.
|
To stop all sounds 1. | Open a new Flash document, and add layers, keyframes, and sounds.
Place a few different sounds into different layers and keyframes. The sounds should be 1 or 2 seconds long so you'll have time to click a button while they're still playing. Make sure each keyframe containing a sound has Event as the Sync setting in the Properties tab of the Property inspector.
| 2. | Add a layer for buttons, and place an instance of a button symbol in keyframe 1 of that layer.
Make sure the layer contains enough in-between frames to match the length of the other layers. That way, this button will be visible throughout the movie. To be methodical, name the layer and give the button an instance name as well.
| 3. | Select the button.
| 4. | From the Add Behavior menu in the Behaviors panel, choose Sound > Stop All Sounds.
The Stop All Sounds dialog appears. This dialog reminds you that this behavior will cause all sounds to stop playing.
| 5. | Click OK.
Flash adds Stop All Sounds to the Behaviors panel and creates a script in the Script pane of the Actions panel for your button (Figure 15.38).
Figure 15.38. Choosing Add Behavior > Sound > Stop All Sounds (top) brings up a dialog explaining the behavior's function (middle). The resulting script (bottom) is much simpler than the behavior-created script for stopping a particular target sound. 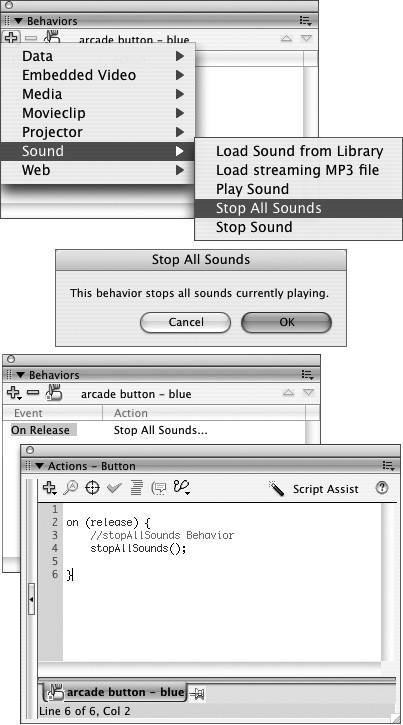
| 6. | Choose Control > Test Movie to test your button.
As the movie plays, the sounds you placed begin playing. When you click the button, all the sounds that are currently playing cease playing until the playhead reaches the next keyframe that contains a soundfor example, when the movie loops back to the beginning.
|
Tip
|