| The Script Navigator is a separate pane of the Actions panel that shows all the items in your document that have scripts attached. This tool is important when you're adding scripts to objects as well as frames. Clicking an item in the Script Navigator list selects that item in the document and, unless you've pinned a script, shows that item's script in the Script pane. To try it, create a document with various scripted items. To select and view scripts via the Script Navigator 1. | Open the document named MultiEventBtn.fla, which you created in "Using Multiple Handlers for One Button," earlier in this chapter.
| 2. | On the Stage, select and copy the button that responds differently to different mouse events. You can close the document now if you wish.
When you copy a button instance that has script attached, you also copy that script.
| 3. | Open the document named KeyPressBtn.fla, which you created and saved in the task "Triggering Actions from the Keyboard," earlier in this chapter.
| 4. | In the Timeline, in the Buttons layer, select frame 3 and insert a blank keyframe (press F7).
| 5. | Paste the button you copied in step 2 (Figure 13.72).
Figure 13.72. When you copy and paste a button that has an attached script, the script is attached to the pasted copy. 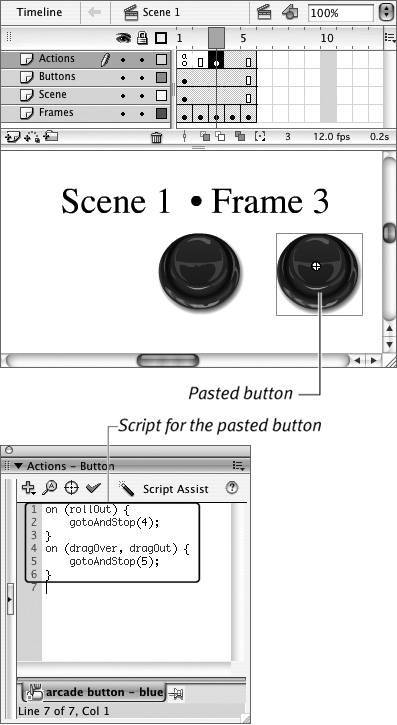
| 6. | Access the Scenes panel, and click the Duplicate Scene button.
If the panel isn't open, choose Window > Other Panels > Scene.
| 7. | Access the Actions panel.
If the panel isn't open, choose Window > Actions.
| 8. | Resize the horizontal and vertical dividers of the Actions panel as needed to view the Script Navigator pane in the lower-left corner of the panel.
For this task, you can close the Actions toolbox (see "Touring the Actions Panel," earlier in this chapter). The Script Navigator displays a list of items divided by category: Current Selection, Scene, Symbol Definition(s). These items are the frames and objects in this document that have scripts attached (Figure 13.73).
Figure 13.73. The Script Navigator pane of the Actions panel displays a hierarchical listing of all the elements in the current movie that have scripts attached. 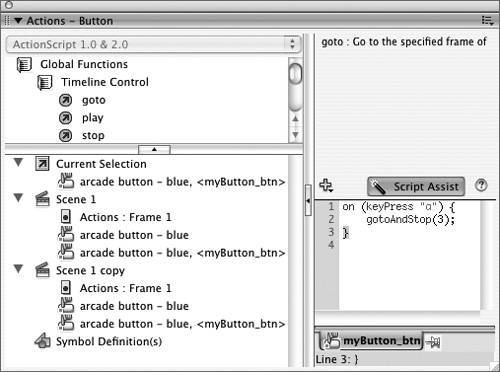
| 9. | In the Script Navigator, under Scene 1, select the first item: Actions: Frame 1.
Flash selects frame 1 of the Actions layer and displays the associated script in the Script pane of the Actions panel. In this case, the script is a single line with the action stop(); (Figure 13.74).
Figure 13.74. Choosing frame 1 of scene 1 in the Script Navigator selects that frame in the Timeline and displays the script for that frame in the Script pane of the Actions Panel. 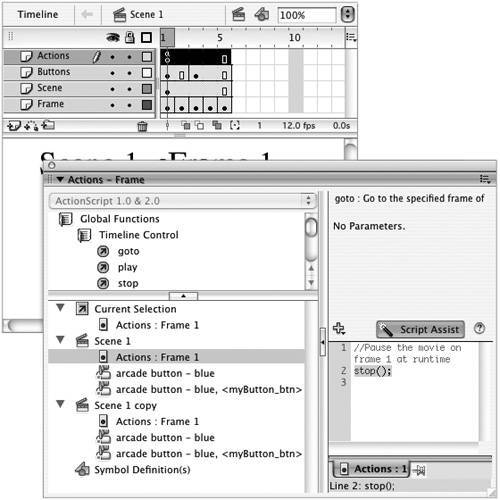
| 10. | In the Script Navigator, under Scene 1, select the second item.
Flash displays that scene in the Timeline, moves the playhead to frame 1, selects the button instance on the Stage, and displays the associated script in the Script pane of the Actions panel.
| 11. | In the Script Navigator, under Scene 1 copy, select the third item.
Flash displays that scene in the Timeline, moves the playhead to frame 3, and selects the button. The button script appears in the Script pane (Figure 13.75). Continue checking out the scripts in this document by choosing items in the Script Navigator. In more complex documents with more elements and scripts, you may need to expand or collapse sections of the Navigator to find the precise script you want. To do so, click the plus (or minus) signs (Windows) or triangles (Mac) to the left of the items in the list.
Figure 13.75. Choosing an element in Scene 1 copy causes Flash to move the playhead to that scene and select the frame that contains that element. 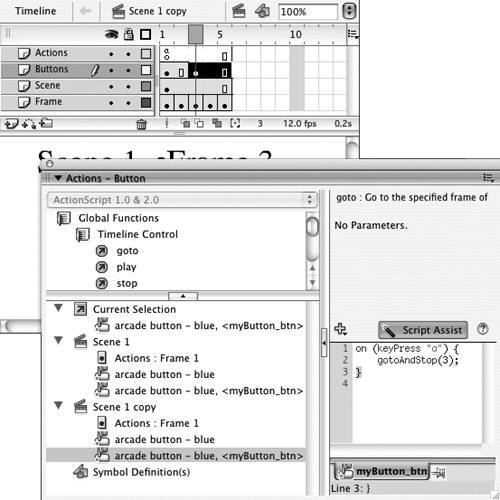
|
 Tips Tips
Double-clicking an item in the Script Navigator pins it in the Script pane. For more details about pinning scripts, see the sidebar "The Mystery of Pinned Scripts." If you'd like to examine a file with more complicated ActionScript, open a copy of one of the Quiz templates that come with Flash. These documents contain a number of scripted elements.
The Mystery of Pinned Scripts To prevent Flash from displaying a different script as you select items on the stage, you can pin a script. Pinning forces Flash to continue displaying the same script even if you select a different frame in the Timeline or object on the Stage. Pinning allows you to examine a variety of elements and situations without losing your place in the script you're creating. To pin the script currently displayed in the Script pane, click the pushpin icon below the pane; the icon changes to a more upright version of a pushpin. You can pin multiple scripts. To display a new script to pin, select an item in the Script Navigator. Double-clicking the item pins its script. Flash adds tabs for pinned scripts to the area below the Script pane. The item currently selected on the Stage or in the Timeline always appears in the leftmost tab below the Script pane. The tab for a pinned script currently on display is highlighted (in Windows, it's white; on the Mac, it's blue); tabs for other pinned scripts are gray. Click a gray tab to select that script. To unpin a script, display that script, and then click the upright-pushpin icon (Figure 13.76). Figure 13.76. The leftmost tab beneath the Script pane displays the name of the item currently selected in the document; the highlighted tab (blue on Macs, white in Windows) displays the name of the pinned script currently visible in the Script pane; the gray tabs indicate other pinned scripts. To select another pinned script, click its tab. 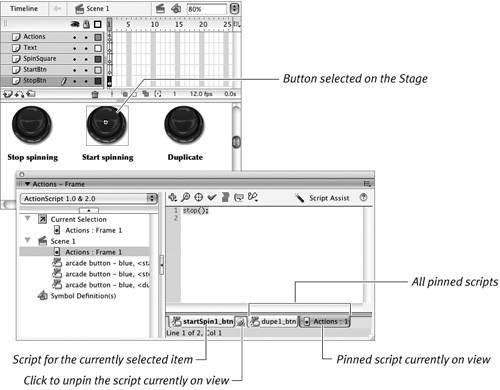
|
|