| In Chapter 12, you created a movie clip with four keyframes representing different button states. When you use ActionScript's default button-state names for the movie clip's frame labels, you can turn the movie clip into a responsive button element. You start by scripting the symbol to pause on its first frame, then add a mouse-event handler. To pause the movie-clip button 1. | Open a new copy of the FrameActions-Template that you created earlier.
Make sure the Properties tab of the Property inspector and the Actions panel (in Script Assist mode) are open.
| 2. | In the Timeline, add a new layer beneath the Actions layer, name it mcButtons, and place an instance of a movie-clip button on the Stage.
The movie clip should contain four labeled keyframes: _up, _over, _down, and Disabled. Open the library of the file MyOwnBtn.fla, which you created for the task "Creating Movie-Clip Buttons," in Chapter 12, and drag an instance of the movie-clip button symbol (MovieClipBtn) to the Stage; or create a new movie-clip symbol that contains those button states. For instructions for opening external library files, see Chapter 7.
| 3. | Using the techniques you learned in "Adding Frame Actions," earlier in this chapter, edit the master button-style movie-clip symbol to add a stop action in keyframe 1.
Your symbol and its script should look like Figure 13.46. For details about editing master symbols, see Chapter 7.
Figure 13.46. To pause the movie-clip button, edit the movie-clip master symbol to add a stop action to the first keyframe. The letter a (indicating the presence of an action) appears in the Timeline (top); the script should look like the figure at the bottom. 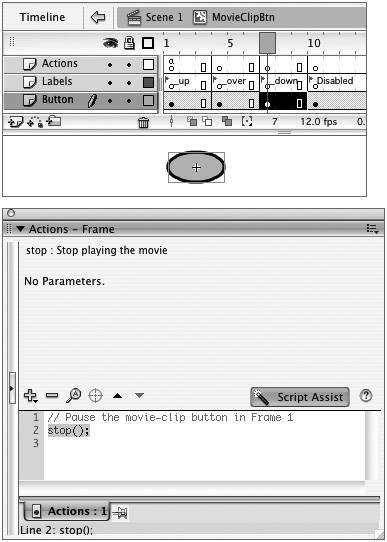
| 4. | To return to the main Stage, choose Edit > Document.
|
To add the mouseEvent handler that displays the default button states 1. | Continuing with the file from the preceding task, select the instance of MovieClipBtn on the Stage.
The Actions panel's title bar changes to Actions-Movie Clip.
| 2. | In the Properties tab of the Property inspector, in the Instance Name field, enter a name, for example, MyBtn1_mc.
| 3. | From the Actions panel's Add menu choose Global Functions > Movie Clip Control > on (Figure 13.47).
Figure 13.47. To attach a mouse-event handler to an instance of a movie-clip symbol, select the instance on the Stage; from the Actions panel's Add menu, choose Global Functions > Movie Clip Control > on. 
Flash adds on (release) to the Script pane (Figure 13.48). This handler, in combination with the default button-state frame labels that you created for this symbol, allows the symbol to respond to a user's mouse movements the same way a standard Flash button symbol does.
Figure 13.48. When you attach the on () handler to a movie-clip instance that has frame labels _up, _over, and _down, Flash uses those labels to make the movie-clip act like a button. To choose the triggering event(s) in Script Assist mode, select or deselect the Event check boxes. Select Release to make the movie-clip button carry out its action when the user clicks and releases the pointer inside the movie clip's graphic area. 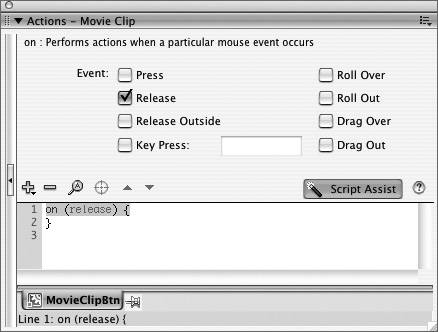
To make the movie-clip button carry out a task, you must attach actions to it, just as you did for the button. A good all-purpose action for testing is trace.
| 4. | With the button instance selected on the Stage, select line 1 in the Script pane, the event handler on (release).
| 5. | From the Actions panel's Add menu, choose Global Functions > Miscellaneous Functions > trace.
The Message field and Expression check box appear in the Script Assist window.
| 6. | With the Expression check box deselected, enter text in the Message field to remind you what the script just did.
Deselecting Expression tells Flash to treat the text you enter as text, not a mathematical formula or number. Flash enters the message label text into the script surrounded by quote marks (Figure 13.49).
Figure 13.49. Flash carries out the action(s) that appear between the curly braces when the triggering event takes place. The trace action can stand in for as yet unspecified actions to speed testing as you develop movie-clip buttons. 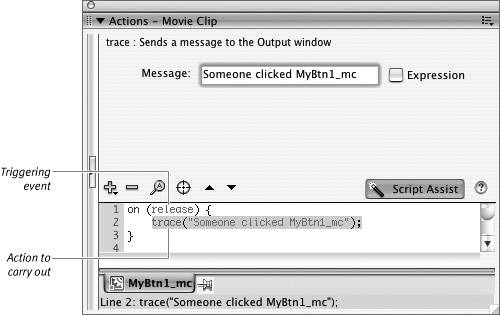
| 7. | Choose Control > Test Movie to try out the first phase of your button-style movie clip.
In the Flash Player window, position the pointer over various areas of the Stage. Upon moving into the image area of the movie clip, the pointer changes from an arrow to a pointing hand, and the graphic for the _over state appears (Figure 13.50). When you click the button, the _down state appears; when you release, Flash opens the Output panel and types in your trace message (Figure 13.51). Flash automatically makes the graphics in the movie-clip symbol define the hit area of the button.
Figure 13.50. During playback, when the pointer is outside the graphic area of the movie-clip button that has an on () handler (top), Flash displays the symbol's _up frame and the pointer is an arrow. Upon entering the graphic area of the movie clip (bottom), the pointer changes to a pointing hand, and Flash displays the symbol's _over frame. 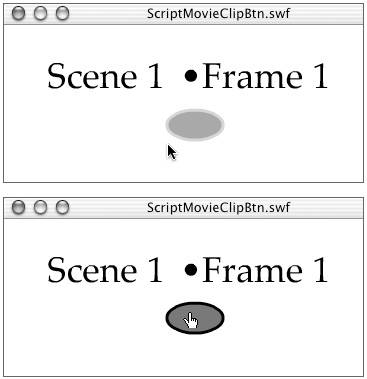
Figure 13.51. Each time you click the movie-clip button, Flash enters the trace message in the Output panel. If the panel is closed or hidden behind other windows, Flash opens it or brings it forward. 
| 8. | Save this file for use in the following task: name it ScriptAClipBtn.fla.
|
 Tip Tip
The preceding task creates a movie-clip button that acts like a button symbol. You can also create movie-clip buttons that respond to mouse movements in a different wayperhaps showing one graphic when the user rolls the pointer over the movie-clip button and another when the user clicks the movie clip button, then drags and releases the mouse button outside the graphic area of the movie clip. When you use your own labels, however, you must do more scripting. To create a non-standard movie-clip button, label the frames for the different button states something other than the default names. The frame labels can be similar though, for example, MyUp, MyOver, and MyDown. Add keyframes and labels for the additional states you want to show, for example, RollOut or DragOut. Instead of attaching a single event handler to the symbol, you must attach multiple handlers that tell Flash which frame to show for each possible interaction. For example, attach on (release) with a goto action that displays the MyUp frame; attach on (rollOver) with a goto action that displays the MyOver frame, attach on (dragOut) with a goto action that displays the graphic for dragging outside the button area, and so on.
|