| If you decide to do a lot of interactivity, you'll need to learn more about ActionScript. Ideally, you'll want to place less code directly on objects and put most of your code in frames. Using frame actions to control objects is a sophisticated technique that goes beyond the scope of this book. To give you a peek at the power of this type of scripting, the following tasks walk you through creating a simple frame action that controls a movie-clip instance. You'll use a mix of assisted and unassisted scripting methods. In the preceding section, you scripted your movie-clip button to use the standard button states (showing the _up, _over, and _down frames) but made no use of its Disabled frame. You may want the disabled state to appear only in certain frames of your movie, not in response to a user's interaction. A Back button that takes users to the previous page may be disabled in frame 1, for example. You can use frame actions to disable (or enable) a movie-clip button. To add frame actions to disable a movie-clip button using Script Assist 1. | Open the file you created in the preceding task, ScriptAClipBtn.fla.
This is a document containing four 5-frame layers: Actions, mcButtons, Scene, and Frames. There is a stop action in keyframe 1 of the Actions layer.
The Properties tab of the Property inspector and Actions panel (in Script Assist mode) should be open on your desktop. ActionScript preferences should be set to display code hints (see "Customizing the Actions Panel, earlier in this chapter).
| 2. | Select the movie-clip instance on the Stage.
The instance should already have the instance name MyBtn1_mc. If not, in the Properties tab of the Property inspector, enter the name in the Instance Name field, (Figure 13.52).
Figure 13.52. Give the movie-clip instance a name that can be used in the script. Enter the name in the Instance Name field in the Properties tab of the Property inspector. 
| 3. | In the main Timeline, select keyframe 1 in the Actions layer.
The Actions panel title changes to Actions-Frame.
| 4. | Click line 2 in the Script pane of the Actions panel,
Flash selects the code for the stop() action that you created earlier.
| 5. | Add a comment to the Script to remind you what the script you're about to add does (see "To begin scripting by adding comments" in the section "Adding Frane Actions," earlier in this chapter).
For example, add The following script disables MyBtn1_mc and displays the Disabled frame.
| 6. | Click the comment to select it in the Script pane.
| 7. | From the Actions panel's Add menu choose Global Properties > Identifiers > this (Figure 13.53).
Figure 13.53. To use Script Assist to enter a target path for a movie-clip symbol instance, start by choosing the identifier this. Script Assist displays an Expression field where you can enter the pathname. 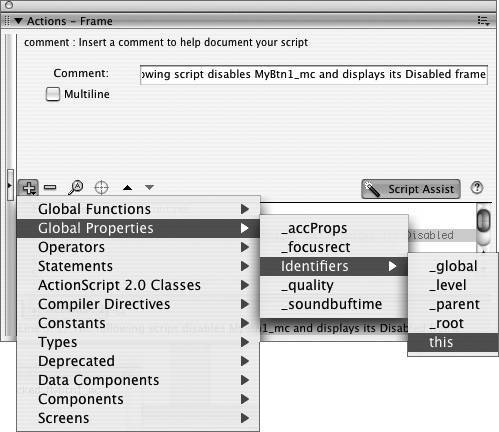
The Expression field appears in the Script Assist window. Use this field to enter code for the target symbol and its properties.
| 8. | Select the contents of the Expressions field (the word this).
| 9. | In the toolbar above the Script pane, click the Insert Target Path tool (the target-sight icon).
| 10. | In the Insert Target Path dialog that appears, select the movie-clip instance that you want to control (MyBtn1_mc), choose the Relative radio button (for pathname style), and click OK.
Flash enters this.MyBtn1_mc in the Expressions field (Figure 13.54).
Figure 13.54. To enter the pathname for your movie-clip button, select the contents of the Expression field (top), click the Insert Target Path tool and choose your symbol in the dialog that appears (middle). Flash enters the path name for your movie-clip symbol into the script (bottom). Script Assist adds the semicolon that defines the end of an action statement; you don't need to add it in the Expressions field. 
| 11. | Click at the end of the text in the Expression field to position the insertion point and type a period character (.).
With code hints active, the code hint menu appears.
| 12. | Scroll the menu to find enabled, click it to select it, then press Enter.
Flash adds enabled to the Expression field and to the script in the Script pane. Items in the code-hint menu appear alphabetically, with underscore sorting before letters (Figure 13.55).
Figure 13.55. Items in the code-hint menu appear alphabetically (top). Select the property enabled and press Enter to add it to the Expression field and the script (bottom). 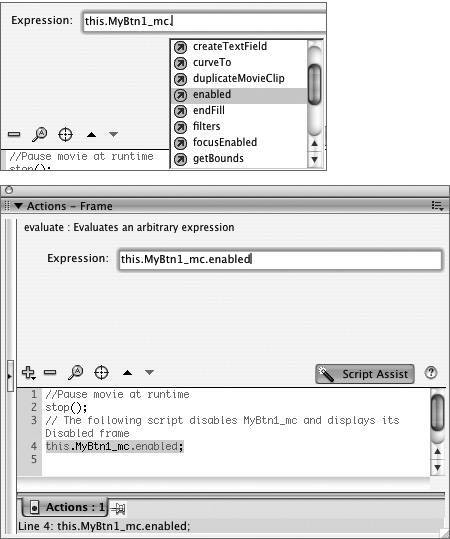
| 13. | With the insertion point at the end of the text in the Expressions field, type a space character followed by the equals sign (=), then another space character, then the word false.
Flash updates the code in the script pane (Figure 13.56).
Figure 13.56. A script that sets the enabled property of the movie-clip button to false disables that movie-clip button. 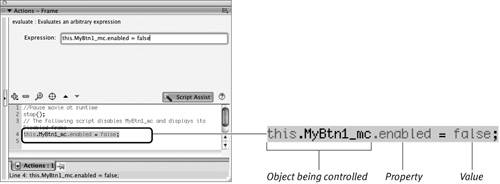
This code tells Flash not to carry out any script attached to the movie-clip button instance MyBtn1_mc. When you publish the movie, the button acts like a static graphic even though it has an event handler that would normally make it show its button states. You can test the movie at this point and see that the movie-clip button no longer responds when you roll over it or click it.
| 14. | Select line 4 in the script pane, the code that disables the button.
| 15. | From the Add menu, choose ActionScript 2.0 Classes > Movie > MovieClip > Methods > gotoAndStop.
The fields Object and Frame appear in the Script Assist window.
| 16. | Click the Object field, to activate it, and click the Insert Target Path tool.
| 17. | In the Insert Target Path dialog that appears, select the movie clip that you want to control (MyBtn1_mc), choose the Relative radio button, and click OK.
Flash updates the Object field and the script pane.
| 18. | Click the Frame field in the Script Assist window; type the frame label that you want to display, Disabled; then deselect the Expression check box.
Flash enters the frame label text, surrounded by quote marks, into the script (Figure 13.57).
Figure 13.57. When you add the gotoAndStop action, the Object and Frame fields appear in the Script Assist window. Use the Insert Target Path tool to fill in the Object field. In the Frame field, type the name of the frame you want the button to display. 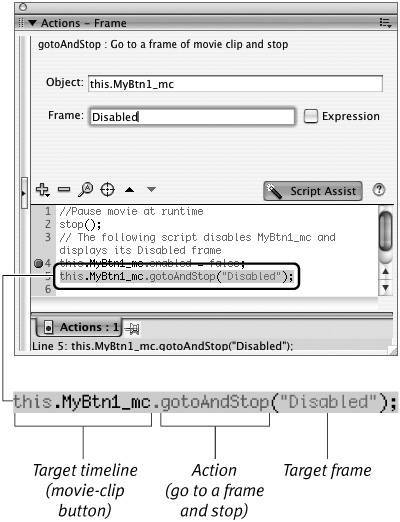
| 19. | Choose Control > Test Movie to try out your button.
Frame actions take place when the playhead enters the frame, not in response to mouse movements by the user. The Disabled frame (the grayed out version of the button) appears when playback starts; when you roll over the button or click it, nothing happens (Figure 13.58). In effect, the button is turned off in frame 1.
Figure 13.58. When you test the disabled button, it displays the graphic for the Disabled frame; the pointer doesn't change as you move it over the graphic. 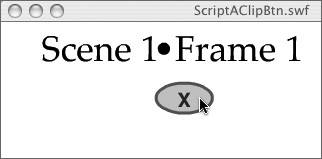
In a real-world application, this would be only a first step. You would script other frame actions to test what frame the user is in as they interact with MyBtn1_mc, turning it on again when appropriate. The following task shows one way to turn on the movie-clip button and make it responsive when the playhead enters frame 2.
|
To add frame actions directly in the Script pane 1. | Continuing with the file from the preceding task, in the main Timeline, select frame 2 in the Actions layer.
| 2. | Choose Insert > Timeline > Keyframe.
Flash inserts keyframe 2 and selects it (Figure 13.59).
Figure 13.59. To enable the button in frame 2 of the main Timeline, add a keyframe to the Actions layer, then add an enabling script to that keyframe. 
| 3. | In the Actions panel, click the Script Assist button to turn off Script Assist mode.
The insertion point appears in the Script pane, but the Script pane may not have focus.
| 4. | Click line 1 in the Script pane to prepare to enter code.
| 5. | To add a comment, type two slashes (//) followed by text that reminds you what the script does, for example, The following script enables MyBtn1_mc and displays its _up frame.
| 6. | To begin the next line of script, press Enter.
The insertion point moves to line 2 in the Script pane (Figure 13.60).
Figure 13.60. Add a comment describing your script. With word wrap active, Flash wraps your comment text to fit in the Script pane. When you finish typing the comment, press Enter to start the next numbered line of your script. 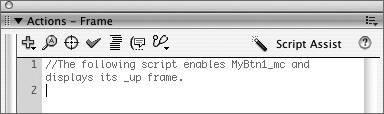
| 7. | To enable the movie-clip button, click the Insert Target Path tool and in the Insert Target Path dialog that appears, select the instance MyBtn1_mc, select the Relative radio button, and click OK.
Flash adds the target object to the script.
| 8. | Type a period character (.); from the code-hint pop-up menu that appears, choose enabled; and press Enter.
| 9. | Type a space character, an equal sign (=), a space character, the word TRue followed by a semicolon (;), and press Enter to start a new line.
Your script should look like Figure 13.61. You must add a goto action to display the movie clip's _up frame again.
Figure 13.61. Setting the enabled property of the movie-clip instance to true makes the movie-clip button active again. 
| 10. | From the Actions panel's Add menu, choose ActionScript 2.0 classes > Movie > MovieClip > Methods > gotoAndStop.
Flash enters a line of code beginning with the text not_set_yet in red and ending in parentheses. The insertion point appears between the parentheses, ready for you to enter the correct parameter (Figure 13.62). With code hints active, a hint pops up reminding you to enter the frame number or label.
Figure 13.62. With Script Assist turned off, when you choose actions from the Add menu (or double-click them in the Actions Toolbox), Flash adds the script directly to the Script pane of the Actions panel. With code hints active, a hint appears reminding you about certain parameters that you must provide. 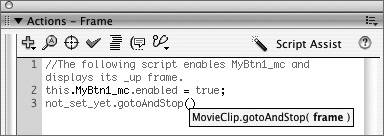
| 11. | Type "_up" between the parentheses, and type a semicolon (;) following the closing parenthesis.
The red text (not_set_yet) indicates another parameter that you must define; here it's the object's target path.
| 12. | To enter the path, select the red text (don't select the dot that follows it) (Figure 13.63).
Figure 13.63. Select the red text (not_set_yet) and replace it with the pathname of the movie-clip instance. You can use the Insert Target Path tool to enter the pathname or type it in manually. 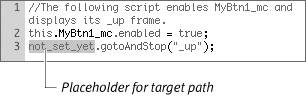
When Script Assist is inactive, the Script pane works like any text editor; drag to select text, or click and Shift-click to make a selection.
| 13. | Click the Insert Target Path tool.
In Script Assist mode, this tool is available only when you've selected a text field in the Script Assist window. When Script Assist is inactive, the tool is always available.
| 14. | In the Insert Target Path dialog that appears, select the movie clip instance MyBtn1_mc, select the Relative radio button (for pathname style), and click OK.
Flash replaces the red text you selected with the target path (Figure 13.64).
Figure 13.64. Click the Insert Target Path tool, select your movie-clip instance in the dialog, and click OK. 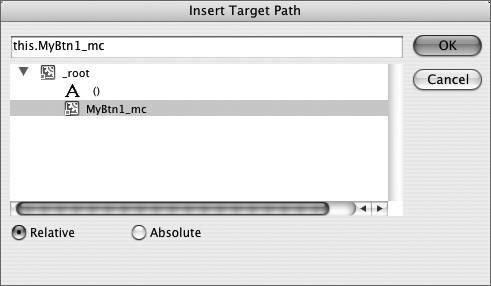
Line 3 of the script is complete (Figure 13.65); it tells Flash that when the playhead enters this frame (frame 2), Flash should display the _up frame of MyBtn1_mc.
Figure 13.65. Flash replaces the selected placeholder text with the correct path to the movie clip instance; this script tells Flash to display the _up frame of the movie-clip instance as soon as the playhead enters frame 2 of the main Timeline. 
| 15. | To get the movie to move to frame 2 at run time, add a new button to frame 1; script it to jump to frame 2 and stop playback when the user clicks it (to review one technique, see "Adding Actions to Buttons," earlier in this chapter).
| 16. | Save the file, and choose Control > Test Movie to try your script.
As the movie starts, the movie-clip button displays its Disabled frame. Click the second button to move to frame 2 of the main Timeline. The first line of code in the script for frame 2 tells Flash to enable the movie-clip button; the second line of code says to show the movie-clip button's _up frame. Click the button and it carries out the trace script you attached to it.
|
 Tip Tip
If you don't have the ActionScript category of Preferences set to show code hints, you can still view them. When the insertion point is right after a period or between parentheses in the Script pane, click the Show Code Hint button in the toolbar to see a hint. The Show Code Hint button is available only when Script Assist is inactive.
|