| As you learned in the previous chapter, Flash's button symbols and button components have certain actions built in. By default, when you move the mouse into the button area, Flash jumps to the Over frame; when you click the button, Flash takes you to the Down frame. To make the button carry out a task or to refine the way a button responds to a user's mouse movements, you attach ActionScript to an instance of a button symbol or button component. You can use Script Assist or the Behaviors panel to get help creating the script. To prepare a document for testing button scripts 1. | Open a new copy of the FrameActions-Template you created earlier in this chapter.
This is a five-frame document with identifying text for each frame and a stop action in keyframe 1.
| 2. | In the Timeline, add a new layer anywhere below the Actions layer; name the new layer Buttons.
Frame 1 of the new layer is a keyframe; frames 25 are in-between frames. Any items you place on this layer will be visible throughout the five-frame movie (Figure 13.12).
Figure 13.12. To practice with button actions, create a movie with identifying text, and separate layers for buttons and actions. Add in-between frames as needed so that all the layers are the same length. 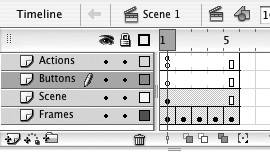
| 3. | With the Buttons layer selected, place an instance of a button symbol on the Stage (Figure 13.13).
Figure 13.13. In-between frames extend the Buttons layer to the match the length of the other layers; the button symbol in keyframe 1 will be visible throughout the movie, although the identifying text from the Scene and Frames layers will change. 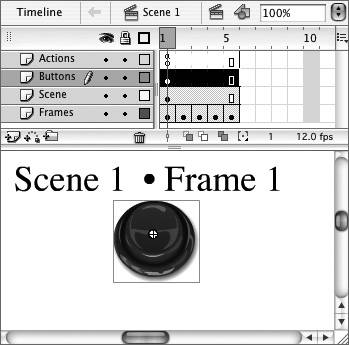
Follow the techniques in Chapter 12 to create a new button symbol, or use one from the Common Library of buttons. (To access this library of button symbols that comes with Flash, choose Window > Common Libraries > Buttons.) Drag a button-symbol instance from the library to the Stage.
| 4. | To name the button instance, access the Properties tab of the Property inspector and type a name in the Instance name field (Figure 13.14).
Figure 13.14. Select the button symbol on the Stage, and enter a name in the Instance Name field in the Properties tab of the Property inspector. Ending the name with _btn makes it clear that the symbol is a button and allows code hints to give you more information as you create scripts. 
It's a good idea to get into the habit of naming each instance of a symbol in your document. For ActionScript to be able to control a symbol, the symbol must have a unique instance name.
| 5. | Save your document as a template for use throughout this chapter, and name it ObjectActionsTemplate.
(For detailed instructions about saving documents as templates, see Chapter 1.)
| 6. | Close the document.
Choosing Save As doesn't close the file you're in. To avoid making further changes to the master template document, you must close it at this point.
|
To add an action to a button-symbol instance using Script Assist 1. | Open a new copy of the ObjectActions-Template that you created in the preceding task.
This is a five-frame document with identifying text, one button instance, and a stop action in keyframe 1.
| 2. | On the Stage, select the button instance.
| 3. | Access the Actions panel.
The Actions panel name changes to Actions - Button (Figure 13.15).
Figure 13.15. The Actions panel name reflects the type of element you're about to script. When you select a frame or click a blank area of the Stage, you're about to create a frame action, and Frame is part of the panel's name (top). When you select a button symbol on the Stage, the panel name includes Button (bottom). 
| 4. | To get help scripting, click the Script Assist button.
The Script Assist window opens.
| 5. | From the Add menu (the plus sign above the Script pane), choose an action (for this task, choose Global Functions > Timeline Control > goto) (Figure 13.16).
Figure 13.16. You can choose an action from the Add menu (the plus sign icon). Select the desired action from the hierarchical menu of categories and subcategories. 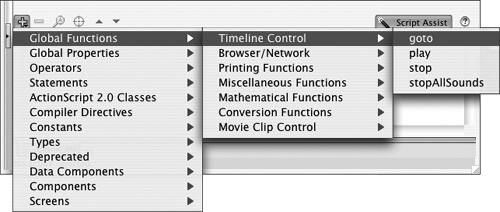
Settings for the goto action appear in the Script Assist window.
| 6. | To script the button to send the playhead to frame 3 and then stop movie playback, do the following:
- Select the "Go to and stop" radio button.
- Leave the Scene field at its default: <current scene>.
- Leave Type at its default: Frame Number.
- In the frame field, enter 3.
Flash uses these settings to create a script in the Script pane (Figure 13.17). You're ready to test your button; see "Previewing Actions at Work," later in this chapter.
Figure 13.17. When you add a goto command using Script Assist, Flash uses the settings in the Script Assist window to write a script that takes the playhead to a specific frame. The script appears in the Script pane. 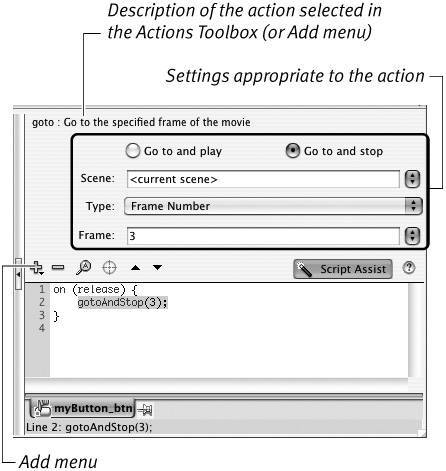
|
 Tip Tip
In the preceding task, you made the playhead move to a specific frame and stop playback. You can also make the playhead jump to a new frame and resume playback from there. In step 6, select the "Go to and play" radio button.
The Mystery of Instance Names The tasks in this section suggest that you end the name of a button instance with the suffix _btn. This practice has two purposes. First, it reminds you what type of object you're looking at; if you name objects consistently with Flash's suffixes, when you read through your scripts you'll be able to see what types of objects are involved. Additionally, the code-hint feature of the Actions panel can provide more information about scripting objects if the object type is identified by the proper suffix. With a movie-clip instance, you'd use the suffix _mc. (Advanced scripters can create scripts that work with text boxes; they use the suffix _txt. Sound objects use the suffix _sound; you'll learn to name instances for sound objects in Chapter 15.) Because instance names may wind up as part of an ActionScript, you must avoid including spaces or characters that have special meaning in ActionScript: for example, slashes or the equals sign. To be safe, use only letters, numbers, and underscore characters. Ideally, instance names should start with a letter. |
The Mystery of Event Handlers Scripts attached to buttons and movie clips acting as buttons must start with a special piece of codeon ()that tells Flash to make the scripted object respond like a button to mouse movements (changing the arrow pointer to a pointing hand, for example, when a user rolls over the button). That code is called an event handler because it responds to things that happen (events) and uses that incoming information to decide (handle) when and how to run a chunk of ActionScript. What follows the handler in parentheses(release), for exampleindicates the condition under which the script will run (in this example, when the user clicks and releases the pointer over a button's hit area or within the graphic area of a movie clip. The statement inside the parentheses is the event. Both Script Assist and the Behaviors panel let you select which mouse-related event (mouseEvent) or keyboard-related event (keypress) will trigger the script. To change the triggering event, select a new one in the Script Assist window of the Actions panel (or in the Behaviors panel) or delete the text between the parentheses and type a new event directly in the Script pane of the Actions panel. When you use the Behaviors panel to attach an action to a button or a movie-clip symbol, Flash automatically adds the event handler on (release) to the script. When you use Script Assist to attach an action to a button, Flash also adds the on (release) handler to the script automatically. When you use Script Assist to attach an action to a movie-clip symbol, however, you must add the on () handler in a separate step (see "Adding Actions to Movie Clip Buttons," later in this chapter). Otherwise, Flash may add the onClipEvent () handler instead. The onClipEvent () handler responds to mouse events anywhere in a frame containing the scripted movie clip, not just when the mouse interacts with the movie-clip itself. Button components have their own set of triggering events. The Behaviors panel inserts click as the default event in scripts attached to button components. The other items that your script requires when you set up event handlers are curly braces. { indicates the beginning of the list of actions that are to be triggered by the specified event. } indicates the end of the list of the actions that are to be triggered by the specified event. All actions between the two braces take place when the triggering event occurs. |
To add an action to a button component instance using the Behaviors panel 1. | Continuing with the copy of ObjectActions-Template that you created in the preceding task, access the Actions, Behaviors, and Components panels.
| 2. | In the Components panel, expand the User Interface category, and drag an instance of the button component to the stage (Figure 13.18).
Figure 13.18. Drag an instance of the button component from the Components panel (Flash Professional 8 shown here) to the Stage to add it to your movie. 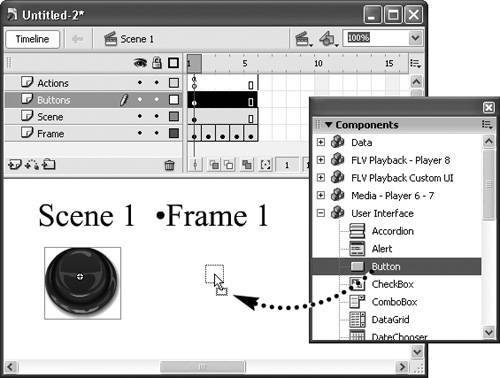
| 3. | On the Stage, select the button-component instance.
The Actions panel name changes to Actions. The Behaviors panel displays the button-component icon and the name of the selected component.
| 4. | In the Behaviors panel, from the Add Behavior menu, choose Movieclip > Goto and Stop at frame or label (Figure 13.19).
Figure 13.19. Choose a behavior from the Add Behaviors menu in the Behaviors panel. 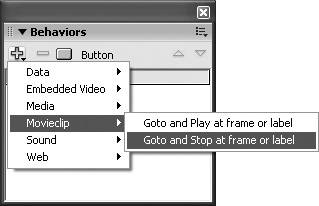
Targeting Frame Labels In setting up the target-frame parameter for the Goto behavior for a movie-clip button, you can enter a frame number or a frame label. There's an advantage to using frame labels. If you ever add or remove frames from the movie-clip button, the frame numbers for the states may change. If they do, you must go back into the Behaviors panel or script to update the frame numbers. It's a hassle, and you must remember that you need to do it. If you target the frame by label, you need never update the script to accommodate changes to frame numbers. |
| 5. | In the Goto and Stop dialog that opens, to script the button to send the playhead to frame 4 and then stop movie playback, do the following:
- For pathname style, select the Relative radio button. A relative pathname identifies the target Timeline in terms of its relative position within the hierarchy of Timelines in a movie: for example, saying start where I am; the target is one level above me; or the target is within me, one level down. An absolute pathname describes the location more specifically, always starting with the top-level Timeline and working its way down to the target movie.
- In the target movie-clip pane, select _root. This pane lists the movie clips in your document. Flash refers to the main document as a movie clip named _root. To instruct Flash to move around in the main Timeline, choose _root as your target movie clip. Flash creates the appropriate pathname using the selected pathname style. (Flash enters the pathname in the field above the target movie-clip pane.)
- For the frame at which to stop playing, type 4 (Figure 13.20).
Figure 13.20. Flash will use the settings in the Goto and Stop dialog to create the script for the behavior that takes the playhead to a specific frame and stops playback. 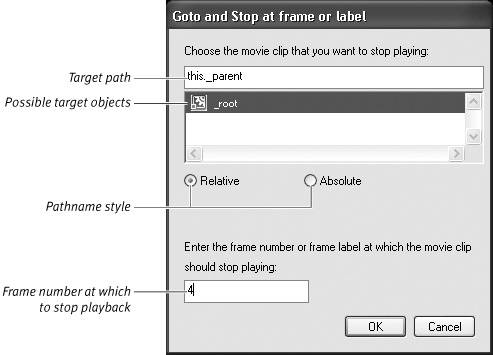
| 6. | Click OK.
Flash adds the behavior to the Behaviors panel and adds comments and code to the Script pane of the Actions panel (Figure 13.21). Button components take their own special events; click is the default.
Figure 13.21. Flash lists all behaviors for a selected object (or frame) in the Behaviors panel (top). The script for the button component created by choosing Behavior > Movieclip > Goto and Stop instructs Flash to move to frame 4 and then pause playback (bottom). The script contains the following elements: A) an event handler (on); B) the event parameter (the triggering eventclick); C) a curly brace marking the beginning of actions that take place in response to the event; D) a comment noting the beginning of the code specific to this behavior; E) a set of actions triggered by clicking and releasing the mouse button inside the active button area (in the main Timeline, go to frame 4 and pause); F) a comment noting the end of the code specific to this behavior; and G) a curly brace marking the end of the actions that take place in response to the event. 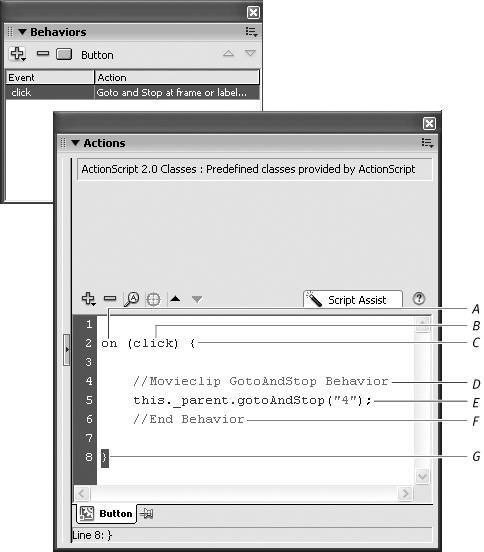
|
Tips You can use the Behaviors panel to assign actions to button symbols. Follow the same steps as in the preceding task for a button component; Flash inserts the default event handler on (release) into the script instead of on (click). You can also use the Actions panel in Script Assist mode to assign actions to button components (or any movie-clip symbol acting as a button); but the steps are more complex (see "Adding Actions to Movie-Clip Buttons," later in this chapter). When you use behaviors to create a script, Flash leaves line 1 of the script blank. Use that line to add comments. Each behavior adds its own comments, but they're fairly cryptic general notes about which behavior the script is forfor example, //Movieclip GotoAndStop Behavior. A comment like //Go to the Company Address page may be more meaningful to your project.
The Mystery of Target Paths Because a button component is a type of movie clip and thus has its own independent Timeline, it needs a pathname that identifies it that way. Behaviors help you deal with this. Place a button component and a button symbol in the same Flash document, and apply a behavior to each; choose the goto behavior to make the movie jump to a specific frame in the main Timeline. If you choose Absolute as the pathname style, the behavior creates the same pathname for both button elements: _root. If you choose Relative for the pathname style, however, the behavior creates different pathnames: this for the button symbol targeting the main Timeline, and this._parent for the button component targeting the main Timeline. What's going on? Think of translating this as me or my. Flash considers the button symbol to be controlled directly by the main Timeline. The symbol's pathname (this) means the target Timeline is my Timeline. Flash considers the button component to be a separate Timeline nested inside the main Timeline, so its pathname (this._parent) translates to my parent's Timeline. When you use behaviors to create a goto script for a movie-clip symbol, you select the pathname style and the target. To use Script Assist to achieve the same result is more complex. You must first create the on (release) event handler, then enter a target path to tell Flash which object to control. |
|