| Flash's button symbols and button components have built-in rules about how the button displays its three states in response to the user's mouse movements. You can take control of that functionality yourself and also create a button that has more than three states by making your own movie-clip button. In the following tasks, you learn to assemble artwork in the Timeline of the movie-clip to create a button with four states: _up, _over, _down, and Disabled. To give the movie-clip button even the first level of interactivity, to make the movie clip respond to mouse movements by displaying different states, you must attach ActionScript. You learn to do that in Chapter 13. To create the button states 1. | In a Flash document where you'd like to use movie-clip symbols, Choose Insert > New Symbol.
The Create New Symbol dialog appears.
| 2. | Type a name for your symbol, MovieClipBtn; choose Movie Clip behavior; and click OK.
Flash switches to symbol-editing mode. In the Timeline you see one layer, with a keyframe in frame 1.
| 3. | Add two new layers to the Timeline, for a total of three layers.
Each layer will hold a different type of information for your button. The top layer will hold ActionScript that tells the movie-clip button what to do; name this layer Actions. The second layer will hold text identifying each keyframe that represents a button state; name this layer Labels. The bottom layer will hold the graphic elements that give the button its look in each state; name this layer ButtonGraphics.
| 4. | In the Timeline, for all three layers, insert keyframes in frames 4, 7, and 10 (Figure 12.29).
Figure 12.29. Your movie-clip button needs a keyframe for each button state. It's a good idea to create a separate layer for the actions, text, and graphic elements in the movie clip's Timeline. 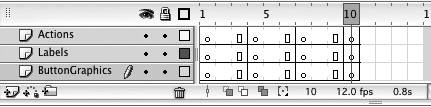
The layers that you added already had keyframes at frame 1. You need to add three more keyframes to accommodate all four button states: _up, _over, _down, and Disabled. Spacing the keyframes out makes them easier to deal with and lets you view the frame labels that you create in the following task.
| 5. | In the ButtonGraphics layer, select keyframe 1; using the oval tool, draw an oval centered over the registration mark on the Stage.
This graphic represents the button's _up state. Give the oval a red fill and a black stroke. Make the stroke fairly wide to make the graphic look more button-like.
| 6. | Select the oval, and choose Edit > Copy.
| 7. | Select keyframe 4 in the ButtonGraphics layer, and choose Edit > Paste in Place.
This graphic represents the button's _over state. Change the fill color to green.
| 8. | Repeat step 7 for keyframes 7 and 10.
In keyframe 7, change the oval fill to blue to represent the _down state. In keyframe 10, change the fill to a light gray and the stroke to a dark gray to represent the button in its Disabled state (Figure 12.30).
Figure 12.30. With Preview selected as your frame-viewing mode, the Timeline displays all the button-state graphics you've placed in the keyframes of the movie-clip button symbol. Use shades of gray for the graphics in the frame that represents the disabled state. (For clarity, since this book can't show you colors, the disabled-state graphic also contains an X.) 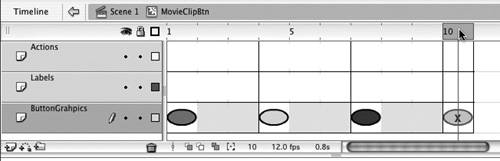
|
 Tip Tip
To assign frame labels to button-state keyframes 1. | Continuing with the file you created in the preceding task, access the Properties tab of the Property inspector.
If the Property inspector isn't open, choose Window > Properties > Properties.
| 2. | In the Labels layer of the Timeline, select keyframe 1.
| 3. | Click in the Frame Label field in the Frame Properties tab of the Property inspector to activate the field, and then type the name of this button state: _up (Figure 12.31).
Figure 12.31. Enter a label for a selected keyframe in the Frame Label field of the Property inspector. 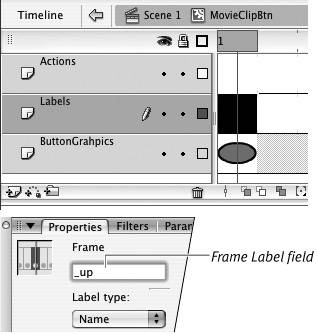
Flash places a red flag icon in any keyframe that has a label. If there's enough room in that keyframe span, Flash also displays the label name (Figure 12.32).
Figure 12.32. A red flag in a keyframe indicates that the frame has a label. If there are enough in-between frames following the keyframe, Flash displays the frame label as well as the flag (here frames have been added at the end of the sequence so the Disabled label is visible). The labeled keyframes in this movie-clip symbol indicate which button state the keyframe represents. 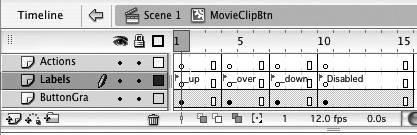
| 4. | Repeat steps 2 and 3 for keyframes 4, 7, and 10, entering the names _over, _down, and Disabled.
There are two reasons to assign labels to keyframes: First, the label reminds you what is in the keyframe; second, and more important, you can use ActionScript to find a frame with a particular label name and then display that frame. You'll use this technique to create the button's visual feedback in response to mouse movements.
| 5. | Return to document-editing mode; for example, click the Back button in the Edit Bar.
| 6. | Drag an instance of the MovieClipBtn symbol to the Stage.
This movie clip is ready to be scripted to act like a button and to carry out whatever tasks you set for it with ActionScript. You'll learn to complete the button's interactivity in Chapter 13. To check out your button states, click the Play button in the symbol preview in the Library panel, or choose Control > Test Movie to play the symbol instance. Flash moves through the keyframes and displays each button state in turn.
| 7. | Save this document for use in Chapter 13. Call it MyOwnBtn.fla.
|
Why Make Movie-Clip Buttons? Flash's button symbols make it easy to create buttons quickly, but they limit you to just three states: Up, Over, and Down. Sometimes you'd like a button to have more states than that. Think of a typical slide show, for example, that has one button for moving to the next slide and another button for returning to the previous slide. The best interface designs use elements consistently. That way, users know what options are available to them and always know where to find the interface elements for carrying out a task. Still, on the last page of a slide show, there's no next slide to go to. In that case, it's common to display the Next button in a state indicating that the button doesn't function right now. When you make your own movie-clip buttons, you can create as many states as you like. |
Tips When you use the labels _up, _down, and _over in your movie clip, ActionScript recognizes these labels as button states and you will have to do minimal scripting to get the button to work (see Chapter 13). To make a more flexible button (for example, one that responds differently to different mouse movements), use other labels. You can use MyUp, MyOver, MyDown, MyDragOut, and so on. Another way to add a reminder about what a keyframe does is to add a comment. To enter a frame comment, select the keyframe; in the Frame Label field in the Property inspector, type two slashes (//) followed by your comment text (Figure 12.33). Frame labels and frame comments are mutually exclusive: Each keyframe can have one or the other. To work around that limitation, add separate layers for comments and labels. Place keyframes in both layers, and then add comments to one layer and labels to the other, as needed. Figure 12.33. The Frame Label field in the Frame Properties tab of the Property inspector can also be used to create comments for a selected keyframe. Type two slashes in the field to begin comment text or choose Comment from the Label Type menu. Comments appear in the Timeline in the keyframe span; long comments are cut off by the next keyframe in the layer. 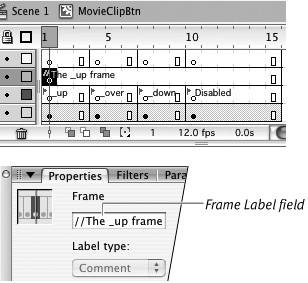 Instead of typing two slashes, you can choose Comment from the Label Type menu. Flash adds the slashes for you. Because ActionScript may use frame labels to create interactivity, Flash exports frame-label text with the other movie data when you publish a Flash Player file. Keeping frame labels short helps keep files sizes small. Comments aren't exported with the final movie. You can make comments as long as you like, but remember that the next keyframe in the layer cuts off the comment text. Size your comments to fit the span containing them.
The Mystery of Frame Label Naming Flash is sensitive about names. Frame label names become part of target paths in ActionScripting; therefore, certain characters that have special meaning in scriptingslashes, equal signs, plus signs, and so onare off limits for labeling frames. To be safe, use only letters, numbers, and underscore characters; don't even use spaces to make word divisions in frame labels. Use capitalization and the underscore character instead. |
|