| In Chapter 8, you learned to make an animated item appear to move slowly or quickly by adjusting the number of in-between frames. When you create an animation with tweening, that method no longer works, because Flash distributes the motion evenly over whatever number of in-between frames you create. You can, however, make an animation slower at the beginning or end of a tween sequence by setting an Ease value. In Flash Professional 8, you can customize the Ease value, creating separate easing values for different aspects of your tween. Imagine animating a setting sun, for example. You may want the sun to change position quickly at first and slowly at the end; but you may want the sun's size and color to change slowly at first and then speed up at the end. Custom easing gives you that control. To make the animation start slowly and accelerate (ease in) 1. | Create a 10-frame motion tween of a graphic that follows a motion guide, using the steps in the first task in "Moving Graphics Along a Path," earlier in this chapter.
| 2. | In the Timeline, select any of the frames in the keyframe span (frames 19).
| 3. | In the Frame Properties tab of the Property inspector, enter a negative number in the Ease field (Figure 9.28).
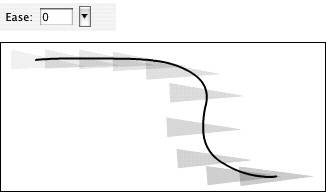
Figure 9.28. A negative Ease value (top) makes changes in the initial frames of the tween smaller and changes toward the end larger (bottom). The animation seems to start slowly and then speed up. 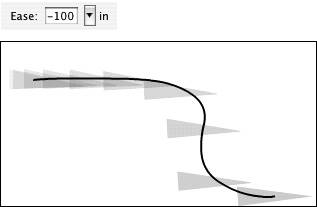
| 4. | Press Enter.
The word in appears next to the field. Easing in makes the animation start slowly and speed up toward the end. The lower the Ease value, the greater the rate of acceleration.
|
Why Use Easing? Easing can create more natural-looking movement for items that gravity affects. In an animation of a rolling ball, for example, you may want the ball to start rolling quickly but slow toward the end to simulate the way that entropy in the real world slows the ball's movement. |
To make the animation start quickly and decelerate (ease out) 1. | Follow steps 1 and 2 of the preceding task.
| 2. | In the Frame Properties tab of the Property inspector, enter a positive number in the Ease field.
| 3. | Press Enter.
The word out appears next to the field. Easing out makes the animation start quickly and slow toward the end (Figure 9.29). The higher the Ease value, the greater the rate of deceleration.
Figure 9.29. A positive Ease value (top) makes changes at the end of the animation smaller and changes in the initial frames larger (bottom). The animation seems to start quickly and then slow down. 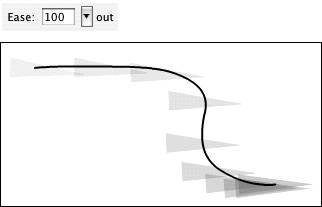
|
 Tip Tip
To create custom easing (Flash Professional 8 Only) 1. | Create a motion tween in which several properties of the tweened graphic change over time.
For example, use the oval tool to draw a yellow circle and convert it to a symbol named Sun. Use the Sun symbol to create a 30-frame motion tween. In keyframe 1, place an instance of the Sun at the top of the Stage. In keyframe 30, place an instance at the bottom of the Stage; resize it to be twice as large; and use the Color setting in the Properties tab of the Property inspector to change the color to dark orange.
| 2. | Select any frame in the keyframe span (frames 129).
| 3. | To access custom easing settings, in the Frame Properties tab of the Property inspector, click the Edit button (to the right of the Ease field) (Figure 9.31).
Figure 9.31. In Flash Professional 8, keyframe spans whose Tween property is set to Motion can have custom easing applied. In the Frame Properties tab for the span, click the Edit button to access a dialog for setting custom easing. 
The Custom Ease In/Ease Out dialog appears (Figure 9.32). The dialog shows the selected tween's changes over time on a graph; the horizontal axis represents each frame in the tween; the vertical axis represents the amount of change. When no easing values have been set, the graph begins as a straight line between a control point representing the tween's first frame (with 0 percent change) and a control point representing the tween's last frame (100 percent change). You can edit the graph to set specific easing values, frame-by-frame, for five properties of a tweened graphic-object (Position, Rotation, Scale, Color, and Filters).
Figure 9.32. The Custom Ease In/Ease Out dialog allows you to control easing precisely, frame by frame, by creating a curve that defines the rate of change in each frame. Without easing, the rate is constant, starting at 0 percent in the first frame of the tween and reaching 100 percent in the last frame of the tween. 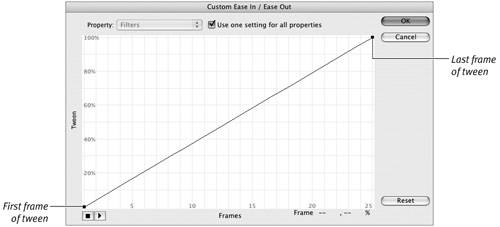
| 4. | To set easing for all five properties simultaneously, select the "Use one setting for all properties" check box.
| 5. | To modify the rate of change, click the graph's line at the frame where you want to the modification to start.
Flash adds a control point with tangent-point handles; these work similarly to anchor points and Bézier handles, allowing you to adjust the shape of the graph's line (Figure 9.33).
Figure 9.33. Click the line in the Custom Ease In/Ease Out dialog to add a control point. Changing a control point's vertical position makes more (or less) of a change take place by the current frame. Adjusting the tangent handles changes the shape of the curve: a steeper curve segment translates to a quicker rate of change; a flatter segment, to a slower one. 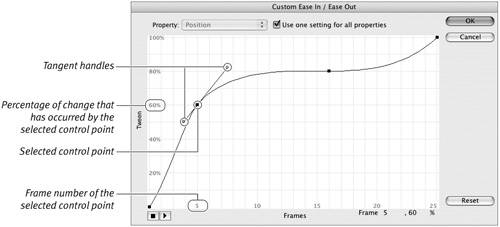
| 6. | Drag a control point vertically to determine the amount of change that should occur by the current frame; adjust the tangent handles to fine-tune the rate of change in the frames on either side of the control point.
Dragging a control point toward the top of the graph makes the curve steeper (changes happen more quickly); dragging a control point to the bottom makes the curve flatter (changes happen more slowly). You can also manipulate the first and last control points' tangent handles to flatten or deepen the curve.
| 7. | Repeat steps 5 and 6 as needed to speed or slow the rate of change in the desired frames of the tween.
| 8. | Click OK.
|
Tips To preview your settings, click the Play button in the lower-left corner of the Custom Ease In/Ease Out dialog. The tween plays in the Flash document window. You may need to move the custom-easing dialog to see the document window. If you have already set a regular Ease value in the Frame Properties tab of the Property inspector, the easing graph in the Custom Ease In/Ease Out dialog reflects that setting. You can use the regular Ease value as a starting place for your custom settings. But be warned: If you've set custom easing, and you enter a value in the regular Ease field, that new setting is applied to the custom-easing curve, wiping out your custom adjustments. You can use easing values to create variations on the general motion of your tweenfor example, making a graphic move back and forth several times even though its tween sequence consists of just two keyframes that move the graphic in a straight line from one position to another. Imagine a 20-frame tween; in the first keyframe, the graphic sits on the left side of the Stage, and in the second, the graphic sits on the right side. Now, set custom easing values for Position in the keyframe span for this tween. Add a control point at frame 5, and position it vertically so that 50 percent of the change is made by that frame. Next, add a control point at frame 10, and position it so that 25 percent of the change has been made. The rectangle moves forward to the middle of the Stage by frame 5, moves backward between frames 5 and 10, and then moves forward again until it reaches the right side of the Stage in frame 20.
To ease changes for different properties separately (Flash Professional 8 Only) 1. | Follow steps 13 of the preceding task.
| 2. | Deselect the "Use one setting for all properties" check box.
| 3. | From the Property menu (Figure 9.34), select one of the following:
Position controls the rate at which a tweened object moves around the Stage.
Rotation controls the rate at which a tweened object spins (using the Rotation property set in the Frame Properties tab of the Property inspector).
Scale controls the rate at which a tweened object changes size.
Color controls the rate at which a tweened symbol instance's Color property changes.
Filters controls the rate at which filter effects (Flash Professional 8 only) take place.
Figure 9.34. Deselecting the "Use one setting for all properties" check box activates the Property menu. Choose a property to create custom easing settings for that specific change. 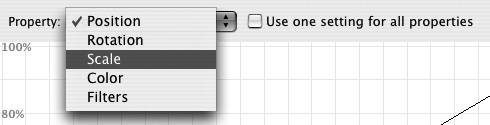
| 4. | Adjust the settings by following steps 57 in the preceding task.
| 5. | Repeat steps 3 and 4 of this task for each property you wish to control.
| 6. | Click OK.
|
Tips If you add keyframes within a span that has custom easing, Flash keeps the custom settings for those frames. Click the Edit button in the Frame Properties tab of the Property inspector to see and further edit those settings. To apply the same curve to several, but not all, of the properties, use the standard copy and paste commands. Set the curve for the first property, press  -C (Mac) or Ctrl-C (Windows) to copy the curve, select a new property from the Property menu, press -V (Mac) or Ctrl-V (Windows) to paste the curve. -C (Mac) or Ctrl-C (Windows) to copy the curve, select a new property from the Property menu, press -V (Mac) or Ctrl-V (Windows) to paste the curve.
|