| As I've hopefully demonstrated, handling HTML forms using PHP is a remarkably easy achievement. Regardless of the data being submitted, PHP can handle it easily and directly. The same is true when the user uploads a file via an HTML form. In order to give the user the option of uploading a file, two changes must be made to the standard HTML form. First, the initial FORM line must include the code ENCTYPE = "multipart/form-data", which lets the HTML know to expect a file as well other data. Second, the <INPUT TYPE=FILE NAME= NAME > element is used to create the necessary field. The INPUT TYPE=FILE in forms allows the user to specify a file on the user's computer which, upon submission, will be uploaded to the server. Once this has occurred, you can then use PHP to handle the file. When a file is uploaded, the server places it in a temporary directory. Your first responsibility is to save that file in a permanent location. The copy() function is used to duplicate a copy of the file in a new location. copy ("SourceName", "DestinationName"); Then, you should delete the temporary file, as a matter of formality , using unlink(). You'll write a very basic script that uploads a file and stores it in the users directory. Like the urls.php script, this example will also both create the HTML form and process it, all in one page. To use PHP for file uploads: -
Create a new PHP document in your text editor. -
Begin with the standard HTML header (Script 10.7): Script 10.7. The simplicity of this script should also indicate how naturally PHP handles HTML forms. There are three steps to uploading files: change the HTML form accordingly , use copy() to move the file to the desired location, then delete the file using unlink(). 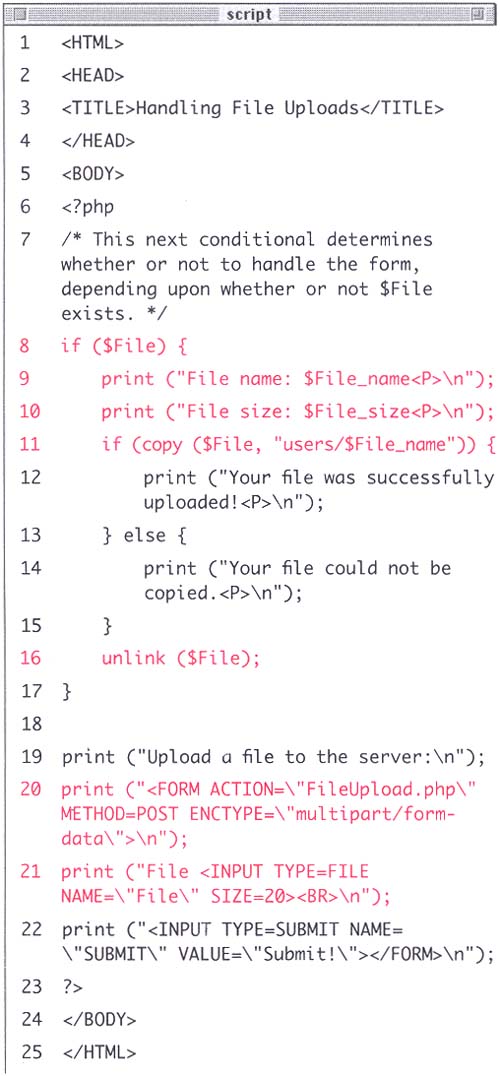 <HTML><HEAD><TITLE>Handling File Uploads</TITLE></HEAD><BODY> -
Open the PHP section and create a conditional to test whether or not to handle the file upload. <?php if ($File) { The information for the uploaded file will be stored in a variable appropriately called $File. If this variable exists (i.e., it has a value), you'll know to process it. -
Print the file name and file size , just for confirmation. print ("File name: $File_name<P>\n"); print ("File size: $File_size<P>\n"); When a file is uploaded, several variables are set. By taking the name of the main variable (in this case, $File) and appending _name and _size, you can retrieve that information for the file as well. -
Attempt to copy the file to the users directory and print out a message based upon the success. if (copy ($File, "users/ $File_name")) { print ("Your file was successfully uploaded!<P>\n"); } else { print ("Your file could not be copied.<P>\n"); } When copying the file, the source is stored in the $File variable and the destination is either absolute (e.g., c:/php/data.txt) or relative to the location of this file (e.g., "php/data.txt" ). Here I've used a relative reference, requesting to put the file within the users directory which is located in the same directory as this page. -
Now unlink the file and close the conditional. unlink ($File); } Most likely the file will automatically be unlinked by the server at some later time, but it is better to keep things tidy as you go, so you'll immediately delete the file once you are done with it. -
Print out the HTML form for uploading the file. print ("Upload a file to the server:\n"); print ("<FORM ACTION= \"FileUpload.php\" METHOD=POST ENCTYPE=\"multipart/form- data\">\n"); print ("File <INPUT TYPE=FILE NAME=\"File\"><BR>\n"); print ("<INPUT TYPE=SUBMIT NAME= \"SUBMIT\" VALUE=\"Submit!\"> </FORM>\n"); Be sure to add the ENCTYPE code to the opening FORM tag. The INPUT TYPE=FILE line is self-evident. -
Close the PHP and the HTML. ?></BODY></HTML> -
Save the file as FileUpload.php, upload it to the server (in the same directory as the users directory), and test it in your Web browser (Figures 10.13 and 10.14). Figure 10.13. The FILE type of input creates a button which, once clicked, allows the user to navigate through their computer until they've located the desired file. Upon selection of the file, its name will then automatically be listed in the window.  Figure 10.14. Successful handling of the file is reflected with a corresponding message. You can also access the file's name and size in bytes at the same time.  Tip I've decide to use the previously created users directory because I know that its permissions allow anyone to write to it. Should you try to copy a file to a directory that does not have the proper write permissions the results would be like those shown in Figure 10.15. Figure 10.15. Attempting to copy the file to a location which does not have the proper permissions gener-ates this error message. You know that the file was successfully uploaded, though, as it accurately displays the file's name and size. The PHP just cannot copy the file to the suggested destination. 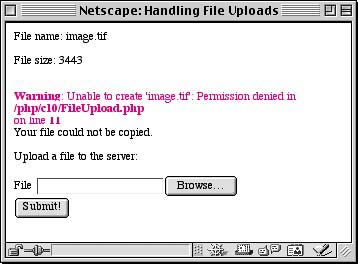
Tip The maximum uploadable file size is determined by several factors. First, the server may have a limit set. Second, PHP itself can impose a limit (in the php.ini configuration file). Third, you can determine a maximum file size by coding <INPUT TYPE=HIDDEN NAME="MAX_FILE_SIZE" VALUE="2048"> in your form before the FILE input. The value field is in byte units.
Tip A file's type, which is assigned to the $File_type variable when $File is uploaded, is the same thing as its MIME ( Multipurpose Internet Mail Extensions ) type, which e-mail applications and Web browsers use to know how to treat a file. A MIME type could be image/jpeg or text/html.
 |