Slowly Changing Dimensions
The slowly changing dimension (SCD) should technically be called slowly changing attribute because any attribute can be handled differently from any other. There are three logical ways of dealing with a slowly changing attribute, identified by three types:
-
Type 1 The existing record is updated with the change. Replacing the data is very appropriate if the old data was erroneous, or it is unlikely that the changes will materially affect important analyses. Type 1 slowly changing dimensions do require re-creating any aggregations that would be affected by the change.
-
Type 2 History is preserved, a new record is added to the dimension, and the old record is marked as inactive and retained with the table. EndDate or IsLatest attribute columns generally represent the latest record of the dimension member business key. A new surrogate key is created for every change, irrespective of the business key. Type 2 changes can cause a serious inflation in the number of members of a dimension.
-
Type 3 Type 3 preserves a version of the history by adding it to the dimension record in a different attribute. Typically, there are two states: current and previous. In some cases, you can have four or five states. When the number of defined states is exceeded, previous states are discarded. A Type 3 change does not create a new row, but it does require extra columns in the dimension table schema. As with a Type 1 change, a Type 3 change requires a dimension update, so you need to re-process all aggregations affected after a change.
While loading dimension tables in the data warehouse, you can check for the existence of the new records. If the dimension record already exists, you have a Type 1 or Type 2 effect, depending on the attribute that is changed. If the record does not exist, you can simply add one. In addition, sometimes the record exists in the data warehouse but is no longer in the source database. This signals a logical deletion. Comparing the existence of the values in both the new and old data sets can be slow, particularly when the tables are large.
A good solution is to use a full outer join between the new table and the existing warehouse dimension table, using the business key for the join. You can then determine updates, inserts, and deletes in one query like the following:
Select SourceTable Full Outer Join Dim_Table On SourceTable.BusinessKey = Dim_Table.BusinessKey
If the resulting dimension business key is NULL, it means the corresponding record does not exist in warehouse (or that it has expired). In this case, a new record can be inserted into the warehouse table. If the resulting source business key is NULL, it means the corresponding record has been deleted and should be flagged with an EndDate in the warehouse table. If neither business key is NULL, it means the corresponding record exists in warehouse and is active. In this case, the appropriate Type 1 or Type 2 processing can be performed as required.
SSIS provides a new Slowly Changing Dimension Wizard as the configuration editor for creating a Slowly Changing Dimension transformation. Building and configuring the data flow for slowly changing dimension data can be a complex task. The Slowly Changing Dimension Wizard offers the simplest method of building the data flow for the Slowly Changing Dimension transformation outputs by guiding you through the steps of mapping columns, selecting business key columns, setting column change attributes, and configuring support for inferred dimension members.
You must choose at least one business key column in the dimension table and map it to an input column. The value of the business key links a record in the source to a record in the dimension table. The transformation uses this mapping to locate the record in the dimension table and to determine whether a record is new or changing. The business key is typically the primary key in the source, but it can be an alternate key as long as it uniquely identifies a record and its value does not change. A business key can also be a composite key, consisting of multiple columns. The primary key in the dimension table is usually a surrogate key, which means a numeric value generated automatically by an identity column or by a custom solution such as a script.
Before you can run the Slowly Changing Dimension Wizard, you must add a source and a Slowly Changing Dimension transformation to the data flow and then connect the output from the source to the input of the Slowly Changing Dimension transformation. Optionally, the data flow can include other transformations between the data source and the Slowly Changing Dimension transformation.
Managing Slowly Changing Dimensions
In this procedure you will learn how to use the new SSIS Slowly Changing Dimension transformation. The transformation will update the Customer Dimension based upon slowly changing dimension changes for Types 1, 2, and 3 changes. You will create a multiple control flow SSIS package that first loads a sample Customer Dimension in a sample database and then uses the Slowly Changing Dimension Wizard to apply updates, additions, and deletions to the sample dimension.
| Note | In the next series of steps, you will create a new SSIS package that uses the Slowly Changing Dimension transformation. You will see how this one transformation replaces the majority of the complex tasks and transformations used in the SQL Server 2000 DTS 2000 package designer. |
Add a New Package for Designing a Slowly Changing Dimension Process
-
In Solution Explorer, right-click the SSIS Packages folder in the Chapter13 project and select New SSIS Package.
-
Right-click the new package and rename the package Customers_SCD.
-
Add a Data Flow task to the Control Flow tab.
-
Right-click the task and rename the task Create Customer Dim.
-
On the Data Flow tab, open the Toolbox and, from the Data Flow Sources group, drag an OLE DB Source to the designer.
-
Rename it Dim Customer.
-
Double-click the new source to open the editor.
-
Click New to create a new connection manager named SSIS DW.
-
Create a new data connection to the server localhost and to the SSIS DW database.
-
Select the [dbo].[DimCustomer] table from the Name Of Tthe Table Or The View in the OLE DB Source Editor dialog box.
-
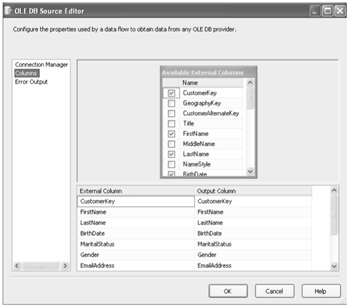
In the Columns section of the editor, deselect all column check boxes except the following:
-
CustomerKey
-
FirstName
-
LastName
-
BirthDate
-
MaritalStatus
-
Gender
-
EmailAddress
-
YearlyIncome
-
AddressLine1
Your screen should look like this:
Click OK.
-
Add a Percentage Sampling Transformation
-
Drag a Percentage Sampling transformation onto the Data Flow task grid from the Toolbox.
Note The Percentage Sampling task will allow you to work with a subset of the DimCustomer table. The Percentage Sampling and Row Sampling transformations provide very effective means of limiting your data set during prototype package development and testing.
-
Connect an output arrow from the OLE DB Source data adapter to the Percentage Sampling transformation.
-
Double-click the transformation to open the editor.
-
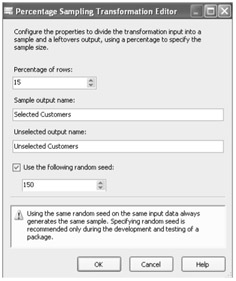
Select 15 percent of rows.
-
Change the sample output name to Selected Customers and the unselected output name to Unselected Customers.
-
Select the Use The Following Random Seed check box and enter 150.
Note Selecting a seed value will enable the transformation always to select the same data set. Although great for development, seed values should not be used in a production environment.
Your screen should look like this:
-
Click OK to close the editor.
Note In the next two steps, you will create a new database (with simple recovery mode) using SQL Server Management Studio (SSMS), and create a new customer dimension table from within a SQL Server Destination from BIDS. These will be used by the package you are creating and will be maintained by a Slowly Changing Dimension transformation.
Connect to SSMS to Create a Simple Database for a New Dimension Table
-
Start SQL Server Management Studio, and connect to the localhost is2005sbs database.
-
In Object Explorer of SSMS, right-click the Databases folder of SQL Server and select New Database.
-
Type the database name: Customers.
-
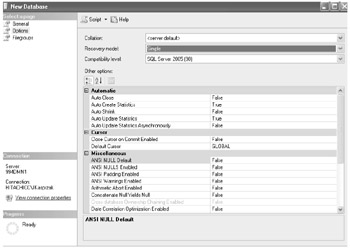
On the Options page, change the Recovery Model to Simple.
Your screen should look like this:
-
Click OK to create the database.
Create a New Table within a SQL Server Destination
-
Switch back to BIDS and drag an OLE DB Destination object from the Data Flow Destination group in the Toolbox to the designer.
-
Drag an output arrow from the Percentage Sampling transformation onto the SQL Server Destination. Choose the output stream Selected Customers, and then click OK.
-
Double-click the OLE DB Destination data adapter and click the New button to create a new connection manager.
-
Click the New button in the Select Data Connection dialog box to define a new data connection:
-
Specify the local SQL server as the data source, select Windows Authentication, and select the Customers database.
-
Click OK twice.
-
-
Click the New button next to Use A Table Or View in the OLE DB Destination Editor dialog box to create a new table.
-
Make changes to the default Create Table command as indicated by the following bold text. (Change the table name to DimCustomer and add the column CurrentRecord, as shown here.)
CREATE TABLE [DimCustomer] ( [CustomerKey] INTEGER, [FirstName] NVARCHAR(50), [LastName] NVARCHAR(50), [BirthDate] DATETIME, [MaritalStatus] NVARCHAR(1), [Gender] NVARCHAR(1), [EmailAddress] NVARCHAR(50), [YearlyIncome] MONEY, [AddressLine1] NVARCHAR(120), [CurrentRecord] NVARCHAR(10) )
Note The CurrentRecord field will be used to flag the current version of SCD Type 2 records with a value of True and all historical dimension records with a value of False. This field should initially be set to True for all records because each represents the current record.
-
Click OK.
-
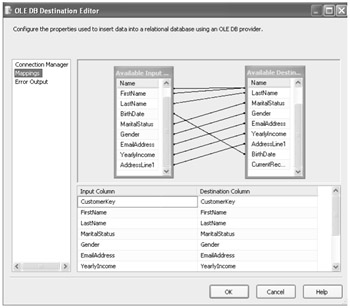
Click Mappings to align the input and destination columns.
Your screen should look like this:
-
Click OK.
Note In the next steps, you will add a task to initialize the CurrentRecord field to True for all records. This is performed to identify all the current dimension rows as the most current version. You will use this column to identify which rows have been changed by the Slowly Changing Dimension task.
Initialize the CurrentRecord Column for Slowly Changing Dimension Reference
-
Click the Control Flow page and add a new Execute SQL Task.
-
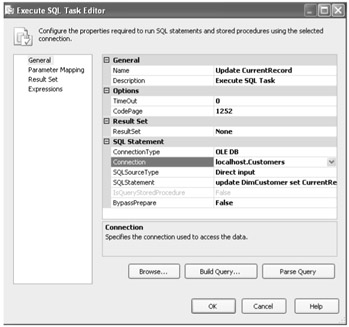
Double-click the new SQL task and set the following properties:
-
Name the task Update CurrentRecord.
-
Select localhost.Customers as the Connection.
Your screen should look like this:
-
-
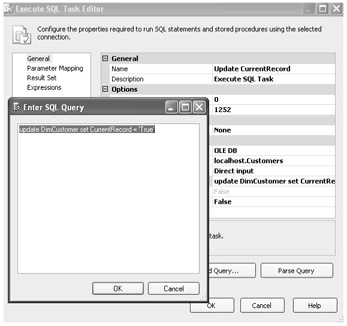
In the SQLStatement property field, click the ellipses button and type the following SQL Statement:
update DimCustomer set CurrentRecord = 'True'
Your screen should look like this:
-
Click OK.
-
Add a precedence constraint by dragging the green arrow from Create Customer Dimension to Update CurrentRecord.
Add a New Control Flow for Customer Dimension Updates
-
On the Control Flow grid, add a new Data Flow task, right-click the task, and rename it Customer Dim Maintenance.
-
Add a precedence constraint from the Update CurrentRecord task to Customer Dimension Maintenance.
-
Double-click Customer Dim Maintenance and, on the Data Flow tab, drag a Flat File source from the Toolbox to the designer.
-
Double-click the Flat File Source data adapter and click the New button to create a new connection manager.
-
Name the connection manager Customer Updates.
-
Use the Browse button to navigate to the C:\Documents and Settings\<username>\My Documents\Microsoft Press\is2005sbs\Chap13\Data\CustomerUpdates.txt source text file.
Note This file contains updated customer information. The Slowly Changing Dimension transformation will identify any new information in it and then perform the necessary updates and insertions to DimCustomer.
-
Select the Column Names In The First Data Row check box.
-
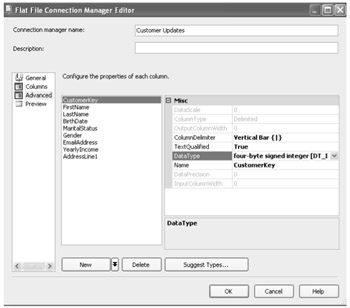
On the Advanced tab, correct DataType and OutputColumnWidth for each column, as shown here:
-
CustomerKey: four-byte signed integer
-
FirstName: Unicode string (50)
-
LastName: Unicode string (50)
-
BirthDate: database timestamp
-
MaritalStatus: Unicode string (1)
-
Gender: Unicode string(1)
-
EmailAddress: Unicode string (50)
-
YearlyIncome: Currency
-
AddressLine1: Unicode string (120)
Your screen should look like this:
-
-
Click OK.
-
In the Flat File Source Editor, click Columns to set the mappings.
-
Click OK.
Add a Slowly Changing Dimension Transformation
-
Drag a Slowly Changing Dimension (SCD) transformation to the Data Flow grid.
-
Click the Flat File Source data adapter to select it and drag its green arrow onto the SCD transformation.
-
Double-click the transformation to open the Slowly Changing Dimension Wizard.
Note The Slowly Changing Dimension Wizard will walk you through the steps of identifying the dimension's key fields, which are SCD Type 1 and SCD Type 2. For SCD Type 1 fields, the SCD transformation will update the existing dimension record with any new data. When new data is identified for SCD Type 2 fields, a whole new record is created. A flag field is maintained by the transformation to distinguish the old and new records.
-
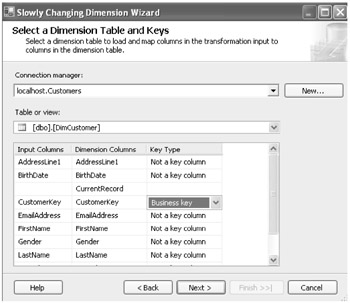
Select Customers in the Connection Manager drop-down list and DimCustomer in the Table Or View drop-down list.
-
In the Key Type column, from the drop-down list, select Business Key for CustomerKey.
Your screen should look like this:
-
Click Next.
Note This field will be used to join records in
 CustomerUpdates.txt to those in DimCustomer. In a production environment, it is unlikely that the customer surrogate key would be stored in the customer update file. Instead, a process would exist within an SSIS package to look up the correct key for existing customer records and generate a key for new records.
 -
Add each of the non-key columns by clicking the list box in the Dimension Columns list.
-
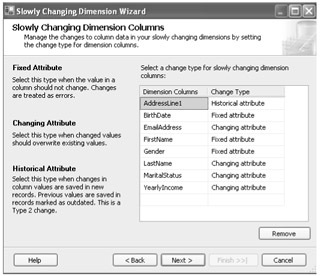
In the Change Type list box for AddressLine1, click Historical Attribute.
Note This column will be treated as SCD Type 2. Any change in value will result in the creation of a new Current record.
-
Identify EmailAddress, LastName, MaritalStatus, and YearlyIncome as changing attributes.
Note These will be treated as SCD Type 1. Any changes to these columns will result in an update to the underlying record.
-
Select FirstName, BirthDate, and Gender as fixed attributes.
Your screen should look like this:
-
Click Next.
-
Clear the check boxes on the Fixed and Changing Attribute Options page.
-
Click Next.
-
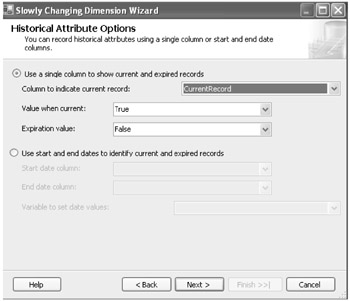
Select CurrentRecord in the Column To Indicate Current Record drop-down list.
-
Set Value When Current to True.
Your screen should look like this:
-
Click Next.
-
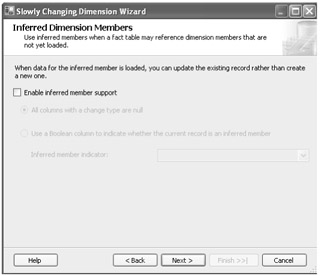
Clear the Enable Inferred Member Support check box to disable it.
Your screen should look like this:
-
Click Next, and then click Finish.
-
Execute the package.
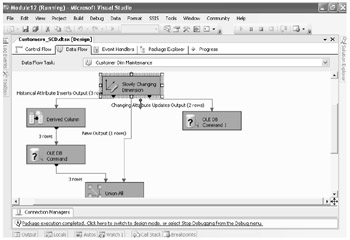
Note The Slowly Changing Dimension Wizard will create three branches in the pipeline from the Slowly Changing Dimension transformation: one to process new records, one to process SCD Type 1 records, and one to process SCD Type 2 records. Three records from
 CustomerUpdates.txt will travel down the historical attributes path, two records will travel down the changing attributes path, and one new record will be added to the dimension. A total of four new records will be inserted into the dimension.
Your screen should look like this:
-
Select Stop Debugging.
-
Save the project.
EAN: 2147483647
Pages: 152