Chapter 14: Optimizing Quality Throughout Production
In this chapter, we will follow the production process and point out what you can do to optimize quality at each step. Quality optimization begins when you first press the record button and ends when you encode or master your final product and then distribute it. Optimization should be on the mind of every creative person who produces content, especially if the content is intended for distribution to the general public. Every decision that you make is based on many factors, including technical quality. Take steps at every point in your production process to make sure that technical quality is maintained , so that technical problems do not interfere with the creative vision of your production.
Production
Production is the part of the content creation process when the technical quality bar is set. During production, technical quality may be affected by the equipment that you use to record audio and video, and by many external sources, such as unwanted sound from airplanes and bad lighting conditions.
Audio
As you prepare to shoot a scene, consider your sound source. Try to prevent sounds that are not part of the source from being picked up by the microphone, including background noise and reverberation . Also think about how you will use the sound in your final work. If a recording contains a lot of background sound, you will hear the sound change when you make a cut. Assuming your tools are adequate for the job, you can ensure a good quality recording by properly placing the microphone, eliminating background noise, and optimizing recording levels:
-
Place the microphone properly. This is the best way to optimize audio quality, since the microphone is the device that first touches the sound. By correctly placing the microphone, you get the cleanest sound pickup. A little extra work at the beginning can save you a lot of frustration later. In general, the microphone should be as close as possible with the front of the microphone facing the source. By doing this, you do not entirely eliminate the source of unwanted background sound, but you help ensure that the sound level from the desired source is sufficiently higher. Close placement also picks up a richer spectrum of sound. For example, you are more likely to pick up the high-frequency sounds that help with clarity and intelligibility. Most microphones have a cardioid pickup pattern, which means that sounds outside a heart-shaped area in front of the microphone will be reduced. Figure 14.1 shows a cardioid pickup pattern.
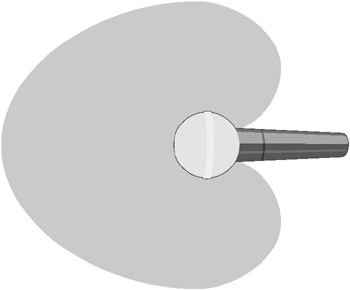
Figure 14.1: Microphone showing a cardioid pickup pattern. -
Eliminate as many background sound distractions as possible. This includes short transient sounds like hammering, coughing, paper rustling, and footsteps, and long continuous sounds like air conditioners, traffic, and airplanes. This also includes room sounds, such as reverberation caused by the sound source reflecting off hard surfaces. You can often take direct action to eliminate a sound. For example, you can unplug a noisy refrigerator, close a door, or hang furniture blankets to cut down reverberation. If direct action is not possible, you may have to work around a distracting sound. There are some sounds, like those made by airplanes and crashing waves, that you will have no control over, regardless of the importance of your production.
-
Optimize recording levels. If you are using a good-quality recorder, typically the only way that you can optimize a recording is by making sure audio levels are set properly. Many camcorders and consumer audio recorders use circuitry that sets the audio level automatically, with an automatic gain control. If you can set levels manually with an audio meter, adjust the input control so that the audio level stays in the lower range, and uses as much of the range as possible while only rarely going over the 100% mark. If the level is too low, you will hear internal electronic noise. If the level is continually over 100%, the audio will be distorted . If you are recording on a digital device, never allow the level to hit 100%. If you do, digital clipping will occur. You may not notice a small amount of distortion with analog electronics and tape, but digital clipping is very noticeable. Clipped audio cannot be repaired or restored.
Video
Assuming that you are using a good-quality camcorder, you can either allow the camcorder to optimize quality automatically or optimize it manually. As a rule, the higher the quality of the camcorder, the more manual controls are available. The reason is that manufacturers assume consumers who purchase inexpensive camcorders will not have the expertise or desire to make manual adjustments. High-quality camcorders for professionals typically offer the choice of automatic or manual control; if a camera operator decides that an automatic adjustment is not optimal, he can override it manually. The following list describes the adjustments that must be made either automatically or manually to record video:
-
Focus. Most camcorders provide an auto-focus feature that automatically focuses the lens, so that the camera operator can be free to aim the camera and compose shots. However, the sensor that determines focus often reads only an area in the center of the image. If the part of an image that you want to be focused is not in that area, the lens will focus on the wrong thing. In those cases, you can switch to manual focus, if it is available.
-
Exposure. An optical iris mechanism opens or closes to adjust the amount of light that enters the lens and focuses on the face of the CCD chips. If the light level is too high, the bright areas of the image become clipped, and video that is clipped cannot be restored. If the light is too low, the image appears muddy or dark, and you are more likely to see video noise. As with focus, the automatic exposure system works much of the time. However, there are times when the exposure sensor adjusts for the wrong part of an image. For example, when shooting a shaded subject against a brightly lit background, many camcorders will adjust for the background and leave the subject dark. Manual override is handy in these cases.
-
White balance. An object reflects a different color depending on the color temperature of the source light. Most camcorders correct for this automatically, so that white objects always appear white. However, if a subject is lit by multiple sources with different color temperatures , the automatic white-balance circuits can correct for the wrong source, making the image appear bluish or reddish. Professional camcorders enable the camera operator to set the white balance manually.
-
Shutter. The shutter adjustment controls the length of time an image is recorded in a frame of video. By default, a frame records about 1/30 of a second of an image. If objects are moving during that time, they appear blurred. However, by adjusting the shutter to 1/1000 of a second, moving objects will appear sharper. High-quality camcorders offer a number of shutter speeds.
-
Gain. If the light level is insufficient even with the iris wide open , many consumer camcorders automatically add gain electronically . The main drawback of this system is that increasing gain also increases video noise. Unless you want a noisy, dark look for your video, make sure the subject is well lit. High-quality camcorders enable you to manually control gain.
Once clean audio and video have been recorded, you can further ensure that quality is optimal when you digitize your content during acquisition.
Acquisition
Acquisition is the part of the production process when the audio and video that have been recorded on tape or film are converted to digital data and saved on a computer hard disk. This task typically requires little creativity; it is often a matter of simply playing a tape and starting a capture program. However, even though it is a fairly mechanical process, the decisions made during acquisition affect the end product just as much as at any other step in the process.
The best approach for acquiring content is to decide on the parameters you want up front, and then use the same settings for everything that you digitize. With parameter standards set, the only factors that can adversely affect acquisition are mechanical or electronic problems, such as a tape creasing or a capture computer that cannot keep up with the amount of data that must be processed .
The acquisition process should be monitored and the final file spot-checked for quality. Often the only indication that you have of the quality of a capture is a display showing the number of frames dropped by the capture program. If a computer is too slow to handle the bit rate at which you are capturing, a capture program adapts by dropping frames rather than bringing the system down. There is no set rule for how many dropped frames constitute a bad capture. Often, a maximum of one or two dropped frames a minute may not be noticed. However, any number of dropped frames indicates a problem, because there should be none if your acquisition computer meets your requirements. If the number is excessive, you should use a computer with more RAM, and a faster CPU and internal bus. The write speed of the hard disk should also be adequate for the bit rate of the content. You can also monitor CPU and memory usage with Performance Monitor.
The following list describes the basic parameters you should decide before you begin acquiring analog content:
-
Video frame size. Frame size is also referred to as the resolution of a video, because it determines the number of pixels that will be used in each frame. The larger the frame size , the more pixels and the higher the resolution.
-
Pixel format. An analog video signal is sampled and the digital information is formatted into pixels. The pixel format defines the arrangement of the data in the pixels. Data stored in RGB formats defines pixels as values of the red, green, and blue components of the video. Data can also be arranged in a YUV format in which luminance information (Y) is separated from chrominance (UV). You can use a YUV format to save hard disk space; in most YUV formats, some chrominance detail is discarded in order to decrease the amount of data needed for each frame. If possible, use the same format that you will use in your final product to save an extra conversion step. Windows Media uses the YV12 pixel format.
-
Aspect ratio. The aspect ratio is the ratio between the height and width of a frame. The standard-definition video ratio is 4:3, for example 640 pixels by 480 pixels. You might also need to consider the aspect ratio of the pixels. Square pixels are commonly used when working with digital video on a computer. However, the digital video-standard for broadcast and video production uses nonsquare pixels that are slightly narrower. Narrower pixels provide higher horizontal resolution. The resolution of 640 pixels by 480 pixels produces a frame aspect ratio of 4:3 with square pixels; a resolution of 720 pixels by 480 pixels produces the same frame aspect ratio with nonsquare pixels.
-
Video frame rate. The frame rate is the number of video frames that are displayed each second. Video must be digitized at a frame rate that is no less than that of the source video in order for motion to appear as smooth as the original. The NTSC standard is roughly 30 frames per second (fps). You might also see it as 29.97 fps, which is the actual frame rate for NTSC color television. The Phase Alternating Line (PAL) standard used primarily in Europe is 25 fps.
You can improve the look and smoothness of video displayed on a computer monitor by using deinterlacing , a feature available on some capture cards and in Windows Media Encoder 9 Series. Analog video standards use a process called interlacing to create a video frame that is composed of two fields. One field contains odd-numbered scan lines; the other field contains even-numbered lines. The two fields displayed together produce one complete frame. Deinterlacing combines the two fields into one frame. The resulting video is then displayed using progressive scanning , which is the scanning method used by most computer monitors . A progressively scanned image does not contain any more image information; it just appears clearer and has less flicker. A similar method is inverse telecine . Film runs at 24 fps. In order to convert film to standard-definition video, redundant video fields are added so that the film appears smooth while running at 30 fps. Inverse telecine removes those fields.
-
Audio sampling rate and bit depth. The sampling rate determines the resolution of the audio. The more samples, the higher the quality. The bit depth is the number of bits used to describe one sample. Again, the more bits, the higher the quality. The Redbook standard for CDs is usually considered the benchmark for good-quality audio. It uses a sampling rate of 44.1 kHz, a bit depth of 16, and stereo. A sampling rate lower than 22 kHz or a bit depth of 8 produces noticeable audio artifacts. Professional audio sampling rates can go as high as 96 kHz.
-
Compression. If you are going to edit or process the content and then encode a final file, you will get the best quality if you work with uncompressed audio and video. After you finish editing, you can use a codec to compress the video for your destination medium, such as MPEG-2 for DVD and Windows Media Video for streaming. The disadvantage of working with uncompressed video, however, is the high bit rate and storage requirements. Therefore, a number of editing systems use proprietary software or hardware codecs with the editable digital media. Digital video formats, such as the MiniDV format, are also compressed. These compression methods are designed for editing and full-screen playback.
Digital formats make working with video and maintaining quality easy. Capturing data is less complicated than capturing and converting an analog signal, because there is no setup required. You can use an IEEE 1394 port for video formats such as MiniDV, the SDIF or AES/EBU port for digital audio, and the SDI port for the professional DV format to capture the data streams from a camcorder or recorder to a hard disk. Then you can open and work with the files in an editor or audio workstation. After you finish an edit, you can save the final product as a file or simply stream the final product back through the connector to an external recording device, such as a camcorder.
If you are working with digital content that has been recorded directly to a hard disk, such as a digital disk recorder (DDR), you can bypass the acquisition process.
The acquisition standards you set in the beginning decide the quality of the end product. After setting a standard and digitizing your content to files, you can begin the post-production phase of your production.
Clean-Up Before Postproduction
After acquiring your content, there is a point in the process when you can optimize your audio and video. While in raw digital form, there are things you can do to your content to clean it up before you start postproduction “ things that would be more difficult, if not impossible to do, after you have started editing, mixing, and adding effects to create your final piece. By doing an initial clean-up, the rest of the process will often go much smoother because you can concentrate on the creative aspect. In general, if you have maintained good technical quality throughout production and acquisition, your raw files can be used directly in the editor and any quality problems can be addressed at that point. However, to help you understand methods for optimizing, we will explore what can be done prior to editing.
In each of the next three stages of the production process we will describe the types of quality problems that you should typically look for in that stage, and explore the tools and processes available.
Identifying Problems
After acquiring your content, you can check the raw files and identify problems that occurred during production that can be cleaned up before you begin the editing process. At this point, you do not necessarily know which parts of the raw material will end up in the final cut, but you may have a rough idea. Look for general problem areas that make the content difficult to work with during editing. For example, it is easier to attempt to remove a loud hum that runs through a large section of the raw content after acquisition, than to edit the content, and then attempt to edit and match each of the edited clips.
The type of video work that we will describe can be performed with fairly simple editor plug-ins that can correct the color and quality of the video frame in general. Therefore, we will wait to work with the video portion of our content until we begin editing, and then apply plug-ins at that point. However, you may choose to modify video content before you edit. The decision of whether to wait should be based on how much clean-up is required, and the complexity of your editing.
As you decide how to optimize your content, keep in mind that every time you process content, you run the risk of losing quality. If you simply copy digital media, the data is transferred bit for bit, so there is no change or loss. On the other hand, when you run content through a processor, such as a converter or color corrector, the bits are modified, so it is possible to lose quality, such as resolution or detail. Also, once applied to a file, you often cannot undo a process. Obviously, if you perform a very stylized color correction and make the image very blue with high contrast, for example, you may not be able to bring the reds and greens back in later if they have been removed. Also, the time it takes to render each process can be considerable. To help with these problems, a number of editing programs enable you to chain effects in real time, so that you can render a final file once with multiple processors and filters.
The goal of audio cleanup at this point is to remove unwanted material, reduce internal and external noise that was recorded during production, reduce the damage caused by digital distortion, and balance audio levels. You do not need to work on content that you know will not be used in the final product, but it is often easier and takes less time to simply process an entire raw file.
Exploring the Tools
Before you begin editing, you can clean up raw audio files and the audio portion of video files with an audio-editing program commonly called a digital audio workstation (DAW). This tool displays audio as a waveform. You can use the mouse to select portions, and then delete, cut, copy, or paste data. You can also mute or silence selections. The workstations also commonly include processors and plug-ins that you can apply to a selection or to the entire file.
To help you visualize working with a DAW, we will use Sound Forge from Sonic Foundry as an example. However, other audio workstations, such as Cool Edit Pro from Syntrillium software and WaveLab from Steinberg have similar functions. Figure 14.2 shows a short music segment opened in a DAW.
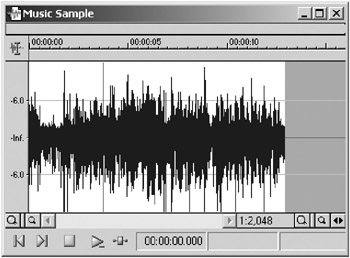
Figure 14.2: Music file opened in a digital audio workstation (DAW).
The following list describes some of the cleanup tasks that you can perform with most DAWs:
Equalization
Equalization (EQ) functions enable you to boost or lower sounds based on frequency in hertz (Hz). The most common types of equalizers are shelf, parametric, and graphic:
-
Shelf equalizers are the simplest type. They raise or lower all frequencies of sound gradually above or below a certain point. The bass and treble controls in a car stereo are examples. Figure 14.3 shows an equalizer display with low-end shelf EQ applied.
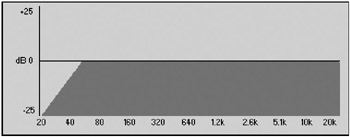
Figure 14.3: Low-end shelf EQ added with an equalizer.The horizontal axis represents the sound spectrum from 20 Hz to 20,000 Hz; the vertical axis represents the amount of EQ that is either added to or removed from a sound, measured in decibels (dB); and sound is represented by the dark shape below the center line. If no EQ is applied, the EQ graph shows all sound at the center line. In this case, the shelf EQ begins at 55 Hz, and gradually reduces sound at frequencies below that point to a maximum of 25 dB (-25) at about 20 Hz.
-
Parametric equalizers raise (boost) or lower ( notch ) frequencies in a selectable range, called a band. With parametric equalizers, you can work with individual tones. For example, you can lower hum from a power source by notching the sound in a narrow band at 60 Hz. Figure 14.4 shows a narrow band notched at 60 Hz and a wider band boosted at 7.5 kHz.
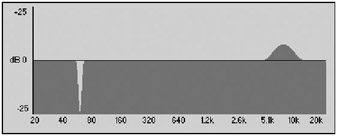
Figure 14.4: EQ settings in a parametric equalizer.You can boost or notch frequencies around 7.5 kHz to bring out or lower sibilance in a voice recording. Sibilance is produced primarily by s , sh , and t sounds.
-
Graphic equalizers boost or notch frequencies in a number of fixed bands. Typically, you use a graphic equalizer to shape the overall sound of an audio track. You could shape the equalization of a computer sound system, for example, to take into account the acoustic characteristics of the speakers and a room. Figure 14.5 shows a 20-band graphic equalizer with sound boosted in the upper and lower bands, and notched around 640 Hz.
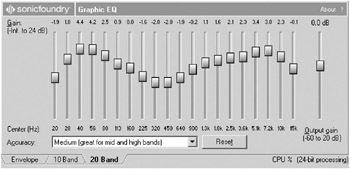
Figure 14.5: EQ settings in a graphic equalizer.
Lower Background Noise
Steady internal or external noise added during production can often be lowered to an acceptable point using equalization. However, noise-reduction programs and plug-ins target noise more precisely. These programs use a sample of the noise to create a digital sound profile. Sounds matching the profile are then removed or reduced. Figure 14.6 and 14.7 show a voice track before and after noise reduction was applied to reduce air-conditioning noise.
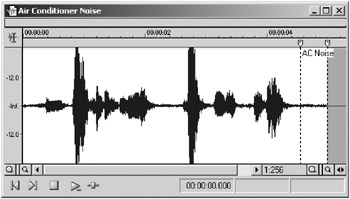
Figure 14.6: Waveform of a voice before noise reduction is applied.
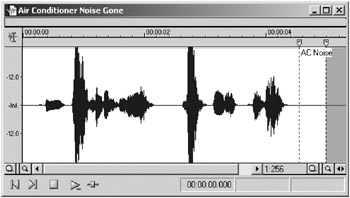
Figure 14.7: Same waveform of a voice after noise reduction is applied.
The wide variable portions of the waveform represent the parts of the sound containing the voice. Air-conditioning noise appears between vocal segments as a fairly consistent thickening of the center line. After noise reduction is applied, the portions containing air-conditioning noise can be reduced to almost nothing. Figure 14.8 shows the sound profile or noise print of the noise that was generated by the noise reduction program.
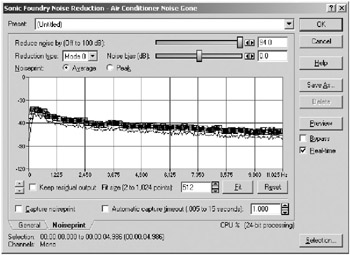
Figure 14.8: Sound profile of noise in an audio file.
A noise-reduction program does not know what noise is; it can only recognize sounds based on the profile. Therefore, if noise contains a wide spectrum of frequencies, such as white noise, which contains all frequencies, the program will reduce all sound, including the sound that you want to keep. Programs can solve many problems, but optimizing the use of programs is an art.
Reducing Pops and Clicks
Another type of noise-reduction function reduces pops and clicks, which are usually added to a recording internally from electronic components. They can also be added to a signal by a medium, such as static from phonograph records and broadcast reception . Figure 14.9 shows a waveform that has been zoomed-in to make a static pop easier to see. Figure 14.10 shows the same section after click-and-pop removal was applied.

Figure 14.9: Waveform showing a static pop.
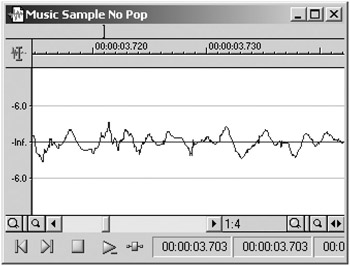
Figure 14.10: Same waveform after pop removal was applied.
This processor can be very effective at removing very short, high-frequency transient noises. Another way to remove noise is to manually redraw the waveform with a pencil tool. This method can be used to remove longer transient noises that are not detected by a noise-reduction program. Figures 14.11 and 14.12 show a portion of a waveform, both with a transient noise and after the transient noise has been removed with the pencil tool.
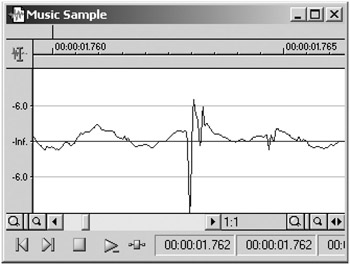
Figure 14.11: Waveform zoomed-in to show a transient noise.
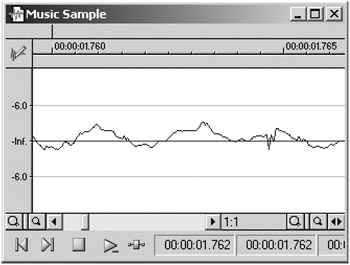
Figure 14.12: Same waveform after the pencil tool was used to remove the noise.
Help Distortion
Digital distortion, or clipping, is caused when an audio signal exceeds the upper limit of the digital range. The result is a very harsh , brittle sound. Figure 14.13 shows the waveform of some clipped audio.
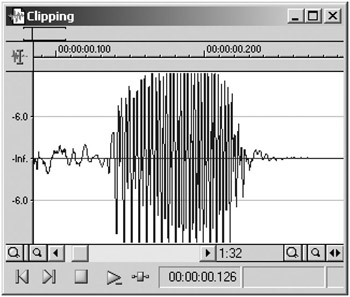
Figure 14.13: Waveform showing clipped audio.
The waveform display is adjusted so that the upper and lower edges correspond to the maximum signal that can be recorded digitally. Notice the clipped parts of the waveform that appear to be cut off evenly. The scale on the waveform is given in decibels of attenuation . The center line is labeled inf for infinite attenuation or no audio signal; the outer edges correspond to zero attenuation or the maximum signal level.
Although audio can never be restored after it is clipped, the sound can be processed so it is less distracting. You can select a clipped portion and lower the level, and then apply shelf equalization to the upper frequencies. You can also apply a clipped peak-restoration process that uses an algorithm that generates an approximation of the original sound, as in Figure 14.14.
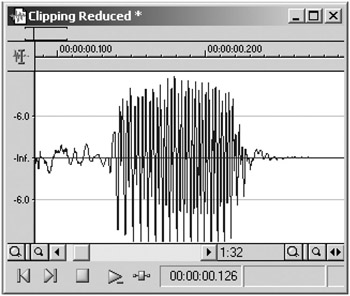
Figure 14.14: Same waveform after a restoration process is used.
If only a few peaks of the waveform are affected, you could also redraw the sections with the pencil tool.
Cut, Copy, and Paste Operations
DAWs provide the same basic tools that you will find on most computer programs. In digital form, sound can be manipulated just like any other data with cut, copy, and paste operations. For example, you can clean up a pop or remove a dog bark by simply selecting the sound and deleting it. You can also replace a sound by copying another sound over it.
After copying a sound onto the clipboard, you typically have two ways to paste it into another section of the track. You can place the cursor at a point where you want to add the sound, and click a paste operation, and the track will open up and add the clip. For example, you could paste brown after quick in The quick fox", and get The quick brown fox. You can also paste using overwrite or replace commands. When choosing this method, the sound replaces the sound after the cursor, but does not change the overall length of the file. For example, using replace to paste brown after The, would change The quick fox to The brown fox.
When working with audio in a video file, you must be careful how you use cut-and-paste operations because these functions change the length of the audio track. If you paste five seconds of audio in the middle of a video file, then all of the audio will be five seconds out of synchronization from that point to the end. Therefore, to maintain sync, you can only use copy -and-replace operations. To remove a section, you must replace it with something else. This is also the case when working with music in a multitrack program.
One way to remove a sound is to use a mute or silence function. Select the portion of the waveform that you want to remove, and click a mute operation. The portion isn t removed, it is silenced. The method that professional sound editors and designers use for muting sound is to replace it with room tone . Often when muting a track you will hear the sound go dead, which sounds unnatural . This is because every room or space, no matter how quiet it is, has a characteristic sound. You may not notice the sound because your perception tunes out continuous background noise. However, you do notice it when it disappears momentarily. To transparently mute a section, you can copy a quiet portion (the room tone) from another part of the track and paste it, using a replace operation, over the section. During production, you can also record a minute of room tone, which you can then use in postproduction. Figures 14.15, 14.16, and 14.17 show a short sound in a video track, and the waveform after the sound was replaced with room tone and by muting. Replacing the sound with room tone creates a continuous waveform that sounds less jarring.
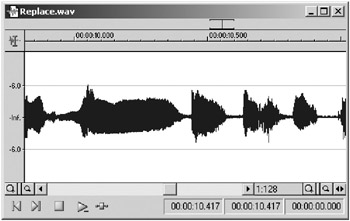
Figure 14.15: Original waveform of a voice track.
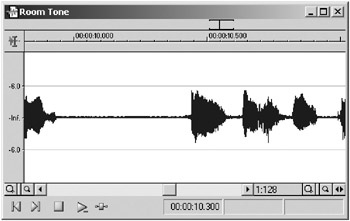
Figure 14.16: Same waveform after a portion was replaced with room tone.
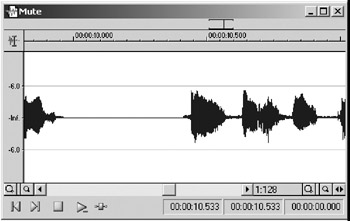
Figure 14.17: Same waveform with a portion muted or silenced.
Change Audio Volume Levels
The volume levels in a file can be changed either manually or through a process that modifies levels by using an algorithm. DAWs typically provide three functions:
-
Manual volume adjustment. You simply use a slider to enter a value (number of decibels), and the program adds or subtracts that number from all samples in the waveform. Keep in mind that it is possible to subtract so much from the wave that sound data is actually deleted, or add so much that the sound becomes clipped. For this reason, percentages are often used.
-
Normalizing. This is a three-step process in which the audio data is first searched for the highest value. Next, the difference between that point and the highest possible point (zero attenuation) is calculated, and then the difference is added to all the samples. Normalizing raises the audio level of a file evenly, so the highest point in the file is as high as possible before clipping. The problem with this method is that the highest point can be a very loud transient sound, such as a pop. Therefore, normalizing cannot be counted on for evening out levels.
-
Dynamic level adjustment. Levels are adjusted automatically based on the settings that you enter and the actual audio level at any point in time, which makes it a dynamic process. There are many variations of dynamic processors, and as many different ways to configure them. However, they all have the following types of controls in common:
-
Input and output. Because these processors change audio levels, they typically provide controls for adjusting the amount of signal entering and leaving the device or program.
-
Threshold. The most necessary control on a dynamic processor is the threshold setting, which determines at what volume level the processor starts working.
-
Ratio. The amount of change the processor will perform on signals that cross the threshold.
-
Attack time. How long it takes before the processor reacts to a signal crossing the threshold.
-
Release. After a signal falls below the threshold, the amount of time the processor takes to return the level to the point where it was before it started changing the level.
-
With the common controls in mind, the following list describes the most common dynamic audio-level processors:
-
Compressor. Not to be confused with the compression applied by a codec, an audio compressor reduces the dynamics of audio content: quiet parts are less quiet, loud parts less loud. Compressors are used to even out audio content, so levels are flatter and more consistent. When the audio level rises above the threshold, the output audio is reduced based on the compression ratio. For example, if a compressor has a 3:1 ratio, a 3-dB increase in input above the threshold produces a 1-dB increase in output.
-
Expander. Increases the dynamics of audio content: quiet parts can become quieter and loud parts louder. If audio content seems too compressed, an expander can bring out more dynamics. Some noise-reduction technologies, such as Dolby, use a proprietary compressor/expander (compander) system, in which content is heavily compressed during recording and then expanded during playback, resulting in a lowering of internal noise. When the audio level crosses the threshold, the output audio is increased, based on the expansion ratio. For example, with a 1:3 ratio, a 1-dB increase in input produces a 3-dB increase in output.
-
Limiter. Restricts the audio level from going too high over the threshold point. Limiters are used to help prevent distortion. A limiter works the same as a compressor with a very high compression ratio. For example, a limiter might have an Inf:1 (infinity to 1) ratio, in which any signal over the threshold produces only a 1-dB increase in output.
-
Frequency-based dynamic processor. Confines compression or expansion to a band of frequencies. For example, if one band of frequencies has more dynamics than the rest of the sound, you can tune one of these processors to reduce the dynamics only in that band of frequencies. One example of this type of processor is a de-esser, which is tuned to reduce sibilant speech sounds, like s and t sounds. If a full-band compressor were used instead, the level of all audio would be reduced with the sibilance, so the sound would not be as natural.
-
Automatic gain control. Maintains a consistent audio level. Automatic gain controls are included in consumer camcorders, for example, to keep levels consistent so that the consumer does not need to worry about audio levels. You can create your own automatic gain processor by chaining two compressors or using a compressor that enables you to enter multiple compression settings. Set one compressor with a low compression ratio and threshold. Set the second compressor to work as a limiter. Then, increase the input gain or lower the threshold so that the audio signal is always above the threshold and is therefore always compressed. You can adjust the release control to minimize the pumping effect you will hear as the level changes.
Processing the Audio
As you play back an audio file, listen for problems with the technical quality, such as transient sounds like clicks, pops, and paper rustling; long background sounds like air conditioning and traffic; and recording problems like distortion and volume levels. You should also consider the overall tone of the sound. If a person was recorded using a lavalier microphone that was buried under their clothing, the sound might be muffled. If the microphone was too far away from a source, the sound might include a lot of room sounds like reverberation, and not seem as present .
To describe how you might approach cleaning up a track, we will use a fictitious video recording (Speaker.avi) as an example.
-
Open Speaker.avi in the audio workstation. Except for providing a video preview window, most DAWs are designed to work with audio only. Therefore, it is often easier to work with the audio by itself, primarily because every time you save audio changes in the file, you also have to resave the video, which can take a great deal of time.
-
Save the file as Speaker.wav, to save the audio by itself in a new file.
-
Play the audio and identify quality problems. Figure 14.18 shows the entire waveform of the track.
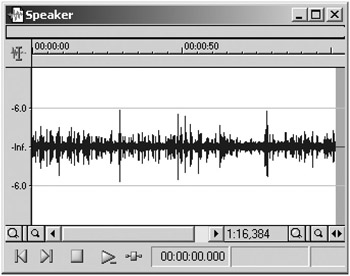
Figure 14.18: Sample waveform of a track from a video.We decide to perform the following fixes:
-
Reduce the background noise.
-
Add clarity and presence to the voice.
-
Remove a few distracting pops.
-
Compress the sound to reduce the dynamics and bring the overall level of the file up. This is sometimes referred to as maximizing the audio. If you will be editing the file in a multitrack or editing program, you can wait until that point to add compression and maximize the audio level.
-
-
Use EQ to reduce noise. Open the parametric equalizer and reduce as much noise as possible without affecting the voice. For example, remove low-frequency air-conditioning rumble, but stop before removing the rich dulcet tones of the speaker.
-
Use EQ to add clarity. During the recording of the fictitious file, the camcorder microphone was 10 feet or more from the source, so you can boost the band of frequencies around 6 kHz a few dB to bring some sibilance back to the voice. We also tune the equalizer to prevent adding more air-conditioning noise. Process the file with the EQ settings.
-
Noise reduction. Select a short section of room tone that contains no voice, open the noise reduction plug-in, and create a noise profile. Preview the track with the profile, and adjust parameters to balance the noise reduction effect against the artifacts that are produced. Then, process the file. It often sounds more natural to leave a little noise to mask the artifacts. By applying EQ first in Step 4, the noise reduction plug-in does not have to process as much, so the sound is often cleaner.
-
Remove pops and transient sounds. Figures 14.19 and 14.20 show a pop that was replaced with room tone using a copy-and-replace paste operation.
Remember to not add or delete data, or the synchronization with the video will be thrown off.
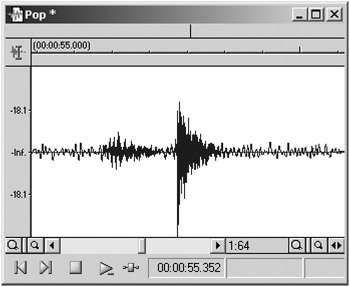
Figure 14.19: Original waveform showing a pop.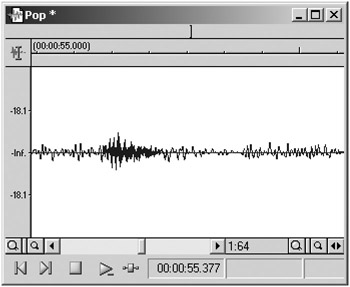
Figure 14.20: Same waveform after the pop was replaced with room tone. -
Compress and limit the audio. Use a plug-in that provides both compressor and limiter functions. First, bypass the limiter and adjust the threshold on the compressor so that it is below the louder portions of the audio track, but higher than the noise. With this setting, the processor should compress only the speech. The best way to properly configure a compressor is by adjusting and listening. You can use the meters and preset values as a starting point, but for the best sound, you must trust your ears. If you are not sure that your ears can be trusted, get a second opinion. Figure 14.21 shows the settings on a compressor plug-in.
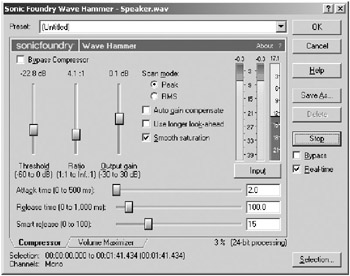
Figure 14.21: Typical audio compressor plug-in.Notice the three, vertical audio meters on the right. The first two meters show either input or output stereo audio levels. The meter on the right appears to be upside down because it moves from the top down. This meter shows gain reduction : the amount of gain that is being reduced over the threshold.
After the compressor is configured, set the limiter threshold so that gain reduction occurs just before the signal reaches the point of clipping. Preview the audio to make sure that the level is as loud as possible without distorting or sounding too compressed. Adjust the input and release on the compressor so the sound is smooth.
Figure 14.22 shows Speaker.wav after it has been compressed and limited. Notice how the dynamics have been evened out and the gain has been maximized without being distorted. Compare this with the original track in Figure 14.18. You may decide that this amount of compression sounds too heavy. This is where the art of sound design comes in.
Figure 14.22: Waveform of the video track in Figure 14.18 after compression is applied. -
Save Speaker.wav and open an editing program, such as Vegas Video 4 or Adobe Premiere. Add Speaker.avi and Speaker.wav to tracks on the timeline, making sure that both start at the zero point, as in Figure 14.23. Then, delete the original audio track in the video file, and save a new video file, retaining the same audio and video settings. Alternatively, you can use a group function instead of saving a new video file, if such a function is available. By grouping the new audio track with the original video, you lock the two files in sync. Then you can edit and move the file and the clips made from the file without losing sync and without having to create an intermediate video file.
Figure 14.23: Video-editor timeline showing the original video track synchronized with the processed track.
In the next stage, you will work with Speaker.avi and other files in the editor to create a final edited and processed file.
Postproduction
After you have cleaned up the audio and re-synchronized it with the video, you can begin editing. Keep in mind that most often you will not need to clean the audio tracks prior to editing if they were recorded well. You can usually open the raw files directly in the editor.
Unlike the previous stage, the editing stage is not all about optimizing technical quality. In fact, almost all energy is spent on the creative aspect, and any further optimization is left until after the edit is finished. At that point in professional production, a sound designer or sound editor is brought in to finish the audio, and a colorist and digital effects editor are brought in to finish the video. In the process of finishing the production, they add elements and smooth out transitions to create a final product that is consistent and free of distracting problems. In audio postproduction, the audio tracks are mixed, and effects and processors are added to create a consistent experience for listeners.
Identifying the Problems
Because our focus is on technical quality, we will bypass the creative part of the postproduction process, and concentrate on optimization steps after the edit has been made. During an edit, the editor is concerned with telling a story, and selecting shots and audio elements that engage and entertain the audience. Likewise, in music production, the producer and musicians are initially concerned with performance and just getting the music on tape (or hard disk). During the creative part of the process, editors, producers , and musicians focus on the artistic aspect of their products and save the final stages of postproduction for mixing and cleaning up the content so that the technical aspect is transparent.
When creating audio and video elements for a game, the process can be different. Instead of editing one final video or mixing a number of finished music files, a game may require hundreds of audio files and various unedited video files. Where a multitrack or editing program is used to create one linear experience, with a game many individual elements are integrated to create one nonlinear game experience. In a sense, the game environment can be thought of as an editing or multitrack program in which the user creates the final mix or edit. Therefore, when creating elements for a game, you often need to design the elements to be combined and layered in a number of ways.
The raw edited video and unmixed audio may contain many rough spots and distractions. As you play the content at this point, you can note the areas that will need to be cleaned to optimize technical quality. One could run into any number of potential problems at this point, many of which are related to an editor or producer who decided to wait until later to resolve a problem. During the process of editing, most creative people choose to focus on high-level decisions and not become bogged down with detailed clean-up tasks.
Most audio problems were described in the previous section. However, there are many problems that can easily be solved when working with multiple tracks and mixing. Therefore, in addition to the techniques described previously, we will explore how to work with the following problems that arise at this point:
-
Uneven levels. Audio levels change from shot to shot. The mix of sounds is uneven .
-
Inconsistent sound quality. The tone or texture of sound changes from shot to shot. Layered sounds do not blend.
-
Audible cuts. Audio levels and quality jump on transitions, especially cuts.
By using a quality editing program, you can handle many video problems automatically during the edit process. Problems such as glitches and unwanted content can be remedied simply by using different shots or cutting around problem areas. For example, if the audio is important in a shot but you cannot use the video because it contains a distraction, you can insert different video at that point but let the audio continue.
Transitions and effects can also be used as a last resort to mask problems. For example, you could use a color or texture effect to cover a white balance problem. Also, if you need to edit out a portion of a continuous shot, but you have no other shot to which you can cut, you can use a dissolve transition to edit the two pieces together. For example, suppose the shot is a presenter giving a long speech and you edit out twenty seconds in the middle because the presenter lost his notes. When you join the two segments together, the cut, known as a jump cut , will appear jarring. If you have no other shot with which to cover up the cut, you can apply a dissolve transition at that point, which appears less abrupt.
There are as many creative ways to edit around problems as there are technical problems. After an edit has been finalized, you can improve the overall technical quality of a video by using effects plug-ins in editors to create a polished, final look. When using plug-ins, the focus is on consistency and matching, so that the look of the video matches from one edited clip to the next, and the overall look is consistent with the artistic vision. In a game environment, plug-ins and processors can be used to match one video element to another, and to the graphic design of the game. The objective of consistency, again, is to make the technical quality transparent, so that the audience only sees the artistic quality. For example, a shift of sharpness from cut to cut would create an inconsistency that might distract the audience from the intended focus of the piece.
Technical quality optimization at this point in postproduction focuses on the following two properties of edited video:
-
Color balance. The color and luminance of images are consistent.
-
Texture balance. The sharpness, detail, and resolution, grain or background noise of images are consistent.
Exploring the Audio Tools
After the initial edit, audio cleanup can be performed on the same editing program or a multitrack program that was designed for detailed audio work. There are also a number of programs that include both a video editor and a multitrack program. To help illustrate concepts, we will use Vegas Video from Sonic Foundry. However, the editing programs Adobe Premiere and Avid Xpress DV offer similar features. There are also a number of multitrack programs and systems that enable you to work with audio synchronized with video, including Syntrillium s Cool Edit Pro and Steinberg s Nuendo.
Most multitrack programs include the following methods or tools to help you work with uneven levels, inconsistent sound quality, and audible cuts:
-
Audio editing and positioning
-
Plug-ins
-
Volume graph
Audio Editing and Positioning
As with audio workstations, you have the same level of editorial control over content in a multitrack program. The difference is in the level of detail. With a DAW, you typically work with individual files down to the detail of redrawing portions of the waveform. With a multitrack program, you work with a number of files, layering the audio vertically in tracks, and editing the files into clips and arranging them horizontally in time. You can also apply transition effects, such as dissolves .
With the flexibility provided by a multitrack, you can fix or mask the problem of audible cuts and inconsistent sound quality in a number of ways, including the following:
-
Adding a background track. Often an audible bump on a cut or some other inconsistency in sound can be masked by layering background sound on another track. The background should also be consistent with the artistic vision. For example, you can add a background of a large noisy crowd and traffic over a scene that was shot on a busy street. However, the same background would not be appropriate for a speaker giving a technical seminar in a meeting room. If you need to mask inconsistent audio in this type of video, you can add a track of room tone. Figure 14.24 shows a background track containing room tone layered over an edited voice track.
Figure 14.24: Background audio track layered with an edited voice track. -
Replacing audio. If the quality of an audio track is inadequate, a multitrack program will enable you to replace a clip or insert a completely new file. All you have to do is select the part that you want to remove and click Delete. Then, drag the new clip to the same position on a different track. You can also select the region and record directly over the clip. For example, if you need to replace a portion of a narration clip, you can bring the narrator into a studio and rerecord the section directly to the edited video. If you must replace sync sound (sound that is synchronized with the video), you can use the automatic dialog replacement (ADR) method available on a number of multitrack programs. With ADR, an actor or narrator synchronizes their reading with the person speaking in the video.
-
Overlap transitions. If the sound does not match across a transition, such as a cut, and you are working with the original edit session, you can overlap the audio and create a smoother transition. To overlap the audio, move the audio on the incoming clip to another track. Then lengthen the audio on the end of the outgoing clip and the beginning of the incoming clip, as in Figure 14.25.
Figure 14.25: Using a multitrack program to overlap audio segments.
Add a fade-in to the incoming piece and a fade-out to the outgoing piece with the volume graph if necessary (see the following volume graph section). By working with the overlapping pieces and the fades, you can often smooth out a harsh transition.
Plug-Ins
Many of the same types of processor and effects plug-ins that you use in an audio workstation are available in a multitrack plug-in. The difference is that a multitrack plug-in must provide real-time processing. In an audio workstation, you preview a portion of the audio with the plug-in and then run the process, which modifies the file. In a multitrack plug-in, on the other hand, you do not modify the data in the original file, but render a final file that includes the video and audio, and all the edits, settings, and processes.
As you work with an edit session, the plug-ins must process the audio in real time, and if you have applied a number of video and audio plug-ins, as well as transitions and a large number of edits, the computer must have enough memory and CPU speed to handle a large number of calculations. For this reason, not all processors are available for multitrack editing. Also, plug-ins are often applied to an entire track. For example, if you only want to add compression to one clip, you can either process the clip in a DAW or move the clip to a new track by itself, and then apply compression to the track.
However, by working with tracks and other multitrack features, such as volume graphs, you can use plug-ins to make the sound consistent throughout. For example, you can move all clips that have the same sound problem to the same track, and apply a parametric equalizer or noise reduction. You can apply a compressor plug-in to a narration track to reduce the dynamic range, so that it mixes better with a music track. Many multitrack programs enable you to chain plug-ins and effects, so you can add compression, equalization, and noise reduction at once to a single track. Many multitrack programs also enable you to route the virtual audio signal in a number of ways, so you can, for example, group several tracks and then apply an effect to all of them at the same time. You can also route the entire audio signal through a plug-in, so you can, for example, apply a limiter to prevent distortion of the final mix.
Volume Graph
You can adjust the volume of a track manually with a volume slider, but this will affect the entire track. Most multitrack programs provide volume and other types of graphs with which you can modify properties of the audio over time. With a volume graph, you can draw the volume curve of the tracks. For example, you can add a volume graph to a music track, and draw a curve that gradually lowers the volume when the narration comes in and returns the music to full volume between narration clips. A volume graph can be used to even out inconsistent audio levels and match levels on transitions. You can also duck or reduce unwanted audio. For example, if the narrator shuffles papers between sections, you can simply fade out the track at that point.
Multitrack programs also use graphs to enable you to modify stereo positioning of a sound and to vary plug-in parameters dynamically. For example, you could automate equalizer settings or change the amount of reverberation that is applied to a track depending on how close an actor is to the camera. Graphs can also be available for video, and enable you to automate color property settings. Figure 14.26 shows a volume graph added to overlapped tracks.
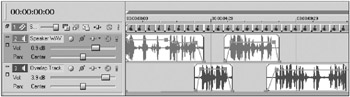
Figure 14.26: Volume graph added to overlapped audio in a multitrack program.
Exploring the Video Tools
In professional video production, a colorist is responsible for the look of an image. As data, image properties can be modified in many ways from simply tweaking the overall tint of a shot to changing properties of individual colors. Color-correction functionality is available as proprietary hardware systems and in programs that run on personal computers. Hardware systems, such as those from daVinci, are designed for use in high-end film-to-video transfer facilities called telecines . Much of the same functionality is available in plug-ins used in computer-based video-editing programs.
Color-correction programs and plug-ins enable you to perform the following types of processing on video:
-
Hue and saturation. Typically, a joystick style control is used to modify the overall hue or tint, and the saturation or amount of chrominance in a video image. As you move the control in a circle, the hue of the image changes gradually from red to green to blue and all the color values in between. As you move the control from the center to the edge of the circle, the saturation increases. For example, to make no change, you place the control in the center of the circle; to add a reddish tint, you would move the control toward the red part of the circle. Figure 14.27 shows a color-correction plug-in.
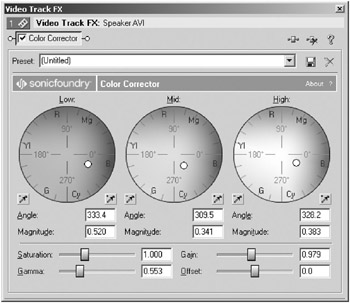
Figure 14.27: Color-correction plug-in. -
Overall luminance. Typically, a centered slider control enables you to add or subtract luminance, which is the non-color intensity of an image, similar to a brightness control.
-
Gamma. With no gamma correction, luminance values change linearly from dark to light. By adjusting gamma, you change the linearity of luminance. If an image was very flat and washed-out, for example, you could adjust the gamma to increase the contrast. On the other hand, you could increase gamma to bring out detail in the grayscale of an image that had too much contrast.
-
Luminance ranges. An advanced color-correction control divides image luminance properties into high, middle, and low ranges, and enables you to adjust hue, saturation, and gamma in each range. For example, you could make the bright areas of an image redder, and the dark areas bluer.
-
RGB control. Typically, three slider controls are used to control red, green, and blue separately. With each slider centered, no change is made. To add a reddish tint, you move the red slider toward a positive value. An RGB control provides a less-intuitive method of color correction, but essentially does the same thing as the hue and saturation, and luminance controls.
The original intent of color correction was to provide a technical quality function. However, the controls are often used creatively to design very stylized images. Many of the other effects plug-ins are used solely for creative purposes, such as those that change the shape of an image or overlay scratches to give video the look of old film. One plug-in that can often be used to improve technical quality is a sharpness or detail enhancer plug-in, which is used to sharpen soft edges. There are also plug-ins that blur edges in an image; you could use such a plug-in to soften a very detailed, but noisy, image.
One important feature of a color-correction system is scene-by-scene correction. If the same color-correction setting was applied to every clip on a track, you would not be able to match quality from one shot to the next, so the system would be limited in its utility. By using scene-by-scene correction, you can adjust all color parameters individually for each shot. For example, if you cut from a dark, bluish shot to a bright, yellowish shot and you want them to match, you can correct each shot separately. Start by correcting one shot to your artistic standard. It could be the first shot in the timeline or another shot that is significant in some way. Then use that shot as the standard to which you match all the other shots.
You should also make sure that the artistic standard you have created will work with the limitations and standards imposed by your medium. If you are delivering your edited file on a CD-ROM with a game, for example, your primary concern may be the bit rate and size of the file. You could create a stunningly beautiful video that takes up more space on the CD than the game and requires so much CPU time and memory that the game cannot run.
To help you with video and saturation levels, you can use two types of displays: the waveform monitor and the vectorscope . These displays are available as hardware that connect directly to an analog video signal. A number of video editors provide software versions of the displays that you can use to see if your video is exceeding any limits.
Waveform Monitor
Figure 14.28 shows a software waveform monitor display.
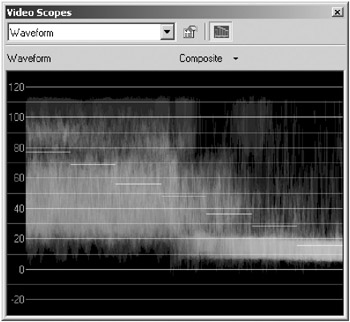
Figure 14.28: Software video waveform monitor display.
The waveform displays video frames on a graph with the vertical axis representing video gain or intensity; brighter objects appear higher on the vertical scale. A totally white frame would display as a straight horizontal line at 100%. Video that exceeds 100% will be distorted or clipped (white). If NTSC broadcast video exceeds 100%, video modulation can actually interfere with the audio signal. As you play back your video on a waveform, notice whether your video levels are too high and occasionally clipping, or too low. If they are too low, you will lose detail in the black areas of the image.
Vectorscope
Figure 14.29 shows a software vectorscope display.
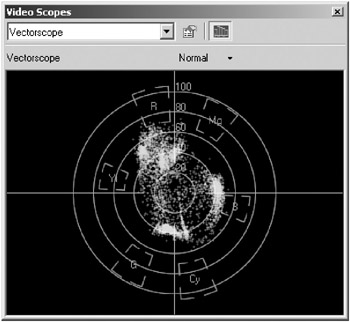
Figure 14.29: Software video vectorscope display.
Note the similarity of the video vectorscope display to the color-correction controls. A vectorscope displays the colors of a video image. The more saturated a color is, the further away it is from the center; the hue of a color is displayed on an angle of the circle. A black-and-white signal displays as a dot in the center; a true red color displays as a dot somewhere on the radius intersecting with the red point on the outer circle. As data, color saturation cannot exceed the limit of the outer circle.
After the edit is finished, and plug-ins and graphs have been applied, and after the audio is edited where necessary to create a consistent look and sound, a final audio or video file is rendered with the editor or multitrack program. In the final stage of a production, the file can go through one last quality-control stage before it is distributed.
Mastering
In general, mastering is the stage in the process of content creation when the final digital media is transferred to the medium that will be distributed to users. If it is to be streamed over a network, the file is simply copied to a media server and the URL announced to viewers . If it is part of a game, it is burned on a CD or DVD with all the other game components. If it is music destined for CD distribution, a master CD is created from the individual music tracks, and the master is used to manufacture multiple CDs, which can then enter the retail chain.
At some point then, the final edited and mixed file is converted or copied to the distribution media. This process can provide one last opportunity to optimize technical quality.
Identifying the Problems
Most often, the optimization is mandated by the limitations of the medium and the methods available to the user for playback, for example, the size of the CD and the quality of consumer sound systems. It is rare that a producer does not know early in the production process what their distribution limitations are. However, it is less rare that producers understand the limitations and take steps to optimize quality all the way through production with those limitations in mind. A good example of this problem often occurs when creating video content destined for streaming on the Internet. For video content to look its best streaming at 56 Kbps, for example, shots with fast motion that involve large portions of the frame should be minimized. Therefore, to optimize quality for low-bit-rate streaming, producers should avoid excessive and unnecessary camera movement. Streaming media codecs are improving, as well as the speed of end-user connections; nevertheless, producers can achieve the best possible quality by considering the limitations of their distribution medium throughout production.
When creating sound for games , the producer must also consider how technical quality matches from one file to the next. Often the files are recorded at different times and in different studios . Not only will the audio levels vary, but the sound quality of the files might also be different.
As you begin the process, you should plan to do test conversions or previews of the final product. For example, you should view the final, encoded streaming-media file before publishing it to the media server. If the preview does not pass your inspection, you can try different settings in the conversion tool, such as the encoder or mastering program, to improve quality. You can also process the audio or video in the file, so that the converter can do a better job.
Exploring the Tools
The conversion tools used to create distributable digital media do not inherently provide features for optimizing technical quality. Most products start with the assumption that this has already been done. Programs such as Cleaner Pro from Discreet Logic and Flip-Factory from Telestream encode content into a number of streaming media files and then publish the files to media servers. A conversion product might include an optimizing tool such as a simple compressor or normalizer to even out audio levels. However, the tools available in a conversion tool are often no better than those found in your audio workstation, multitrack program, and video editor. You may find that the best solution for preparing your digital media is to open the final audio or video file in the production tool that you have been using. To save a processing step, you can go back to your original multitrack program or editing session, make optimization changes, and then render new final files. If the files are part of a game, play the files together in the context of the game or simulate game playback by playing the files in a multitrack editor.
The following list describes the types of adjustments that you will most likely make at this stage:
-
Audio volume. There are typically two reasons to adjust audio levels: to match and to maximize. The level of one file should match that of the others, especially on a CD or in a game, but also on a media server. The levels should also be maximized, so that they play back with the maximum level while maintaining an appropriate amount of dynamic range. The end user should be able to switch between files or cuts, and not have to adjust the volume control. The best way to match and maximize levels is to process files through a compressor/limiter. The WaveHammer plug-in shown in Figure 14.21 and the L2 Ultramaximizer from Waves are examples of tools designed to be all-in-one programs for reducing dynamic range, maximizing the level, and preventing distortion. If you create many streaming-media files, you can define one setting that can be used with all files.
-
Audio quality. Often, overall quality mismatches can be remedied by carefully applying equalization. Assuming that the quality differences are not too extreme, you can select a standard sound, such as a particular music cut, and then use a graphic equalizer to adjust the equalization curve if necessary for the other cuts. For example, you might increase the lower frequencies and notch the file a bit at 6,000 Hz. With this type of overall equalization, you will typically apply no more than 6 dB of EQ. If a track needs more EQ help, you should consider remixing the original session.
-
Color correction. As with audio-quality modification, the amount of color correction at this point should be minimal and applied to the file overall. For example, you may find that adjusting the overall gamma slightly produces video that looks better and brings out more apparent detail after it has been encoded for streaming.
Summary
If you have optimized technical quality throughout your production process, the final product will allow the creative quality of your content to emerge, free from distractions. The technical quality should provide a transparent window through which the audience can fully experience your game, story, message, performance, or artistic statement.
EAN: 2147483647
Pages: 120
- Chapter VII Objective and Perceived Complexity and Their Impacts on Internet Communication
- Chapter IX Extrinsic Plus Intrinsic Human Factors Influencing the Web Usage
- Chapter X Converting Browsers to Buyers: Key Considerations in Designing Business-to-Consumer Web Sites
- Chapter XII Web Design and E-Commerce
- Chapter XVI Turning Web Surfers into Loyal Customers: Cognitive Lock-In Through Interface Design and Web Site Usability