Setting and Testing Effects
Back in the Rumpus tool, in the Add or Edit Sound dialog box, click the Sound File button and select the ![]() Cannon.wav sound file, leaving all the other parameters unchanged. The cannon sound will begin playing immediately. Click OK to go back to the main dialog box, and then click Play. What you ll hear is a basic cannon sound going off every few seconds.
Cannon.wav sound file, leaving all the other parameters unchanged. The cannon sound will begin playing immediately. Click OK to go back to the main dialog box, and then click Play. What you ll hear is a basic cannon sound going off every few seconds.
Now, click the Select radio button for sound 2, and, in the Add or Edit Sound dialog box, load the ![]() Cannon.wav sound file in again, except this time, give it a start time of 1.5 seconds. Click OK, and then click Play in the main dialog box. You will now hear the sounds of two cannons. Alternatively, you can load the
Cannon.wav sound file in again, except this time, give it a start time of 1.5 seconds. Click OK, and then click Play in the main dialog box. You will now hear the sounds of two cannons. Alternatively, you can load the ![]() TwoCannons.rfx Rumpus file, which has two cannon sounds that do what you just did manually. Note that both cannons sound identical at this point. Now, we ll have some fun and apply special effects to the sound of the second cannon.
TwoCannons.rfx Rumpus file, which has two cannon sounds that do what you just did manually. Note that both cannons sound identical at this point. Now, we ll have some fun and apply special effects to the sound of the second cannon.
Although you can turn on one, any, or all of the special effects, start with one effect at a time. To turn on a special effect, simply click its name in the Add or Edit Sound dialog box so that the word takes on a blue background. To turn it off, click the effect name again. Since the second of the two cannon sounds is still selected in the main dialog box, click the Distortion effect in the Add or Edit Sound dialog box so that the name turns blue. Now click OK.
If you look at the Special Effects column in the main Rumpus dialog box, you ll see the letter D in the slot for the second cannon sound, which notes that you added the distortion effect to this sound. Each effect has its own single letter code; if multiple effects are applied, then all the relevant letters appear in the Special Effects column. The letters are listed in the Special Effects group box (see Figure 4.1) in the Add or Edit Sound dialog box.
Click Play in the Rumpus dialog box, and note the marked effect that distortion has on this cannon sound.
Now repeat the procedure, but set the Flanger special effect on one of the cannon sounds. Try it again, setting both the Flanger and Distortion effects on one of the sounds. Try the Chorus, Echo and Gargle effects too. Gargle is a bit of an odd effect, and has not always attracted favorable reviews.
The next chapter discusses the audio background of each special effect, and shows how to alter the parameters to achieve just the right effect that you want. If you click on the Settings button (in the Special Effects group box in the Add or Edit Sound dialog box), you will note that you can change a range of parameters for each of the eight special effects (see Figure 4.2). However, remember that you have to click the item in the Special Effects list box to turn that effect on or off. Note also that when you save a Rumpus file, all of the settings are recorded, regardless of whether they are set to on or off. This means that if you temporarily want to turn off, for example, the Distortion effect, all of your hard work spent getting the parameters just right is not lost.
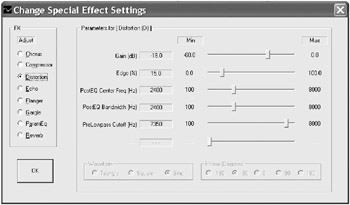
Figure 4.2: Special effects settings for the Distortion effect.
The ninth special effect, environmental reverb, is somewhat different from the other eight effects. If you click on the Environment button, the Environmental Reverb dialog box appears (see Figure 4.3), and you can select from a whole range of preset environments “ from small enclosed spaces to great arenas, both man-made and natural. Probably the most humorous reverb effect is the Sewer Pipe, and other commonly used game environments include the Cave, the Hangar, and the Stone Corridor.
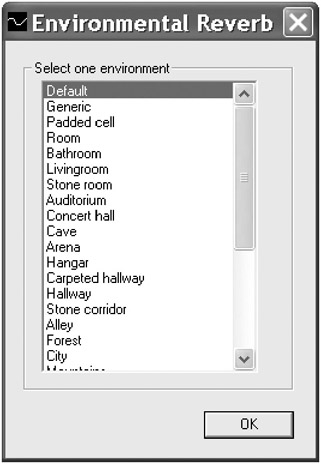
Figure 4.3: Environmental Reverb dialog box.
One of the main differences between the environmental reverb effect and the other special effects is that you need to create two buffers containing each wave file that you wish to process. The first buffer will be untouched by the environmental reverb effect (and so provides the main dry sound), while the second buffer will have the effect applied. This is perhaps less than ideal, and is one reason that we recommend using the EAX environmental reverb effect discussed in Chapter 7. You might, however, want to experiment with sounds with only environmental effects applied, and no dry sound.
Now, load and play the Rumpus file named ![]() CannonInPipe.rfx . This example demonstrates the environmental reverb effect of a cannon going off in a sewer pipe (clearly an essential scenario for many of today s games ). Try deleting the sound without the effect applied (in slot 1), and just playing the wet sound with the environmental reverb effect. Then, load in the
CannonInPipe.rfx . This example demonstrates the environmental reverb effect of a cannon going off in a sewer pipe (clearly an essential scenario for many of today s games ). Try deleting the sound without the effect applied (in slot 1), and just playing the wet sound with the environmental reverb effect. Then, load in the ![]() CannonInPipe.rfx file again and try adding another effect, such as a distortion or flanger effect, to both the dry and wet cannon sounds, and playing them again. You can get a whole range of different cannon and explosive effects simply by playing with the distortion, flanger, and environmental reverb effects.
CannonInPipe.rfx file again and try adding another effect, such as a distortion or flanger effect, to both the dry and wet cannon sounds, and playing them again. You can get a whole range of different cannon and explosive effects simply by playing with the distortion, flanger, and environmental reverb effects.
Now, try adding an environmental effect to music. There are six preset environments designed especially for music, located at the end of the list in the Environmental Reverb dialog box, but all of the other environments can also be applied. Try playing music in various environments, for example, in an arena, in a hanger, and so on.
The Rumpus tool will help you create special-effect settings that work just right for your wave files. Along with the 3-D movement settings, we now have a useful tool working with a great deal of variable parameters. Time now to crack open the code.
EAN: 2147483647
Pages: 120