Implementing NAP
Let’s move on now and talk about how to implement NAP in an enterprise environment. Obviously, this is a big topic and we can’t do it justice in a brief book like this-plus Windows Server 2008 is only at Beta 3 at the time of writing this book, so some aspects of implementing NAP might still change. Still, the NAP platform is pretty far evolved at this point, and we can at least cover some of the important points for deploying it. So let’s look at three aspects in particular:
-
Choosing the NAP enforcement methods you want to use
-
Deploying your NAP solution using a phased implementation method
-
Configuring the NPS and other aspects of the NAP platform
Note that you’ll also find references to other available documentation on deploying NAP in the “Additional Resources” section at the end of this chapter.
Choosing Enforcement Methods
One choice you need to make when planning your NAP deployment is which enforcement method (or methods) to use. DHCP enforcement is probably the easiest solution to deploy, as it relies on modifying the IP routing table of NAP clients and makes no other changes to these clients. But being the easiest NAP solution to implement means DHCP is probably also the weakest NAP enforcement method. So if you’re going to use DHCP enforcement, you probably also want to couple this with another enforcement method, typically 802.1X or IPSec, in order to provide defense-in-depth protection for your network.
802.1X port-based enforcement is a good way of enhancing network protection for both wired and wireless networks within your enterprise, but it requires supporting hardware (802.1X-capable switches) and client computers that have 802.1X supplicant software. This supplicant software has been built into Microsoft Windows since Windows 2000, but it has gone through several updates and is best supported in Windows Vista. This method of NAP enforcement can provide strong network access control, as clients with valid authentication credentials will receive different VLAN identifiers based on their compliance with your network health requirements.
IPSec policies were difficult and sometimes confusing to configure and manage on previous versions of Windows, but in Windows Vista and Windows Server 2008, IPSec connection rules are easy to configure using the Windows Firewall With Advanced Security snap-in. Using IPSec as a NAP enforcement method requires that you set up a PKI infrastructure with an HRA for issuing health certificates to clients in quarantine, which means more planning and deployment overhead when implementing NAP. But because IPSec can be used to restrict communication with compliant clients on a per-IP address or per-port basis, IPSec is the strongest network access control method you can implement using NAP and can be considered a host protection scenario for deploying NAP. However, if you plan on implementing IPSec NAP enforcement, you need to implement IPSec across your entire corpnet because IPSec NAP doesn’t quarantine noncompliant clients on a restricted network. Instead, when a noncompliant client obtains physical access to corpnet, IPSec-enabled hosts on corpnet simply drop any traffic received from the client. So if you still have hosts on corpnet that are not IPSec-enabled, these hosts might be susceptible to malware infection from the noncompliant client. So basically, IPSec NAP is an all-or-nothing solution, so if you implement this as your enforcement solution you need to do it everywhere . Other NAP enforcement methods might require adding network infrastructure (such as a restricted network for quarantining noncompliant clients), but they don’t require making changes to hosts already on your corpnet.
Finally, VPN enforcement is obviously something you should consider deploying if your enterprise has mobile clients that need to remotely connect into corpnet. VPN enforcement provides strong limited network access for any computer trying to access your network using a VPN connection, and is therefore a good choice for implementing perimeter protection using NAP.
Phased Implementation
The best way to deploy the NAP platform in an enterprise is to do this in stages. Begin with a test implementation using an isolated test network so that you can learn how NAP works and test whether your hosts and network infrastructure can support it. Then try a pilot rollout, maybe by deploying NAP for users in your IT department. (They’re used to having headaches, so they won’t be too upset when they can’t RAS into corpnet Monday morning-well, maybe they will be upset, but they’re paid to solve such problems anyway.) Then, depending on the size of your enterprise, you can start rolling out NAP for different business units or in different locations.
Even when you’re deploying NAP, however, you have different options you can implement in terms of the level of enforcement you use. So rather than starting by configuring NAP to refuse network access to noncompliant clients, it’s better to follow a more measured approach like this:
-
Phase 1: Reporting only Implement NAP so that client access is logged in the Event logs on the NPS but no remediation or quarantining is performed. If you follow this approach at first, you can monitor how NAP is doing without users becoming frustrated over network access problems and without having to tie your remediation infrastructure together with NAP.
-
Phase 2: Reporting and remediation Once you’ve monitored NAP in reporting mode for a while and you’ve gained some understanding of the possible health states of NAP clients, you can now enable remediation in addition to reporting. During phase 2, clients that are noncompliant get automatically remediated (if they can be) but nonremediated clients are not prevented from accessing your network.
-
Phase 3: Delayed enforcement After you’re sure that autoremediation is working properly, bump NAP enforcement up a notch and implement delayed enforcement. What this does is allow unhealthy clients to still have access to the network but only for a predetermined period of time. For example, a client that is missing the latest security update would be allowed to connect to corpnet, but if after one week has elapsed the client still hasn’t downloaded and installed the update, the client is moved into quarantine and denied corpnet access until the client can be remediated.
-
Phase 4: Immediate enforcement Finally, once you’re ready (and your users are ready), you can remove the grace period and configure NAP to quarantine noncompliant clients immediately if NAP determines them to be unhealthy. Clients are remediated automatically whenever possible, and when for some reason this is not possible, the client remains in quarantine until it can be manually remediated. Phase 4 is the most secure NAP deployment you can do, but not every organization will need to go this far- you need to balance your security requirements against usability/manageability to determine whether Phase 4 is necessary or Phase 3 (or some earlier phase) might be enough to meet the needs of your business. In general, however, the more managed the environment, the more likely you’ll be to implement Phase 4 (or perhaps Phase 3 with a very short grace period).
Let’s find out more about implementing NAP by listening to another of our experts at Microsoft talk about it deploying it:
Deploying solutions that enforce policy compliance by restricting network access is a powerful tool for protecting the network. However, the time during which the deployment is taking place can also be intimidating because of the concern of unintentionally blocking network access. Appropriate deployment planning and execution can significantly reduce the risk of unintended network restrictions and greatly smooth the process of getting NAP deployed. A recommended process for planning and deploying NAP is the following one:
-
Plan an enforcement type.
-
Plan the health policy.
-
Deploy the NAP components.
-
Enable NAP in reporting mode.
-
Enable NAP in deferred enforcement mode.
-
Enable NAP in full enforcement mode.
A significant decision that needs to be made early in the NAP deployment planning is what type of access enforcement will be used. There are four enforcement types supported natively with NAP: Server and Domain Isolation using IPSec policies, 802.1x authentication, VPN remote access, and DHCP. Other options might be provided by NAP partners. The decision of which enforcement type to use depends on many factors, including what is currently in use in the network, the desired robustness of the enforcement, and cost of deployment and maintenance.
NAP depends on the administrator to define the health policy for the network. This commonly includes standards regarding antivirus measures, firewalls, patch management, and other items that are viewed as critical for protecting or managing the network. By defining the health requirements of the network, the administrator can then plan the software required to check for and enforce compliance with those standards using the NAP infrastructure. Once health policies are defined, administrators can ensure that the appropriate software and tools are deployed in advance of enabling NAP.
After the initial planning, the NAP components and servers need to be deployed. This deployment process includes installing and configuring the required Network Policy Servers, System Health Validators, and System Health Agents. This should be done while NAP policies are operating in reporting mode. When operating in this mode, the NAP health policies are in place and all clients connecting to the network are requested to participate in health checks. However, in reporting mode, regardless of compliance to the health policy, no access restriction is applied. The results of the health check are logged, but all clients are given full network access. This mode allows administrators to validate the operation of the NAP infrastructure, see the level of compliance with the health policies, and take steps to get the compliance rates to the desired levels, without causing any disruption to the end user. One of those steps is to enable automatic remediation of noncompliant clients to elevate compliance rates.
After compliance levels are at an acceptable level, the administrator can enable NAP deferred enforcement. In this operating mode, computer health is checked and noncom-pliant clients receive a notification that they are out of compliance. This allows for additional elevation of the compliance rates, introducing the operation of NAP to the end users, while giving noncompliant users time to address any lingering problems before network restrictions are applied. As with reporting mode, the results of the client health checks are logged and can be analyzed by the network administrator to verify client compliance rates and the operation of the NAP infrastructure.
The final step is to enable NAP in enforcement mode. This mode applies the defined access restrictions to clients that fail the health compliance check, protecting the network from clients that are unhealthy. As with the other modes, the results of the health check are logged for monitoring the NAP infrastructure operation. Automatic remediation can be applied to noncompliant machines to return them to a compliant state and restore full network access with as minimal impact to the user as possible.
–Kevin Rhodes
Lead Program Manager – Network Access Protection
One thing to consider when you’re deploying NAP is how to handle exceptions. A good example is when a contractor comes on site and has to connect to corpnet using her laptop to perform some task. Now in situations like this, you often can’t just let NAP take control of her computer and try and remediate it if the machine is not compliant. Why not? Well, first there’s the ownership issue-the contractor’s computer belongs to her, not the enterprise. Second, how can NAP remediate her machine if it’s running different AV software than you use in your enterprise? Or a different host-based firewall? Or a different operating system, like Linux?
What should you do in these types of situations? Let’s hear some insights concerning this issue from another of our experts:
It’s inevitable: as soon as you get NAP deployed in your organization someone way more important than you will demand an exception to the policy. Or perhaps you have some non–NAP capable machines on your network and you want a simple method for exempting them from the policy. Or maybe you have a vendor coming on site who needs network access for the afternoon. In any case, managing exceptions to your policy is a key part of a successful NAP deployment. Because NAP is built around RADIUS, you can build exception policies based around many types of attributes. The following are three common scenarios that occur frequently.
The first and most common scenario of all involves non–NAP capable computers. NAP policies can include a conditional statement about whether or not a machine is NAP capable. This provides a convenient method for allowing access to machines that are not NAP capable, while still enforcing health on those that are. For example, your policy set can be expressed as follows:
-
Healthy Full Access: Grant access when “Computer Health matches ‘Healthy’ AND Computer is NAP-capable.”
-
Not Healthy Restricted Access: Quarantine when “Computer Health matches ‘Not Healthy’ AND Computer is NAP-capable.”
-
Not NAP Capable Full Access: Grant access when “Computer is not NAP-capable.”
Because the Network Policy Server processes rules sequentially, any machines that are NAP capable will be judged against one of the first two rules, while any machines that are not NAP capable will fall back to the third rule. This exception method is a useful way to preserve interoperability with existing machines as you go through your NAP deployment.
The second scenario involves a machine that is NAP capable but that you want to exempt from policy. Using the NAP-capable Computers attribute would not help in this case because the machine would match one of the first two policies from the previous example. Instead of exempting based upon NAP capability, you can design a policy that exempts based upon group membership. These groups can include user and machine accounts, and complex rules can be built combining the two (for example, allow when user is in DOMAIN\Finance Users and machine is in DOMAIN\Finance Workstations). In the preceding example, you would want to list group-based policies first because these rules must be matched for the exemptions to be granted. If the group-based rules are not listed first, the match will occur within the original two Healthy / Not Healthy rules and the exemptions will never be triggered.
In the final example, what about the vendor who comes on site briefly and needs network access? In this case, the computer and user will not have group memberships to build rules around. If you’ve completed your NAP deployment or taken a more aggressive enforcement stance, you might not have the “Not NAP Capable” rule to fall back on either. In this case, a simple way to exempt a user on a short-term basis is by MAC address. A new rule could be created that utilizes the Calling Station ID RADIUS Client Property. This rule could be expressed as “Exempt by MAC Address: Grant access when Calling Station ID matches ‘0015B7A6F653’.” Once your rules are ordered properly, the visitor’s connection attempt will match this rule first and will gain network access based purely on its MAC address.
–John Morello
Senior Program Manager, Windows Server Division
Configuring the Network Policy Server
Let’s now look at configuring the NPS, which you’ll remember is the “heart and soul” of NAP. The discussion that follows is not meant to be a tutorial on how to do this. (You’ll find references to “Step by Step” guides for NAP under “Additional Resources” at the end of this chapter.) Instead, we’re just going to take a bird’s-eye view of the Network Policy Server MMC snap-in and see what’s there and how certain configuration tasks are performed. These screen shots were taken using a near-Beta 3 build, so they should be nearly accurate for Beta 3 and probably beyond also. They were also taken on a test NAP deployment that uses 802.1X for the NAP enforcement method.
Let’s start by opening Network Policy Server from Administrative Tools.
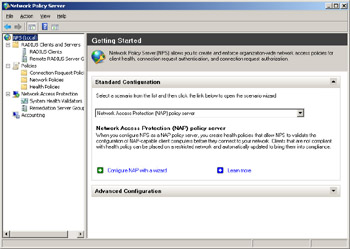
From the root node of the NAP console, you can configure NAP various ways. For example, by selecting Network Access Protection (NAP) policy server from the drop-down list, you can define health policies your NPS can use to check the health of clients when they try to access your network. Other options available include configuring a RADIUS server for dial-up or VPN connections, and configuring a RADIUS server for 802.1X wireless or wired connections.
Selecting the RADIUS Clients And Server node lets you configure RADIUS clients and remote RADIUS server groups. Your RADIUS clients will be your network access servers that perform NAP enforcement. Because we’re using 802.1X as the enforcement method for our test network, typical RADIUS clients might be 802.1X-compliant Ethernet switches or wireless access points.
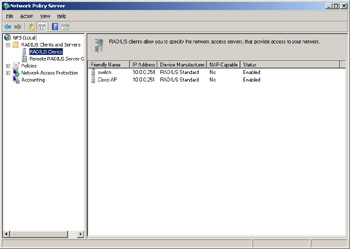
The Remote RADIUS Server Groups node lets you specify where to forward connection requests when the local NPS server is configured as a RADIUS proxy.
Selecting the Policies node lets you configure connection request policies, network policies, and health policies for your NAP deployment. Connection request policies (the first node) let you designate whether connection requests are handled locally or are forwarded to a remote RADIUS server for processing. Because we’re using 802.1X NAP enforcement, we also need to configure PEAP authentication as part of our connection request policy. Health policies (the third node) let you define the configuration required for NAP-capable clients to access the network. You deploy a health policy by configuring System Health Validators (SHVs), creating a health policy, and adding the policy to the Health Policies condition in network policy.
The Network Policies node (second node in the preceding figure) is where some key NAP configuration settings reside. Here is where you specify who will be authorized to connect to your network and also the conditions under which they can (or can’t) connect. In our test setup, we have three network policies defined: one for 802.1X clients that are compliant, another for clients that aren’t compliant, and a third for clients that are not NAP-capable.
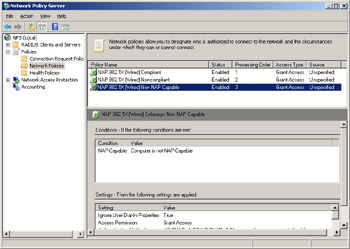
Let’s examine the properties of the first policy mentioned (the one for compliant clients) and see what settings can be configured here. Let’s double-click on this policy to open its properties.
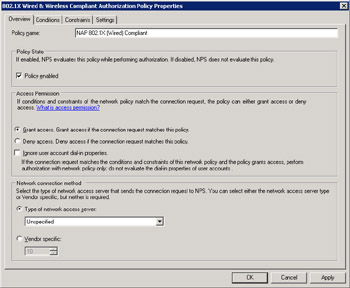
Notice that it’s here on the Overview tab that you can enable or disable your network access policy and specify whether clients that match this policy should be granted or denied access to your network. Note that this particular policy setting can be confusing. For example, when you think of “noncompliant” policy you might expect this to be “Deny Access” because you don’t want noncompliant computers accessing your network. But this is actually not the right place to do that-this should be “Grant Access” for all policies that are going to be allowing clients to be checked for health.
Now let’s switch to the Settings tab and select NAP Enforcement on the left.
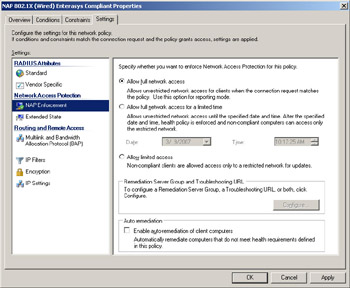
Note that here is where we can configure the level of enforcement (full access, full access with grace period, or limited access to the restricted network only) and also whether auto-remediation is attempted or not. For example, the settings you configure here for a network policy for compliant clients might look like this:
-
Allow full network access
-
Auto-remediation turned off
By contrast, the settings you configure for a policy for noncompliant clients might be these:
-
Allow limited access
-
Auto-remediation turned on
Looking back under the root node in the NPS console, the Network Access Protection node is where you can configure SHVs and also remediation server groups, which are groups that let you specify the remediation servers that will store and provide software updates for NAP clients that need them. By default, the NPS includes one predefined SHV called the Windows Security Health Validator.
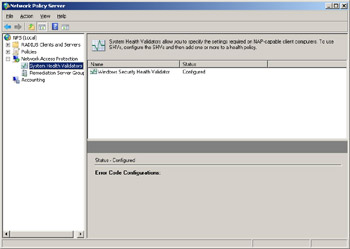
To configure the settings for this SHV, double-click on it to open its properties.
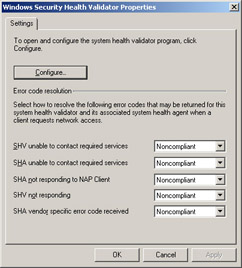
If we click the Configure button, we can see the different kinds of health checks that are performed by this default SHV.
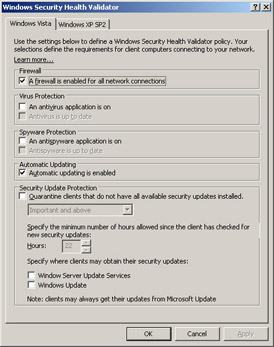
As we described earlier in this chapter, the Windows SHV performs the following kinds of health checks on NAP clients:
-
Check whether the Windows Firewall (or any other NAP-compliant host-based firewall) is enabled.
-
Check whether AV software is running (and optionally whether its sig file is up to date).
-
Check whether Windows Defender or some other antispyware program is running (and up to date).
-
Check whether Automatic Updates is turned on for the machine.
-
Check whether all available security updates above a specified level of criticality are installed, the minimum time since the client last checked for security updates, and where the client obtains its updates from.
How does the NPS know how to handle a NAP client whose health satisfies (or fails to satisfy) the requirements you’ve specified in this Windows SHV? Look back under the Policies node again, where you’ll find a subnode called Health Policies. If you select this node in our test network, you’ll see two kinds of health policies that have been defined.
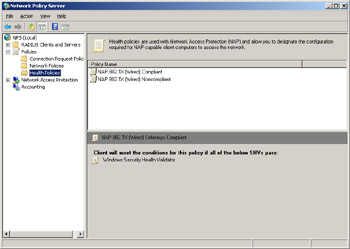
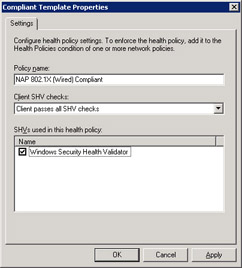
If you double-click on the “compliant” health policy, you’ll see that the Windows SHV is being used to check for compliance.
Looking back under the root node, the fourth and final subnode, called Accounting, can be used to configure logging for the NPS. This logging can be in the form of local logging (for display in Event Viewer) or remote logging to a SQL server.
That’s a brief whirlwind tour of the Network Policy Server snap-in, which is used for configuring your NPS. There’s another way of configuring NPS, however, and that’s by doing it programmatically. Let’s hear from an expert at Microsoft concerning how this can be done:
Pre-Windows Server 2008, the Server Data Objects (SDO) API made it possible to programmatically configure and administer Microsoft’s RADIUS server (IAS). The SDO API was designed for programmers who use C/C++ and Visual Basic.
With NPS however, programmatic configuration is now possible using scripts and batch files. The new netsh nps context has made this possible. Following is a sample VBScript called AddClient.vbs that can programmatically add a list of RADIUS clients provided in a text file using one of the new netsh nps commands:
If WScript.Arguments.Count = 1 Then Set objShell = CreateObject("WScript.Shell") Set objFSO = CreateObject("Scripting.FileSystemObject") Set objTextFile = objFSO.OpenTextFile(WScript.Arguments.Item(0), 1) Do While objTextFile.AtEndOfStream <> True arrclientinfo = split(objTextFile.Readline, ",") netshcmd = "netsh nps add client name = """ & arrclientinfo(0) &_ """ address = """ & arrclientinfo(1) &_ """ state = ""enable"" sharedsecret = """ & arrclientinfo(2) &_ """ requireauthattrib = ""no"" napcompatible = ""no"" vendor = ""RADIUS Standard""" objShell.Run "cmd /c"& netshcmd wscript.sleep 15000 Loop objTextFile.Close Else Wscript.Echo "Usage: addclients.vbs filename" Wscript.Quit End If The AddClient.vbs vbscript just shown makes use of the netsh nps add client command and a text file named clients.txt containing per-line comma-delimited RADIUS client friendly names, the hostnames, and the RADIUS client shared secrets:
radiusclient1,host1,secret1 radiusclient2,host2,secret2 radiusclient3,host3,secret3 radiusclient4,host4,secret4
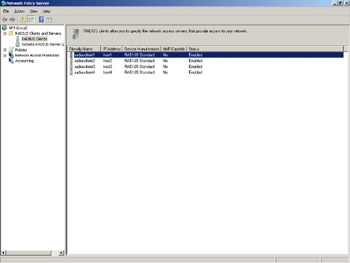
Running this script adds these RADIUS clients to the NPS configuration, and the NPS snap-in displays the four new RADIUS clients.
–Kapil Jain
Software Development Engineer, NPS Test Team
Configuring NAP Clients
Now that we’ve examined how to configure NAP on the server end (that is, the NPS), what sort of configuration do NAP clients need and how is this done? Windows Vista and Windows Server 2008 include an MMC snap-in called NAP Client Configuration that you can use to manually configure client-side NAP settings.
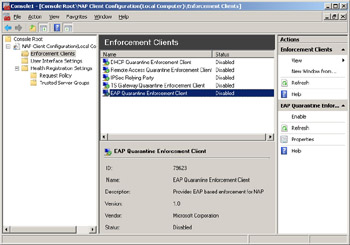
For example, to configure the NAP client to respond to 802.1X enforcement policy on the NPS, you simply select the Enforcement Clients node as shown in the preceding figure, right-click on EAP Quarantine Enforcement Client, and select Enable.
Obviously, you’ll get tired of configuring NAP clients manually like this if your enterprise has thousands of client computers. The solution? Use Group Policy to configure your NAP clients. In Windows Server 2008 and Windows Vista, the Group Policy settings for NAP are found under this policy location:
Computer Configuration\Windows Settings\Security Settings\Network Access Protection
Here’s a screen shot showing NAP client settings in Group Policy for configuring supported enforcement methods. Compare what you see here with the previous screen shot and you’ll see that the same user interface for locally configuring NAP clients is used by the Group Policy Object Editor, which is pretty cool indeed.
EAN: 2147483647
Pages: 138