| You are now ready to export your document and create the HTML page that displays the page with your buttons and rollovers. Fireworks does all the work; you just have to set up the location where you want all your files saved. 1. | Choose File > Export. Navigate to the Lesson08 folder. In the Export pop-up menu, select HTML and images. From the HTML pop-up menu, select Export HTML File.
For this page, you want not only the images with the HTML code for the rollovers; you also want the page exported as HTML. You also want to make sure that you select the Lesson08 folder for exporting your files. That folder includes some HTML documents for testing the links on your buttons.
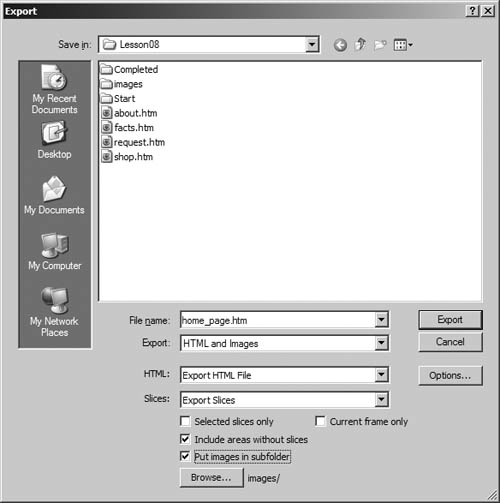 | 2. | Select Export Slices from the Slices pop-up menu.
The slice (the translucent green area on top of each button) determines how Fireworks creates (cuts) the buttons. If you don't export the slices, the page is exported as one image. The slice also enables the JavaScript for rollovers if slices are not exported, your rollovers will not work.
Note Select Include Areas without Slices to create a graphic for areas without a slice. If you deselect this option, you create empty cells in the HTML table. | 3. | Select Put Images in Subfolder.
Generally, you will want to separate your images from the HTML files. This is a file maintenance and organization issue only, but highly recommended. Fireworks defaults to a subfolder named Images. When you select Put Images in Subfolder, you'll see the default folder name images next to the Browse button. If you want to store your images in a folder other than the images folder, click the Browse button and locate the folder.
There is an images folder already created in the Lesson08 folder for you to store your images. You don't need to click the Browse button for this exercise. If the folder did not exist, Fireworks would create one for you.
The files you export from Fireworks need to be saved in a folder (or in subfolder) that is defined (or will be defined) as a site in Dreamweaver. In Lesson 11, you will define the Lessons folder as the local site folder.
Note Some folder names and filenames are capitalized in this book for readability. Some Web servers do not support capital letters for filenames. When you are building your images and HTML pages, it is a good idea to use lowercase for all of your filenames. That way, you can be sure that the filenames are supported on any server. The folder that Fireworks creates for you is actually all lowercase. | 4. | Click Options to define the HTML options that Fireworks uses when generating the HTML.
You need to set several options to define how Fireworks creates the HTML file. These options are defined in the HTML Setup dialog box. You can access this dialog box from the Export dialog box, as you just did, or you can choose File > HTML Setup.
On the General tab of the HTML Setup dialog box, you can choose the HTML style that Fireworks generates and the file extension.
| 5. | For this exercise, with the General tab selected, choose Dreamweaver HTML from the pop-up menu. Select htm (.htm) as the extension. If you are using a Macintosh, choose Dreamweaver from the File Creator pop-up menu.
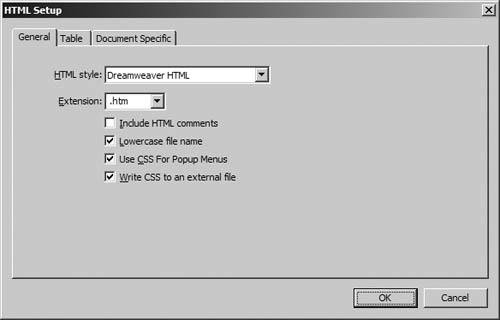 The method Fireworks uses to create the HTML depends on the HTML style you choose from the pop-up menu. Fireworks supports Dreamweaver, FrontPage, GoLive, and a generic style. Since you will be using Dreamweaver in Lesson 11, you want Fireworks to generate the proper code for Dreamweaver when it exports the HTML. The method Fireworks uses to create the HTML depends on the HTML style you choose from the pop-up menu. Fireworks supports Dreamweaver, FrontPage, GoLive, and a generic style. Since you will be using Dreamweaver in Lesson 11, you want Fireworks to generate the proper code for Dreamweaver when it exports the HTML.
On the Extension pop-up menu, you can choose from a variety of popular extensions. If the one you need doesn't appear in the list, you can enter the extension in the text box.
The Include HTML Comments check box determines whether Fireworks inserts comments in the HTML code. Comments show where you should copy the code if you are pasting the code in an HTML editor. If you are familiar with HTML, you might not need the comments, so deselect this option to cut down on the code that Fireworks produces. In Lesson 11, you will use Dreamweaver to examine the HTML files, so you don't need to select this option.
The Lowercase File Name check box forces Fireworks to generate all-lowercase filenames when it exports your files. Since many Web servers are case sensitive, it is a good idea to use lowercase for all of your filenames. That way, there is no confusion, and your naming convention is consistent.
The File Creator option for the Macintosh enables you to double-click the file to open Dreamweaver from the Finder.
| 6. | Select the Table tab.
The Table tab allows you to modify the spacing in the table that Fireworks creates. For this exercise, you will use all of the defaults.
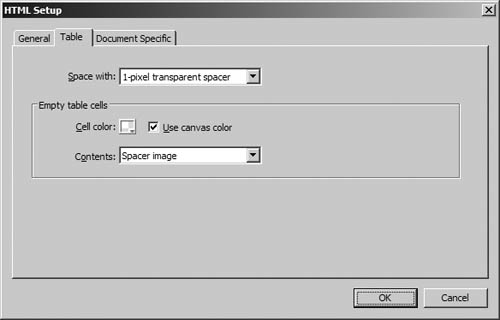 Whenever you have slices on your page, Fireworks generates an HTML table when it generates the HTML file. In the Space With pop-up menu, you can choose from 1-Pixel Transparent Spacer (the default), Nested Tables No Spacers, or Single Table No Spacers. If you choose the 1-Pixel No Spacer option, Fireworks inserts a transparent GIF image. If you choose the Nested Tables option, Fireworks creates tables within tables to replicate the page. This creates some complicated code, but it is fairly accurate. If you choose the Single Table option, the code is minimal, but the page may not appear correctly in all browsers. Whenever you have slices on your page, Fireworks generates an HTML table when it generates the HTML file. In the Space With pop-up menu, you can choose from 1-Pixel Transparent Spacer (the default), Nested Tables No Spacers, or Single Table No Spacers. If you choose the 1-Pixel No Spacer option, Fireworks inserts a transparent GIF image. If you choose the Nested Tables option, Fireworks creates tables within tables to replicate the page. This creates some complicated code, but it is fairly accurate. If you choose the Single Table option, the code is minimal, but the page may not appear correctly in all browsers.
If the table has empty cells, you can set the method that Fireworks uses to fill the cells: None, Spacer Image, or Non-breaking Space. You choose these methods from the Contents pop-up menu. Choosing None is not recommended, as browsers may not render the table properly when the cells are empty. Choosing Spacer Image (the default) inserts a transparent GIF image in the cell. Fireworks creates a small image named spacer.gif and uses that image in all of the tables it generates. Choosing Non-breaking Space inserts the code for a space ( ) in the cell.
| 7. | Select the Document Specific tab. Set the first row of slices to doc.name + Underscore + Row/Column..., and set Frames to Underscore + Frame#.
On the Document Specific tab, you can customize the file naming scheme for the images in the rollovers. As you choose from each of the pop-up menus, an example of the resulting filename appears. The resulting filename appears as home_page_c2_f2.gif in the dialog box.
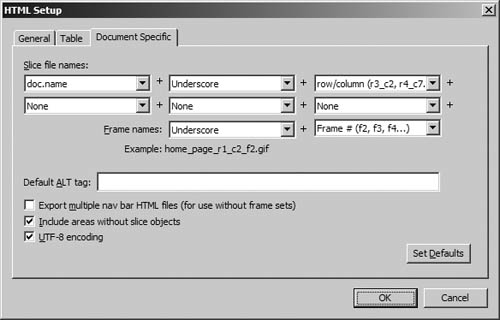 Select Include Areas without Slices to ensure that the entire document is exported. If this option is not selected, areas without slices do not appear when you view your document in the preview window, and they are not exported. Select Include Areas without Slices to ensure that the entire document is exported. If this option is not selected, areas without slices do not appear when you view your document in the preview window, and they are not exported.
You can enter an alternate image description in this dialog box that is applied to each image in the table. As you learned in Lesson 6, the Alt text enhances your site's accessibility. Although you can enter a universal value here, you should add Alt text to each slice instead.
Note There are several options for naming your rollover files. You could also choose Rollover from the Frames pop-up menu to add_over instead of _f2 at the end of the filename. Tip If you find yourself setting the options in this dialog box over and over and you consistently use the same settings, click Set Defaults to retain your current settings. | 8. | Click OK to close the HTML Setup dialog box, and then click Export to export your slices and create the HTML page.
Fireworks exports your images using the Optimization settings on the Optimize panel and creates an HTML file.
| 9. | Open the HTML file in your browser to check the results.
The buttons and the links should work. If not, make sure you exported your files to the Lesson08 folder.
| 10. | Save and close your file.
|
|