Editing with the Point Tools
You’ve already explored the Pen tool a little in this chapter. The Pen tool and the Freehand Pen tool contain similar functionality in that they both allow you to draw paths. The difference with these two tools is preference. The Pen tool provides you with some help in drawing (I personally need all the help I can get). The Freehand Pen tool provides no help in drawing; it’s almost as if you’re drawing directly onto your computer screen with pen in hand.
Grouped with these two Pen tools, however, are three other tools designed specifically for editing paths: the Point tools. These tools are as follows:
-
Add Anchor Point Tool: This tool allows you to add more anchor points to a path. All you do is click this tool, and then click on an area of a closed path where you would like another anchor point.
Tip To make the smoothest paths, you’ll want to use as few anchor points as possible. However, the more complex the path you’re creating, the more anchor points you’ll need to use. Aim to use the fewest number of anchor points possible for best results.
-
Delete Anchor Point Tool: This tool allows you to remove anchor points from a path. Perhaps you have too many anchor points and want to smooth out your path. Click this tool, and then click on an anchor point within a closed path. This allows you to remove the anchor point.
-
Convert Point Tool: This tool allows you to change an anchor point from a curve to a straight line, or a straight line to a curve. Let’s take a look at editing your path with this tool.
Fine-Tuning Paths with the Convert Point Tool
If you haven’t done so already, select the Convert Point tool from the toolbox. This tool resides with the Pen tools. Your cursor should look like an upside-down V. Then, perform the following:
-
Click on the third anchor point (on the bottom line) within the closed path. Notice this anchor point becomes dark. Originally, you created this anchor point as a straight line (recall you used the Shift key to draw a straight line from the previous anchor point to this anchor point).
However, now that you’ve clicked it with the Convert Point tool, you can create curves at this anchor point.
-
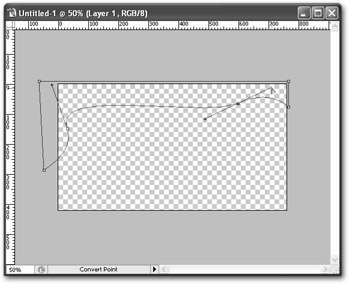
Click and hold your mouse, then drag up and to the right, as shown in Figure 6-13. Notice you’re now able to change the curvature of your closed path.3. Once you’ve made these changes, click outside the path. The anchor points disappear. We’re now ready to make our path a selection, and then eventually fill it with color and complete the web header.

Figure 6-13: Changing the curvature of a path with the Convert Point tool
EAN: 2147483647
Pages: 108