Exploring Groups (Using the Group Expert)
|
Sorting allows you to define the order in which records are printed. Grouping records, in comparison, allows you to separate records into logical units that are related to each other in some way. For example, you'll often see reports group data by region or employee.
In Crystal Reports, all grouping is controlled through the Group Expert.
To access the Group Expert, make sure you're in the report that you've created within this chapter. From the menu bar, select Report, Group Expert. The Group Expert dialog box displays, as shown in Figure 8-10 (on the following page).
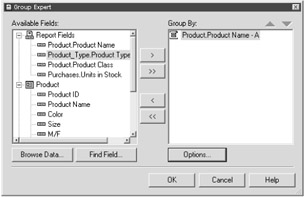
Figure 8-10: The Group Expert
The Group Expert is a nice feature in that it provides a single location for adding and accessing all groups within a report.
In many ways, the Group Expert is similar to the Record Sort Expert. You use the Add (>) button to select the fields you wish to create as a group. You may define multiple groups and change the order in which fields are grouped using the Up and Down arrows (just as you did with the Record Sort Expert).
To see how all this grouping stuff works, let's try an example. Continue using the report you've created within this chapter.
-
Select Report, Group Expert from the menu bar.
The Group Expert dialog box displays.
-
In the Available Fields list box, select the Product Type Name field.
This field is available from the Product Type table.
-
Press the Add button (>) to add this field.
The Product Type Name field is listed within the Group By list box. By default, this group is sorted in ascending order.
-
Press the OK button on the Group Expert.
You're returned to the Report Design area.
Preview your report. Your work should look something like Figure 8-11. Notice that your report now groups all data by the Product Type Name field. This information is sorted first, followed by Product Name (which you defined to sort earlier in this chapter).
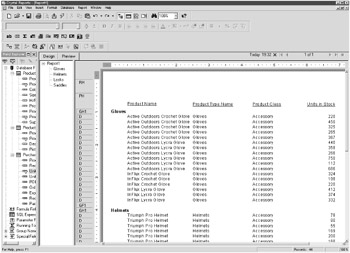
Figure 8-11: Creating a single group
| Note | Whenever you create a group, that group's field always becomes the first to sort. |
Notice that there are now two new sections added to your Report Designer screen. These new sections are the Group Header and Group Footer (you can see these best in the Design tab). With each group you add, a subsequent group header and footer are also added.
Let's look at what both of these new additions can do for you.
Understanding the Group Headers and Footers
Select the Design tab and you'll see two new sections added to your report: a Group Header and a Group Footer (shown in Figure 8-12).
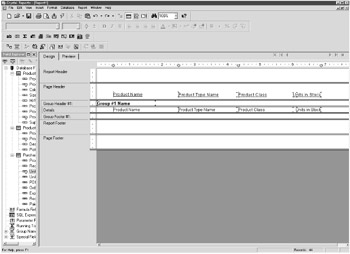
Figure 8-12: The Group Header and Group Footer sections
The Group Header section (labeled Group Header #1) prints when Crystal Reports processes the first record of each group. The Group Footer section (labeled Group Footer #1) prints when Crystal Reports processes the last record of each group.
Although the Group Footer is blank in this example, you'll find that it's often useful for subtotals and summary totals (you'll learn more about creating these values in Chapter 9).
Grouping Options
Now that you've gotten a little practice with how groups work, let's look at some of the grouping options available to you. Using the example report that you've been working on in this chapter, access Report, Group Expert from the menu bar. When the Group Expert displays, press the Options button. A Change Group Options dialog box displays, as shown in Figure 8-13.
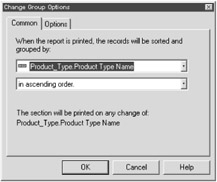
Figure 8-13: The Change Group Options dialog box
The Common tab displays the field upon which you're creating a group and the sorting direction of this group. By default, all groups sort in ascending order; however, you also have the option to sort in descending, specified, or original order.
You've already learned about ascending and descending sort order in this chapter. Specified order allows you to define a user-defined order. Crystal Reports places each record into this custom group that you specify. Original order is the order in which the data is pulled from the database. Original order essentially means no sort order.
Select the Options tab. You'll notice the following functionality:
-
Customize Group Name Field: The group name field is what displays in the group header. By default, the group name field has the same value as the group field. For example, with this option, you could group on the Customer ID but display the Customer Name as the group name.
-
Keep Group Together: This check box keeps groups from breaking across pages. By checking this option, Crystal Reports forces the group header, details, and group footer together.
If there's not enough room for all this information to print on the current page, Crystal Reports moves this information to the next page. While this option is useful, realize that it may also create blank pages within your reports.
-
Repeat Group Header On Each New Page: This check box allows you to repeat the group header when groups are spread over several pages.
For now, you can cancel out of the Change Group Options dialog box and the Group Expert dialog box.
The Group Tree
If you haven't already done so, select the Preview tab of the report you've been creating. Whenever you create a group in Crystal Reports, you'll notice the creation of a tool known as the Group Tree, as shown in Figure 8-14.
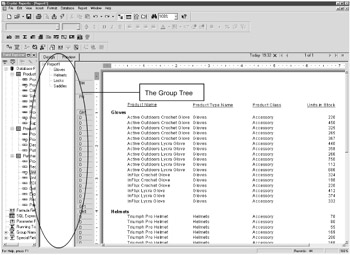
Figure 8-14: The Group Tree
The Group Tree allows you to use smart navigation to quickly drill down on groups to view details of the group's underlying data. Essentially, the Group Tree is a navigation tool for dynamically getting around your reports. Your users will find this a great aid in finding and viewing information within a report.
You may repeatedly press the Group Tree button on the Standard toolbar to display or hide the Group Tree.
| Tip | The Group Tree is only available within the Preview tab. |
|
EAN: 2147483647
Pages: 177