Adding Database Fields (Using the Wizards)
|
Once you've added the necessary tables to your report and pressed the Next button, you'll find yourself at the Fields screen. This screen enables you to choose the table information that you want to display in your report (see Figure 4-4).
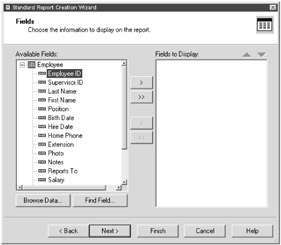
Figure 4-4: The Fields screen (of the Standard Wizard)
Perform the following steps to add database fields to your report:
-
While in the Fields screen, hold down the Ctrl key on your keyboard. Select the following fields:
-
Last Name
-
First Name
-
Position
-
Birth Date
-
Home Phone
-
Extension
-
Photo
-
Notes
Tip You don't have to pick all the fields for your report within this area. Once you're finished with the tabbed screens, you can add additional information (such as database fields) from the Report Design screen.
-
-
Click the Add button (>) to add the fields to the Fields to Display list box. Then click the Next button at the bottom of the screen.
Notice that you're now looking at a screen associated with grouping.
Browsing Data
Database tables can contain any number of fields. Often, you'll find it useful to browse sample records contained within these fields.
Crystal Reports makes browsing data easy. To view some data contained in a database field, perform the following steps:
-
In the Fields screen, select the database field for which you wish to browse data.
You must select the database field from the Available Fields list box.
-
Select the Browse Data button at the bottom of the Fields screen.
A sample of the data contained within the field displays, as shown in Figure 4-5.
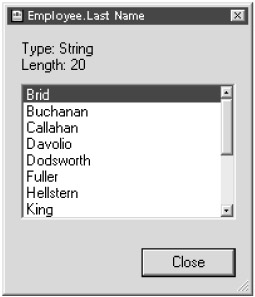
Figure 4-5: Browsing database field data -
Once you view the sample data, press the Close button to close the Browse dialog box.
The Browse Data option is useful when trying to figure out which database fields contain the data you'd like your report to display.
Finding Fields
As your work with different reports increases, you may find some database tables containing possibly hundreds of fields. If this is the case, scrolling will probably prove painful and annoying in your search for different database fields. Another solution is to use the Find Field button, which is next to the Browse Data button.
To use the Find Field functionality, press the Find Field button. A search dialog box displays (shown in Figure 4-6), which allows you to type in and then search for the names of fields within a data-base table. You can type in either the full or partial name of a database table. Once you type in this information, press the OK button to initiate the search.
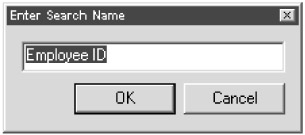
Figure 4-6: Crystal Reports' Finding Fields functionality
If your text matches the name (or part of the name) of a database table, you'll find that table highlighted within the Available Fields list box.
Changing the Field Order
The order of the fields within the Fields to Display list box represents the order in which the fields will display in your report. You can change this order by selecting a field (in the Fields to Display list box) and pressing the "up" or "down" arrow buttons above the list box, as shown in Figure 4-7. You'll see that field move up or down in the Fields to Display list box.
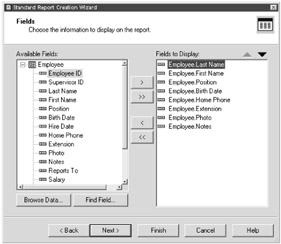
Figure 4-7: Changing the display order of database fields
Once you've explored these options, press the Next button at the bottom of the Fields screen. A Grouping screen displays.
|
EAN: 2147483647
Pages: 177