3.4 Integrate using the Web Clipping portlet
|
| < Day Day Up > |
|
3.4 Integrate using the Web Clipping portlet
The Web Clipping portlet displays, on a portal page, Web content that was "clipped" from another Web site. Web Clipping actually uses two portlets:
-
Administration portlet - The administration portlet builds the resultant "runtime" portlet by obtaining the specifications of the external HTML page to be "clipped" and then clipping the regions of those pages that should be displayed in the portlet.
-
Runtime portlet - The resultant "clipped" portlet is an instance of the Web Clipping portlet. This portlet is added to your page like any other portlet.
The Web Clipping portlet provides a quick and effective means of presenting portions of, or even whole Web pages in WebSphere Portal. We used the Web Clipping portlet to "clip" a Web-enabled view from one of our sample Domino databases.
Portlet listing
Table 3-6 contains information on the Web Clipping portlets.
| Web Clipping | The name used in the documentation (for example, InfoCenter) |
| Web Clipping | Title in portlet selector (Edit Layout and Content") |
| Web Clipping Portlet | Name in portlet selector (installation) |
When a Web page has been clipped, a new entry into the portal catalog will be shown that includes the new clipped portlet. For our example, the new listing is shown in Table 3-7.
| Web Clipping Customer View | No information in the documentation for this portlet |
| Web Clipping Customer View | Title in portlet selector (Edit Layout and Content) |
| Web Clipping Customer View | Name in portlet selector (installation) |
3.4.1 Considerations
The Web Clipping portlet takes content from a specified URL, extracts a selected subset of this Web page, and embeds the content into a portlet. Unlike the Web Page portlet, the content is rendered within the portlet context. However, this portlet does not always work as intended with existing HTML. For example, JavaScript does not always function as intended. Header information is mostly lost.
Display cache
The display cache is a feature that uses the WebSphere Application Server dynamic cache feature to store portlet output for a specified time before it expires. If a user requests that portlet during that timeframe, the content is drawn from the cache instead of from the portlet. This may not be desirable since you may want caching enabled for some, but not all, clipping portlets. An alternative is to specify a CacheTimeout configuration parameter for a specific portlet. To specify a caching timeout value, set the following configuration parameter in the clipping portlet under Portal Administration → Portlets → Manage Portlets. Highlight your portlet and click Modify Parameters. Specify:
CacheTimeout = ##
where ## is some number of seconds. Note that this parameter has no effect if the display cache is not enabled for the portal.
| Applicable portlet patterns | Display |
| Development time | Insignificant |
| Developer skill set | WebSphere Portal administration skills are needed. Domino developer skills would be useful, but are not required. |
| Range of applications | Narrow |
| Handle rich text | No |
| Performance | Limited |
| Session Management | No |
| Clustering | No |
| Scalability | No |
| Requires single sign-on | Depending on the application, the Web Clipping portlet has extensive firewall, security, and authentication configurations. |
| Required software versions | Standard HTML browsers with JavaScript support are required. Netscape 5 and above and Internet Explorer 4 and above are supported. |
3.4.2 Implementation details
In this section we describe how to use this technique to "clip" a Web-enabled view from one of your sample Domino databases and generate a runtime portlet. We have already "clipped" the example for presentation purposes. We have placed the administration Web Clipping portlet on a page along with our completed portlet for this demonstration. Although we have included the Web Clipping (administration portlet) on the page, it can also be accessed (and most likely would be) by clicking Portal Administration -> Web Clipping. This approach would generally be used since the administration portlet would not be shown to users. We used the first method in our example just to show both portlets in the same page. To fully explain this implementation, we provide complete details concerning:
-
Initial setup
-
Administration portlet options
-
Configuration options
-
Results
Initial setup
Our example begins with accessing the Web Clipper portlet page. Deploy the portlet and add it to a page; Figure 3-13 shows the result.
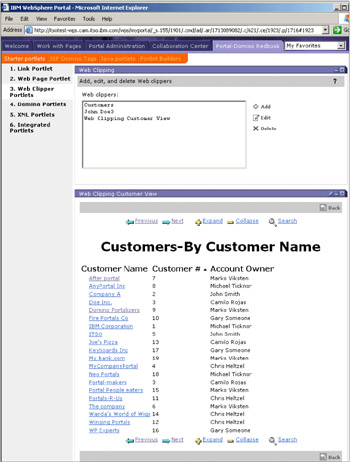
Figure 3-13: Web Clipper Portlets page
A close-up of the administration portlet is shown in Figure 3-14.
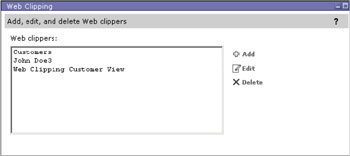
Figure 3-14: The Web Clipping (administration) portlet
Administration portlet options
| Add Web clipper | To add a Web clipper, click Add. Follow the Web clipping configuration options and then add the generated portlet to a page and activate. |
| Edit Web clipper | To modify the settings for a Web clipper, select it from the Web clippers list, and click Edit. Make your desired changes to the Web clipper configuration information, and click Done. |
| Delete Web clipper | To delete a Web clipper, select it from the Web clippers list, and click Delete. A confirmation dialog appears. Click OK to delete the Web clipper. Click Cancel to keep the Web clipper. |
| Note | When deleting a Web clipper, be sure to delete both the portlet itself, and its associated portlet application, through Portal Administration. Otherwise, you will not be able to create another Web clipper using the same name. |
Configuration options
The Web Clipping portlet has a number of configuration options. This portlet actually has three basic edit screens that must be completed. The first edit screen is shown in Figure 3-15 on page 84. Be sure to click Next on the bottom of the first edit screen to go on to the second edit screen. If you click Cancel on this screen, you will exit the edit view and no changes will be saved.
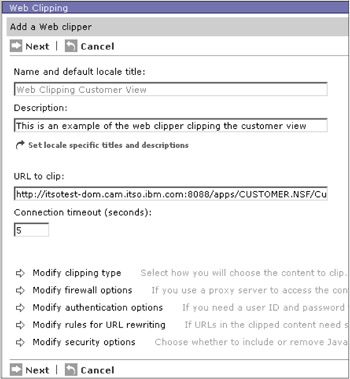
Figure 3-15: Adding a Web clipper- Edit screen 1 options
The first Web Clipping edit screen options are the following:
-
Name and default locale title:
Specify the name for the Web clipper. This is the default locale title. Select the Set locale-specific titles and descriptions option to set locale-specific titles.
-
Set locale-specific titles and descriptions:
Select this option to specify locale-specific titles and descriptions for the Web clipper. This option only appears if the portal is configured to support more than one language. A list of locales appears. Select a locale, then click Set title for selected locale. A prompt for the title appears. Type in the Web clipper title for the selected locale, then click OK. Repeat this procedure for each locale for which you want a locale-specific title. Click Done when you have finished setting locale values. Figure 3-16 shows the locale options.
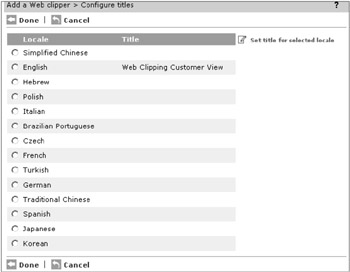
Figure 3-16: Set title for selected locale page from edit screen 1 options -
Description:
Specify a description to provide more detailed information about the Web clipper.
-
URL to clip:
Enter the URL of the Web page you want to clip.
-
Connection timeout:
Enter the amount of time, in seconds, that you want to keep the connection to the original server open when idle (maximum time: 100).
-
Modify clipping type:
To change the type of clipping that the Web clipper performs, click Modify clipping type when creating or editing a Web clipper. Specify the clipping method, and click Done. Click Cancel to return to the edit page without modifying the clipping type. The Modify clipping type screen is shown in Figure 3-17.
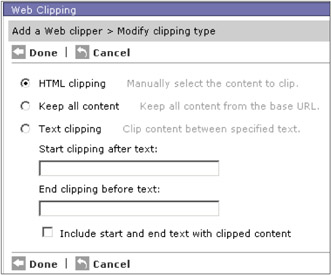
Figure 3-17: Modify clipping type page from edit screen 1 optionsThe following are options on the modify clipping type page:
-
HTML clipping: This choice enables you to manually select elements of the document by clicking them with the mouse. Selected elements are highlighted in yellow to indicate that they will be kept after clipping.
Note When performing HTML clipping, consider using the following:
To select more than one element, hold the Control key when you click on additional elements. By default, a single click selects an element, and if any other elements were previously selected, they are deselected.
You might need to experiment on the best place to click to highlight the particular element you are interested in, whether it is the contents of a table cell or the entire table itself. You can also click mouse button 2 and step up through the element nesting order to whatever level you wish. To ensure that you get the expected content, pay attention to the highlighting.
-
Text clipping: This choice enables you to select the content between specific text strings that are in the HTML document. Content between these strings is kept, and all other content is discarded.
-
Start clipping after text: Begin clipping (or keeping) content after this text string.
-
End clipping before text: Stop clipping content after this text string.
-
Include start and end text with clipped content: Select this option to include the text strings in the resulting output.
-
Keep all content: This choice brings the entire Web page into your portlet without discarding any content.
-
-
Modify firewall options
If you are clipping an HTML document accessed through a firewall, specify the proxy server information. Click Modify firewall options. Click Use a proxy server. Enter the hostname and port of the proxy server, along with a user ID and password, if necessary. Click Done. Click Cancel to return to the edit screen without modifying the firewall options. The Modify firewall options are displayed in Figure 3-18.
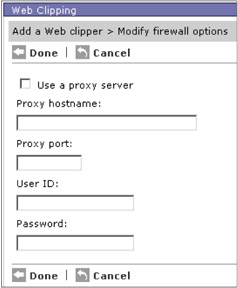
Figure 3-18: Modify firewall options page from edit screen 1 optionsThe following are options on the Modify firewall options page:
-
Do not use a proxy server: This choice indicates that you do not require a proxy server to access the HTML document you want to clip.
-
Use a proxy server: This choice indicates that you require a proxy server to access the HTML document.
Note If you specify proxy settings, the proxy must have access to the target content. If the proxy does not, local system access will not be used, and you will receive an error in the browser indicating that the content could not be retrieved.
-
Proxy host: Enter the hostname of the proxy server.
-
Proxy port: Enter the port number used to communicate with the proxy server.
-
User ID: If required, enter the user ID used to access the proxy server.
-
Password: If required, enter the password used to access the proxy server.
-
Confirm password: Enter the password again for verification.
-
-
Modify authentication options:
If you are clipping an HTML document which requires authentication for access, provide the authentication information.
To specify the proxy server information, click Modify authentication options. Click Authentication required. Select the type of authentication to be used and enter any appropriate information, such as a user ID and password. Click Done. Click Cancel to return to the edit screen for modifying the authentication options. The authentication options are shown in Figure 3-19.
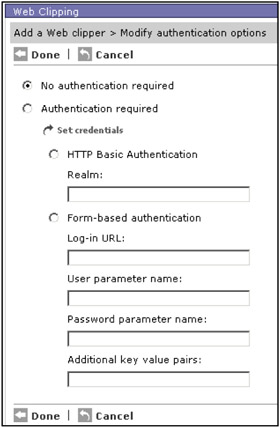
Figure 3-19: Modify authentication options page from edit screen 1 optionsThe following are options on the Modify authentication options page:
-
No authentication required: Select this choice if no authentication is needed to access the HTML document.
-
Authentication required: Select this choice to define an authentication method for accessing the HTML document.
-
Set credentials: Clicking this takes you to the credential vault. Figure 3-20 on page 91 shows the credential vault options screen.
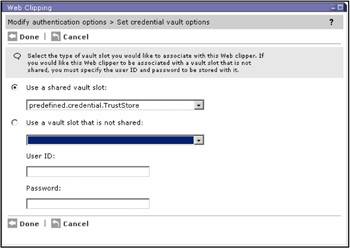
Figure 3-20: Credential vault optionsNote The Web Clipping Portlet now stores authentication information within the WebSphere Portal's credential vault. The authentication settings page has a link to a credential settings page.
Select to either use a shared credential slot or a non-shared slot. In either case, the slots must already have been configured on the Credential Vault administration page. The shared credential slot will already have the user ID and password credential, which cannot be modified on this page. The non-shared slot is a slot identifier only. If a non-shared slot is selected, a user ID and password is requested in order to create a credential for the administrator building this clipping portlet.
The editor will pull the user ID and password from the credential in order to log in to the backend system. From then on, the credential vault is required to store all credential information.
When the clipping portlet is later edited, the Authentication Settings page will pull up the credential of the user editing the clipping portlet and will show user ID and password if the credential is non-shared.
If the Web clipper is using a shared credential, the portlet will access the backend content using that credential without requiring the user to log in first. If the Web clipper specifies a non-shared slot, and an instance of that slot does not yet exist for this portlet and the user accessing it, then the user will have to edit the portlet and provide a user ID and password for logging into the backend system. This user ID and password are stored in a new slot instance for the defined non-shared slot. The next time that user accesses this portlet, the credential will be reused and the user will not have to log in again.
Editing of the portlet at runtime is still available to users with existing credentials to allow them to modify the user ID and password.
-
HTTP Basic Authentication: If HTTP basic authentication is used to access the HTML document, specify the realm to which the document belongs.
-
Form-based Authentication: If the HTML document you are clipping is a form, specify the URL and parameters used by the form.
-
Log-in URL: Enter the URL of the form. To locate the target URL of the form submission, look for the FORM tag on the login page (browse the source of the page) and locate the ACTION attribute. The URL in the ACTION is the URL that you need to specify.
-
User parameter name: To determine this value, log in to the page, right click on View Source, and use the name attribute of the INPUT tag.
-
Password parameter name: To determine this value, log in to the page, right click on View Source, and use the password attribute of the INPUT tag.
-
Additional key value pairs: Enter any additional key value pairs corresponding to other parameters required by the form. Use an ampersand (&) to separate each pair.
-
-
Modify rules for URL rewriting: To change the way URLs are handled by the Web clipper, you can specify rules for URL rewriting. The regular expression syntax for specifying URL rewriting rules is based on the Perl standard. Enter the appropriate entries and click Done. Click Cancel to return without modifying the rules. Figure 3-21 shows this option.
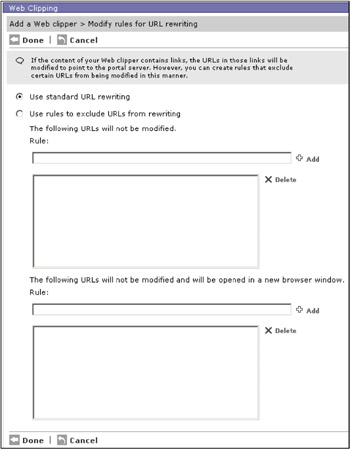
Figure 3-21: Modify rules for URL writing page from edit screen 1 optionsThe following are options on the Modify rules for URL rewriting page:
-
Use standard URL rewriting: This choice ensures that URLs in links within the Web clipper are modified to point to the portal, rather than the host originally targeted by the link.
-
Use rules to exclude URLs from rewriting: This choice enables you to specify rules that are used to identify which URLs will not be altered. These links will not go through the portal. For example, a rule of ".*.gif$" will match any URL that ends in ".gif", while a rule of ".*ibm.com.*" will match any URL containing "ibm.com". In the field "The following URLs will not be modified," enter one or more rules to identify URLs whose content will be retrieved from the original host. These links are opened in the same window. Click Add to add listings or highlight a link and click Delete to delete. In the field "The following URLs will not be modified and will be opened in a new window," enter one or more rules to identify URLs whose content will be retrieved from the original host. These links are opened in a new window. Click Add to add listings or highlight a link and click Delete to delete.
-
-
Modify security options:
Choose whether to include or remove JavaScript in the clipped content. Check Remove JavaScripts from the clipped content to remove JavaScript from the clipped contents. Click Done or Cancel. This option is shown in Figure 3-22.

Figure 3-22: Modify security options page from edit screen 1 options
Web Clipping edit screen 2 (clip contents) is shown in Figure 3-23. Choose the content you want to keep by pointing and clicking.
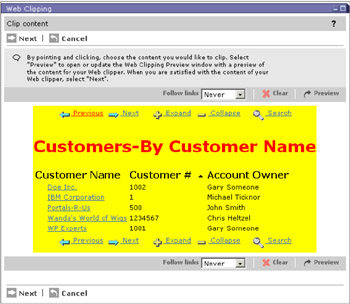
Figure 3-23: Web Clipping portlet edit screen 2 options
The selected contents will be yellow. The options on this edit screen are the following:
-
Next: Click Next to progress to the next screen after you have made your selection.
-
Cancel: Click Cancel if you would like to go back to the previous screen.
-
Follow Links: Specify whether links should be followed. The choices are Never and Ask. The default is Never.
-
Clear: Clicking Clear resets the Specify a description to provide more detailed information about the Web clipper.
-
Preview: Clicking Preview pops up a browser to show your highlighted selection.
Web Clipping Edit screen 3 (content preview) options are shown in (Figure 3-24 on page 96). This screen contains the preview of the clipped Web page. Click Done to keep your new content; click Cancel if you would like to go back to the previous screen.
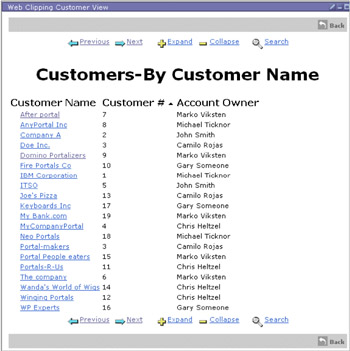
Figure 3-24: Close-up of "clipping" using the Web Clipping portlet
Table 3-8 provides the configuration values that we used in our example.
| Field | Inserted value |
|---|---|
| Name and default local title | Web Clipping Customer View |
| Description | This is an example of the Web clipper clipping the customer view |
| URL to clip | http://itsotest-dom.cam.itso.ibm.com/apps/CUSTOMER.NSF/CustomersByName?OpenView |
| Connection timeout (seconds) | 5 |
| All other fields | default |
Results
The result of setting up the Web Clipper, "clipping" the Web page, and placing the portlet on the page is shown in the original figure, Figure 3-13 on page 82. A close-up of our Web Clipped Web page is shown in Figure 3-24.
Clicking a highlighted document will cause it to be displayed within the portlet context, as shown in Figure 3-25.
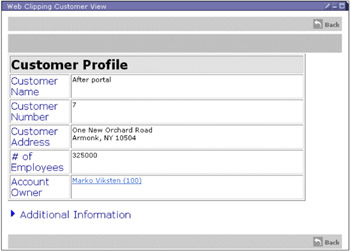
Figure 3-25: Result of clicking a highlighted link in the Web Clipped portlet
The navigation row of the "clipped" view also functions. If you click the Next navigation icon, the screen will show the remaining items in the view, as shown in Figure 3-26.
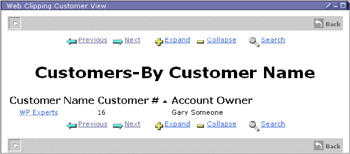
Figure 3-26: Result of clicking the navigation Next
|
| < Day Day Up > |
|
EAN: 2147483647
Pages: 103