3.5 Integrate using Lotus Notes portlets
|
| < Day Day Up > |
|
3.5 Integrate using Lotus Notes portlets
Using the Lotus Notes portlets available in WebSphere Portal Extend is another example of the simplicity of using prepackaged portlets. This technique configures a Web-enabled view in your Domino application to the portal environment through direct and efficient configuration screens. The view is displayed in your portal context and no external Web browser session will open.
3.5.1 Lotus Notes portlets
There are a number of prepackaged Lotus Notes portlets available in WebSphere Portal Extend. In the beta and soon to be released version 5 of WebSphere Portal Extend, the number of portlets drops to two. This is because the two portlets will include the configurations of all Lotus Notes portlets. The collaborative feature of Lotus Notes portlets is of particular use to quickly integrate existing Domino applications into the WebSphere Portal environment. Table 3-9 lists a number of useful portlets, and although this is not an exhaustive list, it provides a good understanding of the use of these portlets. The Redpaper, "WebSphere Portal Collaboration Services," REDP0319, provides a specialized look into these collaboration portlets.
| Portlet Name | Portlet Description |
|---|---|
| iNotesMailPortlet iNotesCalendarPortlet iNotesContactsPortlet iNotesNotebookPortlet iNotesToDoPortlet | Provides iframe-based access to iNotes™-enabled Domino servers and mail files. It includes access to the Welcome, Mail, Calendar, To Do List, Contacts, and Notebook iNotes functions. |
| MyNotesMailPortlet MyNotesCalendarPortlet MyNotesToDoPortlet | Displays users' mail, calendar, and to-dos from their traditional Lotus Domino mail file. The "my" name designates the fact that these portlets autodetect a user's mail file settings-and thus do not need to be configured individually for each user. |
| NotesMailPortlet | Displays any view in a traditional Domino mail database. |
| NotesDiscussionPortlet | Displays a Notes database built with the Domino Discussion database template. |
| NotesTeamroomPortlet | Displays a Notes database built with the Domino Teamroom database template. |
| NotesViewPortlet | Displays any view in any Domino database. |
| In-line Quickplace Portlet | Displays a QuickPlace® inside an iframe. |
| QuickplacePortlet | Launches a designated QuickPlace in a separate browser window. This portlet is also included in WebSphere Portal Enable. |
| SametimePortlet | Launches the Sametime Connect Java client. This portlet is also included in WebSphere Portal Enable. |
In this section we describe the use of NotesViewPortlet as it can be used to show any view from any Domino database.
Portlet listing
We used the portlet setting in our example technique. This portlet is designed to allow you to display any Notes database view in a portlet window. It is the most flexible of all the Notes portlets, as it is not limited to databases with specific templates, such as the NotesDiscussion portlet.
| Lotus Notes View Portlet | Name used in the documentation (for example, InfoCenter) |
| Lotus Notes View Portlet | Title in portlet selector (Edit Layout and Content") |
| NotesViewPortlet | Name in portlet selector (installation) |
3.5.2 Considerations
The Lotus Notes View portlet can be used to implement the basic Display portal pattern. However, when a highly customized interface or a requirement with additional functionality is needed, the Lotus Notes View portlet may not be a good choice.
| Applicable portlet patterns | Display |
| Development time | Insignificant |
| Developer skill set | WebSphere Portal administration skills are needed. Domino developer skills would be useful but not required. |
| Range of applications | Moderate |
| Handle rich text | Display |
| Performance | Limited |
| Session Management | No |
| Clustering | No |
| Scalability | No |
| Requires single sign-on | Depending on the application, the Lotus Notes View portlet can be configured to use single sign-on. |
| Required software versions | Each portlet may have its own software requirements. The Lotus Notes portlets generally require: Client requirements:
Server requirements:
|
3.5.3 Implementation details
This section describes how to use the Lotus Notes View portlet to display within the portal context view information from one of the example databases. To fully explain this implementation, we provide complete details concerning:
-
Initial setup
-
Configuration options
-
Results
Initial setup
Begin by accessing the Lotus Notes View portlet. Deploy the Notes View portlet and add it to a page. Figure 3-27 shows the Domino portlets page before configuration.
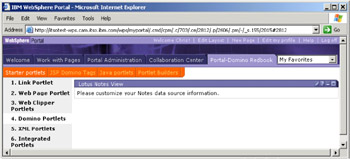
Figure 3-27: Domino portlets page before configuration
Configuration options
This portlet has two configuration screens that must be completed. Figure 3-28 on page 102 shows the first configuration screen.
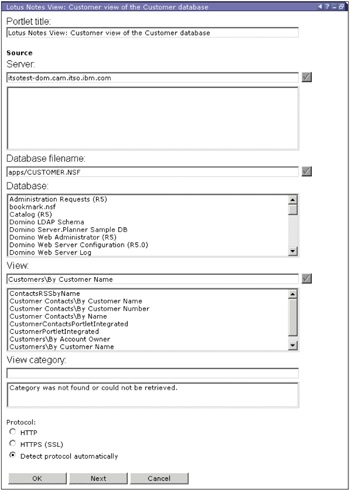
Figure 3-28: Lotus Notes View portlet edit mode- Page one
Click Next on the bottom of the first edit screen to go to the second screen. If you click OK on the first edit screen instead, you will exit the edit view and be left with the default settings for much of the portlet's configuration. Clicking Cancel will exit the edit screens without saving any configuration changes. Details for the edit screens follow.
-
Edit screen 1 options (Figure 3-28):
-
The first configuration setting to make is to name the portlet. This name will show at the top of the portlet window in the portal.
-
The next few options are basic options selecting the server, database, and the view for the portlet. After selecting a server, select the check mark, and the portlet populates the database list. The check box next to the database list then populates the view list once you have chosen a database, and so forth.
Note There is some support for spelling in these configuration fields. For example, the database name does not have to end in ".nsf".
If you don't see your servers in the server list, or the databases/views to choose, then it is possible that the access rights are not properly set in your environment. Verify that you have enabled all the correct Domino settings (LDAP, HTTP, DIIOP, and so on).
-
The protocol that is used for the portlet can also be selected on this screen. If Detect protocol automatically is selected, the portal will first try HTTP. If that is unavailable, it will try HTTPS.
-
After completion of the first edit screen, go on to Edit screen 2, which is shown in Figure 3-29.
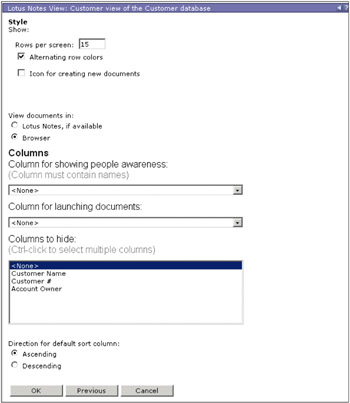
Figure 3-29: Lotus Notes View portlet edit mode- Page two
Click OK on the bottom of this edit screen to complete the configuration and return to display mode. If you click Previous on this edit screen instead, you will return to the first edit screen. Clicking Cancel will exit the edit screens without saving any configuration changes. Details for the second edit screen follow.
-
Edit screen 2 options (Figure 3-29):
-
Choose the number of rows to appear in your portlet. The default setting is 15.
-
Choose whether or not to alternate row colors to better highlight the row divisions. The default setting is Yes.
-
You can choose to display the icons to create new documents. If you check this option, you then have to enter which Notes form is used for creating new documents. The default setting is No.
-
Choose how documents the user wishes to view are launched-either in the Lotus Notes client, or in another Web browser window. The default setting is to use the browser.
Restriction: The option to view documents in the Notes client only works with Internet Explorer browsers, as it functions via a small ActiveX control which launches the Notes client and passes the database and document details to it. Non-IE browser users will view documents within their browser via Domino HTTP.
-
Choose whether categorized views are expanded or collapsed when opening. The default is expanded. If a view category is not selected this item is not displayed.
-
Choose several options for the view columns:
-
Select which column will be enabled for people awareness, so that names will be highlighted if the people are online, and contact option menus will be presented. Collaboration portlets need to be installed on the server for this option to work.
-
Specify which column you want to use to launch the document selected via document action menus.
-
Select which columns (if any) you want to hide from the view as it is presented by the portlet.
-
-
Finally, you must choose the direction for default sorting: either Ascending or Descending. The default is Ascending.
-
Configuration values used in our example are listed in Table 3-10.
| Field | Inserted value |
|---|---|
| Portlet title | Lotus Notes View: Customers view of the Customers database |
| Server (location of the Domino server) | itsotest-dom.cam.itso.ibm.com |
| Database filename (including filepath if not in the Domino Data directory) | apps/Customer.nsf |
| View | Customers\By Customer Name |
| View Category | We left this blank for our example |
| Protocol (HTTP/HTTPS/detect protocol automatically) | Detect protocol automatically |
| Which column you want to use to launch the document selected via document action menus | Customer Name |
Results
After configuring the Lotus Notes View portlet, the result of the Domino portlets page is shown in Figure 3-30.
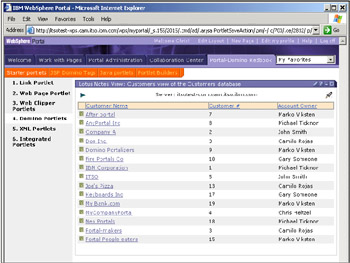
Figure 3-30: Result of modifying the Lotus Notes View portlet
If you click a highlighted link inside the portlet, you are able to open a document (if access allows) into a new Web browser session and out of the portal context, as shown in Figure 3-31.
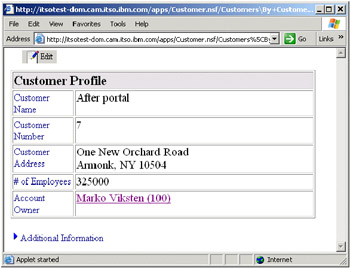
Figure 3-31: Result of clicking the first highlighted link in the Lotus Notes View portlet
For column titles with a highlighted link, you can order the listing based on that column. The configured server always shows up below the portlet window's title region (itsotest-dom.cam.itso.ibm.com). If the portlet allows for launching the Notes client or a Web browser, the launch rocket icon is present below the title region. The arrows to the left of the server name are for navigation if more than one screen is available. If you have rights to create documents in the respective Domino database, which is "author" at minimum, then a "Create new document" icon also shows up next to the launch rocket icon.
|
| < Day Day Up > |
|
EAN: 2147483647
Pages: 103