3.3 Setting Up Windows NT 4.0 Computers
| Configuring Windows NT is a little different than configuring Windows 95/98/Me. To use Samba with Windows NT, you will need both the Workstation service and the TCP/IP protocol. Both come standard with NT, but we'll work through installing and configuring them to make sure they are configured correctly. 3.3.1 Basic ConfigurationThis section presents the steps to follow for TCP/IP- related configuration on Windows NT to get it to cooperate with Samba. If you need more details on Windows NT network administration, refer to Craig Hunt and Robert Bruce Thompson's Windows NT TCP/IP Network Administration (O'Reilly), an excellent guide. You should perform the following steps as the Administrator or another user in the Administrators group . 3.3.1.1 Installing the TCP/IP protocolFrom the Control Panel, double-click the Network icon, click the Protocols tab in the Network dialog box, and look to see if you have the TCP/IP protocol installed, as shown in Figure 3-20. Figure 3-20. The Protocols tab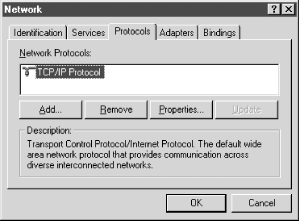 If the protocol is not installed, you need to add it. Click the Add button, which will display the Select Network Protocol dialog box shown in Figure 3-21. You should immediately see the TCP/IP protocol as one of the last protocols listed. Figure 3-21. Select Network Protocol dialog box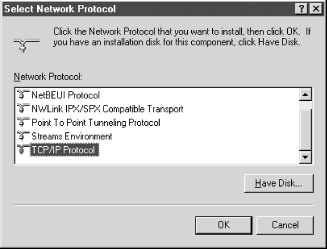 Select TCP/IP as the protocol and confirm it. If possible, install only the TCP/IP protocol. If you see anything other than TCP/IP listed in the Protocols tab and it is not a protocol that you need, you can remove it. If you try to remove a protocol and get an error message saying that the protocol is being used by another service, you need to click the Services tab and remove that service before you can remove the protocol. For example, to remove the NWLink IPX/SPX Compatible Transport protocol, you would need to remove the Client Service for Netware first. 3.3.1.2 Installing the Workstation serviceAfter installing TCP/IP, click the Services tab in the Network dialog, and check that you have a Workstation service, as shown at the end of the list in Figure 3-22. [8]
Figure 3-22. Network Services tab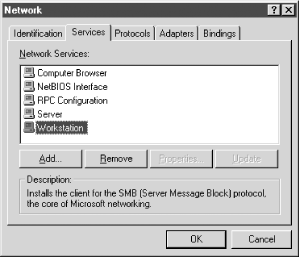 This service is actually the Microsoft Networking Client, which allows the computer to access SMB services. The Workstation service is mandatory. The service is installed by default on both Windows NT Workstation 4.0 and NT Server 4.0. If it's not there, you can install it much like TCP/IP. In this case you need to click the Add button and then select Workstation Service, as shown in Figure 3-23. Figure 3-23. Select Network Service dialog box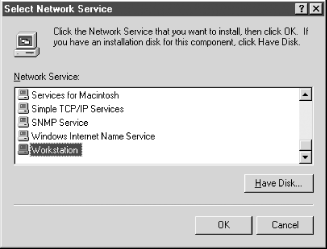 3.3.1.3 Configuring TCP/IPAfter you've installed the Workstation service, return to the Protocols tab and select the TCP/IP Protocol entry in the window. Then click the Properties button below the window. The Microsoft TCP/IP Protocol dialog will be displayed. There are five tabs in the dialog, and you will need to work with four of them:
3.3.1.3.1 IP Address tabThe IP Address tab is shown in Figure 3-24. Figure 3-24. Microsoft TCP/IP Properties dialog for Windows NT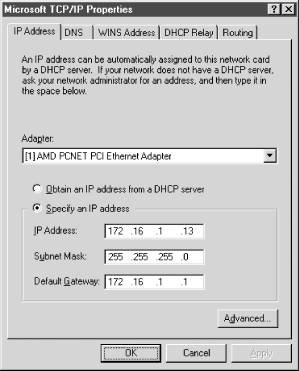 Select the "Specify an IP address" radio button, and enter the computer's IP address and netmask in the space provided for the proper adapter (Ethernet card). You or your network manager should have selected an address for the client on the same subnet (LAN) as the Samba server. For example, if the server's address is 172.16.1.1 and its network mask is 255.255.255.0, you might use the address 172.16.1.13 (if it is available) for the NT workstation, along with the same netmask . If you use DHCP on your network, select the "Obtain an IP Address from a DHCP server" button instead. The gateway field refers to a system typically known as a router . If you have routers connecting multiple networks, you should enter the IP address of the one on your subnet. In our example, the gateway happens to be the same system as the Samba server, but they do not by any means have to be the same. 3.3.1.3.2 WINS Address tabClick the WINS Address tab, shown in Figure 3-25, and you can begin to enter information about name servers. Enter the address of your WINS server in the space labeled Primary WINS Server. If your Samba server is providing WINS service (in other words, you have the line wins support = yes in the smb.conf file of your Samba server), provide the Samba server's IP address here. Otherwise, provide the address of another WINS server on your network. Figure 3-25. The WINS Address tab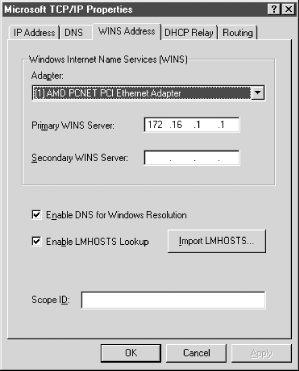 You probably noticed that there is a field here for the network adapter. This field must specify the Ethernet adapter on which you're running TCP/IP so that WINS will provide name service on the correct network. For example, if you have both a LAN and a dial-up adapter, make sure you have the LAN's network card specified here. The checkboxes in the lower half of the dialog are for enabling two other methods of name resolution that Windows can incorporate into its name service. Samba doesn't require either of them, but you might want to enable them to increase the reliability or functionality of name service for your client. See Chapter 7 for further information on name resolution issues. If you'd like to use a DNS server, select the Enable DNS for Windows Resolution checkbox. In addition, you will need to do some configuration to allow the Windows system to find the DNS server, unless you're using DHCP. 3.3.1.3.3 DNS tabClick the tab for DNS, as shown in Figure 3-26. Enter the IP addresses for one or more DNS servers in the space provided. Also, enter the hostname (which should be the same as the NetBIOS computer name). You will enter this again later in another control panel, so make sure they match. Finally, enter the DNS domain on which this system resides. For example, if your workstation has a domain name such as metran.cx , enter it here. You can safely ignore the other options. Figure 3-26. The DNS tab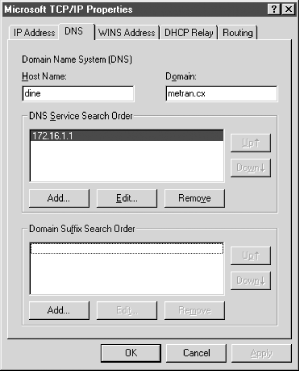 3.3.1.3.4 The LMHOSTS fileIf you want to install an LMHOSTS file, it must be placed in the directory \system32\drivers\etc under your Windows installation directory (usually C:\WINNT ). The easy way to make sure it gets to the proper location is to use the Import LMHOSTS button on the WINS Address tab. (But if you want to do it over the network, you will have to do that after file sharing is configured!) Remember to click the Enable LMHOSTS Lookup checkbox on the WINS Address tab to enable this functionality. When you are satisfied with your settings for IP Address, WINS Address, and DNS, click OK to return to the Network dialog box. 3.3.1.3.5 BindingsNow click the Bindings tab, and check the bindings of network hardware, services, and protocols. Set the "Show Bindings for" field to "all services," and click all the + buttons in the tree. You should see a display similar to Figure 3-27, which shows that the NetBIOS, Server, and Workstation interface services are connected to the WINS client running TCP/IP protocol, and that the WINS client is bound to the Ethernet adapter of the local area network. Figure 3-27. The Bindings tab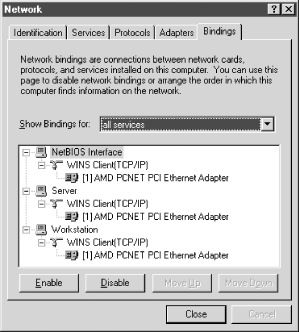 You can safely leave the default values for the remainder of the tabs in the Network dialog box. Click the OK button to complete the configuration. Once the proper files are loaded (if any), you might need to reboot for your changes to take effect. 3.3.2 Computer Name and WorkgroupThe next thing you need to do is to give the system a NetBIOS computer name. From the Control Panel, double-click the Network icon to open the Network dialog box. The first tab in this dialog box should be the Identification tab, as illustrated in Figure 3-28. Figure 3-28. The Identification tab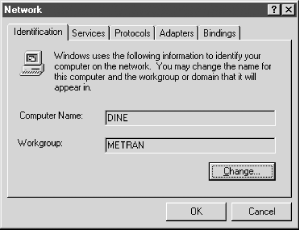 Here, you need to identify your computer with a name and change the default workgroup to the one you specified in the smb.conf file of your Samba server. Click the Change button below the two text fields. This will open an Identification Changes dialog box, where you can set the workgroup and the computer name, as shown in Figure 3-29. Figure 3-29. The Identification Changes dialog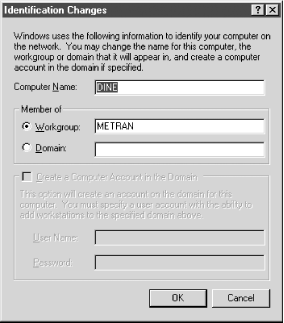
3.3.3 Adding a UserIn all the previous steps, you were logged into your Windows NT system as Administrator or another user in the Administrators group. To access resources on the Samba server, you will need to have a username and password that the Samba server recognizes as valid. Generally, the best way to do this is to add a user to your NT system, with the same username and password as a user on the Samba host system.
To add a new user, open the Start menu, navigate through the Programs submenu to Administrative Tools (Common), and select User Manager for Domains. Click the User menu and select the first item, Add User..., shown in Figure 3-30. Figure 3-30. User Manager for Domains window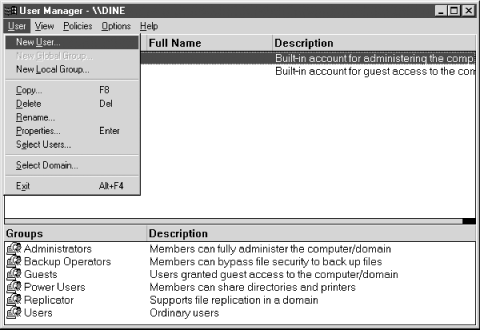 This brings up the New User dialog box shown in Figure 3-31. Figure 3-31. The New User dialog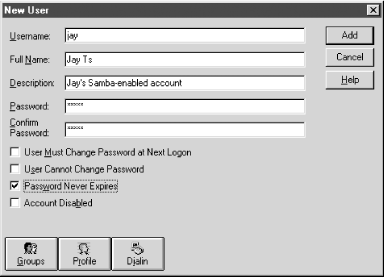 Fill it out as shown, using the username and password that were added in the previous chapter, and make sure that only the checkbox labeled Password Never Expires is checked. (This is not the default!) Click the Add button to add the user, and then click the Close button. You should now see your new account added to the list in the User Manager dialog box. Now open the Start menu, select Shut Down, and select the "Close all programs and log on as a different user?" radio button. Click the Yes button, then log in as the user you just added. 3.3.4 Connecting to the Samba ServerNow for the big moment. Your Samba server is running, and you have set up your NT client to communicate with it. Double-click the Network Neighborhood icon on the desktop, and you should see your Samba server listed as a member of the workgroup, as shown in Figure 3-32. Figure 3-32. The Windows NT Network Neighborhood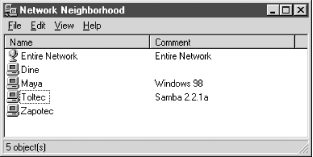 Double-clicking the server name will show the resources that the server is offering to the network, as shown in Figure 3-33. In this case, the test directory and the default printer are offered to the Windows NT workstation. Figure 3-33. Shares offered by the Toltec server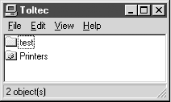 If you don't see the server listed, don't panic. Select Run... from the Start menu. A dialog box appears that allows you to type the name of your server and its share directory in Windows format. For example, you would enter \\ toltec \ test , as shown in Figure 3-34, and use your server's hostname instead of "toltec". Figure 3-34. Opening a shared directory, using the server's NetBIOS name in the UNC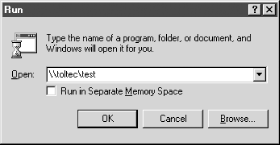 This will work even if browsing services are not set up right, which is a common problem. You can also work around a name-service problem by entering the server's IP Address (such as 172.16.1.1 in our example) instead of the Samba server's hostname, as shown in Figure 3-35. Go back and check your configuration, and if things still aren't right, go to Section 12.2 to troubleshoot what is wrong with the network. Figure 3-35. Opening a shared directory, using the server's IP address in the UNC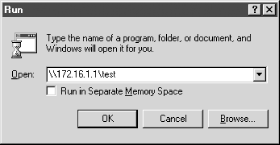 If it works, congratulations! Try copying files to and from the server by dragging their icons to and from the folder on the Samba share. You might be pleasantly surprised how seamlessly everything works. |
EAN: 2147483647
Pages: 475
