2.6 A Basic Samba Configuration File
| The key to configuring Samba is its configuration file, smb.conf . This configuration file can be very simple or extremely complex, and the rest of this book is devoted to helping you get deeply personal with this file. For now, however, we'll show you how to set up a single file service, which will allow you to fire up the Samba daemons and see that everything is running as it should be. In later chapters, you will see how to configure Samba for more complicated and interesting tasks . The installation process does not automatically create an smb.conf configuration file, although several example files are included in the Samba distribution. To test the server software, though, we'll use the following file, which you can create in a text editor. It should be named smb.conf and placed in the /usr/local/samba/lib directory: [4]
[global] workgroup = METRAN [test] comment = For testing only, please path = /usr/local/samba/tmp read only = no guest ok = yes This brief configuration file tells the Samba server to offer the /usr/local/samba/tmp directory on the server as an SMB share called test . The server also becomes part of the METRAN workgroup, of which each client must also be a part. If you have already chosen a name for your own workgroup, use the name of your workgroup instead of METRAN in the previous example. In case you are connecting your Samba system into an existing network and need to know the workgroup name , you can ask another system administrator or go to a Windows system in the workgroup and follow these instructions:
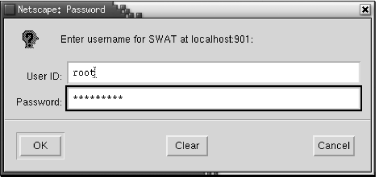
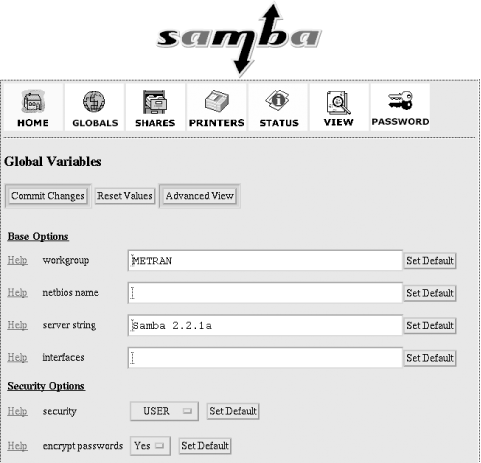
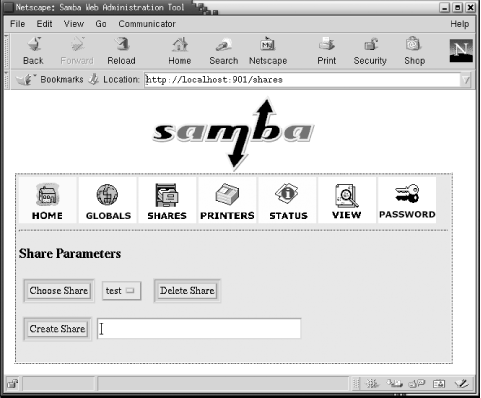
We'll use the [test] share in the next chapter to set up the Windows clients . For now, you can complete the setup by performing the following commands as root on your Unix server: # mkdir /usr/local/samba/tmp # chmod 777 /usr/local/samba/tmp You might also want to put a file or two in the /usr/local/samba/tmp directory so that after your Windows systems are initially configured, you will have something to use to check that everything works. We should point out that in terms of system security, this is the worst setup possible. For the moment, however, we only wish to test Samba, so we'll leave security out of the picture. In addition, we will encounter some encrypted password issues with Windows clients later on, so this setup will afford us the least amount of headaches . 2.6.1 Encrypted PasswordsIf your Windows clients are using Windows 98 or Windows NT 4 Service Pack 3 or above (including Windows 2000 and Windows XP) and you are using a version of Samba earlier than 3.0, you must add the following entry to the [global] section of the Samba configuration file: [global] encrypt passwords = yes In addition, you must use the smbpasswd program (typically located in the directory /usr/local/samba/bin/ ) to enter the username/password combinations of the Samba users into Samba's encrypted password database. For example, if you wanted to allow Unix user steve to access shares from a client system, you would use this command: # smbpasswd -a steve New SMB password: Retype new SMB password: Added user steve. When the first user is added, the program will output a message saying that the encrypted password database does not exist. Don't worry: it will then create the database for you. Make sure that the username/password combinations you add to the encrypted database match the usernames and passwords you intend to use on the Windows client side. You must run smbpasswd for each client user. In Samba 3.0, passwords are encrypted by default, so the encrypt passwords = yes parameter in the configuration file is optional. However, you will still need to run the smbpasswd command to add users to the encrypted password file. 2.6.2 Using SWATCreating a configuration file with SWAT is even easier than writing a configuration file by hand. To invoke SWAT, use your web browser to connect to http://localhost:901 , and log on as root with the root password, as shown in Figure 2-1. Figure 2-1. SWAT login After logging in, click the GLOBALS button at the top of the screen. You should see the Global Variables page shown in Figure 2-2. Figure 2-2. SWAT Global Variables page In this example, notice that SWAT retrieved the workgroup name from the smb.conf file that you created. (If it didn't, go back and perform that step correctly.) Make sure that the security field is set to USER . If you are running Samba 2.2 and your Windows clients are at least Windows 98 or Windows NT 4 SP 3 or later versions, find encrypt passwords in the Security Options section and select yes . The only other option you need to change from the menu is one determining which system on the LAN resolves NetBIOS addresses; this system is called the WINS server . At the very bottom of the page, set the wins support field to Yes , unless you already have a WINS server on your network. If you do, put the WINS server's IP address in the wins server field instead. Then return to the top of the screen, and press the Commit Changes button to write the changes out to the smb.conf file. Next, click the SHARES icon. You should see a page similar to Figure 2-3. Select test (to the right of the Choose Share button), and click the Choose Share button. You will see the Share Parameters screen, as shown in Figure 2-3, with the comment and path fields filled in from your smb.conf file. Figure 2-3. SWAT Share Parameters screen If you specified that you want to use encrypted passwords on the GLOBALS page, click the PASSWORD button. Near the top of the screen, you will see the Server Password Management section. Enter your Unix username and password in the spaces, and click the Add New User button. This functions the same as the smbpasswd utility and creates an entry in the /usr/local/samba/private/smbpasswd file to allow you to authenticate from a Windows client. Now click the VIEW button at the top, and SWAT shows you the following smb.conf file: # Samba config file created using SWAT # from localhost (127.0.0.1) # Date: 2002/09/05 04:56:43 # Global parameters workgroup = METRAN encrypt passwords = Yes wins support = Yes [test] comment = For testing only! path = /usr/local/samba/tmp read only = No Once this configuration file is completed, you can skip the next step because the output of SWAT is guaranteed to be syntactically correct. 2.6.3 Disabling OplocksThe smb.conf file you have just created is certainly good enough for the purpose of initial setup and testing, and you can use it as a starting point from which to develop the configuration of your production Samba server. But before you get too far with that, we want to bring one thing to your attention. If you are the type of administrator who is highly concerned about data integrity, you might want to make the following modification to your smb.conf file before continuing: [global] oplocks = no That is, use a text editor to add the line oplocks = no to the [global] section of your smb.conf file. With this example, as with other examples we will present throughout this book, you do not need to enter the [global] line again in your configuration file. We include it only to indicate in which section the parameter belongs. The oplocks = no parameter disables opportunistic locking by clients. This will result in significantly poorer performance, but will help ensure that flaky Windows clients and/or unreliable network hardware will not lead to corrupted files on the Samba server. We will cover opportunistic locking (oplocks) in more detail in the section "Locks and Oplocks" in Chapter 8, and recommend that you understand the ideas presented there before implementing a production Samba server that serves database files or other valuable data. 2.6.4 Testing the Configuration FileIf you didn't use SWAT to create your configuration file, you should probably test it to ensure that it is syntactically correct. It might seem silly to run a test program against an eight-line configuration file, but it's good practice for the real ones that we'll be writing later on. The test parser, testparm , examines an smb.conf file for syntax errors and reports any it finds along with a list of the services enabled on your machine. An example follows ; you'll notice that in our haste to get the server running we mistyped workgroup as workgrp (the output is often lengthy, so we recommend capturing it with the tee command): Load smb config files from smb.conf Unknown parameter encountered: "workgrp" Ignoring unknown parameter "workgrp" Processing section "[test]" Loaded services file OK. Press Enter to see a dump of your service definitions # Global parameters [global] workgroup = WORKGROUP netbios name = netbios aliases = server string = Samba 2.2.6 interfaces = bind interfaces only = No ...(content omitted)... [test] comment = For testing only! path = /usr/local/samba/tmp read only = No The interesting parts are at the top and bottom. The top of the output will flag any syntax errors that you might have made, and the bottom lists the services that the server thinks it should offer. A word of advice: make sure you and the server have the same expectations. |
EAN: 2147483647
Pages: 475