Fill-In Forms
|
| < Day Day Up > |
|
Fill-In Forms
Fill-in forms are so misunderstood! They're one of the easiest things to create. What are they good for? How many times have you received a form to fill out, and then, when you type in the information, the underlines move over and your text isn't underlined anyway? It works great if you print it and fill it out by hand, but how do you get it back to the sender now? Well, you could scan it with a scanner, but why did they send you this kind of form anyway?
Although the directions seem lengthy, they're quick to learn, and you can master them easily.
Open the Forms toolbar by choosing View → Toolbars → Forms. The toolbar looks like Figure 18-4, which shows the Word 2002/XP Forms Toolbar.

Figure 18-4: Word 2002/XP Forms Toolbar
Form Fields
Form fields are the area in your document where your user will be able to enter information. When your form is complete, the fields are the ONLY areas of the document that can be changed.
Text Form Fields
Click on the ab| button to insert a text form field. Double-click the gray form field that appears, or click on the form field and hit the Properties button (the icon with the hand on it) on the Forms toolbar. You now have a Properties window for that text form field. Refer to Figure 18-5.
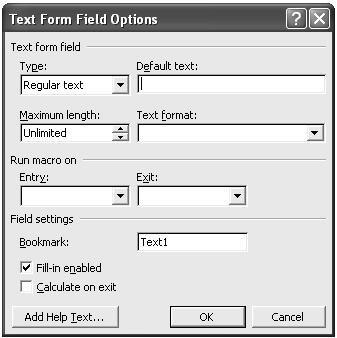
Figure 18-5: Form Field Properties - Text
Suppose that you are creating a contract form and this particular field will be used for the contractor's name. Give this form field a bookmark name of 'Contractor.' Bookmarks can only be one word, so if you use 'Contractor Name,' you must put 'ContractorName' or 'Contractor_Name' as the bookmark.
By giving the bookmark a name you understand, it's easy to later insert cross-references to the bookmark in your document.
Inserting a cross-reference makes the same information appear again, without having to type it again.
Suppose you want to use this text form field for an account number and suppose that your account numbers are something like ABC01, ABC02, etc. You will want to restrict the size of this text form field to 5 characters.
As the default value, you can enter LLLNN to indicate the syntax of the expected entry. You can use Uppercase text formatting to ensure that your account numbers are all uppercase. You'll note that you can add help text as well.
Check Box Form Fields
This one is fairly straightforward. Insert a checkbox and then double-click it to view the properties. Suppose you have a checkbox for Yes and one for No. Perhaps you already know that 60% of the responses will be Yes. You could have Yes default to checked.
To allow only one checkbox to be selected requires Visual Basic for Applications. Generally, using only ONE checkbox for the exception is the better choice. For instance, a field with the label 'Married' could have just one checkbox.
Dropdown Form Fields
These form fields are much easier than you would think! Insert one and double-click it. You can add items to the list and organize them alphabetically or from the most popular to least popular. A field like this can be used for choosing from a list of specific items. This avoids mistakes from typos, particularly if your list is limited.
There's a 25-item limit! If you find yourself needing more, label each drop-down form field with some kind of criteria. For instance, suppose you've got 73 department names. Make three drop-down form fields, one each for department names that begin with A through J, K through R, and S through Z. The only other alternative is a Visual Basic for Applications object combo box.
Consider using the drop-down form field instead if, for instance, you have a limited number of accounts as described under the Text form field options.
If you do not want your drop-down form field to appear as if the first item is selected, create an item using a dozen or so spaces. Even though you cannot see it, you can move it to the top of the list in the properties box. When the form is viewed, that item shows nothing selected. You could also put a choice called 'Choose from List.'
Creating Forms in Tables
If your form is, for instance, a subcontractor agreement that is fairly standard, you will just want to insert form fields as described above.
However, if your form is something that needs to mostly be completed by the user, you may want to use tables. Forms with tables are especially nice because they can be filled out electronically and by hand. Using table borders to underline your form field can make it look like it was a form that was put into a typewriter and completed.
Suppose you need name and date on one line. Make four columns. The first cell should contain 'Name:,', the second should contain your form field and have a bottom border on it (unless you are keeping all of your cell borders). The third should contain 'Date:,', and the fourth should contain a text form field formatted as a date and can have a bottom border. The following Tip describes how to accomplish your goal.
Some of these instructions can apply to Macrobutton forms too.
Begin by turning on the Forms toolbar. Then create a table that has twice as many columns as it does entries (check box form fields only require one column).
With the Show/Hide button on, the form might look something like Figure 18-6 while you develop it.
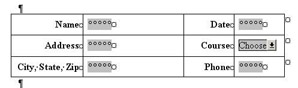
Figure 18-6: Sample Form-Developer View
You can also change the sizes of the cells to get the most out of your available space, as shown in Figure 18-7.
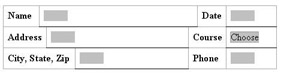
Figure 18-7: Sample Form with Resized Cells
When you've completed the form, you can remove certain borders from the table, if desired, which gives you something like Figure 18-8.
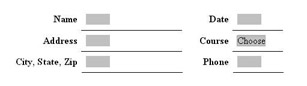
Figure 18-8: Sample Form-User View
Protecting Fill-In Forms
These types of form documents must be protected for the form fields to work. The last button on the Forms toolbar, which looks like a padlock, allows you to quickly protect the form while you are creating it to ensure that your form fields work as planned. However, to truly protect your form prior to actually using it, go to Tools Protect Document and choose Forms. Give it a password if you like.
Warning: When you protect the form, fill it out and then decide to change something in the form, you must unprotect it. If you unprotect it, fix that item, then reprotect your form, all of your filled-in form fields will be empty again!
New in Word 2002/XP: This behavior does not occur; the fields are not reset to be blank.
Warning: You may have protected your form, but anyone can create a new document from it simply by opening a blank document, hitting Insert File and inserting your form document. Your form is now unprotected, whether you used a password to protect the original or not. The good thing is that if you forget the password for your form, you can use the same method to unprotect it and then re-protect it.
Spell checking Protected Fill-In Forms
After completing your form, your users may want to spell check it. The spell check option is grayed-out and unavailable. The form must be unprotected, spell checked and then re-protected. You will not want to let your users do this because they may lose the entries they've made. Visual Basic for Applications code is required to work around this in versions 2000 and below.
Hyperlinks don't Work in Protected Forms? That's right. So here's your workaround:
-
You will need to have a form field to which you want to hyperlink or you can create one. (If you want this to be a *hidden* form field, particularly if you are protecting your document but not for form purposes, select it and make it one point in font size and one character in length.)
-
Give the bookmark a friendly name for you to refer to.
-
Record a macro that does an Edit-Go To to the bookmark for that form field.
-
Insert a command button next to what you would have clicked on for your hyperlink.
-
Have that command button run your macro.
|
| < Day Day Up > |
|
EAN: 2147483647
Pages: 130