If(( DCOMCOM) (COMDCOM)) return S_OK
|
| < Free Open Study > |
|
If(( DCOM == COM) && (COM == DCOM)) return S_OK;
Everything you know about COM applies directly to DCOM. DCOM is not necessarily a "new way" to do COM, and it is not necessarily a modification to traditional COM. In essence DCOM is an evolution, providing the ability for a client to access servers located on another machine. A developer may configure a client to access a remote server by taking two approaches, both achieving the same end result of remote activation:
-
Use the DCOM configuration utility (dcomcnfg.exe) to redirect all client requests on a given machine to a named remote machine hosting the server. This is the "no-code" approach.
-
Program a client to always access a named remote machine using DCOM-centric COM library calls and structures. The approach always overrides any settings specified by the dcomcnfg.exe utility.
Both approaches require that the server information is correctly registered on each machine, including entries for ProgIDs, CLSIDs, AppIDs, LIBIDs, and IIDs. Each approach requires configuring the remote server with the desired security attributes to determine which clients can access the server and exactly how they may do so. We will access our CoCar EXE server using both techniques, starting with the dcomcnfg.exe utility. But first, a little more detail is needed on how our objects are created remotely.
Local SCM to Remote SCM Communications
Communication between a client and remote server is established by the SCM on the client machine asking the SCM on the server machine to find, load, and return an interface pointer from a remote COM object. We already know that if a client requests an interface from a COM object on the same machine (in-proc or local), SCM consults the system registry to find the exact location of the component home based off the InprocServer32 or LocalServer32 subkeys of HKCR\CLSID.
In remote activation, the SCM on the client's machine reads the local registry and discovers the path of the object maps to some other named machine. The red flag that alerts a SCM to "go remote," is the presence of the RemoteServerName entry in the AppID of the local registry (Figure 5-24). This realization results in the local SCM making a call to the remote SCM, which in turn looks up the path to the binary in the remote registry. This SCM to SCM contact is accomplished again by ORPC calls.
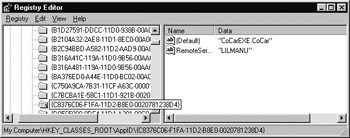
Figure 5-24: A given AppID may have a RemoteServer-Name value specifying a remote machine.
As you recall, an AppID should have a listing under the corresponding CLSIDs for each coclass in the server:
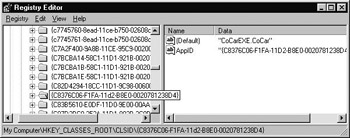
Figure 5-25: CLSID listing should have a corresponding AppID value.
With these two registry tweaks (and assuming the server has been actually registered on the remote machine) your client requests will now be sent to the named machine, without a single line of code changed in the client. Rather than making these adjustments by hand or via a REG file, you may make use of the dcomcnfg.exe utility to enter or remove them using a friendly GUI environment.
As mentioned, dcomcnfg.exe is not the only way to access a remote server. If you choose to alter your client's code base to launch a remote server, you have a handful of new COM library items to help you get across the wire. For example, the CoCreateInstanceEx() function takes as one of its parameters a COSERVERINFO structure. One of these fields specifies the name of the remote machine.
| Note | SCM will always honor explicit creation calls above any RemoteServerName registry entries. |
What is DCOMCNFG?
The dcomcnfg.exe utility that ships with Windows NT is an administrative tool used to redirect client requests to a remote machine without affecting the existing code base. This same tool is used to configure the security attributes for a given COM application on the remote machine on a server-by-server basis. Configuring a remote connection requires administration details for each computer involved in the experience of this long-distance relationship. This is a frustrating aspect of DCOM, as it can tend to require a good deal of running around the office to configure everyone's machine properly.
DCOM is available for Win95/98 as well. However, as these operating systems are not enterprise-level systems you will find many options unavailable, most notably in the area of COM security. Under NT workstations, you will find more security options than you can shake a stick at, and all servers are allowed to be launched when asked to do so by an authenticated client.
| Note | The DCOM lab presented at the end of this chapter assumes a Windows NT configuration. |
An Overview of DCOMCNFG
When you first run dcomcnfg.exe, you will see four individual tabs (using NT SP4; SP3 does not supply the Default Protocols tab). The leftmost Applications tab lists all coclasses on a given machine (Figure 5-26). If the server has registered a ProgID you will find it listed alphabetically; if not, you will find the less-than-friendly CLSID listings.
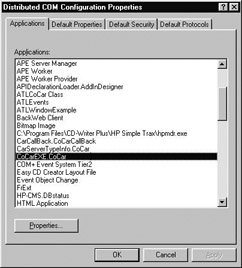
Figure 5-26: The Applications tab allows you to edit the security and activation values for a given COM application.
As an interesting side note, whenever dcomcnfg.exe is launched, it will automatically discover any COM applications that do not currently have an AppID listing and assign one automatically, using the first CLSID encountered in the server's type library (again, this is a good thing, as many legacy COM servers never registered AppIDs). Assume we want to configure LocalShapes.CoHexagon using dcomcnfg.exe. Even if we do not edit our REG file to configure a specific AppID, the AppID assigned to LocalShapes.CoHexagon will be identical to the CLSID of CoHexagon.
When you double-click any AppID entry (or select an item and hit the Properties button), you will launch another tabbed dialog which allows you to set the activation and security settings of that particular AppID (such as LocalShapes.CoHexagon). We will see this in just a moment, but let's finish discussing the remaining tabs of the main dialog.
The Default Properties tab (Figure 5-27) allows you to configure how DCOM will generally behave on a given machine. First off, you have the option of enabling or disabling DCOM itself on the current machine. The other options allow you to establish machine-wide default authentication and impersonation levels (which we discuss shortly). If a given AppID does not specify otherwise, these settings will be used when accessing the remote server.
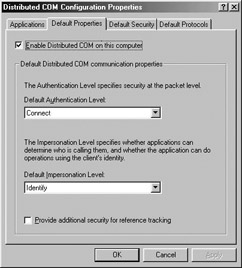
Figure 5-27: You may specify default client security checks using the Default Properties tab.
The Default Security tab (Figure 5-28) allows you to configure how this machine will allow remote users to launch and access the COM applications residing here. This same tab allows you to modify the set of users allowed to configure COM applications on this machine (read: "who can install new COM servers and configure existing ones").
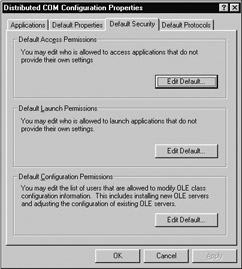
Figure 5-28: You may apply machine-wide DCOM security settings with dcomcnfg.
The final tab, Default Protocols, lists each network protocol currently used by DCOM. This tab allows you to configure the current protocols, add new ones, and remove existing ones (which you should typically not do).
A New Hive: HKEY_LOCAL_MACHINE
Keep in mind that the values set with the Default Properties, Default Security, and Default Protocols tabs are used only if a given AppID does not specify otherwise. Typically you will want to configure an AppID yourself and override many of these default settings. Your system registry holds the value of each DCOM-centric default under HKEY_LOCAL_MA- CHINE\SOFTWARE\Microsoft\Ole, as shown below:
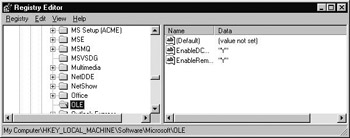
Figure 5-29: Location of all default security settings for a particular machine.
As you can see, many of these entries revolve around secure access to the COM servers. Therefore, we need to get the basics of COM security under our belts before going remote.
COM Security Basics
Now that a client machine can redirect all activation requests to a remote host using the RemoteServerName value, we need to address the issue of COM security. Just because we have registered a COM server on some remote machine does not mean clients can come breaking down the doors whenever they desire. While a client machine uses dcomcnfg.exe to redirect clients to a remote server, the remote machine also uses dcomcnfg.exe to configure how a given COM application deals with its security issues.
COM security can be configured using two approaches, both achieving the same end result (more or less). First, you may elect to use declarative security. This approach stores a server's security settings in the local system registry. Declarative security is typically done using dcomcnfg.exe on an AppID-by-AppID basis (or by using the default DCOM security settings mentioned earlier).
Programmatic security, on the other hand, makes use of a number of COM security interfaces and security-related COM library calls. As you may suspect, this gives you more control over security measures than declarative settings. The core library function in the COM security suite is CoInitializeSecurity(), which sets the security for a given process at run time. If a given process sets programmatic security, any declarative entries in the registry are ignored. In fact, the COM runtime calls CoInitializeSecurity() automatically using the declarative entries you made with dcomcnfg.exe.
COM's security is based on the NT security model. Every time a user logs onto an NT workstation, he or she is required to supply a user name and password, collectively termed a user account. NT assigns a security ID (SID) to each user account, which may then be added to local or global groups such as Administrators, Users, and Power Users. The User Manager utility supplied with Windows NT allows system administrators to edit these groups.
SIDs can also be used to establish security settings for a given resource. NT maintains the master list of "who can do what to whom" using a Discretionary Access Control List, or DACL. The DACL is used to establish the three fundamental COM security traits:
-
Authentication: Are you who you claim you are?
-
Access Control: Who can use and/or launch this COM server?
-
Server Identity: Sets identity for running the remote server.
Setting the Authentication Level
Authentication is the act of verifying the identity of a DCOM client. A DCOM server needs to be certain that a remote client is who it claims to be before it allows any further activity (such as activation or access to currently active objects). NT provides authentication services through a Security Support Provider (SSP) OS layer such as the NT 4 Lan Manager (NTLM).
The authentication of a remote client takes place at the packet level, and therefore the packet is the unit of measurement used to determine how often the SSP should perform authentication logic. Here are the various authentication levels supported by COM:
| Authentication Level | Meaning in Life |
|---|---|
| None | Absolutely no client authentication performed whatsoever. |
| Connect | Verify client identity at initial RPC connection only. |
| Call | Verify client identity for the first packet sent. |
| Packet | Verify client identity for each packet sent. |
| Packet Integrity | Packet level authentication plus a signed payload to ensure no tampering has taken place during transmission. |
| Packet Privacy | Packet Integrity level plus encryption to ensure that no "along the wire" peeking can take place. |
Recall that the Default Properties tab of dcomcnfg.exe can be used to set the default level of authentication. NT SP4 also allows you to set the authentication level on an AppID basis under the General tab of a given AppID. This configuration will override any authentication level set at the machine level. For example, we may establish the default authentication level of our CoCar server as shown in Figure 5-30:
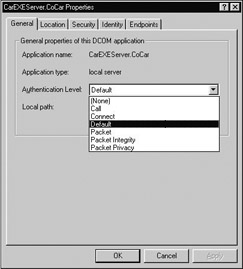
Figure 5-30: Managing authentication at the AppID level.
Access Control
Like authentication settings, access control may be set at the machine-wide or AppID level using dcomcnfg.exe. Each AppID maintains an Access Control List (ACL), specifying which groups or individual users can access, launch, and configure the underlying COM server. If you wish to establish a default machine-wide access control level, you may do so from the Default Security tab. If you wish to specify control access for a given COM application, you may select an AppID and create unique ACLs for the following access categories:
-
Access permissions: Users included in the Access ACL may invoke methods on the remote server. If they are not on the list, they cannot access a running COM server.
-
Launch permissions: Users contained in this ACL have the rights to start up a new instance of a COM server. Any user that has launch permissions should also have access permission; however, the reverse situation is not always true. You may block out some users from launching a new instance of the COM server while allowing them to access running servers.
-
Configuration permissions: Specifies who is able to change these ACL lists for a given AppID. Chances are you do not want Fred from accounting to configure your COM servers, and using configuration levels, you may block him out.
Figure 5-31 illustrates the dcomcnfg.exe ACL editor used for launch permissions. Access and configuration settings use a similar ACL editor.
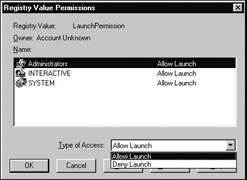
Figure 5-31: ACLs may be established for access, launch, and configuration permissions using dcomcnfg.exe. You have the choice of default machine-wide settings or AppID-specific setting.
Information concerning a COM application's ACL lists are held in the registry as named values, under HKCR\AppID:
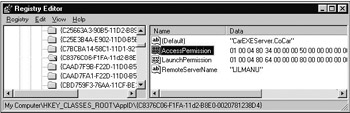
Figure 5-32: Access control for HKEY_CLASSES_ROOT\AppID\{C8376C06-F1FA-11d2-B8E0-0020781238D4} (CoCar).
Server Identity Settings
The final issue we need to address has to do with server identity. Once a SID has passed the authentication, launch, and access security checks, COM needs to know under which "identity" to launch the server, meaning "what is the SID for the user who is using me?" The choices are controlled from the Identity tab and may take the following values, which are used to set the RunAs value for a given AppID:
-
The Interactive User: This is really only useful during COM debugging sessions. All COM servers run under the identity of the user logged on at the server NT workstation. This would mean if your buddy logged onto your machine after hours under her account, she has the identity rights for this server. This is the only identity setting that permits a server to launch any UI elements contained in the server.
-
The Launching User: This is the default (and worst) choice. Here you give identity rights for your COM server based off the user that launched it. This has the unappealing side effect of SCM launching a new instance of your server for each remote client.
-
This User: For any production application, this is the correct setting. You may establish a user account for the COM application. As long as you add in the correct users and groups to this ACL, you ensure a select group around the enterprise is the "identity" of the COM server.
Going Remote Using DCOMCNFG: Setting up the Client and Server Machines
Now that you have an understanding of these four tabs and basic DCOM security options, let's investigate how to configure our CoCar EXE server to run on a remote host. First, you must be connected to at least one other machine (just had to mention that).
Now let's begin by configuring the client machine. Begin by launching dcomcnfg.exe. From the Applications tab, double-click the AppID entry for CoCarEXE. Under the Location tab you specify the machine on which SCM should look for the remote server. This entry automatically enters a RemoteServerName value under HKCR\AppID (see Figure 5-33).
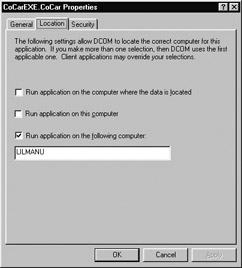
Figure 5-33: Editing the RemoteServer-Name value for a given AppID.
Notice that it is possible to configure a single AppID with what seems to be more than one location. If you were to check both the On this Computer and On the Following Computer options, SCM will activate the server at the closest proximity from the client. When we learn how to access a remote computer programmatically with the COM library, these settings will be overridden by the client's code base.
Now we need to set up security options on the server machine. Open dcomcnfg.exe on the server computer and locate CoCar (if you can't find it, you may have forgotten to register the server). Under the Security tab, you must make sure that your server's ACL allows the remote client to access and activate the server. Using the ACL editor, it is often easiest to specify members of the Everyone group during testing and debugging:
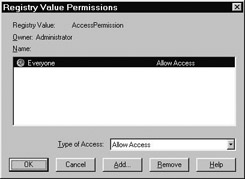
Figure 5-34: Setting universal access to a COM server.
Finally, if your server displays any user interface elements (including message boxes) you must set the server's identity as the Interactive User (Figure 5-35). If you forget to do so, when the server item launches a UI, it will not be displayed and your server will appear to hang (as the GUI is waiting for some user interaction). In the real world, you would want to create a specific This User account to assume the identity of the launch and would not establish either Interactive or Launching user identities.
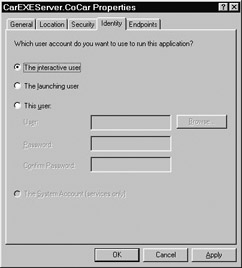
Figure 5-35: The Interactive User is the only identity that allows the server to show any GUI element.
Programmatic DCOM Library Function Calls
There are times when the best choice for remote access is to hard code a remote server in your client code. Imagine that the end user may select a number of options from a drop-down list box. Based on the selection, you might have to access information located across the enterprise on numerous remote machines. Clearly you need more flexibility than the RemoteServerName AppID value. You need code. The COM library supplies a small set of functions and data structures to help streamline remote access. Before you can use any of the following DCOM-specific COM library calls, you must define the following constant in your program before including <windows.h>:
// This includes all DCOM centric definitions. #define _WIN32_DCOM #include <windows.h>
If you do not do so, you will have a number of errors, as the DCOM-centric definitions have been conditionally omitted from your compile. With that detail out of the way, the first new DCOM related item at our disposal is the COSERVERINFO structure, used to specify the named remote server:
// COSERVERINFO is used to specify the characteristics of a remote connection. typedef struct _COSERVERINFO { DWORD dwReserved1; // Reserved (Set to NULL) LPWSTR pwszName; // Remote computer name. COAUTHINFO *pAuthInfo; // Authentication settings. DWORD dwReserved2; // Reserved (Set to NULL) } COSERVERINFO; Beyond the two reserved fields, the LPWSTR field specifies the remote server machine. This may be in the form of a UNC, DNS, or IP address. COAUTHINFO is another structure which allows for programmatically setting security authentication levels. For our purposes, we will send in NULL for this parameter and use the default authentication established by dcomcnfg.exe
The COSERVERINFO structure is used as a parameter to another DCOM-centric item, CoCreateInstanceEx(). This function is very unique in that it allows you to specify a batch of interfaces you want to acquire from the server in a single round trip. To do so, you need to create and establish a MULTI_QI structure.
MULTI_QI allows you to specify any number of required interfaces using a fixed array. When the RPC returns, you may check the HRESULT for each QI attempt, and see which (if any) interfaces were unsupported by the remote object. Here is how MULTI_QI breaks down:
// MULTI_QI is a structure which allows you to obtain a batch of remote // interfaces in a single round trip. typedef struct _MULTI_QI { const IID* pIID; // The IID you are looking for. IUnknown * pItf; // Storage for interface pointer. HRESULT hr; // Error code for a given QueryInterface() invocation. } MULTI_QI; To illustrate using these new DCOM-centric items, here is some sample code using all three DCOM items to access a remote server:
// Programmatically accessing a remote CoHexagon. void main() { ... // These are parameters to CoCreateInstanceEx(). COSERVERINFO csi = {0}; // null out all fields. MULTI_QI qi[2] = {0}; // null out all fields. // Set the name of the remote server. csi.pwszName = L"SERVERMACHINE"; // Must be Unicode. // Here are the interfaces I want from the CoHexagon. qi[0].pIID = &IID_IShapeEdit; qi[1].pIID = &IID_IDraw; // Create the remote CoHexagon. CoCreateInstanceEx(CLSID_Hexagon, // CLSID of object. NULL, CLSCTX_REMOTE_SERVER, // CLSCTX &csi, // Machine information. 2, // Items in MULTI_QI array. qi); // MULTI_QI array. // Assign interface pointers to fetched results // (could check each HRESULT...) IDraw* pDraw = (IDraw*)qi[0].pItf; IShapeEdit* pSE = (IShapeEdit*)qi[1].pItf; pDraw->Draw(); ... } Time for a lab that will give you a chance to work with dcomcnfg.exe and programmatic remote activation. When you have finished this lab, it is time to rejoice, as you will no longer be subjected to raw COM development using C++, REG files, or nasty source code ports. From here on out it is all about ATL (for the most part). I guarantee your hard work over the last five chapters will serve you well in all your future COM and ATL endeavors.
Lab 5-2: Accessing a Remote Server Using DCOM
This lab will give you the chance to experiment with remote server access. First off, you will configure a server on a remote machine, specifying various security settings using dcomcnfg.exe. Next you will access your remote server with an existing C++ client using both approaches discussed in this chapter (configuration and code). Needless to say, you must be connected to one other computer to work through this lab.
On the CD The solution for this lab can be found on your CD-ROM under:
Labs\Chapter 05\CPP Remote Client
Step One: Register the Server on the Remote Machine
Create a folder on the remote server machine to hold the required files. Copy the following files from the client machine to the server's folder:
-
The server's REG file.
-
The server's type library file (*.tlb).
-
The server binary you created in Lab 5-1 (CoCarEXE.exe).
Next, run the server once on the remote machine to force a call to LoadTypeLibEx(). This will ensure your server's interfaces and type information are registered on the remote host. Verify you have the correct HKCR\Interface and HKCR\TypeLib entries using regedit.exe.
Next, open the REG file on the remote machine for editing. Be sure that the LocalServer32 key points to the correct path on the server machine (if not, make the necessary edits now before merging). Merge this file into the system registry and verify the correct ProgID and CLSID listings, again using regedit.exe.
Now that your remote server has been properly registered with the system, we need to assign some security options to the EXE.
Step Two: Secure the Server on the Remote Machine
We will not add any high-level security measures to the remote CoCar server, but instead take the low road, and opt for easy configuration (perfect for a lab). Open up dcomcnfg.exe on the server machine, locate your ProgID from the Applications tab, and pull up the corresponding AppID property page by double-clicking on the ProgID.
Using the Security tab, edit the ACL for both launch and access permissions to include the name of your remote client. Again, to keep it simple, simply add Everyone into each ACL.
Under the Identity tab, be sure you select the Interactive User. Although this is not recommended for production-level COM servers, this option is often essential for debugging. This is especially true in this case, since we must be able to view message boxes on the remote machine, and the Interactive User is the only setting that will allow a COM server to display a GUI.
This finishes up the server configuration. Now, change keyboards, and return to your development (client) machine.
Step Three: Configure the Client Machine
Begin by launching dcomcnfg.exe. The first step is to redirect the client machine to go remote. Locate the AppID for your CoCar EXE server and launch its property page. Under the Location tab, specify the name of the remote machine (whatever that may be), and deselect the Run application on this computer setting:
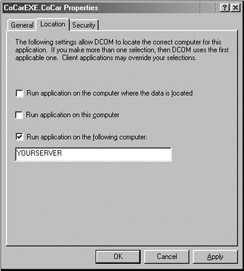
Figure 5-36: Specifying the remote server.
Recall that this modification will be held under the RemoteServerName value of the COM object's AppID.
Now, run your existing client from Lab 5-1 (or assemble a simple VB client). You should hear some whirling away on each machine, followed by the two message boxes appearing on the remote monitor, courtesy of your IStats interface. This is location transparency at its finest. We had no need to alter a single line of code. The universal marshaler took us from point A to point B automatically.
Step Four: Programmatic Access to your Remote Server
As the final step of this lab, we will change our client's code base to make use of the DCOM-centric COM library items. Before you do, open up dcomcnfg.exe one more time and "roll back" the client changes you have just made.
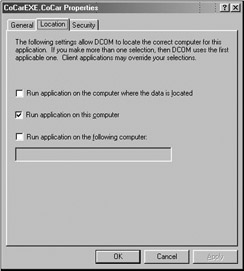
Figure 5-37: Reset the location of the DCOM server.
Run the client again and verify that CarEXEServer.exe has launched on your local machine. Remember, programmatic DCOM will always overwrite any RemoteServerName values. Therefore, there is no need to set a RemoteServerName value when writing DCOM code in the raw.
Now open up a C++ client project workspace, and modify (or create) main() to behave as follows:
-
Create a COSERVERINFO structure, and set the pwszName field to be the name of your remote host.
-
Create an array of MULTI_QI structures to hold each interface you wish to fetch. Set the pIID fields to each index in the array to your named IID values.
-
Call CoCreateInstanceEx(), passing in your structures and other parameters. Be sure to set the CLSCTX flag to CLSCTX_REMOTE_SERVER.
-
If CoCreateInstanceEx() succeeds, assign fetch interface pointers to a local interface variable (don't forget that MULTI_QI returns the HRESULTs for each QueryInterface() attempt).
Here is the complete C++ client code, front to back:
//The steps above equate to the following code: #define _WIN32_DCOM #include <windows.h> #include "CarServerEXETypeInfo_i.c" // MIDL file. #include "CarServerEXETypeInfo.h" // MIDL file. int main(int argc, char* argv[]) { CoInitialize(NULL); COSERVERINFO csi = {0}; // -> ADD YOUR SERVER NAME HERE!!!!!!!! <- csi.pwszName = L"YOURSERVER"; // Here are the interfaces I want. MULTI_QI qi[3] = {0}; qi[0].pIID = &IID_IEngine; qi[1].pIID = &IID_IStats; qi[2].pIID = &IID_ICreateCar; // Create the remote CoCar. CoCreateInstanceEx(CLSID_CoCar, NULL, CLSCTX_REMOTE_SERVER, &csi, 3, qi); // Assign interface pointers to fetched results. IEngine* pEngine = (IEngine*)qi[0].pItf; IStats* pStats = (IStats*)qi[1].pItf; ICreateCar* pCCar = (ICreateCar*)qi[2].pItf; // Exercise the car. BSTR name; name = SysAllocString(L"Cindy"); pCCar->SetPetName(name); pCCar->SetMaxSpeed(40); pStats->DisplayStats(); SysFreeString(name); // Clean up. pCCar->Release(); pStats->Release(); pEngine->Release(); CoUninitialize(); return 0; }
Now, run the program on the client machine. You should see the same message boxes pop up on the remote server, this time using programmatic DCOM. The patiently waiting client is shown in Figure 5-38.
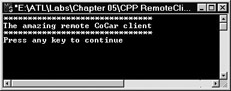
Figure 5-38: From C structure to DCOM server in five easy chapters.
If you have remained diligent and worked through these first five chapters, you have most certainly developed a solid understanding of core COM. As you have most likely realized, doing raw COM development can be a long and winding road. Although it is completely possible, creating COM servers is straight C++ and IDL can be an error-prone experience.
The Active Template Library (ATL) provides the help you need to remain focused on your application's logic by providing framework support for the necessary "COM goo." Now that you have a firm background in the basics of COM development using IDL and C++, it is time to turn to the world of ATL.
|
| < Free Open Study > |
|
EAN: 2147483647
Pages: 171