Custom Controls and Indicators
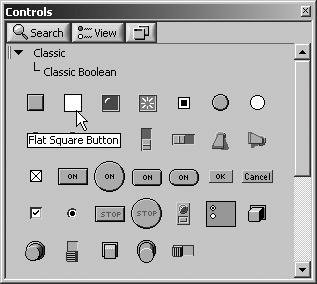
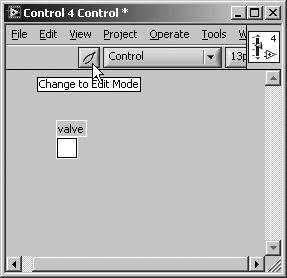
In Chapter 13, "Advanced LabVIEW Structures and Functions," we learned about type definitions, a kind of custom control. Type definitions usually focus on the underlying data type, but with custom controls, you can also customize the appearance of the control. You can customize controls and indicators to make them better suited for your application while displaying a more impressive graphical interface. In the previous examples, you might want to display the temperature stages at various points in a process to represent the real-world scenario. Or you might want to turn on and off a valve by clicking on a valve picture control above. You can save a custom control or indicator ("control" from here on, for simplicity) in a directory or LLB file, just as you do with VIs and globals. LabVIEW uses the ".ctl" file extension for custom control files. You can use the saved control in other VIs, as well as in the one in which it was created. It's possible to even create a master copy of the control if you need to use it in many places in the same VI by saving the control as a type definition. When you make changes to a type definition, LabVIEW automatically updates all the VIs that use it! That's a huge time saver and an absolute necessity for large LabVIEW projects. You may also want to place a frequently-used custom control in the Controls palette. Do this by selecting Tools>>Advanced>>Edit Palette Set from the menu, or just put it in the ./user.lib/ directory, and it will appear in the User Controls palette the next time you restart LabVIEW. OK, so how do you create a custom control? We'll start with a very simple example. Activity 17-1: Custom ControlsUsually, you will want to import pictures for your custom control, so first of all have your picture files available, maybe along with a graphics program. LabVIEW doesn't have any sort of picture editor. When you create a custom control, you always base it on the form of an existing control, such as a Boolean LED or a Numeric Slide control. In this activity, we'll create a custom Boolean that looks like a valve that is open or closed.
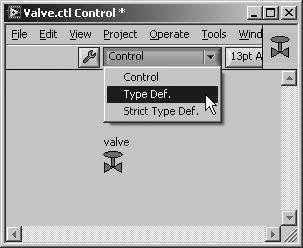
An important concept to understand is that you cannot change the behavior of a control; you can only modify its appearance. This also means that generally you can't change the way a control displays its data (a custom control based on a slide will always have something that slides in one dimension, for example). Despite these limitations, you can produce some fancy graphical interfaces, especially if you're artistically inclined and willing to experiment. If you want to create a master copy of your control so that all the VIs that contain it are automatically updated when you make a change to the master copy, select Type Def. from the ring on the Control Editor's toolbar (see Figure 17.16). Figure 17.16. Configuring Valve.ctl to be a Type Definition A type definition forces the control data type to be the same everywhere it is used, but different copies of the type definition can have their own name, color, size, and so on. This is useful because only the master copy can be modified in behavior, thus preventing accidental changes. A strict type definition forces almost everything about the control to be identical everywhere it is used. Finally we'll mention one very powerful type of customized control: the XControl. XControls in LabVIEW let you not only create custom interfaces, but let you embed custom behaviors by writing LabVIEW code for the XControl. For example, you could create an XControl that is like a CD Player interface. Among other things, you could define that the "stop" button works whenever the "play" button is active and pressed, and that the "play" button resets the "stop" button. XControls are beyond the scope of this book but for more information, check out the LabVIEW examples and documentation on this very nifty feature. |


EAN: 2147483647
Pages: 294