Working with the Linux File System
| < Day Day Up > |
| Test Objective Covered:
To effectively manage a Linux server, it's imperative that you have a sound understanding of the Linux file system. We've already introduced this topic earlier in this chapter, but now we're going to dive in a little deeper in the sections that follow. Default Linux File System StructureIf you're familiar with Windows or DOS, you will probably be completely lost when you first encounter the default Linux directory structure. There's little in the way of similarity between them. That's because they are based on completely different standards. The Linux directory structure is based on the Linux Standards Base (LSB). The goal behind the LSB project is to encourage all the various Linux distributions to conform to a set of operating system standards, including how the file system is organized. The purpose is to ensure compatibility between distributions. Within the LSB is the File Systems Hierarchy (FSH) standard. This defines directory structures, naming standards, and usage. For more details on the LSB, visit http://www.linuxbase.org. A full review of all the default Linux directories is beyond the scope of this study guide. The folks at Novell, however, felt it important enough that they included this objective in the CLE. Here are the common Linux directories you need to be familiar with to be successful in the CLE Practicum:
Warning Because the data stored in /var can grow very large ( especially with NNLS installed), you should make sure the partition where /var is located has lots of free space. Some NNLS administrators will actually add an additional disk to the system, partition it, and mount it at /var to ensure they don't run out of space . As you will be working a great deal with these directories in this course, it would be a good idea to commit their names and uses to memory. Keep in mind that these are the default system-created directory structures. There's nothing to stop you from modifying the structure or creating your own additional structures. If you do, however, be sure to document your changes. An administrator down the road might inherit your system from you and will need to know what you have put where. Command-Line File System UtilitiesJust as with other operating systems, Linux provides a suite of utilities you can use to manage the file system. These include tools to make directories, copy files, move files, delete files, remove directories, view the contents of files, and so on. It's been my experience that system administrators who learned their trade in a graphical environment tend to become a little nervous when presented with command-line file system utilities. I've heard arguments from them to the effect that, if graphical utilities are available, in this case X Window System, why bother learning how to use the command-line version of these utilities? In a Windows world, there is some validity to their argument. Windows command-line utilities generally aren't as powerful as their graphical counterparts. The same can't be said for Linux. There are two good reasons for leaning how to use command-line Linux tools. First and foremost, many Linux system administrators and implementers actually install their systems without X Window System. They want their server systems to run as fast as possible. They don't want to "waste" CPU cycles redrawing graphical screens. Second, the Linux command-line file system utilities tend to be much more powerful than their graphical counterparts. Most experienced administrators share this opinion, preferring command-line utilities over their graphical equivalent. In short, to be a good Linux system administrator, you simply must know how to effectively use the command line. With that said, let's review some of the most commonly used command-line file system management utilities. Note that this study guide doesn't go into great depth on the syntax required to use these commands. You can use the man command to learn the specifics of how to use each of those utilities.
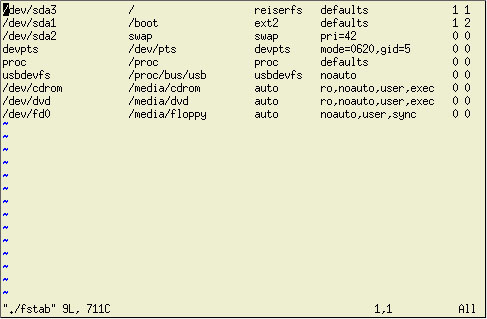
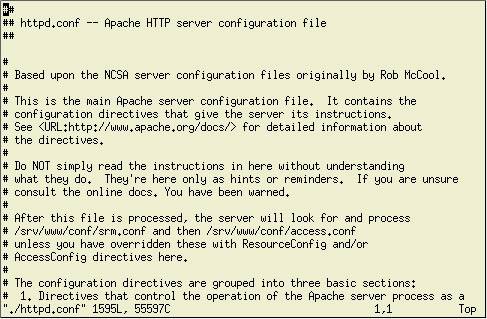
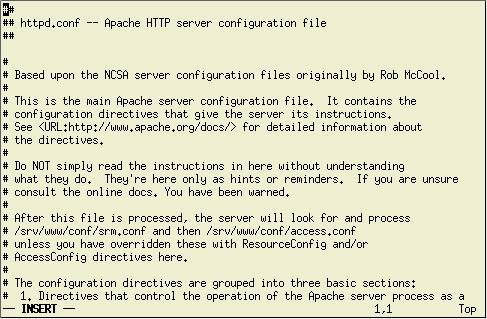
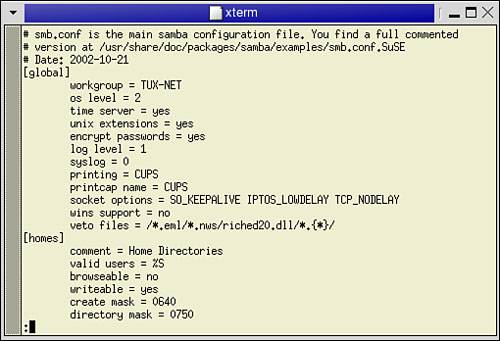
The preceding commands are very useful when you're maintaining a Linux system, especially one with NNSL installed. At this point, we need to discuss in depth several utilities that you must know how to use in order to install and configure NNLS on your Linux system. These include mount, tar, gunzip , and vi . Using the mount CommandIn order to install NNLS on your Linux system, you must know how to use the mount command. This command wasn't included in the preceding list because you need to know how to use it in depth. You will probably need to use the mount command whenever you insert a floppy diskette or a CD/DVD disc in your Linux server's drives. Tip Some Linux distributions use an automount daemon that detects a new diskette or disc in the system and will automatically mount it . The syntax for the mount command is as follows : mount -t filesystem_type device mount_point The mount command supports many different file system types. There are really only two that you need to be concerned with for the CLE certification. The first is the ISO9660 file system. This is used by most data CDs. The other is the VFAT file system. This used by most floppy diskettes. Tip Technically, a floppy diskette can be formatted using any file system that supports the media type. However, in this book, all the floppy diskettes we will work with will be formatted using the FAT file system. This allows them to be readable in both Windows and Linux systems . Check the man page for mount to see a complete list of supported file systems. To mount a floppy diskette on a SUSE Linux system, you would insert the disk and then enter mount -t vfat /dev/fd0/media/floppy . Note Remember that you don't have to use the /media/floppy direcrory. You can mount the disk anywhere in the file system. However, many applications are hard-coded to look in /media/floppy when they are looking for a floppy diskette . On a Red Hat system, you would use the same command, but you would mount the diskette in the /mnt/floppy directory. If you have the correct entry in the fstab file, you don't have to specify the file system type or the mount point. Consider the fstab file shown in Figure 2.14. Figure 2.14. The fstab file. Notice that /dev/fd0 is configured to automatically mount to /media/floppy . Because of this, you can enter the following command to mount a floppy diskette: mount /dev/fd0 You can customize your fstab file to make the mount process even easier. To do this, use the following command: ln -s /dev/fd0 /dev/floppy Note To learn more about how ln is used to create links, check out its man page by entering man ln . When executed on your system, this command creates a file in /dev called floppy and creates a symbolic link between it and the /dev/fd0 file. After it's executed, you can mount a floppy diskette on your system by simply entering the following: mount /dev/floppy CDs are mounted in a similar fashion as floppies. On a SUSE Linux system, insert the CD in the CD drive and then enter the following command: mount -t iso9660 /dev/cdrom /media/cdrom A Red Hat system is mounted in the same way except that the default mount point is /mnt/cdrom . Notice in Figure 2.14 that there is an entry in the fstab file for /dev/cdrom that configures it to automatically mount to the /media/cdrom directory. Because of this, you can mount a CD using a simplified mount command as shown here: mount /dev/cdrom If your system doesn't have an entry for /dev/cdrom in the fstab file, you can create your own symbolic link, as we did for the floppy diskette drive. Check the fstab file and entry for the CD drive. If your CD drive is the master drive on the secondary IDE channel (which is how most PC manufacturers configure them), its corresponding link in /dev will be hdc . You can create a symbolic link for /dev/cdrom by entering the following command: ln -s /dev/hdc /dev/cdrom Once this link has been created, the preceding mount command will work properly. To access a mounted floppy diskette or CD, simply change directories to the mount point. The files on the media will be accessible in that directory. It is critical that you remember that mounted media must not be removed unless you first dismount it. You'll notice that, once mounted, you can't open the CD drive door until it is dismounted. There is nothing to stop you, however, from removing a mounted floppy diskette from its drive. This can be a serious issue. Changes made to the files on the diskette may not be immediately written to the disk. Dismounting the media immediately writes all changes to disk. If you remove it without dismounting , files may become corrupted. To dismount a mounted floppy diskette, enter the following command: umount /dev/floppy or umount /dev/fd0 To dismount a mounted CD, enter the following command: umount /dev/cdrom Tip You can also use the mount point directory with the umount command. For example, you could dismount a floppy diskette by entering umount /media/floppy . Managing Archive FilesWith the concept of mounting removable media behind us, we still need to cover a few more topics in this chapter. Novell wants you to understand how to work with Linux archive files in preparation for your CLE practical exam. Most operating systems have programs written for them that can compress multiple files into a single zip file. You've probably downloaded a zip file before from the Internet, or had one emailed to you. Linux also has utilities for working with compressed files. It's a little bit different, however, than those you've probably worked with on the Windows or Macintosh platforms. Linux uses two separate utilities: tar and gzip . The tar utility, which stands for tape archive , is used to take multiple files from the Linux file system and combine them into a single file. Tape archive files usually end with a .tar extension. This archive file is not compressed. The gzip utility is used to compress files. It can be used to compress any file in the file system, but it is most frequently used to compress archive files. The gunzip file is used to decompress a compressed file. Files compressed with gzip usually have a .gz extension. If you see a Linux file that has a .tar.gz extension, you know that this is an archive file that has been compressed with gzip. Note Compressed archive files are sometimes called tarballs . There are two ways to decompress and extract a tarball file. The first way is to use the gunzip command to decompress the file, and the syntax is gunzip file_name . After the file has been decompressed, you'll notice that it automatically loses its .gz extension. For example, if you were decompressing mystuff.tar.gz , the resulting file from the gunzip process would be mystuff.tar . After decompression , the archive is extracted using the tar command, and the syntax is tar -xvf file_name . The x switch tells the tar utility to extract an existing archive file. The v switch tells the tar utility to display the progress of the extraction process on the screen. The f switch tells the tar utility that the string of text that follows is the name of the file to be processed . Warning The v switch is optional, but the x and f switches are not . The tar utility can also be used to both decompress and extract, and this is the second method for managing tarball files. To do this, simply add a “ z switch to the tar command and run it against the . tar.gz file. This will automatically decompress and then extract the archive. For example, if you have a tarball named mystuff.tar.gz , you could decompress and unarchive it by entering tar -zxvf mystuff.tar.gz . Editing Text FilesThe last topic we will address in this chapter is that of editing text files. Another way that Linux is unique from Windows is the fact that most Linux configuration changes are made by editing text files. If you're familiar with Windows, you know that most of its configuration parameters are stored in the Registry. Data in the Registry is stored in a series of binary files that can only be edited with a binary file editor such as REGEDIT or REGEDT32. Linux configuration parameters, on the other hand, are stored in a series of text files that are located, for the most part, in the /etc directory. Which is the better method? I suspect this question is very subjective . Personally, I much prefer editing a text file. For me, they are much more intuitive. Too many times have I opened up Registry keys in Windows and had to do a lot of head scratching to understand them. With a text file, programmers can (and usually do) include documentation for the various parameters as comments within the file. Most Linux distributions include a number of text editors, both graphical and command-line, that you can use to edit these configuration files. Using vi from the Command LineOne of the most commonly used editors is vi ”a command-line text editor. Depending upon your distribution, you might have vi or vim (which stands for vi improved ) installed. To open a file for editing in vi, enter the following command: vi / path_to_file/file_name When you do, vi is executed, and the specified file is loaded. For example, if you need to edit the smb.conf file (which is used to configure the Samba service), you could enter vi /etc/samba/smb.conf . When you do, the following appears, as shown in Figure 2.15. Figure 2.15. The vi command mode. If you're used to text editors such as Notepad under Windows, you might find vi a little confusing at first. You need to understand that vi operates in two different modes: Insert mode and Command mode. Insert mode is used for actually editing the file. When the file is first opened in vi, however, it is opened in Command mode. This mode is what is shown in Figure 2.15. To edit the file, you must enter Insert mode by pressing Ins or by pressing i , as shown in Figure 2.16. Figure 2.16. Editing in vi Insert mode. Notice in Figure 2.16 that the text “ INSERT - appears at the bottom of the screen when you are in Insert mode. When you are in Command mode, this text is absent, as shown in Figure 2.15 In Insert mode, you can edit the file just as you would with any other text editor. To return to command mode, press the Esc key. In Command mode, you can enter commands to work with the file. To enter a command in Command mode, you must first type:. This brings up a command prompt of sorts where you enter vi commands (see Figure 2.17). Figure 2.17. Entering vi commands. Notice that you now see a colon (:) and a cursor at the bottom of the screen, as shown in Figure 2.17. This cursor is used to issue commands to vi. For example, to exit vi and save all changes made to the currently open file, you would enter exit or q at the command prompt. To exit vi without saving changes to the file, you would enter quit! or q! . A full review of all vi commands is beyond the scope of this book. Fortunately, there is an extensive help system available for vi. At the shell prompt, enter vimtutor to learn more. Editing Text Files Using Graphical UtilitiesIf text-based editors make you uncomfortable, you can also use one of several graphical text editors from the X Window System environment to edit Linux configuration files. On a Red Hat system, you can use the gedit utility. Open a terminal session and enter gedit from the shell prompt. You can also select Main Menu, Programs, Applications, gedit . When you do, the screen looks like Figure 2.18. Figure 2.18. Editing text files with gedit. You'll find that gedit works in a manner very similar to the Notepad utility on a Windows system. On a SUSE Linux system, you can use the KWrite utility to edit text files in a graphical environment. You can run KWrite by selecting Applications, KDE Menu, Editors, KWrite . When you do, the screen shown in Figure 2.19 appears. Figure 2.19. Editing text files with KWrite. When you understand how to use mount, tar, gunzip, and vi, you've got the skills you need to complete an initial NNLS installation. Before continuing, make sure you can use these utilities in Lab Exercise 2-3. |

| < Day Day Up > |
EAN: 2147483647
Pages: 128