8.5 Building Your Blog
| < Day Day Up > |
| Once you've configured iBlog's preferences and tested out the interface, you're ready to make your mark on the Internet with your blog. When you're first starting out, there are three things that you need to do:
Think of your blog in the same context as a book. Each book (a blog) has a table of contents (categories), and inside, the book has chapters (entries) that contain text and pictures. So, the first thing you'll need to do is create the blog, specify any categories (if needed), and then start making your blog entries.
8.5.1 Creating a Blog The actual process of building a blog with iBlog is pretty simple. To create your first blog, select New Blog (Option- Figure 8-10. The Attributes pane.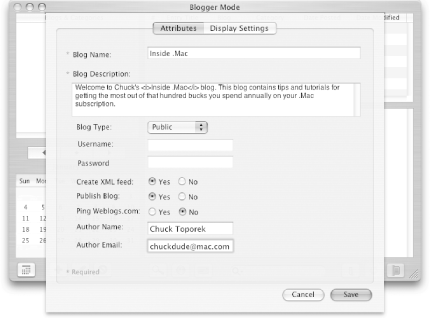 As you can see from Figure 8-10, the sheet for creating a blog has two tabbed panes: Attributes and Display Settings. The Attributes pane is where you assign a name and description for your blog, specify whether your blog will have an RSS XML feed that other bloggers can pick up on and so you can add your name and email address to the blog. There's also an option to select whether your blog will be Public (the default) or Private. If you opt to select Private from the Blog Type pop-up menu, you will need to assign a username and password. This is a good way to restrict access to certain blogs that you want to allow only a select few access.
The Display Settings sheet, shown in Figure 8-11, is what you use to set up the layout and specifics of your blog. From this sheet, you can specify:
Figure 8-11. The Display Settings pane.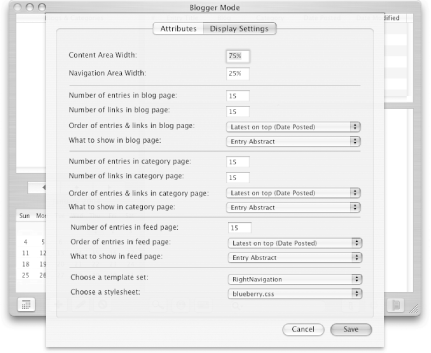 For most people, the default entries should be fine. However, if you want to change the stylesheet around so that you're not using the default, your options consist of blueberry (the default), banana , blackberry, honeydew, mint, or plain. You can preview each of these stylesheets by selecting one, clicking on the Save button, and then clicking on the Preview icon in iBlog's main window. The page will build and then you can see how it will look. When you've finished changing the settings for your blog on the Attributes and Display Settings sheet, click on the Save button. This creates a folder for the blog on your hard disk (in ~/Sites/iblog ); the blog also shows up in the Blogs & Categories section of iBlog's window, as shown in Figure 8-12. Figure 8-12. The Blogs & Categories section.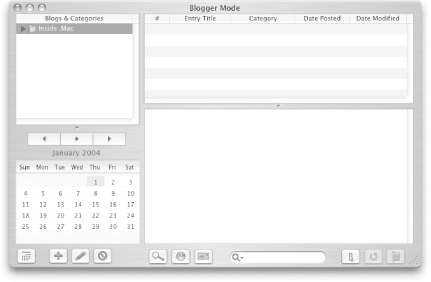 As you can see, the blog shows up in the window as a folder with a black disclosure triangle to its left. To reveal the contents of the blog folder, click on the disclosure triangle so that it points downward. You can also use the right arrow key to reveal the folder's contents, just as you would in the Finder's List View. If a blog doesn't have any categories assigned to it, the folder will appear empty. From here, you have one or two options. You can opt to create categories for your blog, or you can just start writing entries and publishing them up to your blog. Before showing you how to create a blog entry, though, I'll first cover blog categories. 8.5.2 Creating a Category To add a category to your blog, you can either select New Category from the File menu (Shift- Figure 8-13. Select New Category from the plus-sign button's context menu.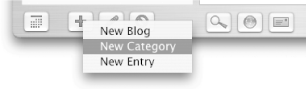 After selecting New Category, a sheet opens up with a text field so you can assign a name to the category, as shown in Figure 8-14. The only required field on this sheet is the Category Name field. Figure 8-14. Give your category a name and add an image, if you desire .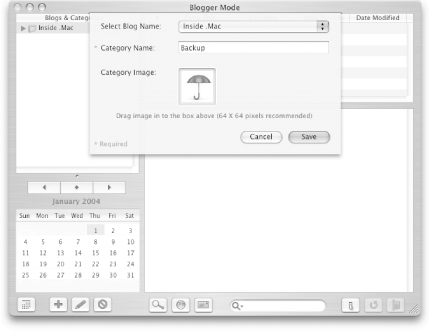 If you have an image you want to associate with the category, you can drag that from the Finder and drop it into the Category Image box. Images should be no more than 64 64 pixels square. Once assigned to a category, the image will appear along with any blog entry that fits into the category. When you have saved the name for your category (by clicking on the Save button in the sheet shown in Figure 8-14), the new category will appear as a folder within the blog's folder, as shown in Figure 8-15. Figure 8-15. Categories appear as folders within the Blog folder.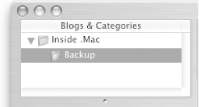 8.5.3 Making an Entry With two steps down, the only step remaining is actually creating your blog entry. As shown earlier in Figure 8-13, click on the plus sign button at the bottom of iBlog's window and select New Entry from the menu. Or, if you prefer, you can select New Entry from the File menu ( After selecting New Entry from the menu, the New Entry window shown in Figure 8-16 pops open. Just type in the information for your blog entry, and click on the Save button when you're finished. Figure 8-16. The New Entry window gives you a place to create your blog entries; just fill in the blanks.
After you click on the Save button, the New Entry window closes and your blog entry appears in iBlog's window, as shown in Figure 8-17. Figure 8-17. The saved blog entry, just waiting to be previewed and published.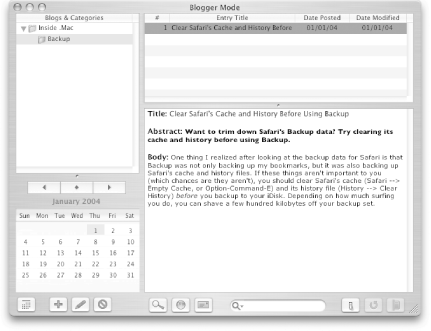 If you decide that you want to change something in your blog entry (maybe the title or some part of the body isn't quite right?), you can double-click on the entry in the list at the upper-right part of the window. This will open the blog entry in the editing window so you can make your changes; just click on the Save button when you're satisfied with the changes. 8.5.3.1 Previewing your blog entryNow comes the moment of truth: the time when you get to see how your blog entry will look before it is published. At the bottom of iBlog's window, click on the button that looks like a magnifying glass; this is the Preview button. When you click on the Preview button, iBlog creates the web page for your blog entry, saves it into your ~/Sites/iblog folder, and then opens the blog in your default web browser, as shown in Figure 8-18. Figure 8-18. Your first chance to see your blog is in Preview mode.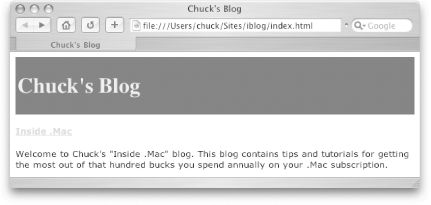 As you can see from Figure 8-18, iBlog previews a page that lists the blogs you've created; in this case, it's my blog for Inside .Mac . If you click on the link for the blog title, you will be taken to another page (shown in Figure 8-19) that lists the blog entries and their categories. Figure 8-19. A preview of the blog entry created back in Figure 8-16.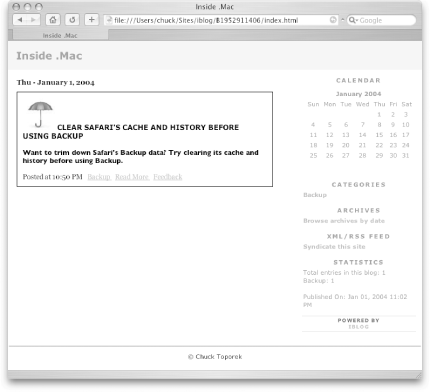 Now let's take a closer look at what gets posted on the blog page. If you look at Figure 8-20, you'll see a close up of the blog entry itself. Here you can see that iBlog places the entry in a box, assigns a date above the entry, and then uses the title and abstract you've given to the blog entry. Figure 8-20. A closer look at the blog entry.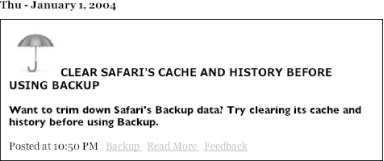 Beneath the entry's abstract, you'll see a timestamp that tells you when the blog entry was posted, followed by three links:
Of the three, only the first link title should change for you (unless, of course, you're running a blog category named "Backup"). Figure 8-21 shows what the entire blog entry looks like, if someone were to click on the Read More link. Figure 8-21. View the full blog entry with the Read More link.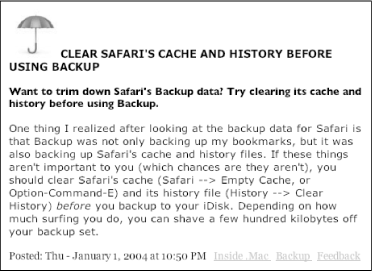 You can see that the blog entry carries three links of its own; these include:
When a reader clicks on the Feedback link, a new email message window will open up in their default email client. The reader can then send their comments to you via email if you entered your email address in the Attributes sheet when you created the blog (see Figure 8-10, earlier in this chapter).
If you're satisfied with how the previews of your blog entry look and read, it's time to publish your blog. 8.5.3.2 Publishing your blogTo publish your blog, click on the Publish icon (the one with a little globe on it, just to the right of the Preview icon). When you do, you'll probably run into the error message shown in Figure 8-22. Figure 8-22. What? No blogs found?!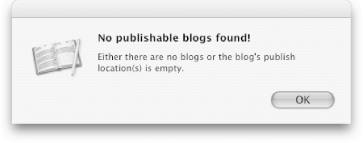 Before you can publish your blog, you first need to specify which blogs are publishable in iBlog's preferences. Go to iBlog Figure 8-23. Click on the checkboxes to assign the blog as publishable.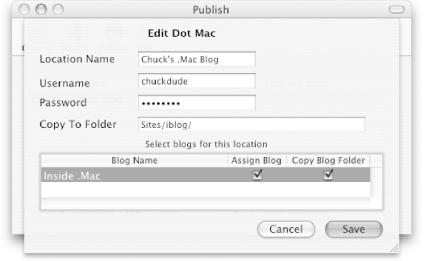 After clicking the Save button, close iBlog's preference window and try publishing your blog again. This time it should work and not give you any errors. The only time you should see an error now is if you're not connected to the Internet. The reason for that is because iBlog publishes to your iDisk, and it needs that Internet connection to create the files and folders in your iDisk's Sites folder ( /Sites/iblog ). 8.5.3.3 Sending an email notificationWhen iBlog connects to your iDisk, a message window appears and displays information about the files being transferred to your iDisk. After the files have transferred successfully, iBlog opens the entry in your default web browser. One thing that's particularly odd about the entry, though, is the naming scheme used isn't particularly user -friendly. For example, the link for the post created in this example is:
Worse yet, if someone just goes to:
the reader will see an error message, saying that the page doesn't exist. To help you get around this, iBlog includes an email notification button at the bottom of its window. When you click on this button (which looks like an envelope), the sheet shown in Figure 8-24 appears. From here, you can select contacts in your Address Book and send them an email notification with the link to your blog entry, as shown in Figure 8-25. Figure 8-24. Use the sheet to select and/or search for the people whom you want to notify about your blog.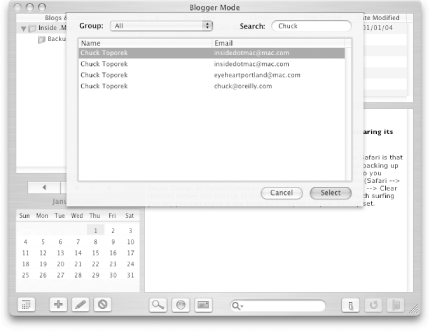 Figure 8-25. After clicking on the Email button, iBlog opens a new email message window that includes a link to the blog entry. Unfortunately, there's no way to automate this process; you'll have to point the readers to your blog each and every time. Another solution to this problem is to take the index.html file that iBlog creates in ~/Sites/iblog and just drag that to the /Sites/iblog folder on your iDisk. This makes it so people can just go to the iblog directory with the link:
and they will see a page similar to the one shown earlier in Figure 8-18 that just lists blogs. |

 Preferences ( -,),click on the Publish icon in the toolbar, and then double-click on the name of the item in the Publish Locations field. You'll see the name of the blog you created (in my case,
 | < Day Day Up > |